

Updated Oct 3 2013: This tutorial is compatible with XCode 5 and XCode 4.
We’re taking a practical approach to learning iOS programming. This means lots of hands on work and practice! In order to benefit the most from these lessons, you should open XCode and try to follow along.
This is part 2 of the lesson plan. Click here for the entire Learning Plan.
Tools Required and Costs
To recap from the introduction video, all you need to get started:
- A Mac with XCode. XCode is free.
- An Apple Developer Account. It is free to register, but costs $99 if you want to test on a device and publish to the App Store.
- The will to learn the Objective-C programming language and how to use XCode.
If you don’t have a Mac and you don’t want to buy a new one, have you considered the following options?
- Can you borrow a friend’s Mac?
- Do you have access to a computer lab with Macs?
- Buying a used Mac Mini?
Aside from option #1 and #2, buying a used Mac Mini is probably the cheapest way to start. A brand new Mac Mini is $500 and you can get a used one from Craigslist or eBay for half the price.
Difference Between XCode and Objective-C
I see a lot of confusion between learning XCode or Objective-C for building iPhone apps. The distinction between the two is that XCode is the application that you will be writing your code in and Objective-C is the programming language you will use to write that code.
So the majority of your learning will be around programming concepts and the Objective-C programming language but because we’re doing all of that inside of XCode, you’ll learn how to navigate and use XCode as a result.
Getting XCode
XCode is available for free in the Mac App Store!

Creating a New XCode Project
When you launch XCode for the first time, you’ll see a welcome screen. Click on Create a new project.
Next, make sure that you’ve selected Application under iOS on the left hand side. On the right hand side, you’ll see all of the different app templates you can use to start your project.
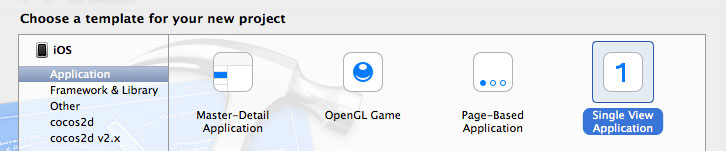
You’ll want to select Single-View Application and click OK.
Next, XCode will ask you for some basic pieces of information to start your project.
Project Name: You can fill in whatever you want to call your project. Mine is “BlankDemo”.
Organization Name: This is optional. At the top of all your files, it will say “CompanyName” if you don’t fill this in.
Company Identifier: This is to identify your app. You can fill in com.companyname. Your app will turn out to be com.companyname.projectname.
Class Prefix: You can leave this empty. If you fill this in, all new files you create will be prefixed by this prefix in order to distinguish the files you created from files originating from other sources.
Devices: You can leave this set to iPhone for now.
If you’re using XCode 4, you’ll see additional options. These options are selected in XCode 5 by default.
Use Storyboards: Storyboards are a way of constructing navigation flows within your app and in XCode 5 this is on by default, so make sure this is selected if you’re using XCode 4 for the sake of following along.
Use Automatic Reference Counting: This should be selected because otherwise, we would have to manage the disposal of objects ourselves, which is a more advanced topic.
Include Unit Tests: For the demos we’re building, we don’t need this included. Unit tests are a way of writing test cases for your app so you can efficiently test your app after every change.
Once these settings are in place, click Next and you’ll be presented with your newly minted XCode project!
Running Your XCode Project
At this point, we won’t write any Objective-C code. Let’s just run the XCode project as is and see what shows up.
Click the Play icon in the upper left hand corner of the XCode interface.

Now the iPhone simulator will launch and show you a grey screen.

Congratulations! You’ve compiled your very first XCode project and run it!
In the next tutorial, we’ll be adding to the user interface to display something on the screen.
Click here to go to the next lesson now!
Frequently Asked Questions
There are none right now but if you have a question related to this tutorial, please ask it in the comment section and I’ll add your question and my answer in this section.