Every day, I’m building and working with applications that connect to remote data sources whether they’re files, feeds, databases, etc. I also do a lot of work daily involving video streaming to iOS devices. If you’ve had to build any sort of connected iOS app, I am pretty sure you’ve cursed at the iOS gods at one point or another when debugging some intermittent, hard-to-reproduce network bug. In times like those, being able to see what is being sent and received across the wire is invaluable and time-saving.
That’s where Charles Proxy comes in. With Charles, you’re able to peek into the network requests and responses that your app is making/receiving. I’m sure there are other types of tools out there that allow you to do the same thing but I really enjoy how easy Charles is to use.

Disclaimer: I’m in no way related or affiliated with the developer, Karl von Randow, nor am I getting paid or compensated to write this article. The sole purpose of writing this article is to show you guys how I use the tool to ease my iOS development and hope that it can help someone else as well.
Alright, let’s start with some scenarios you might encounter:
ARTICLE CONTENTS
Debugging HTTP Connection and Sessions
Debugging Network Issues That Only Occur On Devices
Testing Your App In Various Network Conditions
Debugging Video Streaming Issues
Debugging Airplay Related Issues
Discovering Vulnerabilities In Your App
Debugging HTTP Connection and Sessions
Your most basic use of Charles will be just having it running in the background while you test your application in the iOS simulator in Xcode. In this way, you can actually capture the network calls that your app is making and what responses it is getting back.
Here are some scenarios where using Charles can be handy:
- If you see an empty screen in your app when it’s supposed to fetch some data and display it, then the first thing I would check is if the data is actually being returned from the network request.
- If you app is sending some data to a server to be saved or processed and you’re not getting the expected result.
- Your app is making a call to some API and you’re not receiving the expected results.
-
And anything else that relates to your app making/receiving network calls/responses!
For any of the scenarios above and more, the first thing I would do is double-check that my app is sending the request and parameters that I’m expecting it to, and secondly, that my app is receiving the responses that it is expecting.
Monitoring that network traffic coming in and out of your app is as simple as having Charles Proxy open while you’re testing your application in the iOS Simulator. When you open Charles Proxy, don’t be alarmed if it starts logging things that your app isn’t connecting to. The proxy is monitoring all the network traffic from any app that you’re running.
Below is a screenshot of what Charles Proxy looks like.
<
p style=”text-align: center;”>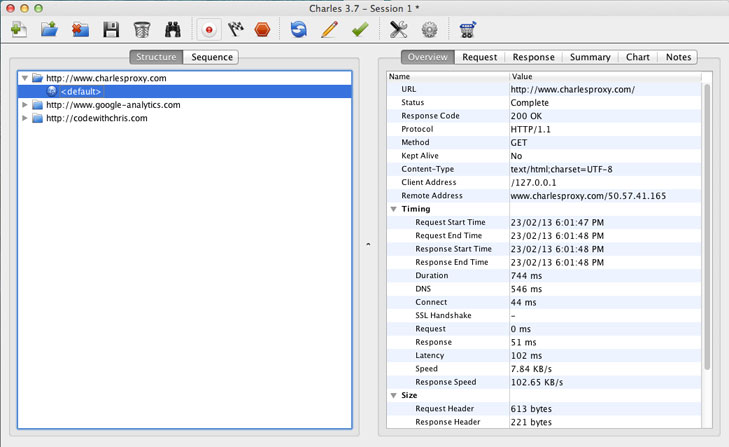
On the left hand side, you can see the top level domains that your app is making requests to. You can expand the tree nodes to see the actual requests. Select a request to see the detail on the pane on the right hand side.
On the right hand side, you can see an overview of that specific network call such as latency, time elapsed etc. You’ll notice tabs near the top of the right hand side. Click “Request” or “Response” to view the actual data of the network request or response.
By inspecting the requests that your app is making and the data that is coming back, you’ll be able to identify issues that may end up causing you hours of headaches down the road.
Debugging Network Issues That Only Occur On Devices
Have you ever encountered a bug that you weren’t able to reproduce in the iOS Simulator but only later discovered that it is only reproducible on the actual device?
For me, that situation occurs more often than I’d like but it’s not all that surprising because as good as the Simulator is, at the end of the day, it is meant to simulate a real device. The best test is on the actual device(s) and platform(s) that your users will be using your app on.
For network related issues that are only reproducible on the actual iOS device, Charles Proxy can help you identify the cause of the bug (On a side note, there’ve been many cases where what I thought was NOT a network bug turned out to be indirectly caused by a network issue). You can test your app on your actual iOS device and see the network calls that it’s making and the responses that your app is receiving right from Charles on your laptop.
Here are the quick and easy steps to set this up:
Step 1 of 6: Make sure that your iOS device and your laptop are connected to the same wireless network.
Step 2 of 6: On your laptop (OSX) go into System Preferences -> Network to find your IP Address.
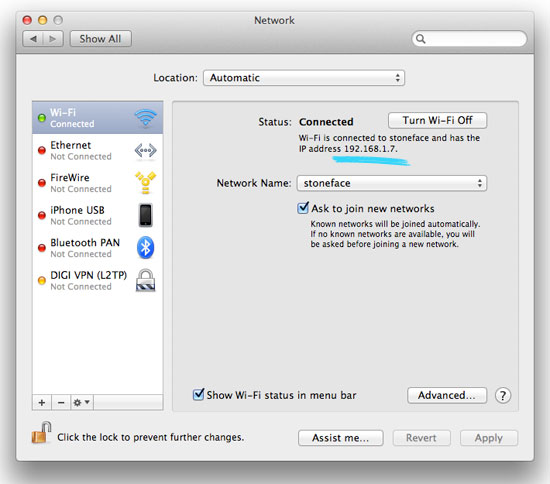
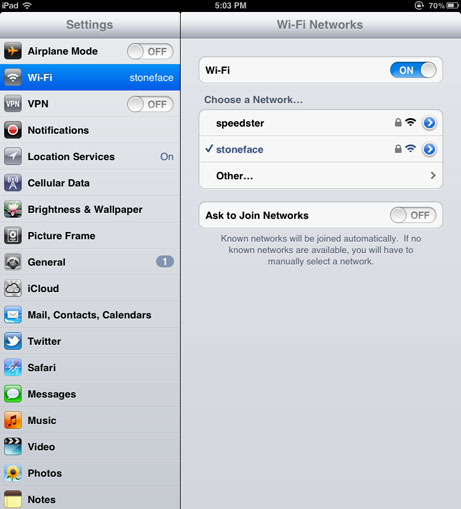
Step 3 of 6: Then on your iOS device, go into Settings, Wi-Fi
Step 4 of 6: Click the little arrow beside your wireless network to see the details of the network
Step 5 of 6: For the proxy settings at the bottom of the screen, select “Manual” and enter the IP Address you found on step 2 and the default port that Charles Proxy listens to is 8888.
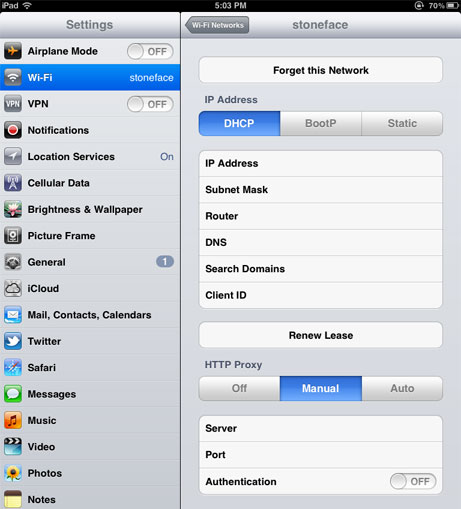
Step 6 of 6: Now your iOS device will be connecting to the internet through your laptop on the port that Charles is monitoring. All your network requests from your iOS device will be viewable in your Charles window
Now you can test your application and see what network calls your app is making, and what responses it is getting back to help you troubleshoot all of those hard-to-resolve network related bugs.
Testing Your App In Various Network Conditions
Charles can be really helpful in testing your app in various network conditions. When you’re building your app in XCode with a strong internet connection, you’re missing out on all of those cases in the wild that your users will be experiencing such as Wi-Fi cutting in and out, slow 3G connections or internet connections dropping completely.
Your app will be really slick and polished if it handles all of these scenarios gracefully and doesn’t leave the user staring at a frozen UI or worst yet, having the app crash all together.
Within Charles, you have tools to either throttle the connection or stop it completely. The beauty of it, is that you can control this on a per host level so you can throttle only certain connections your app is making requests to and debug situations where the app never gets a response or gets a connection timeout.
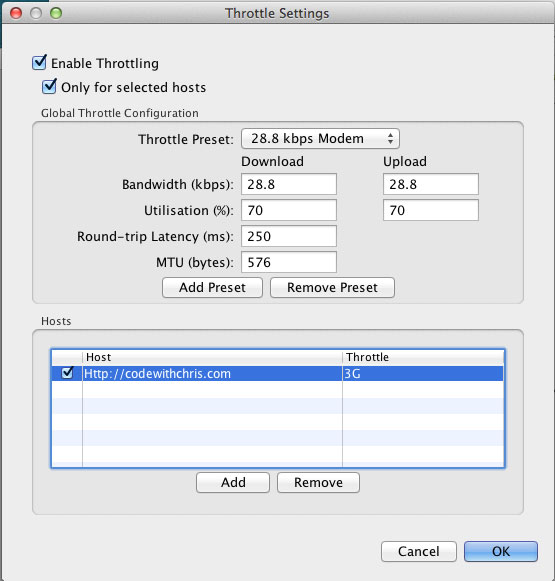
Set up your proxy as described in the section above. In Charles, open up the menu “Proxy” -> Throttling Settings and you’ll see the menu below. As you can see, you can turn on throttling on a global level, for all hosts. Or you can enable it only for select hosts. The way I’ve got it set up below, throttling will be on for only the codewithchris.com domain and it will throttle it to a point where it simulates bandwidth over 3G.
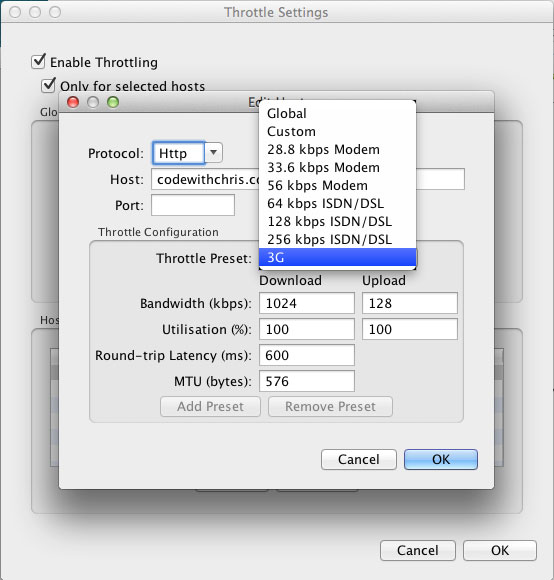
Here’s a screenshot of the bandwidth presets you can set for your selected host or you can specify custom to set your own. A good way to test connection timeouts is if you throttle it to something really low like 0.01 kbps.
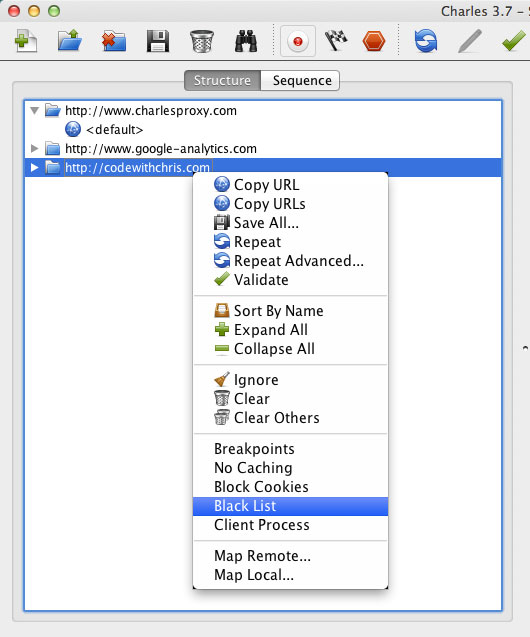
If you want to prevent your app from connecting to a host at all, such as simulating a situation where the server is completely unreachable, then you can blacklist a host. Just right click the host in the left pane and select “Blacklist” as shown in the screenshot below. To see the list of currently blacklisted hosts and to modify the list, go to the menu item “Tools” -> “Black list…”
Debugging Video Streaming Issues
Charles is a good way to debug video streaming issues, especially authenticated streams. If your Charles Proxy is hooked up and you monitor your video playback on your application you can see the video chunks being downloaded.
Combined with the throttling tips in the section above, you can test your video playback under a variety of low bandwidth and high bandwidth situations.
Other situations that may occur during video playback are concurrency restriction limits being hit or being unable to authenticate after idling on the playback screen for a long time. These are some of the common situations that may occur for video playback applications and Charles Proxy can help save you a lot of time in debugging them!
Debugging Airplay Related Issues
Charles Proxy is helpful for debugging Airplay related issues because you can’t test Airplay on the iOS simulator. If you test Airplay on your device and you encounter problems, it could be very difficult to see what’s going on.
I’ve encountered issues before with video streaming where toggling back and forth between playing the video through Airplay and playing the video on the device will, at some point, cause the video not to stream anymore, leaving the user staring at a black screen.
With Charles Proxy, I was able to set up the proxy like described above and then run my test case of toggling back and forth between playing the video stream on my iOS device and on my TV through Airplay.
What I discovered was that in the process of passing the stream back and forth between my TV and the iOS device, the content delivery network serving the video would deny the request for the m3u8 playlist. At that point, the user was left staring at a black screen. Without Charles Proxy, I would probably be left tearing my hair out, trying to figure out what was wrong!
Discovering Vulnerabilities In Your App
A really nifty feature of Charles Proxy is called Breakpoints. This allows you to specify any host (you can get as granular as indicating a certain URL with specific parameters) as a breakpoint and when your app makes a request or receives a response from something that matches your breakpoint, it will pause request/response to give you an opportunity to analyze and edit the request/response before it continues to it’s destination.
This is something that a malicious user could attempt to do to your application and try to trick your app into unlocking features, gaining unauthorized access, submitting high scores and inducing other undesired behaviour.
Using Charles Proxy with Breakpoints will give you the ability to put on the “hacker” hat and try to break your own app.
Set breakpoints on those resources/servers that your app relies on to get configuration information, receive data and submit data. Then use your application as a normal user would and when Charles Proxy breaks on the breakpoints, modify the request/response values to try to break your app and find security vulnerabilities.
Here’s how to do it:
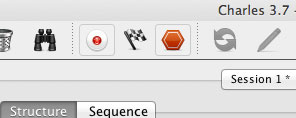
Below, the red hexagonal button is the toggle to turn breakpoints on or off. If you don’t have any specific hosts set up in your breakpoints list then toggling breakpoints on will do nothing. Read further below to see how to put specific hosts into your breakpoints list.
To add something to your breakpoints list, you can right click on a specific request in the left pane of Charles and simply choose “Breakpoints”. When you do this, it will automatically toggle Breakpoints to be ON.
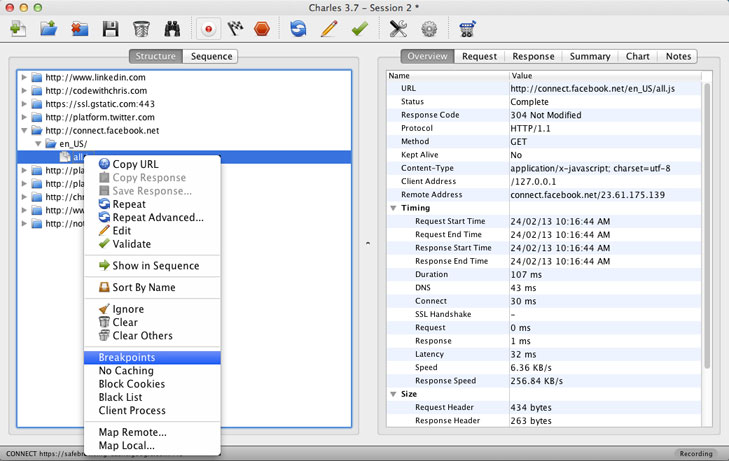
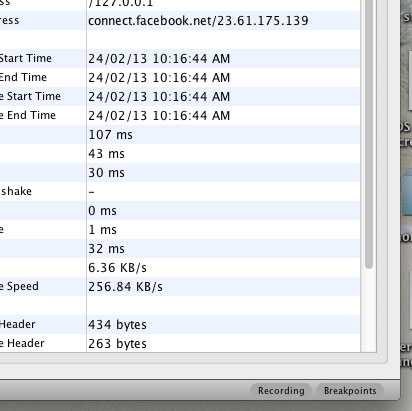
You can see in the lower right hand corner of your Charles window whether Breakpoints are on or off.
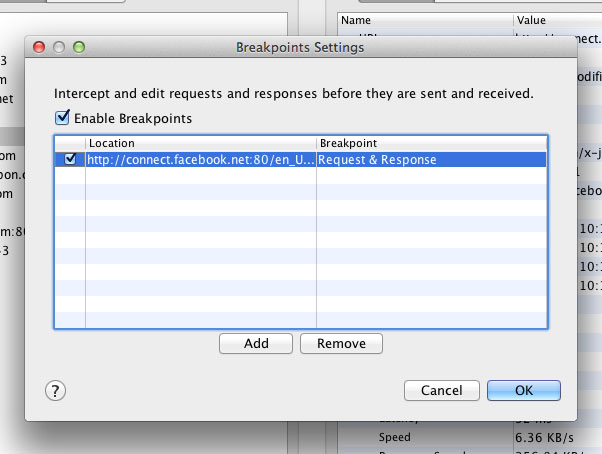
In the menu “Proxy”, if you click the menu item, “Breakpoints”, you’ll see the window below which lists the current locations that you’ll break on. You can even add or remove locations from this menu as well.
Apps that do client side processing and then sends the results to a server are especially susceptible because the server expects to receive accurate information from the client side app. If someone is able to intercept the request before it gets to the server and change it’s values first, then you’ve got yourself a security concern!
As to how to resolve those vulnerabilities, that’s a different discussion altogether but the point here is that Charles Proxy can help you identify those security holes.
I hope that this article exemplifies the usefulness of a tool like Charles Proxy in helping you develop and debug your applications. I’ve only touched a subset of all the available features of this tool! I’ll update this article as I learn and squeeze out more functionality from it.
Please take a moment to leave a comment and share this with your friends who may find it helpful!


