by Chris Ching
Oct 15, 2018: Updated by Adrien Villez for the latest version of Swift and Xcode!
Custom fonts can make all the difference in the world when you’re trying to convey a specific user experience. Luckily, it’s pretty easy to add your own fonts in your iOS app but there are some common pitfalls to watch out for.
Let’s walk through how to add custom fonts to your iOS application and I’ll highlight the common mistakes as we go.
ARTICLE CONTENTS
1. Include your fonts in your XCode project
2. Make sure that they’re included in the target
3. Double check that your fonts are included as Resources in your bundle
4. Include your iOS custom fonts in your application plist
5. Find the name of the font
6. Use UIFont and specify the name of the font
The license can usually be found with your font download or on the site where you bought/downloaded it. Taking a minute to check it ensures you won’t get into legal trouble down the road.
Step 1: Include your fonts in your XCode project
Most commonly, you’ll have a TTF or OTF font that you’ll want to use with all of your UILabels or UITextViews in your app. Well, the first step is to include these fonts into your XCode project.
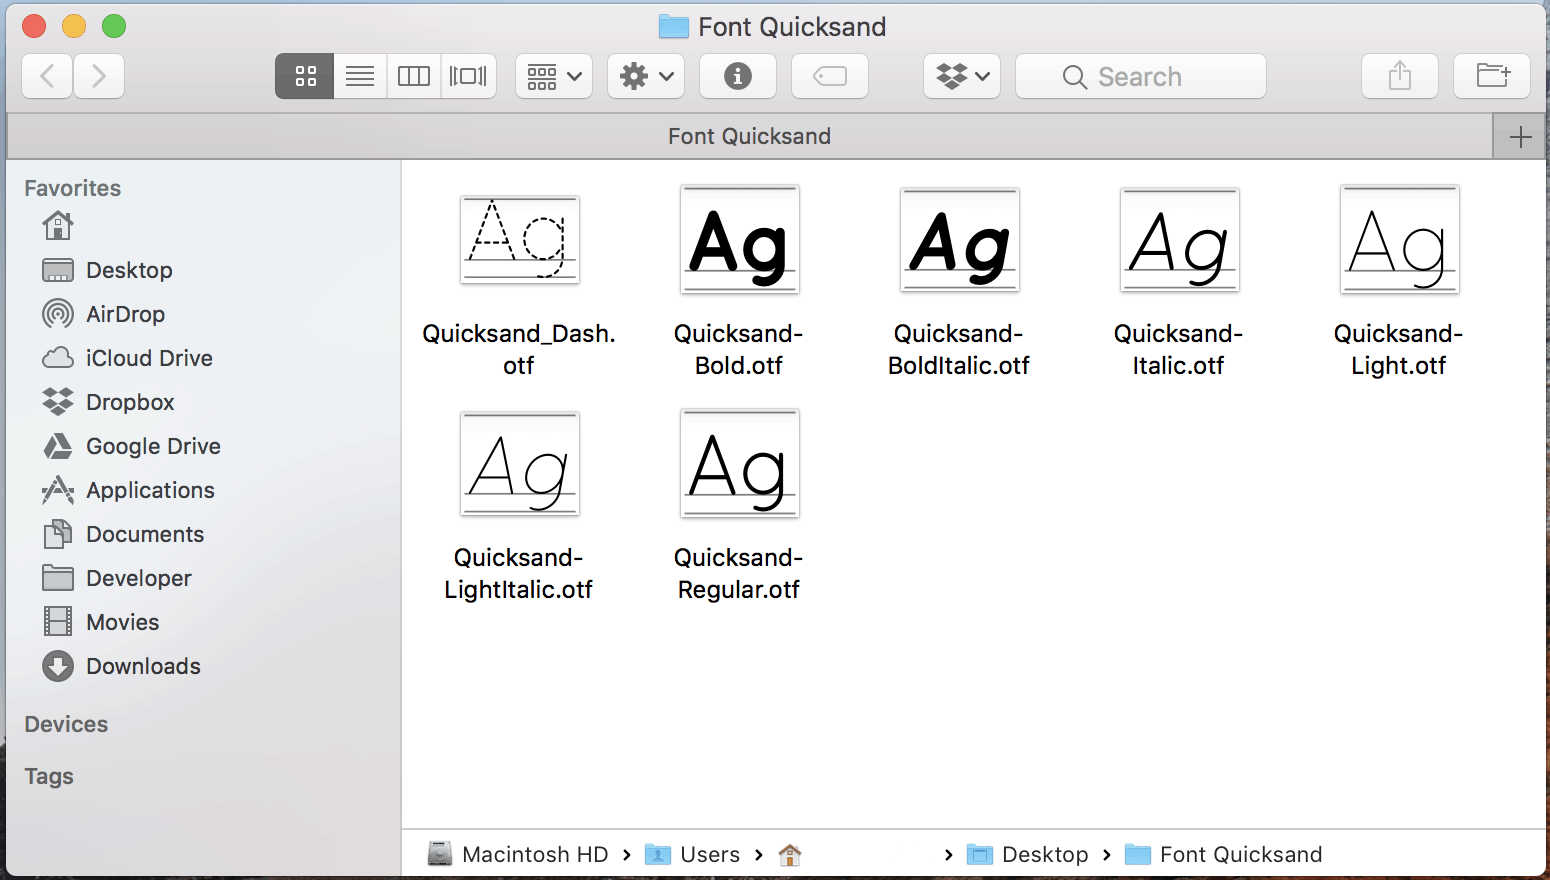
I commonly keep all of my app resources such as images or fonts in their own directory called “Resources”. I find that this helps me stay organized as projects get much more complex and there are a lot of files. Whatever your case may be, either drag and drop your font file(s) into your XCode file tree or right click and “Add Files To…” to select your fonts.
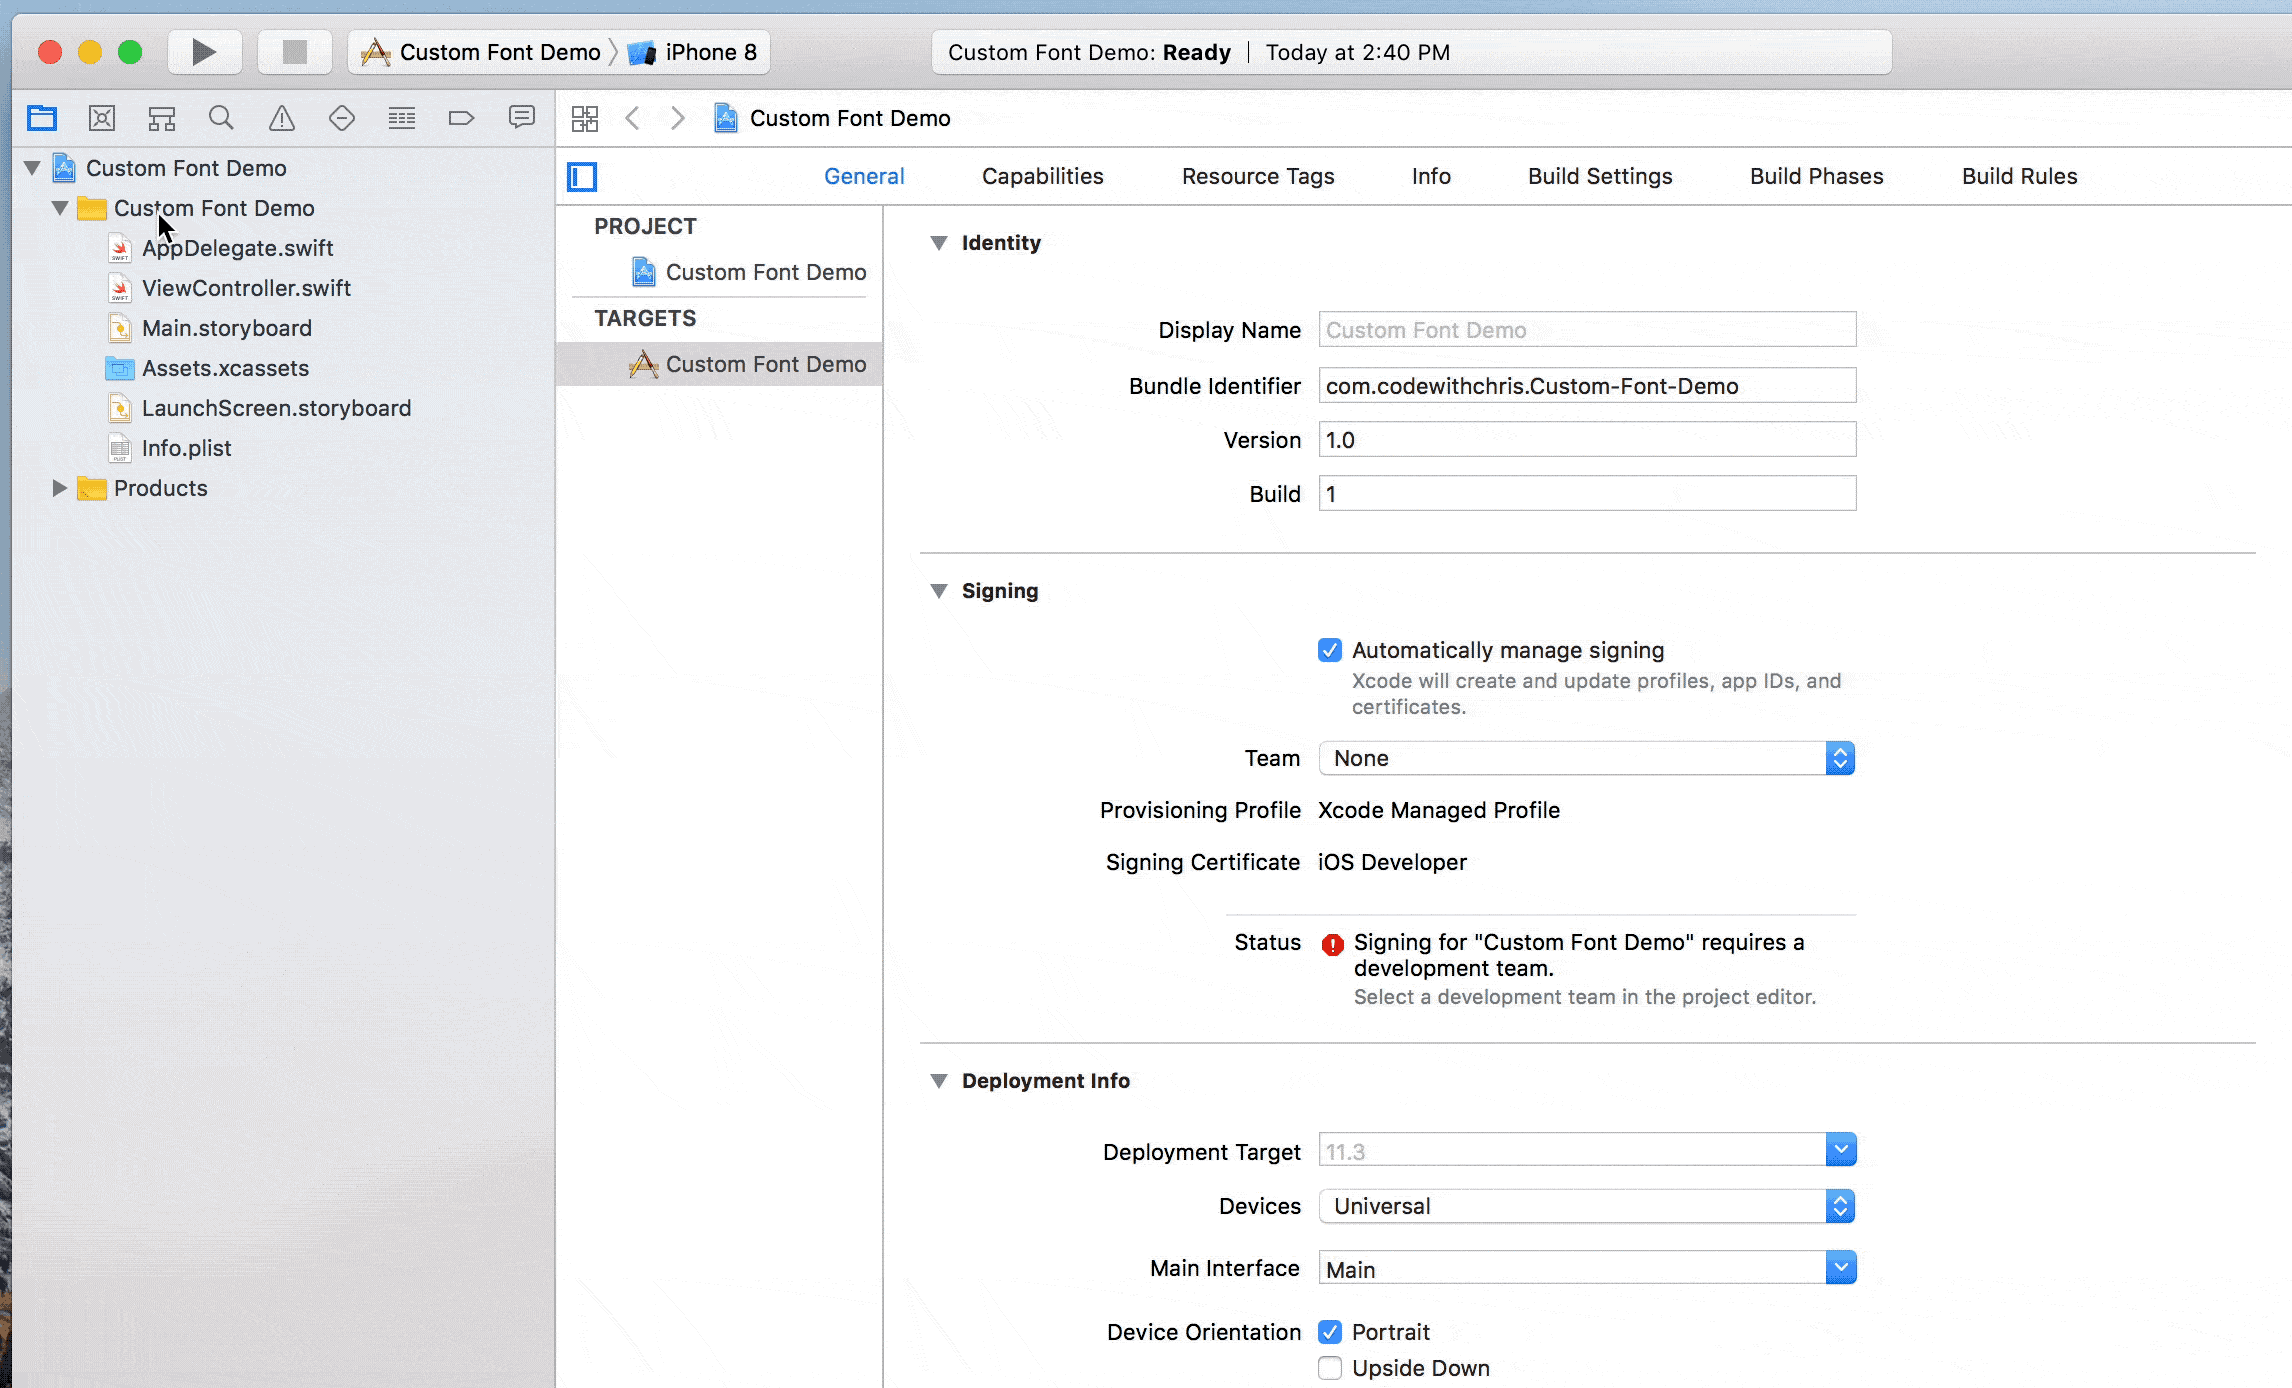
Make sure that the target you want to use your font in is checked!
(Click the GIF to play it)
Step 2: Make sure that they’re included in the target
The next thing to do is to make sure that they’re resources and included in your build target that you want to use the fonts in.
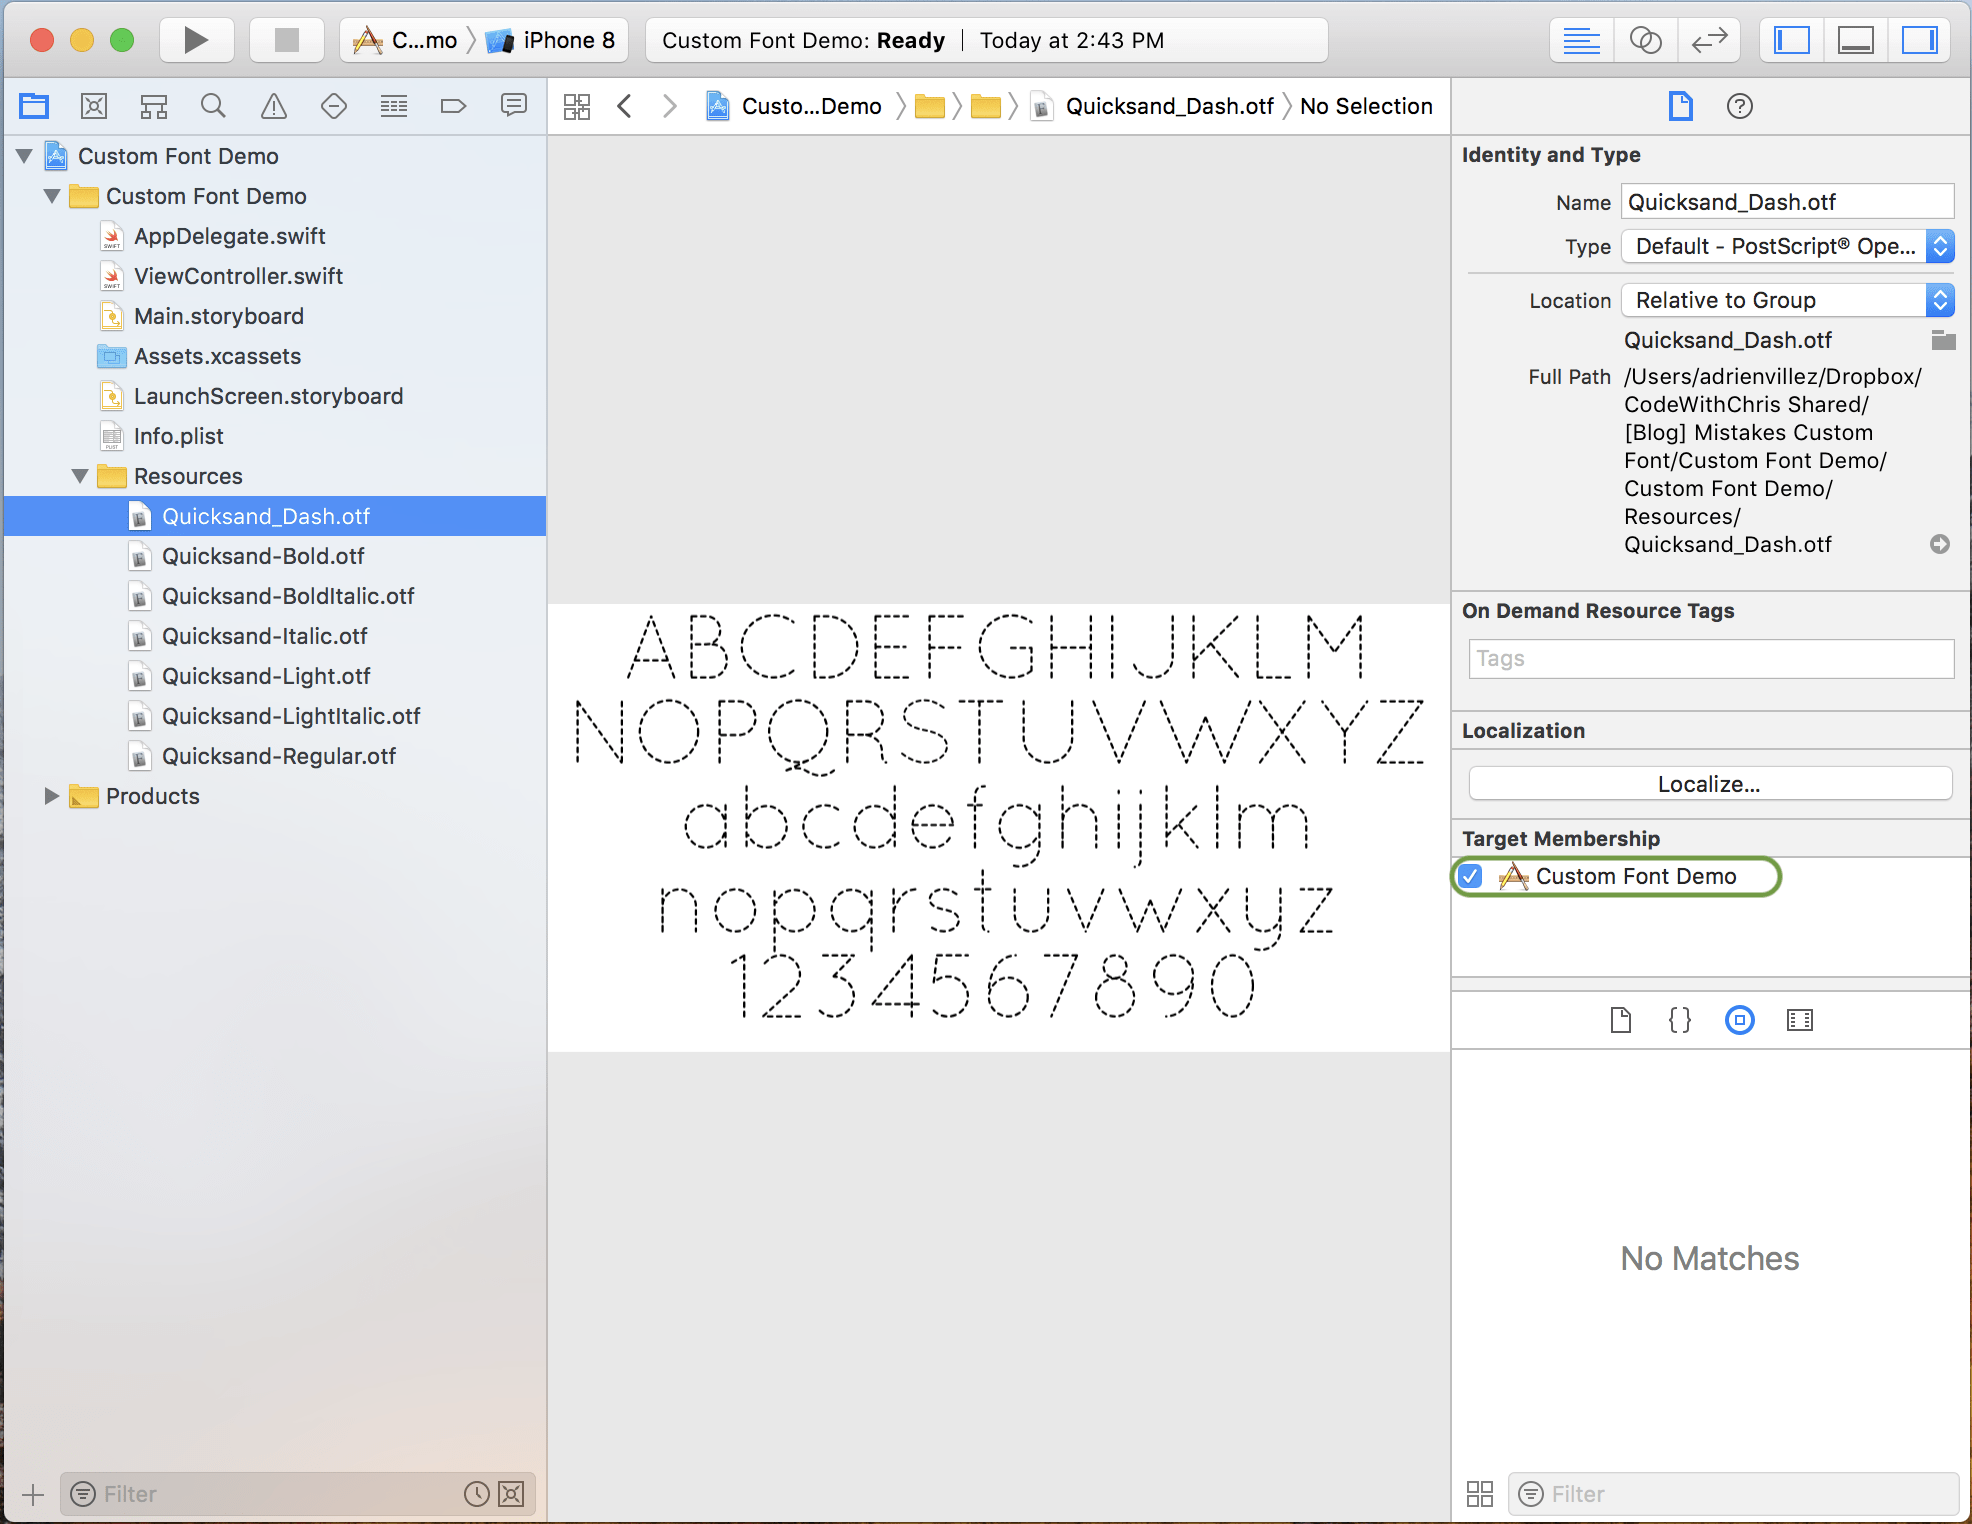
Make sure that the target you want to use your font in is checked under “Target Membership”
Step 3: Double check that your fonts are included as Resources in your bundle
This should not be a problem but sometimes when you’re having trouble getting your font face to show up, this can be a source of headache so let’s double check now to rule it out as a potential pitfall.
this can be a source of headache
Go to your project Build Phases pane by highlighting the XCode project file in your solution explorer and on the right hand side, select “Build Phases”. You’ll see that one of the sections you can expand is “Copy Bundle Resources”. Open that list and make sure that your fonts are included in that list.
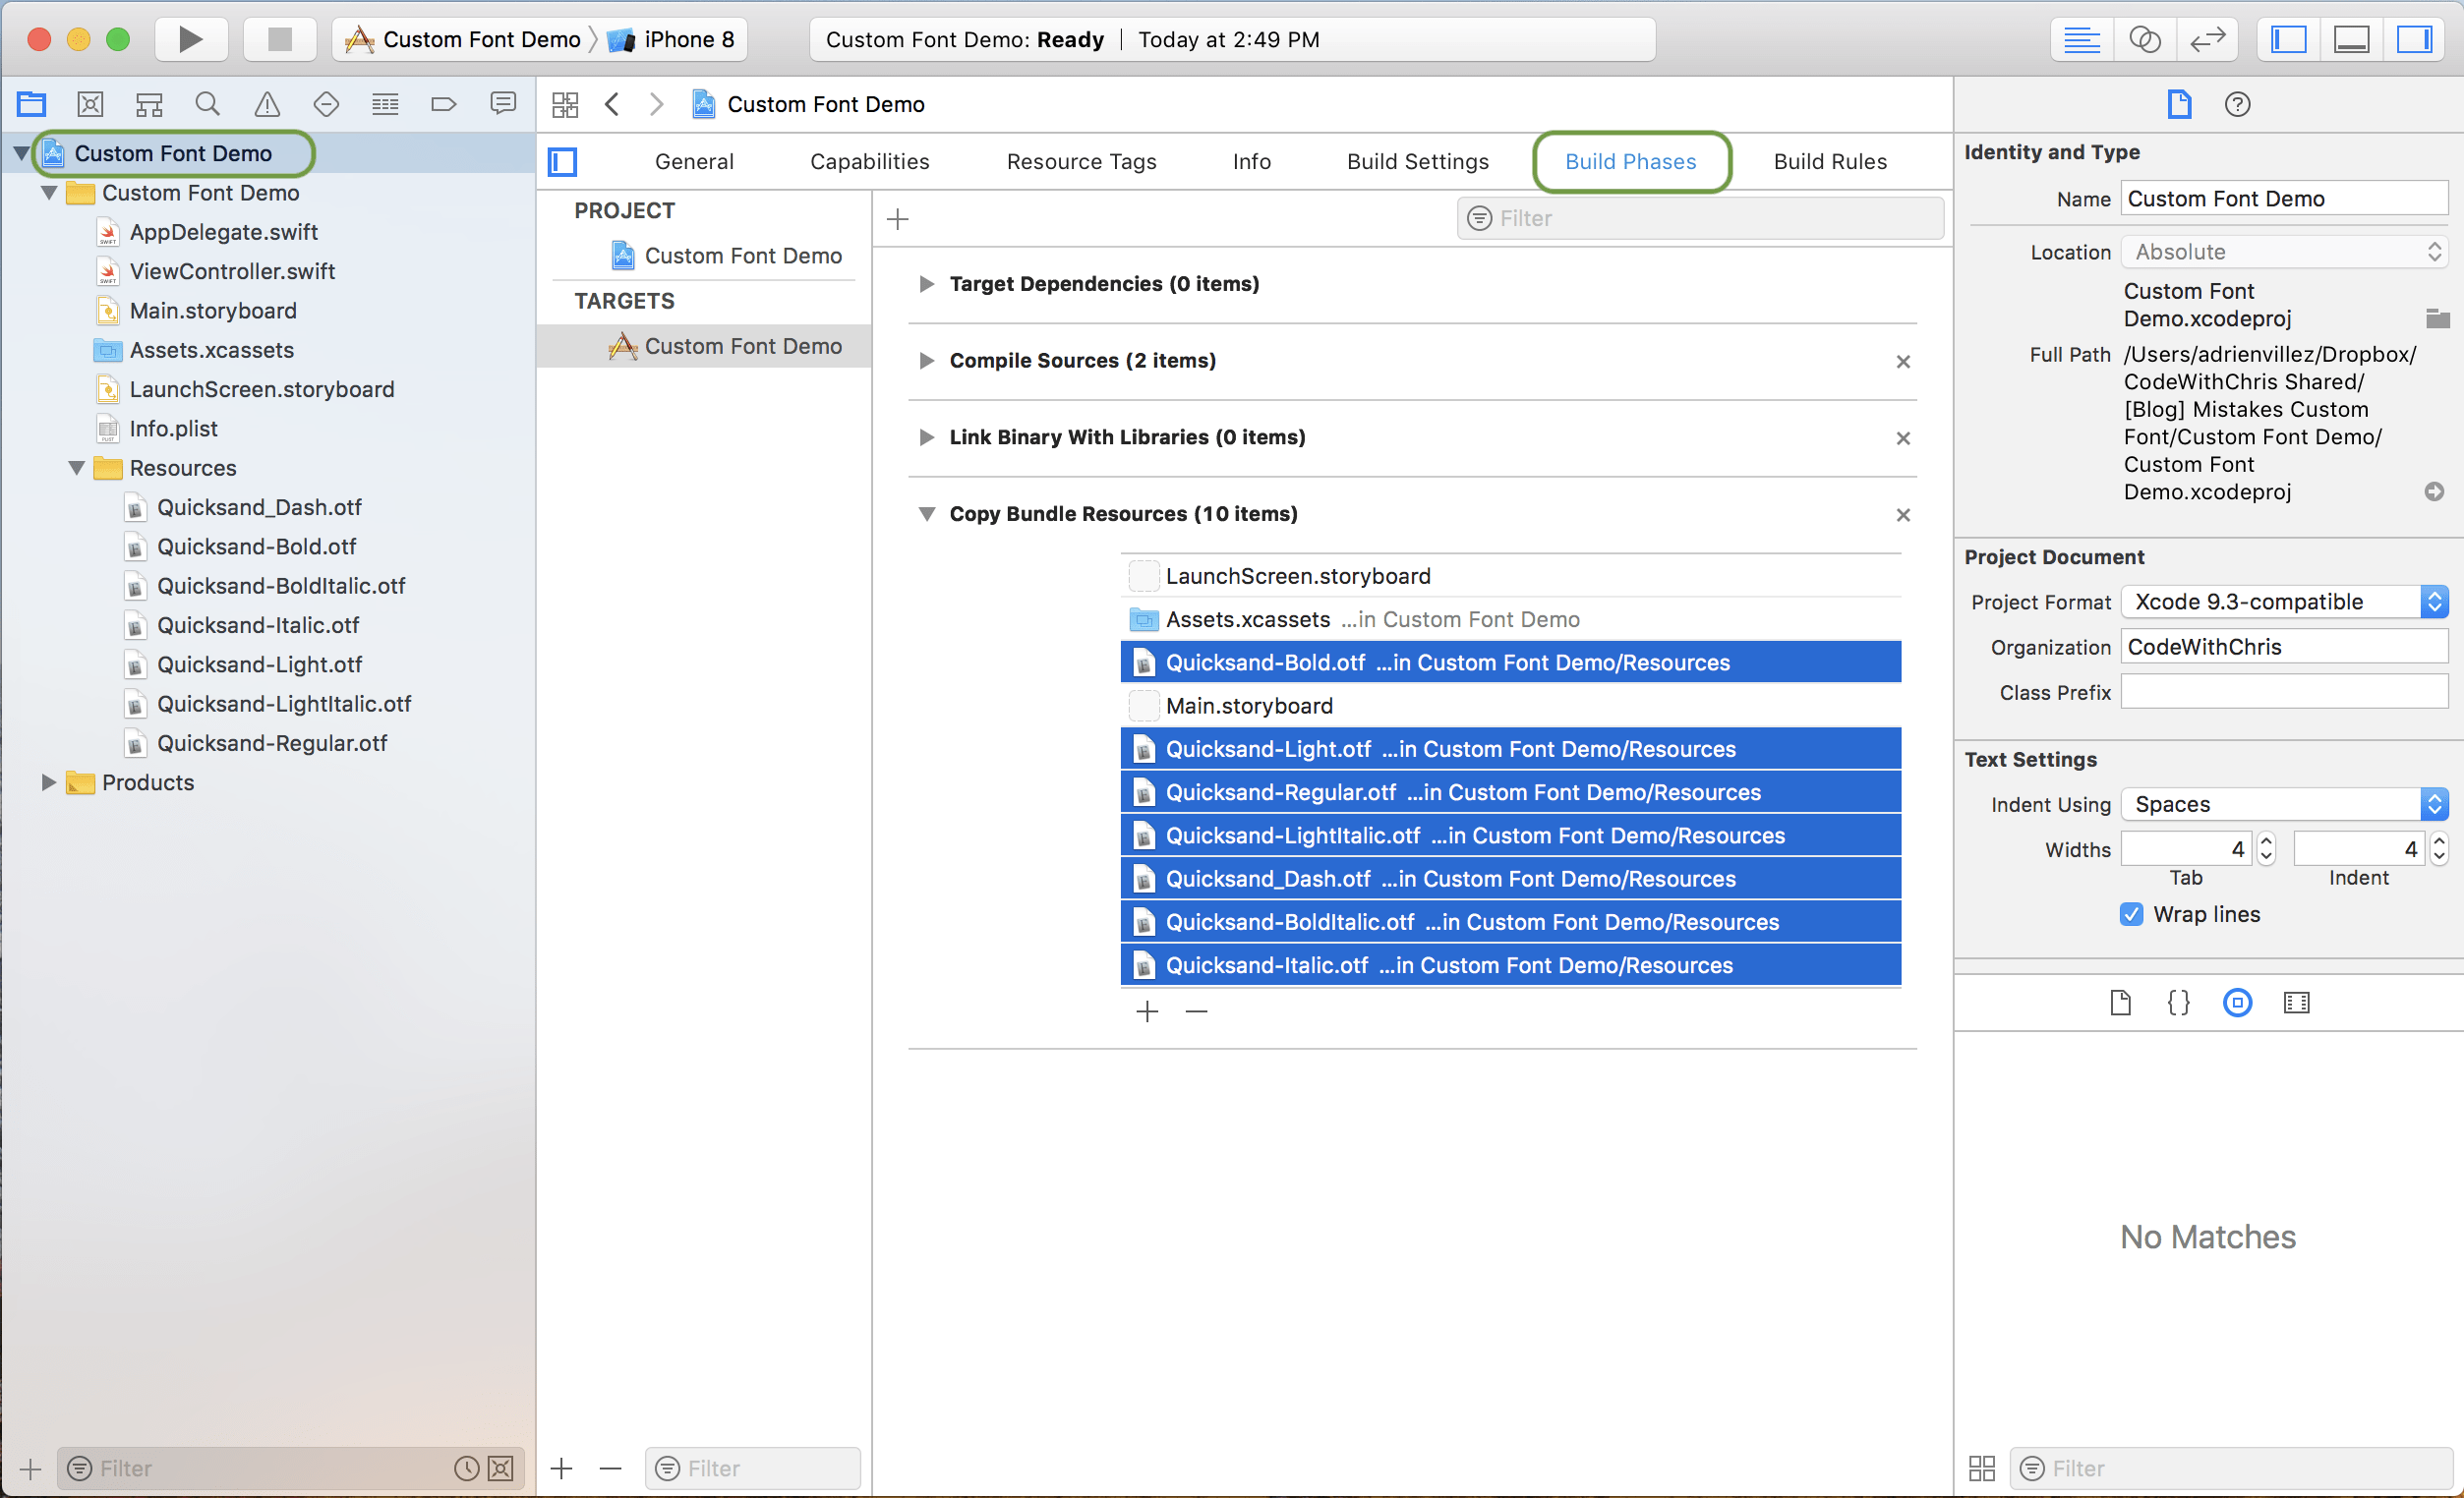
Ensure that your fonts are in the “Copy Bundle Resources” list
Step 4: Include your iOS custom fonts in your application plist
The next thing to do is to modify your app’s plist to include these font faces. By default, your plist will be named as info.plist.
Open it and add a new row called “Fonts provided by application” which will be an array that you need to add all the filenames of the fonts you want to use. In my case, it was seven of the Quicksand fonts as you can see in the screenshot below. Be careful to include the extension and make sure that you don’t perform any typos here. That’s another common problem, as simple as it may seem.
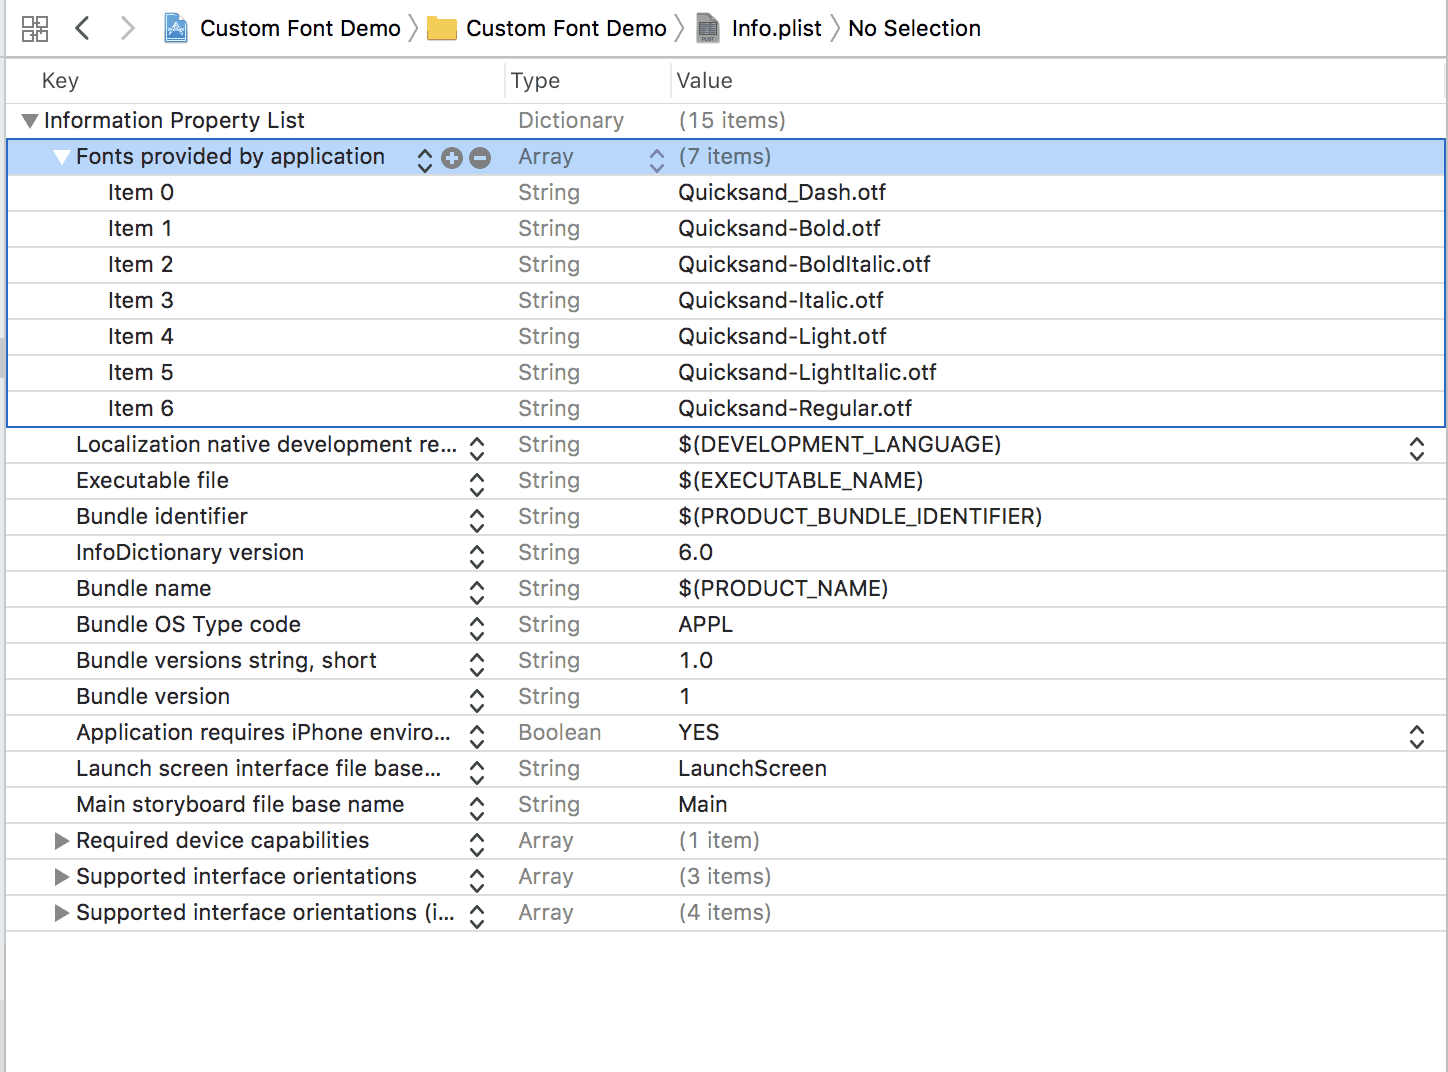
See the above screenshot on the key that you need to add, followed by the filenames of the fonts you want to include in your iOS app
…make sure that you don’t perform any typos here. That’s another common problem
Step 5: Find the name of the font
This is a common pitfall for many people trying to include custom fonts into their iOS app. This was something that eluded me before as well and it’s the fact that when you specify which font you want to use, you’re not specifying the file name but rather, the font name. The tricky part is that the font name may not be what you expect. It could be very different than any of the visible font names that you can see.
So in order to easily find the name of the font that you want to use, you can output something to the console window and see for yourself.
The tricky part is that the font name may not be what you expect
Add this snippet of code to log all the fonts available to your app in the console.
override func viewDidLoad() { super.viewDidLoad() // Do any additional setup after loading the view, typically from a nib. for family: String in UIFont.familyNames { print(family) for names: String in UIFont.fontNames(forFamilyName: family) { print("== \(names)") } } }
Once you run your app, you’ll get the list of fonts displayed in your console log. Then its just a matter of finding your custom font in the list and getting the font names.
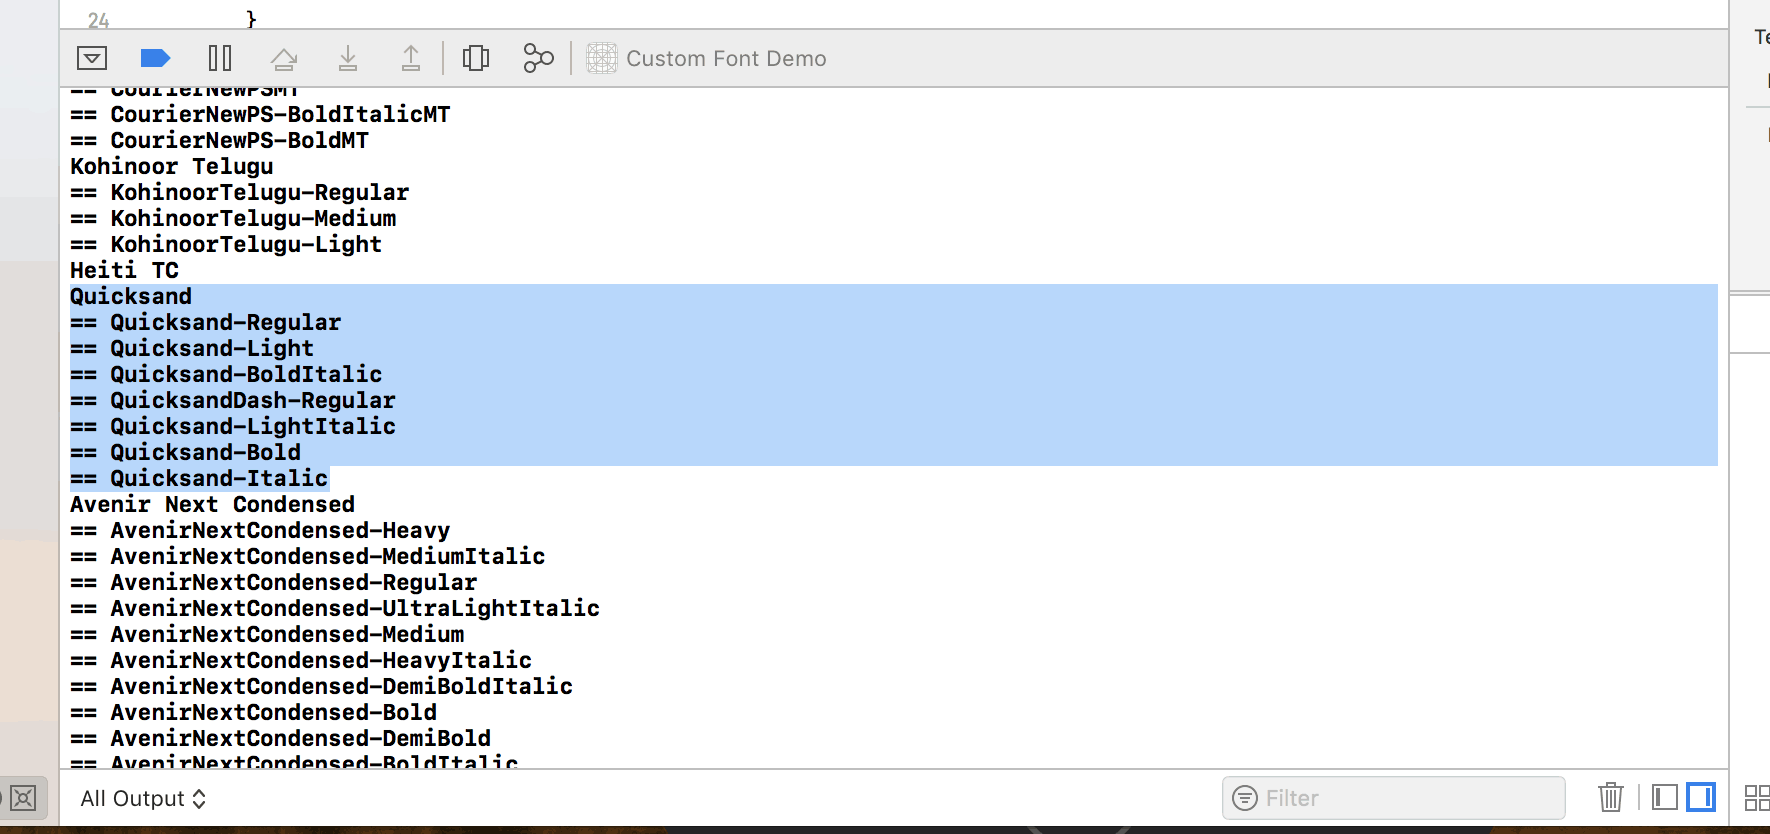
Logging all fonts and finding the font names for your custom font.
In the screenshot above, as you can see the font name I needed was QuicksandDash-Regular. This font name was no where to be found in the font properties or from the macOS font viewer. Remember to get rid of that code snippet after you find the font name that you need!
Step 6: Use UIFont and specify the name of the font
And finally, you can simply display your custom font using UIFont and whatever UILabel or text view you want.
let label: UILabel = UILabel(frame: CGRect(x: 0, y: 0, width: self.view.frame.size.width, height: 120)) label.textAlignment = NSTextAlignment.center label.text = "Using Custom Fonts" label.font = UIFont(name: "QuicksandDash-Regular", size: 35) label.backgroundColor = UIColor.white self.view.addSubview(label) view.backgroundColor = UIColor.gray
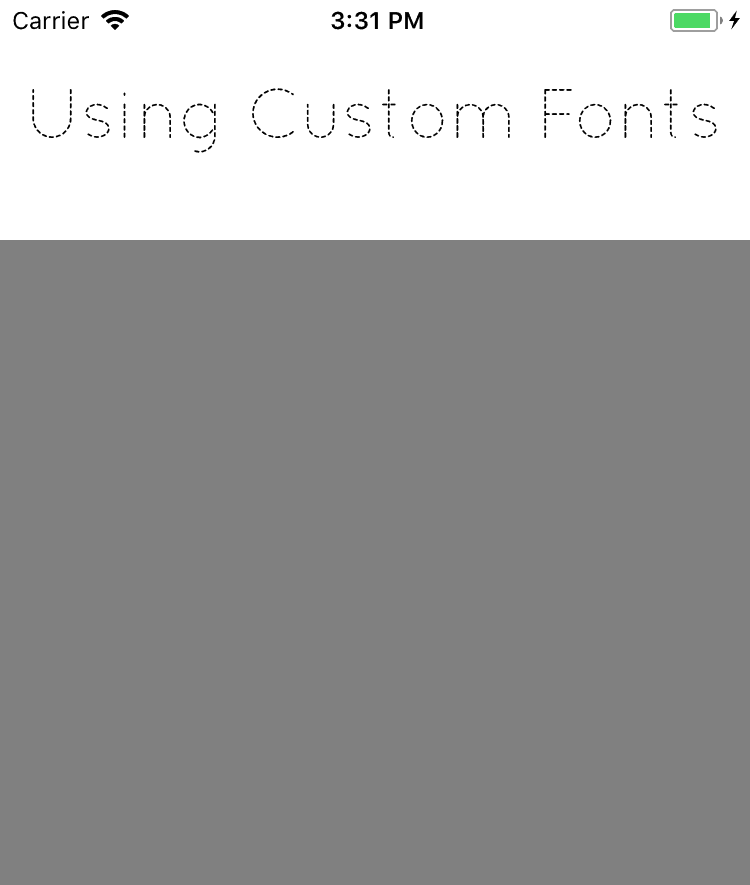
Sample of using custom fonts in your iOS App!
I hope that this iOS custom fonts tutorial was helpful to you. Let me know in the comments below!
Hi Chris,
The best tutorial for adding new fonts I’ve found. Saved me a lot of time.
What about SwiftUI can you do this for SwiftUI
Really Great work
Thanks for your article, very helpful! I got custom fonts to work in Xcode 6. 🙂
Thanks! Nice write-up. Very useful code snippets. Worked like a charm.
cool, thanks a lot 🙂
Good refresher Chris. Thanks…..I recalled your notes and found the problem within seconds.
thank you very much !!
Hey Chris, nice tutorial as usual.
But i have a problem that i can’t solve. If i add a custom font and i set two diferents sizes, for example wAnyhAny = 10 and wRegularhRegular = 20, the custom fonts just dont show. Instead it shows a system font. It seams its a xcode bug. Any workaround for this?
Thanks and nice job.
Thanks for this post Chris! I’m from Brazil, and here is 2:00 AM. After 2 hours of headache I solve my issue with the snnipet of the step 5 :D.
Exactly what I needed. Thank you!
Cheers 🙂
Nice tutorial….. Really helps keep posting… (y)
Chris! Number 5 was what had gotten me. The actual font name was different than the file name. Thanks for this great post! (fyi you can check the file name by double clicking it in Finder window and the name displays in the navigation bar of the opened window.)
Step 6a: UIFont initializer failover for Swift 1.1:
private let heinemannFont = UIFont(name: “HeinemannRomanSpecial-Rm”, size: 18.0) ?? UIFont.systemFontOfSize(18.0)
Its good post…… but any idea how many font add in one app?
In 60 seconds I found out everything I needed to know about how to implement & manage custom fonts. Thanks for this
Great post! Thanks alot!
Step 5 – I always surround this with an ifdef DEBUG and put it in the AppDelegate’s didFinishLaunchingWithOptions method.
Has anyone else tried adding their custom font to font book and using the font from the interface builder? I added the font to both the app and fontbook and it seems to be working well
Thank you for this tutorial! it was very useful!
Superb tutorial Chris. You are simply a legend! I can’t thank you enough. Just out of interest, do you have any Sprite Kit tutorials, such as how to constantly move objects in a for loop and collision detection??? Thanks, Dan.
Awesome.
The snippet to list all the fonts is very useful!
Thanks for sharing.
hi! can i use these fonts on ios7 http://www.google.com/fonts/specimen/Hind ? if not how should i know if fonts are compatible with ios7 or not? hint: im not a programmer 🙂
Thanks for this tutorial.
Great tutorial! Here’s the code for listing the available fonts in the log converted for Swift:
for family: AnyObject in UIFont.familyNames() {
println(“(family)”)
for font: AnyObject in UIFont.fontNamesForFamilyName(family as NSString) {
println(” (font)”)
}
}
Just thought I’d share it since I converted it.
Hey Falemar.. Thanks for your code snippet 🙂
Im having difficulties in adding my custom font .. i dragged and dropped it and it is found in the list of custom fonts but when i run the app the font isn’t changed.. any ideas?
Oh yeah. That’s what I’m looking for. I’m starter to Swift and trying to convert the code to swift but second loop gives me error. After seeing your post I understood where I was wrong.
Will this let me use my font across other apps? like Copy and Pasting into a text message or comment field on instagram? an App called Better Font does this and I can’t seem to make it work.
Super duper – thank you
When I add a bunch of fonts to the application memory becomes an issue. Seems like over 100 fonts the issue appears. Any way to dynamically load the fonts as needed instead of placing them each in the plist? Seems like they are all loaded at the start incase needed causing a huge memory suck.
Thanks!
This time I followed this guide it didnt show up in the iteration over the fonts, but when I removed the file from “Copy bundle resources” and added it again, then it showed up. Just a tip for peeps out there.
Thanks for this clear and coherent list. Every time I swap a font on iOS and something goes wrong, I double check on your list and most often find that I’ve missed a thing or two.
Great article. Thanks for sharing the information.
Good article! Even iOS pro’s will find this useful. Also, a good source for open source fonts is https://www.google.com/fonts
Open Sans is one of my favs.
Thanks for all the tutorials, Chris! One would think that the internet is full of helpful tutorials, but in reality only about 0.01% are properly comprehendible to first time developers such as myself. Your resources make up most of that 0.01%! I honestly struggled to understand programming before I stumbled upon your website. This is a comprehensive, easy to understand resource which is a must for any first-timer! I just can’t imagine life before your tutorials. Your explanations are so well thought-out, and premeditated. They make any first time developer feel on top of things. Keep up the outstanding work!
Thank you for the kind words! I really appreciate it and thank you for reading 🙂
Awesome tutorial! Thanks!
Chris, I love you.
I love you man!
I looked all around the web and not even a single mention of your second mistake!
You are a life saver, kudos!
Cool, prevents me to look inside huge and unhandy iOS doc.
It works well with a recursive loop fetching children and setting font each view at a time.
Thanks ! nice one… 🙂
GREAT ARTICLE DUDE, THANKS FOR TAKING THE TIME
Thanks Andrés 🙂
Hi Chris! I keep coming back to this post because I keep forgetting all the steps I need to do! Thanks for the post, it was really helpful!
Then the article is working as expected! 🙂 Thanks for using it Rahul!
Great stuff!
I linked this article up from Stack Overflow:
https://stackoverflow.com/questions/1371407/has-anyone-had-success-using-custom-otf-fonts-on-the-iphone/21489854#21489854
Thanks Etay 🙂
this is the the best article for the font confusion..thank you..!
Thanks for reading Kart!
Thank you. Great way to get started with custom fonts.
Glad it helped 🙂 Thanks for reading John!
Thanks for this, just used to include a font in my app, nice clear instructions, will bookmark! Thanks!
Thanks for reading Dan and I’m glad it helped!
Thank You !!
Thanks isaced!
This is an awesome tutorial Chris! tbh I haven’t used many of your tutorials but when I do they are awesome! Keep up the good work.
Thanks for reading!
If this is about common mistakes, Step 1 should be “Make sure you have a proper font license for mobile/app embedding.” Neutraface, for instance, cannot be embedded without a special license. This stuff is commonly overlooked but can get you in legal trouble, so it’s just as important as the technical details.
Thanks Stephen! oh the irony! I’m going to update this article in the coming week with this and I’ll follow up.
Very nice, short and concise writeup. Great help. Thanks!
Thanks for reading Andreas! 🙂
i missed step 4.
Awesome it worked for me..Kuddos..!
thanks for this detail artical its very help full. i just follow the steps and complete my task
thanks alot
Thanks for reading, Shahid!
Thank you Chris! Thorough, yet to-the-point. Nicely done!
Thanks for the great feedback, Paul! 🙂
Really nice tutorial Chiris keep going with this type of tutorials
Definitely will, thanks Srinu!
Thank a lot! step5 is helpfull for me ^^
Thanks for reading, Steve and i’m glad it helped!
Awesome! Thanks!
Thanks for reading, Johannes!
Brilliant, thanks.
Thanks for reading, Andy!
Great, i never knew i was missing familyname and fontname difference
It stumped me when i didn’t know about it too! Thanks for reading!
Hi Chris Ching,
I’m new to xcode… followed all your steps, but where do I actually enter the code in step 6? When I use the storyboard for creating labels, I can’t find the code that describes the characteristics of that label… many thanks!
Hey Rene, i had to look this one up because i haven’t specified custom fonts through storyboards before. From what I read, there’s no supported way through Interface Builder but you can use the user defined custom key/value attributes to do so (https://stackoverflow.com/questions/9090745/custom-font-in-a-storyboard). Hope that helps!
Step 5 was my problem. Thanks for making this work for me 🙂
I’m glad that it helped Juan! Thanks for taking the time to comment. I really appreciate it!
Thank You so much , quite straight forward and really easy to follow.
Thanks for reading, Ankur!
Thanks, good man! Didn’t realize the font name isn’t the file name… should have known that I suppose.
Yeah, this caused me a lot of wasted time when i first ran into it too!
Thanks a lot, great tutorial. Very helpful!
Thank you, i really appreciate the comment 🙂
Very useful! Added to my bookmarks!
Thanks
Thank you for reading!
This is a great tutorial. I looked through the iOS documentation for a while and could not find any of this information. Thank you for explaining this concept in a highly accessible manner.
Thank you for reading Noah. I really appreciate it!
After find many solution. Step 5 of yours help me in the end.
Sometime file name cannot use in code but have to find from application support font.
Thank you very much.
Thanks a lot for this. Worked the first time!
Can i do it on windows or pc?
Hello Shan Shan, you can use something called Xamarin or PhoneApp/Appcelerator to build iOS apps on Windows, but XCode won’t run on Windows unfortunately!
Cool. Very clear totorial!
Thanks for such a clear guide! Just the right amount of detail.
Thanks a lot. because i was missing step-3 , no one cal telling about that, except you. so thanks a lot.
Thank You !!
Perfect.
Great tutorial, it works like charm.
Chris..Thanks…Your post really helpful for me.
I followed this example(and the rest of the internet) to a T. My .ttf files are being copied to the target resources, I have added the ‘Fonts provided by application’. I even ran your sample code, but when I do, my added font is not included. I don’t see it in the list. I was wondering if you’ve ever seen this hiccup? I’m about to restart and try again.
Hello Pablo,
Yes! It’s caused me a lot of headaches before as well, even when you think you know what you’re doing! Does your project have multiple build targets? If so, make sure that the expected info.plist (the one you added “fonts provided by application”) is read by your project. One way to check is to change some settings in the info.plist and see if it takes effect in the app. If so, then you’ll know you’re modifying the proper one.
Also, when you try to use your font, it’s important to get the proper font name and you can follow the technique in my post to find the proper name to use. Usually those are the hiccups for me.
Hope that helps!
Thanks, I didn’t see step 2 mentioned on any other tutorial ! Helped a lot. Also, I knew about step 5 but couldn’t remember the code, so thanks for that two !