


1. Introduction
1. Introduction
2. Xcode Project
3. User Interface
4. Auto Layout
5. Graphic Assets
6. Writing Code
7. Wall of Fame
Source Code
This Dice Roll app tutorial was actually the first CodeWithChris tutorial before even the War app that you already did.
That’s why there’s a special place in my heart for this app!
Here’s a short video clip of the completed app:
The Completed App
Let’s get started!
2. Xcode Project
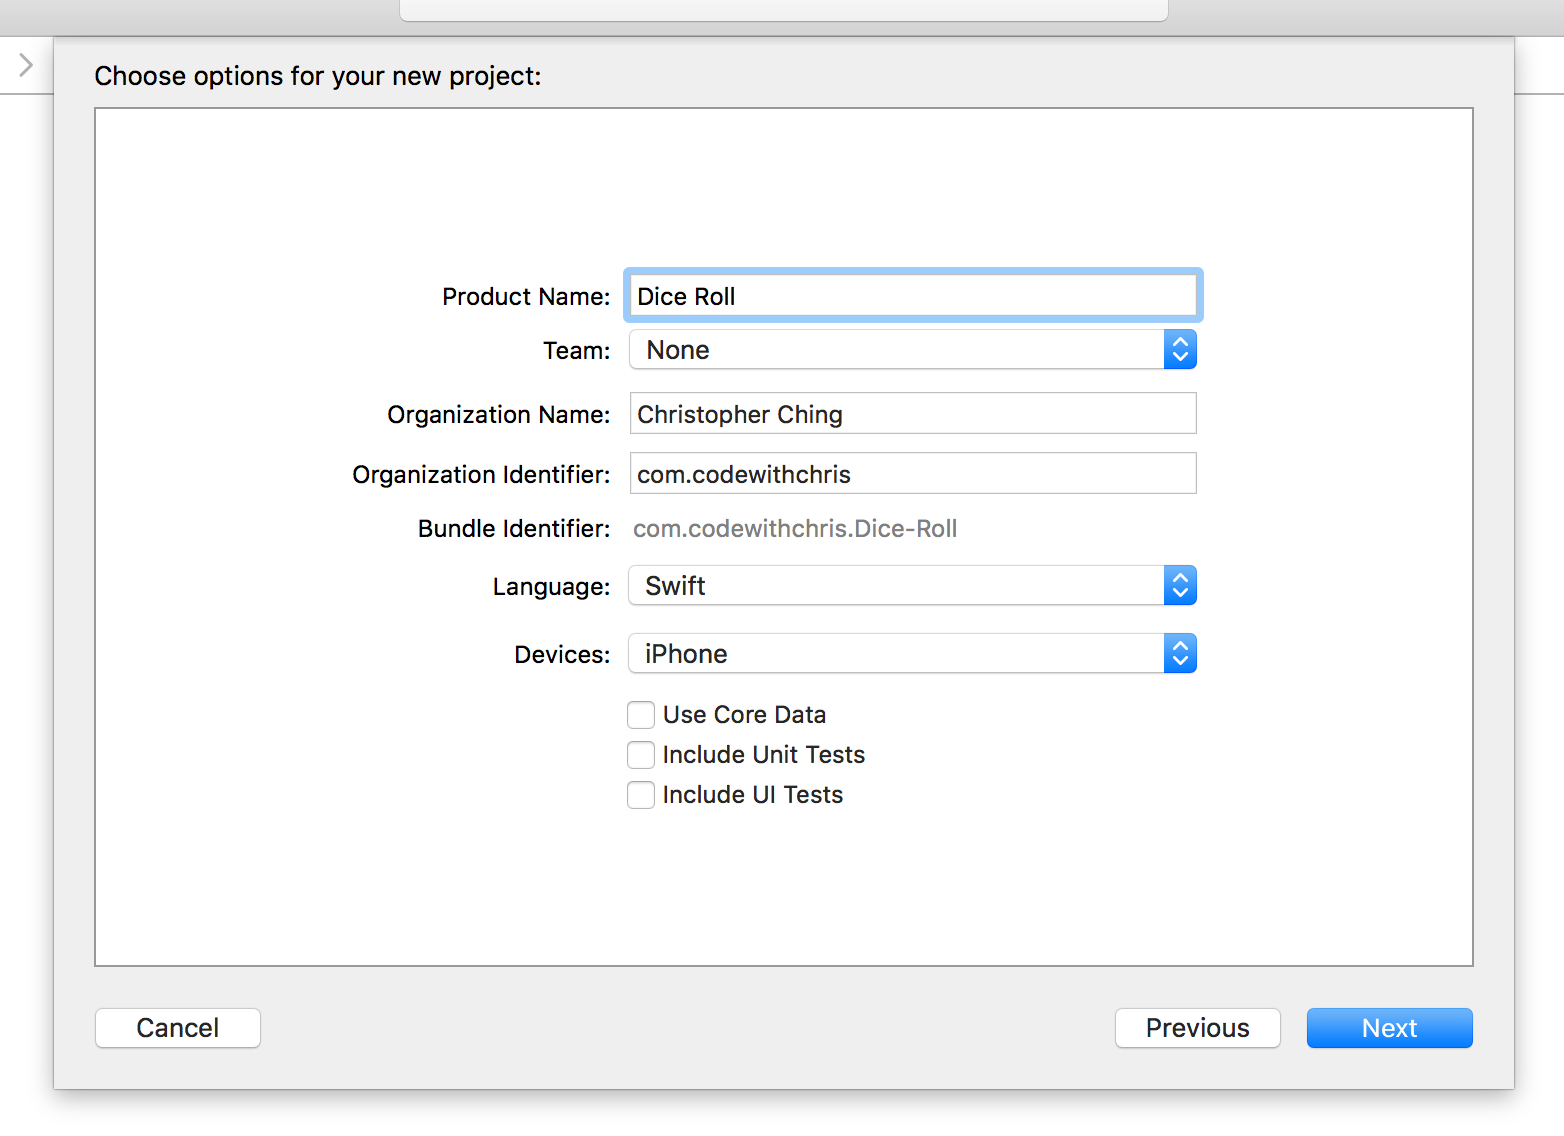
Alright! Let’s launch a new project in Xcode and in the new project dialog box, make sure that you’re looking at the iOS tab.
Choose Single View Application.

In the following project configuration screen, enter whatever you like.
Here’s what mine looks like:
Hit the Next button and save the project where ever you’d like.
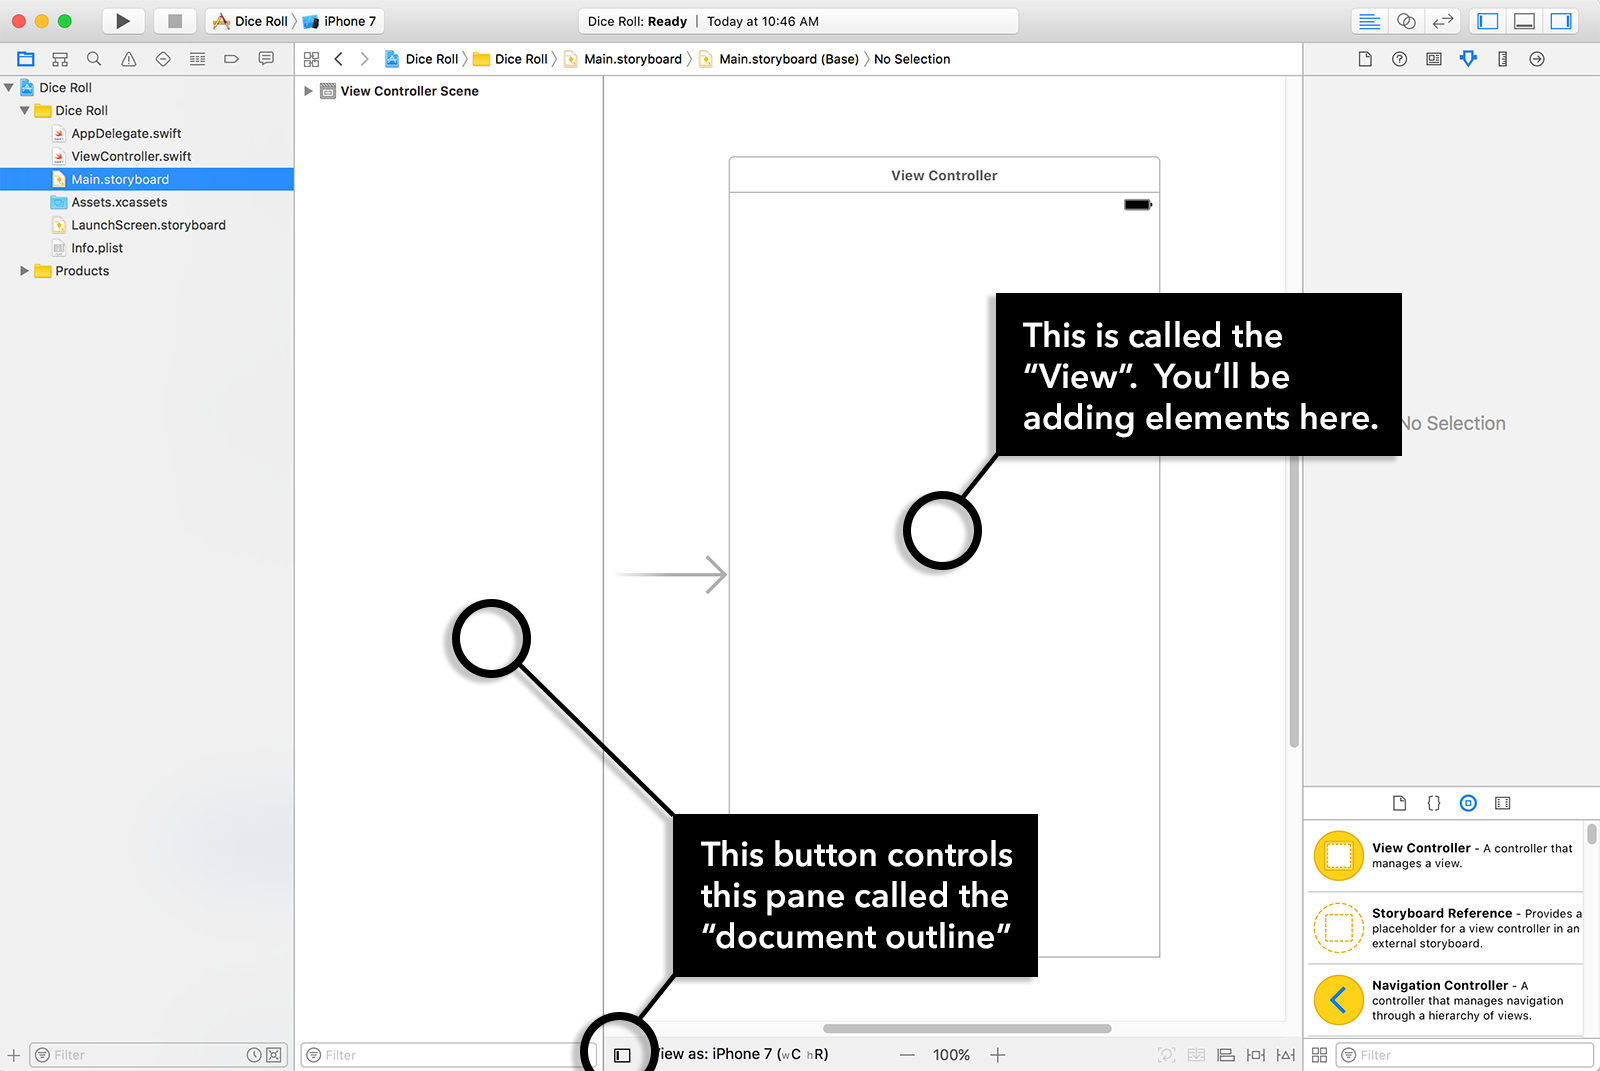
Now that you have your brand new Xcode project, in the left hand side File Navigator, select the Main.Storyboard.
We’re going to be starting with the user interface first.
Here’s what you should see on your screen:
3. User Interface
Next, in the lower right hand corner of the Xcode interface, there’s a pane called the Library Pane.
The Library Pane consists of several tabs. We’ll want to select the “Object” tab.
The Label
Once you select it, in the filter text box below the object list, type in the word “label” and it should filter the list of elements to the one we want:
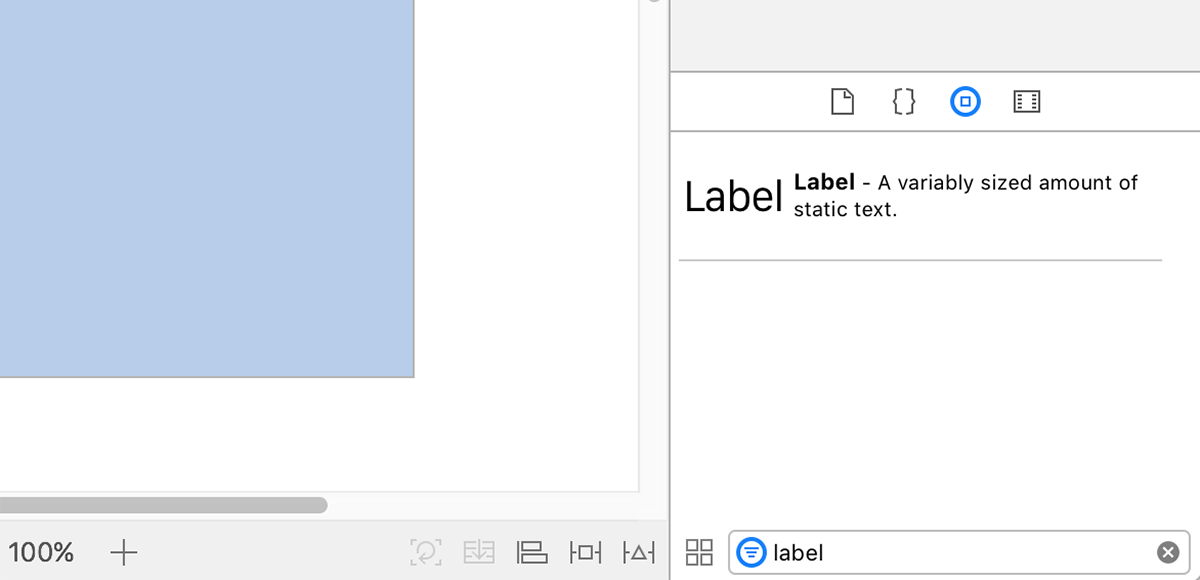
Click and drag that label element onto the view of your storyboard.
If you’ve done this properly, it’ll look like this:

Don’t worry too much about the placement of it because we’ll be using something called “Auto Layout” rules to specify how these elements should be arranged on the view.
Let’s customize this label a little bit by changing the default text.
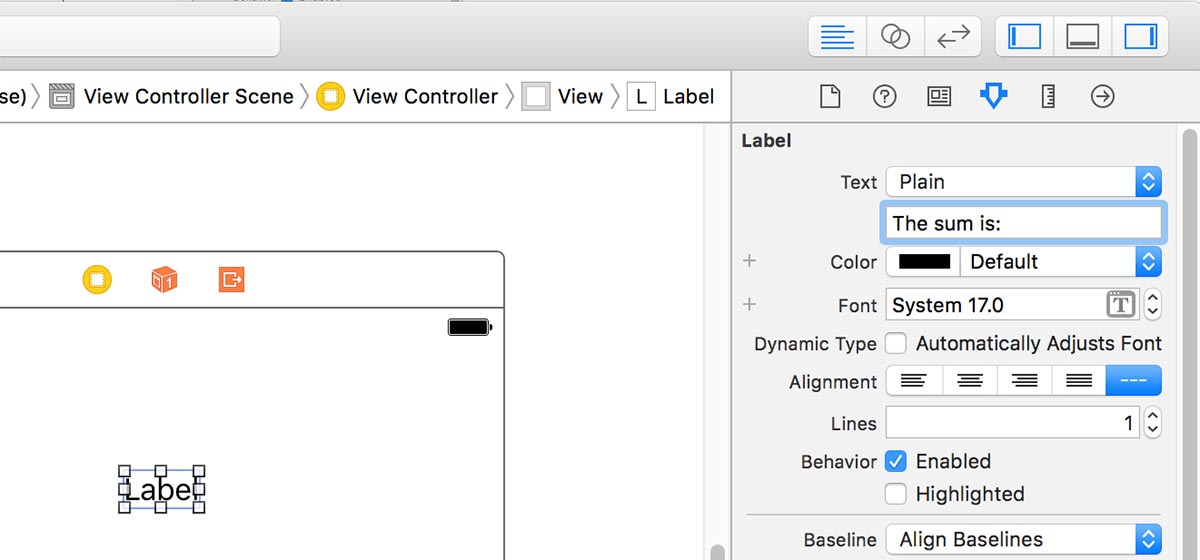
On the pane on the right hand side is called the Inspector Pane and it shows you information and configurable properties of whatever element or file you have selected.
Go ahead and select the label in your view.
Then in the Inspector Pane, change the text property of the label to show “The sum is:”.
The ImageViews
Next, let’s add some ImageViews onto our view.
Go to the Object library once again and type in “imageview” into the filter text box.
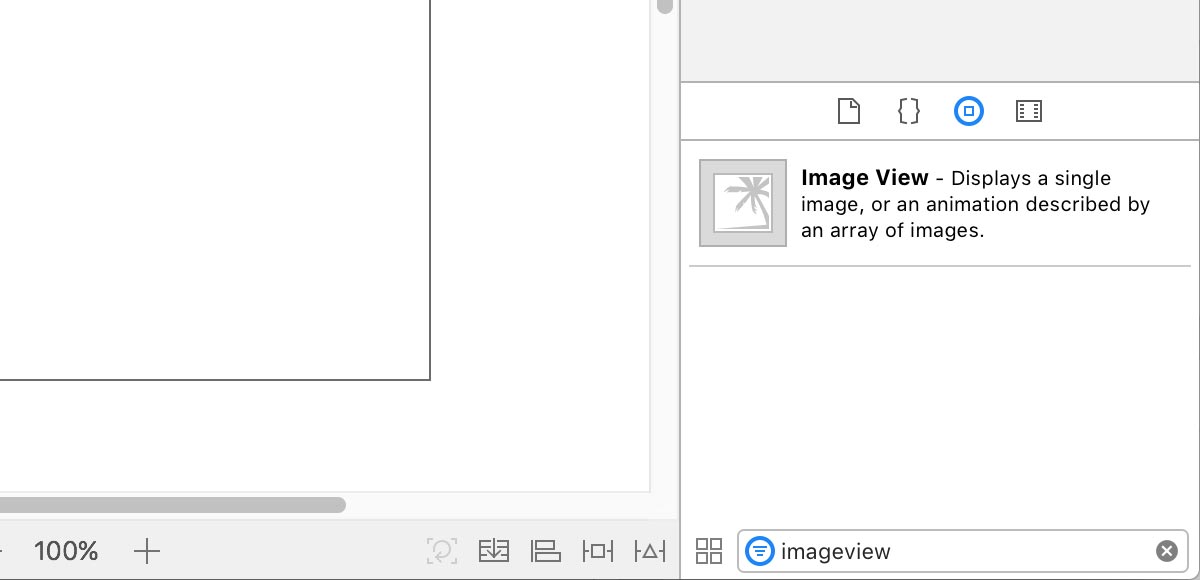
It should show us the “Image View” element. Click and drag this element onto your view.
When you drop it onto your view, it’ll have a few handles surrounding the element which you can use to resize it.
If you don’t see these handles, simply click on the UIImageView element on your view and the handles should appear:

We need to make some room so that we can add a second imageview so click on the lower right handle of the image view and resize it so that it’s a square on the left side of the view.
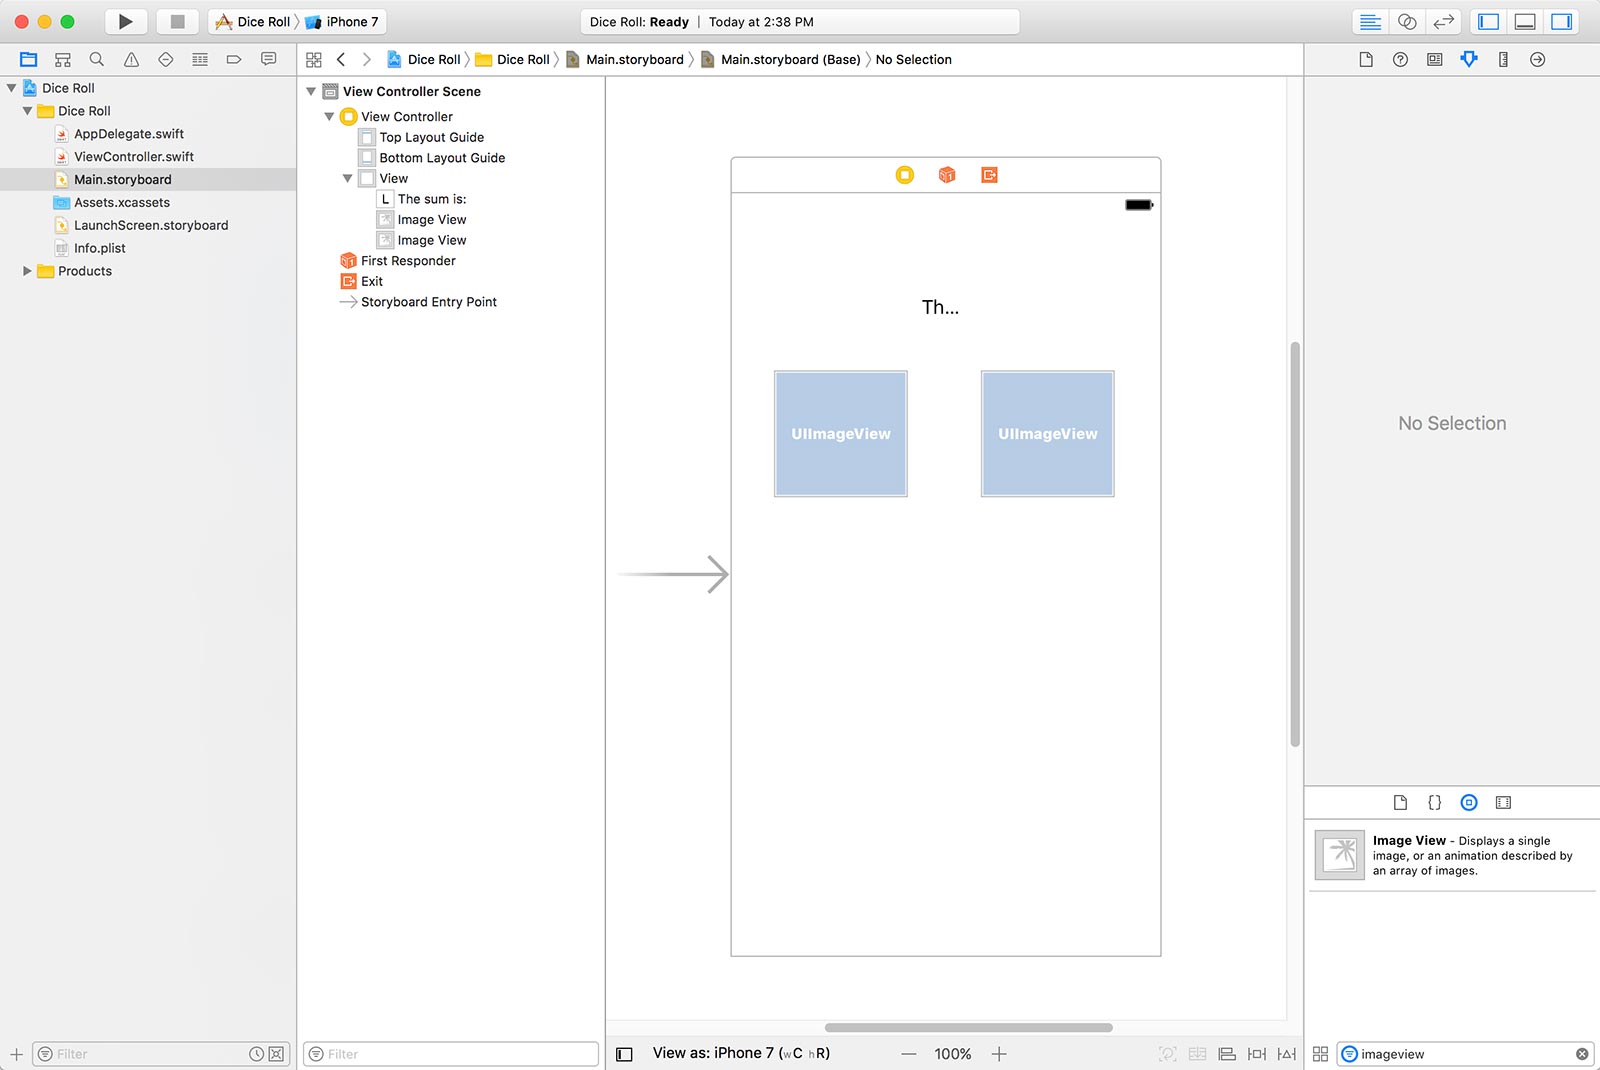
Now drag and drop a second image view onto your view and resize it to a square using the handles, just like the first one.
Now your user interface should more or less like this (don’t stress over the positions and sizes at this point):
The Button
There’s one last element we need to add: the button to roll the dice!
Go back to the filter text box of the Object Library and type in “button”.
It should filter the list and show you the button element.

Click and drag this element below the two imageviews.
Let’s configure this button by changing it’s button text.
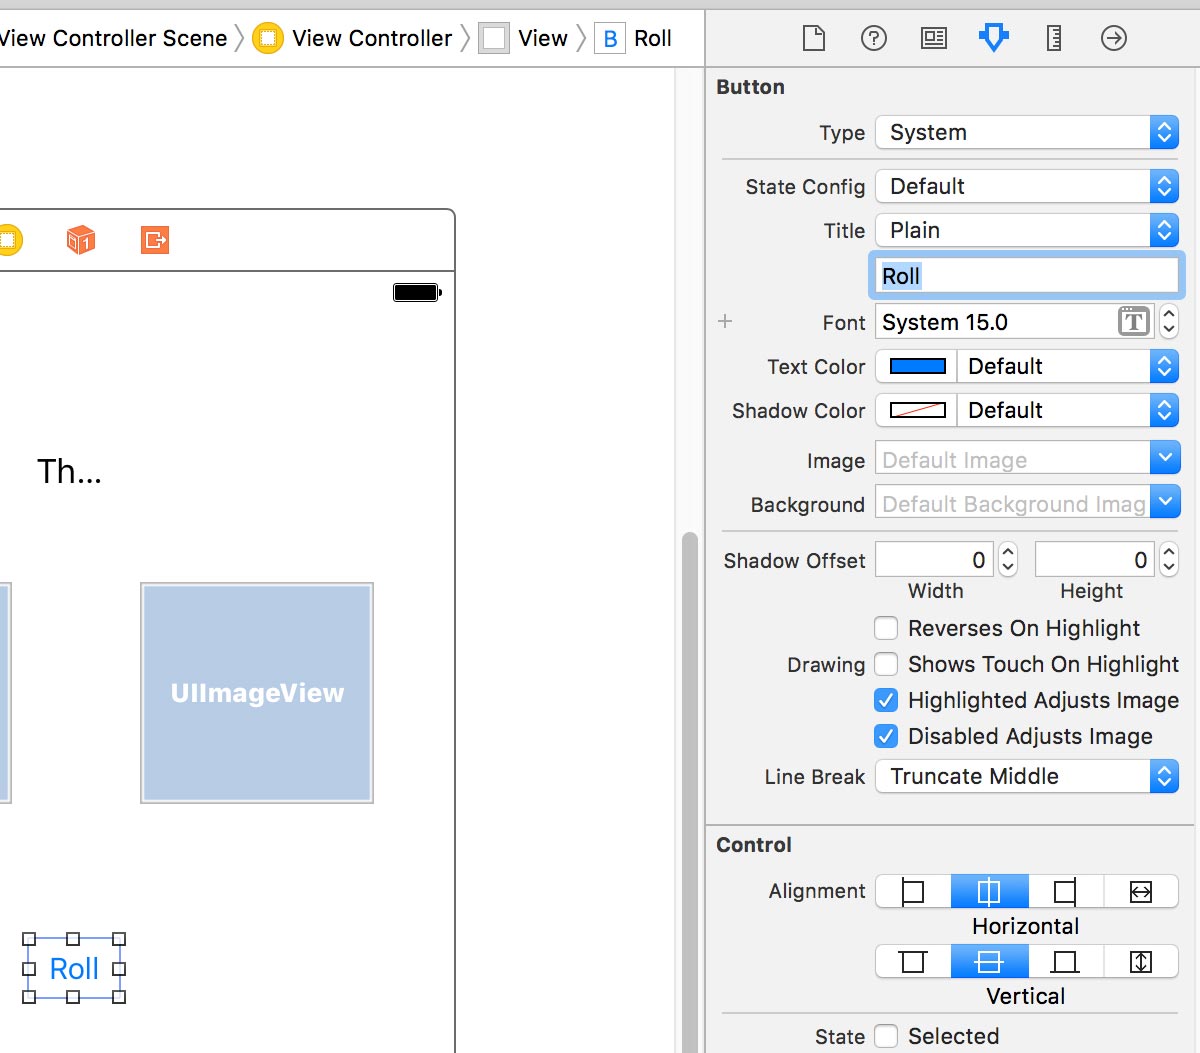
Make sure the button is highlighted by clicking on it. This should change the Inspector Pane on the right to display the configurable properties of the button.
Look for a property called “Title”. It’ll say “Plain” next to it, which is fine.
However, below that dropdown, there’s a textbox with the default text of “Button”.
Change that text to “Roll”.
4. Auto Layout
Even though the elements look like they’re positioned correctly on our view, they’re actually not!
Xcode uses a system called Auto Layout to determine the size and position of elements and so far, we haven’t specified any Auto Layout rules!
Imageviews into a Stackview
First, we’re going to put the two image views into a horizontal stack view. If you’re not sure what a stack view is, just check out my lesson on Stack Views.
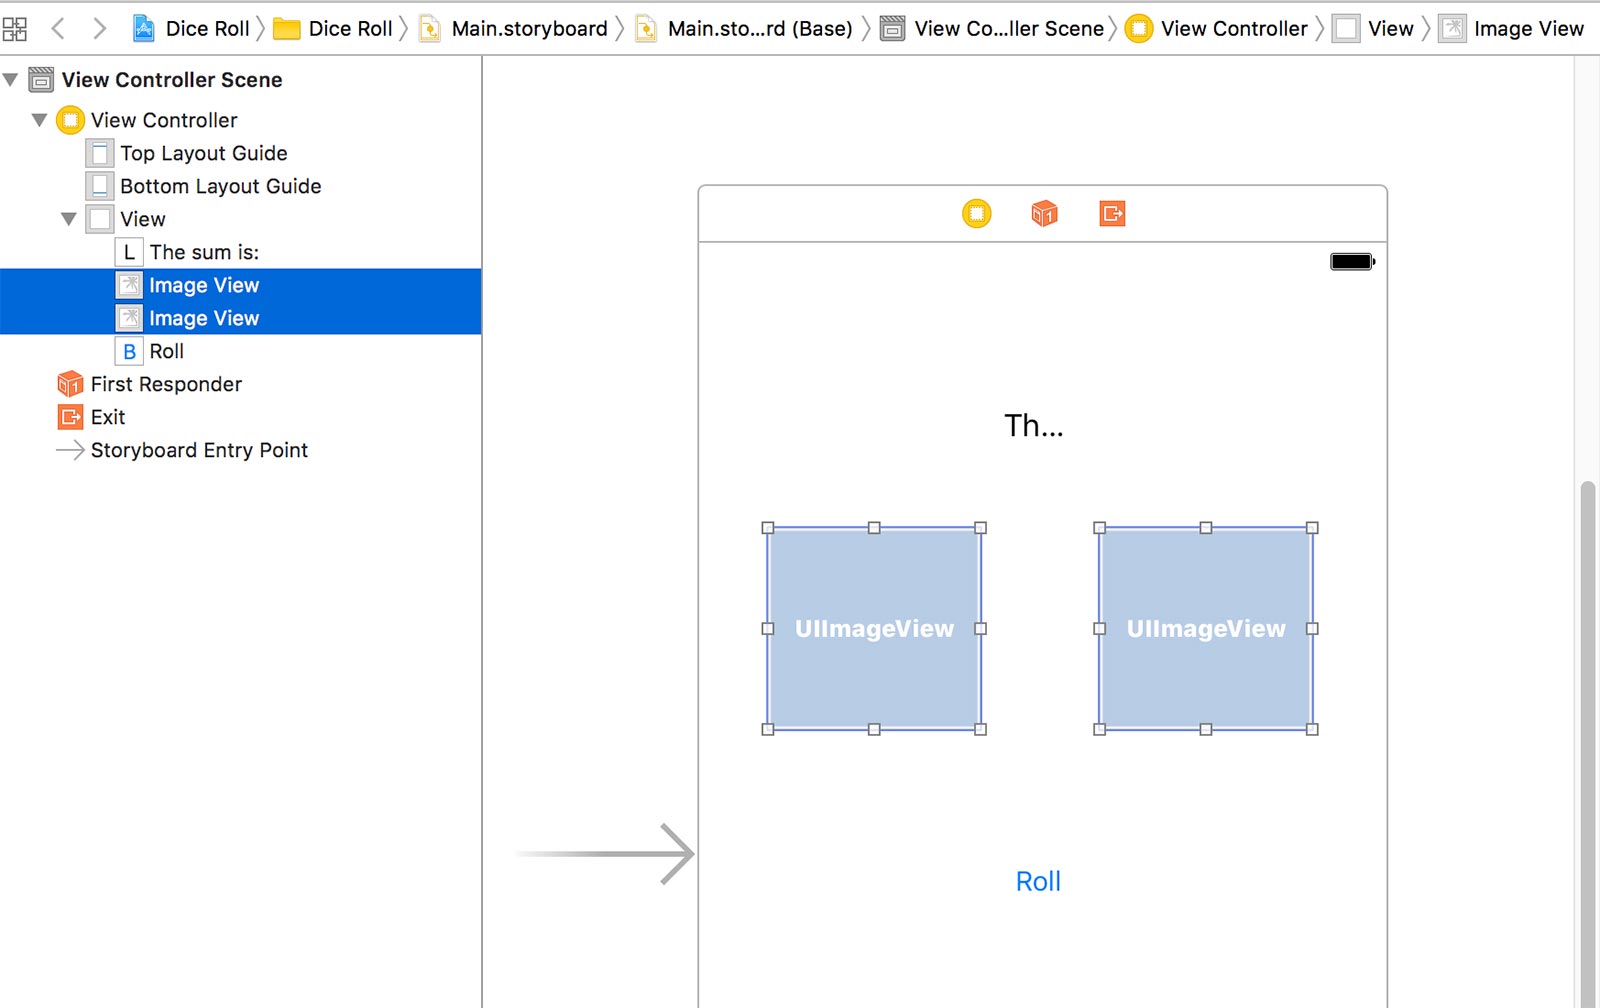
We’ll need to have both of the image views selected. It’s easiest to do this in the Document Outline where all of the elements are listed.
Simply hold down the cmd key on your keyboard and then click on the first imageview and then click on the second.
Now both of them should be highlighted like this:
Now that you have them both highlighted, we’re going to click on the Stack button (See screenshot below to find the button) to put both of the UIImageViews into a Stack View.
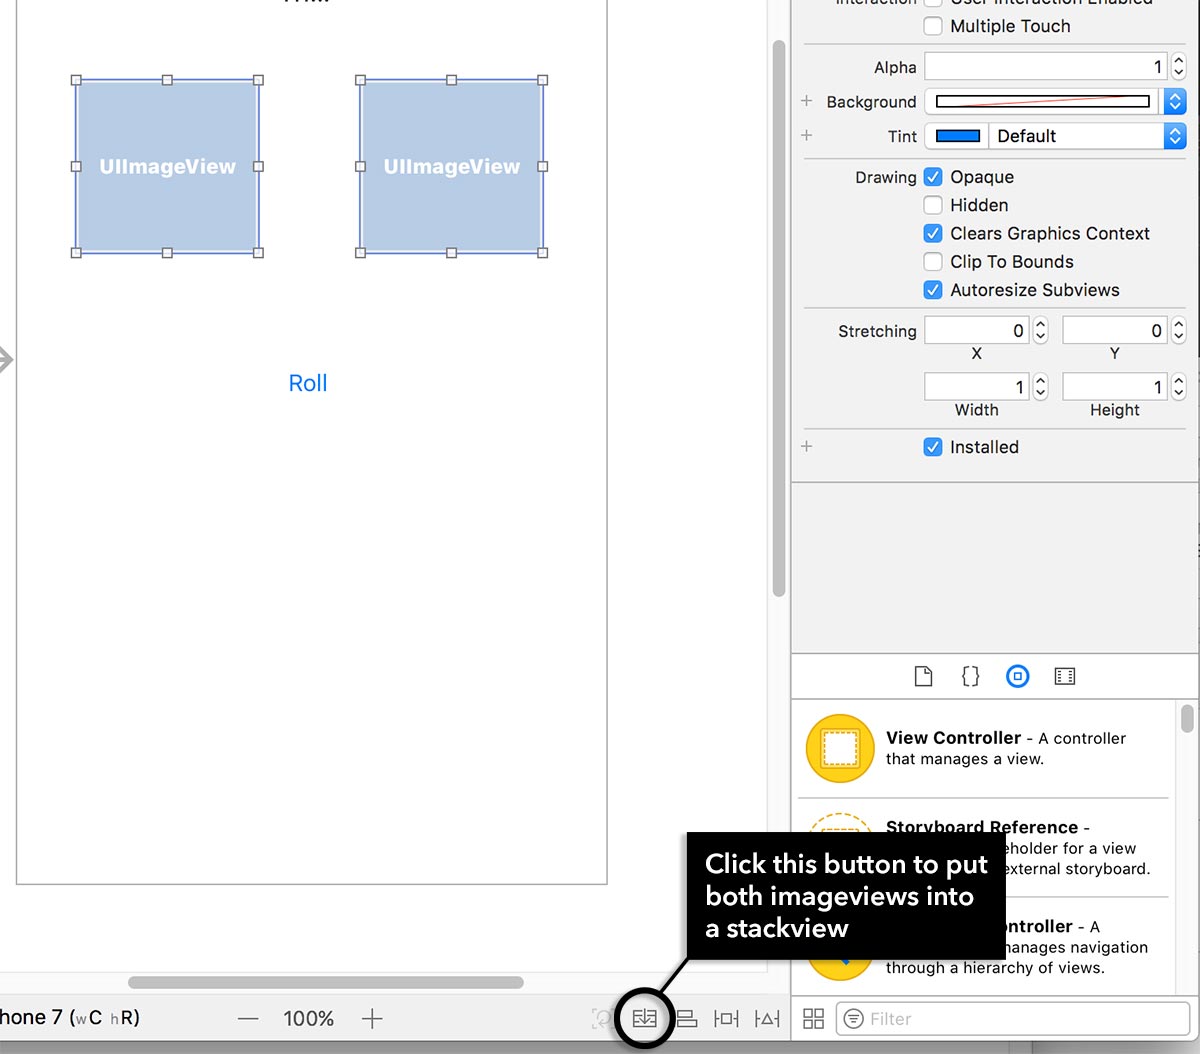
Xcode should be smart enough to detect that you want to stack these two imageviews horizontally. If instead Xcode put them vertically on top of each other, then simply change the Axis property of the stackview to “Horizontal” (You can see how to get to the configurable properties of the stackview below).
If you did it wrong, you can also press CMD+Z on your keyboard to “Undo”.
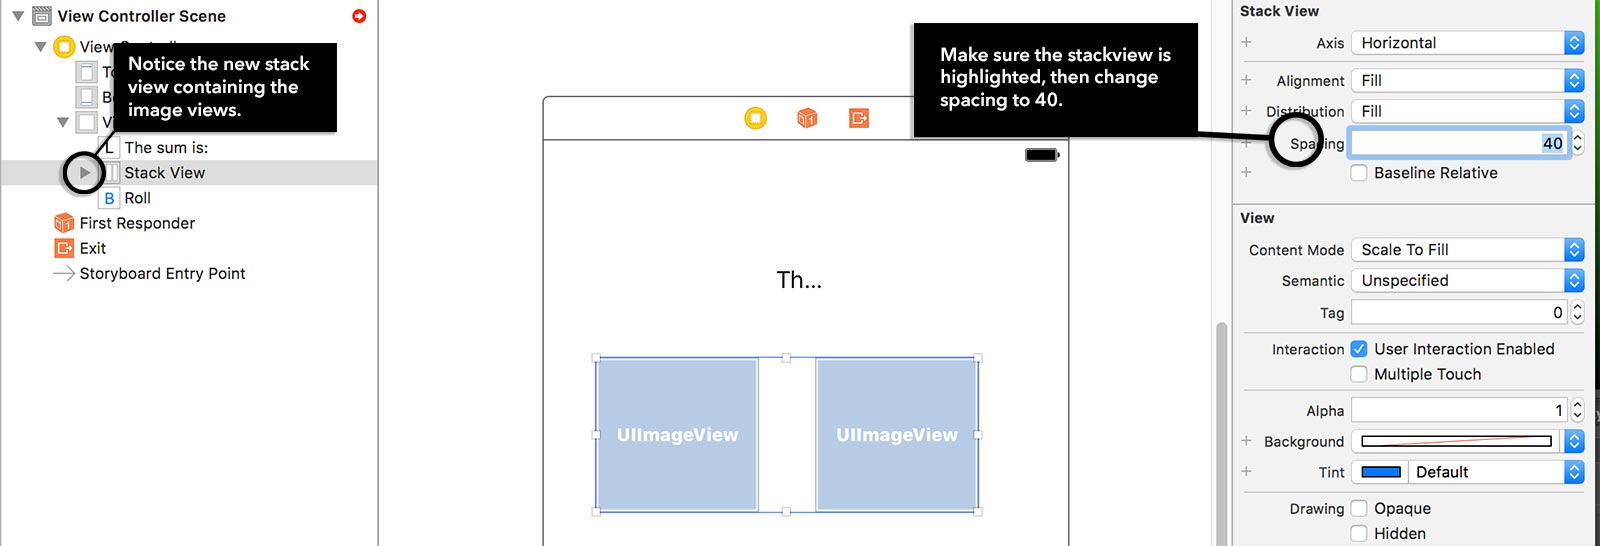
Now in the Document Outline you should see the stack view containing your two imageviews (you may have to expand the stackview node in the document outline to see the imageviews).
We’re going to change the spacing of the elements inside the stackview. Highlight the stackview by clicking on it in the Document Outline. This will cause the Inspector Pane on the right hand side to show you the properties of the stackview.
Change the Spacing property to 40 and you’ll see now there’s a gap between your two imageviews inside the stackview.
Everything into a Stackview
Now we’re going to put everything into a vertical stackview. This includes the label, the horizontal stackview (which contains your two imageviews) and the button itself.
Go to the Document Outline and just select all three elements by holding down CMD and clicking each one.

Then click the Stack button just click you did before.
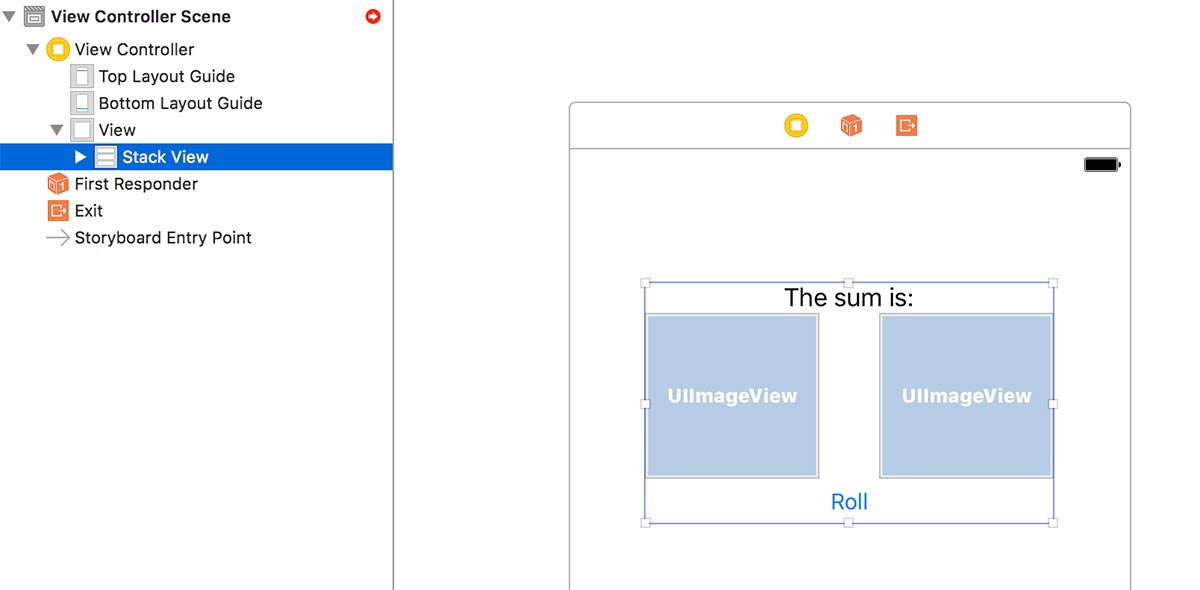
This time, Xcode should be smart enough to put all three elements in a vertical stackview. If not, change the Axis property of the stackview to “Vertical”.
Stackview Auto Layout Constraints
Now we have to anchor this top level stackview to the edges of the screen. We’ll do this by specifying four Auto Layout constraints; one for each side.
First, select the stackview so that it’s highlighted.
Then in the lower right corner, you’ll see an Add New Constraints button. It looks like a square with a line on either side (See screenshot below).
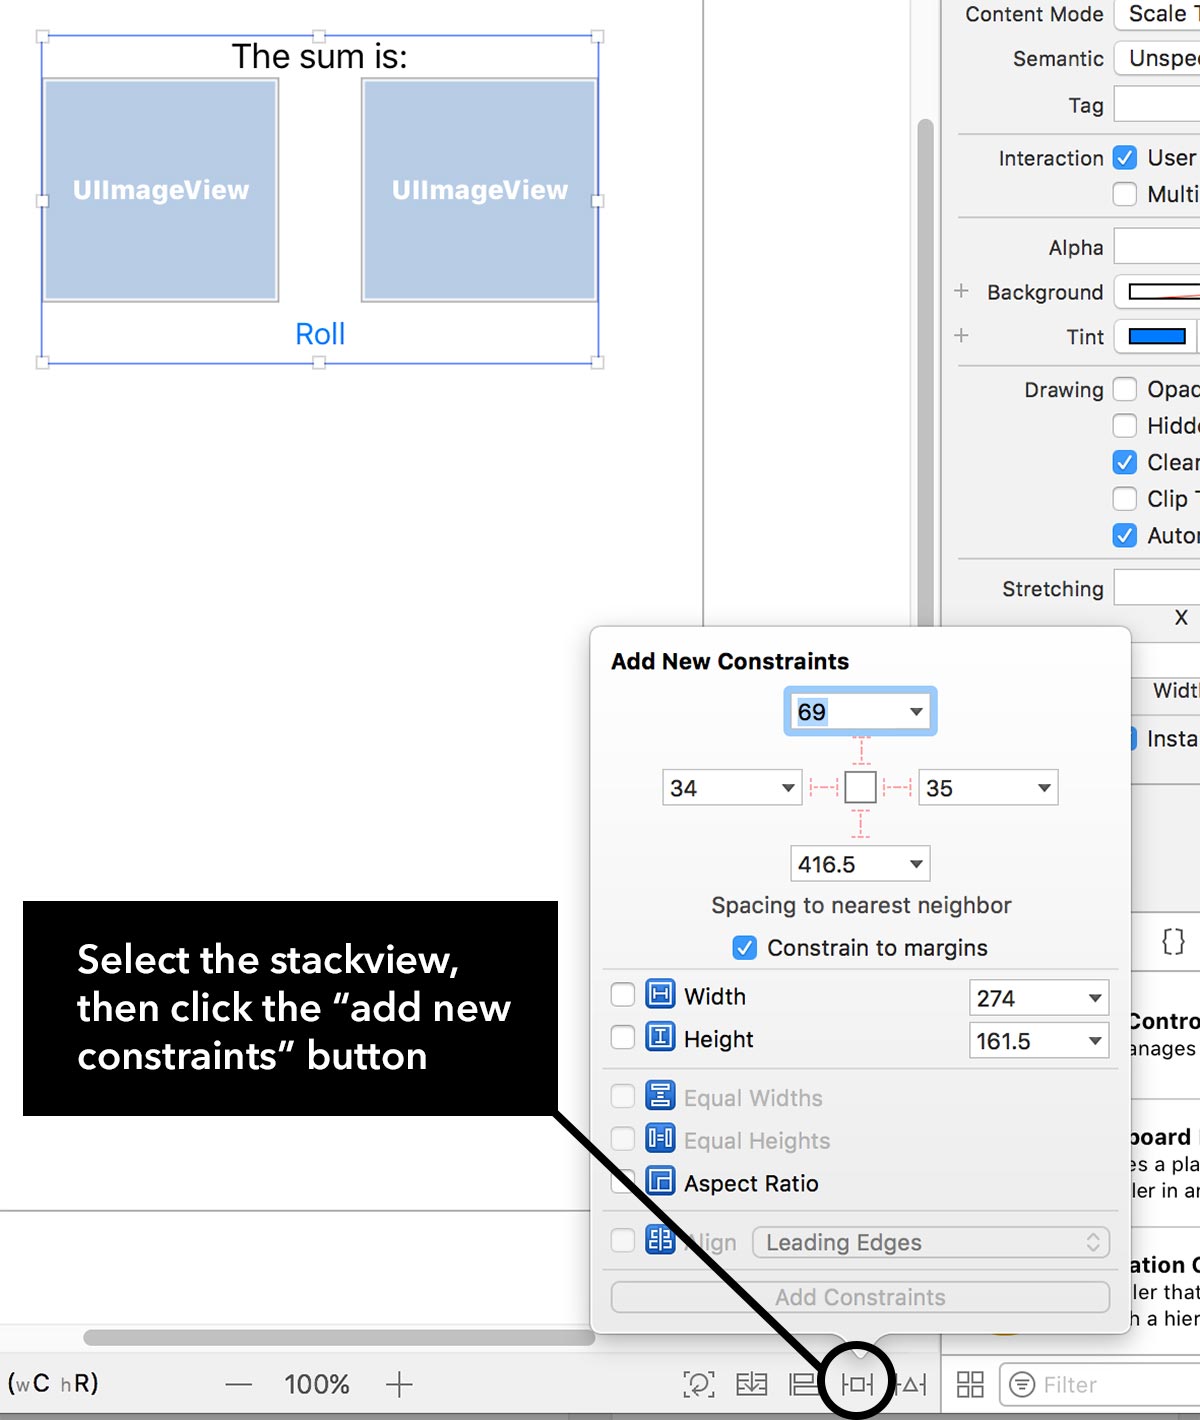
Clicking that icon will open a menu that lets you easily add four edge constraints.
If the options are greyed out and there are no values in the textboxes in that pop up menu, that means you haven’t selected the stackview so select it first.
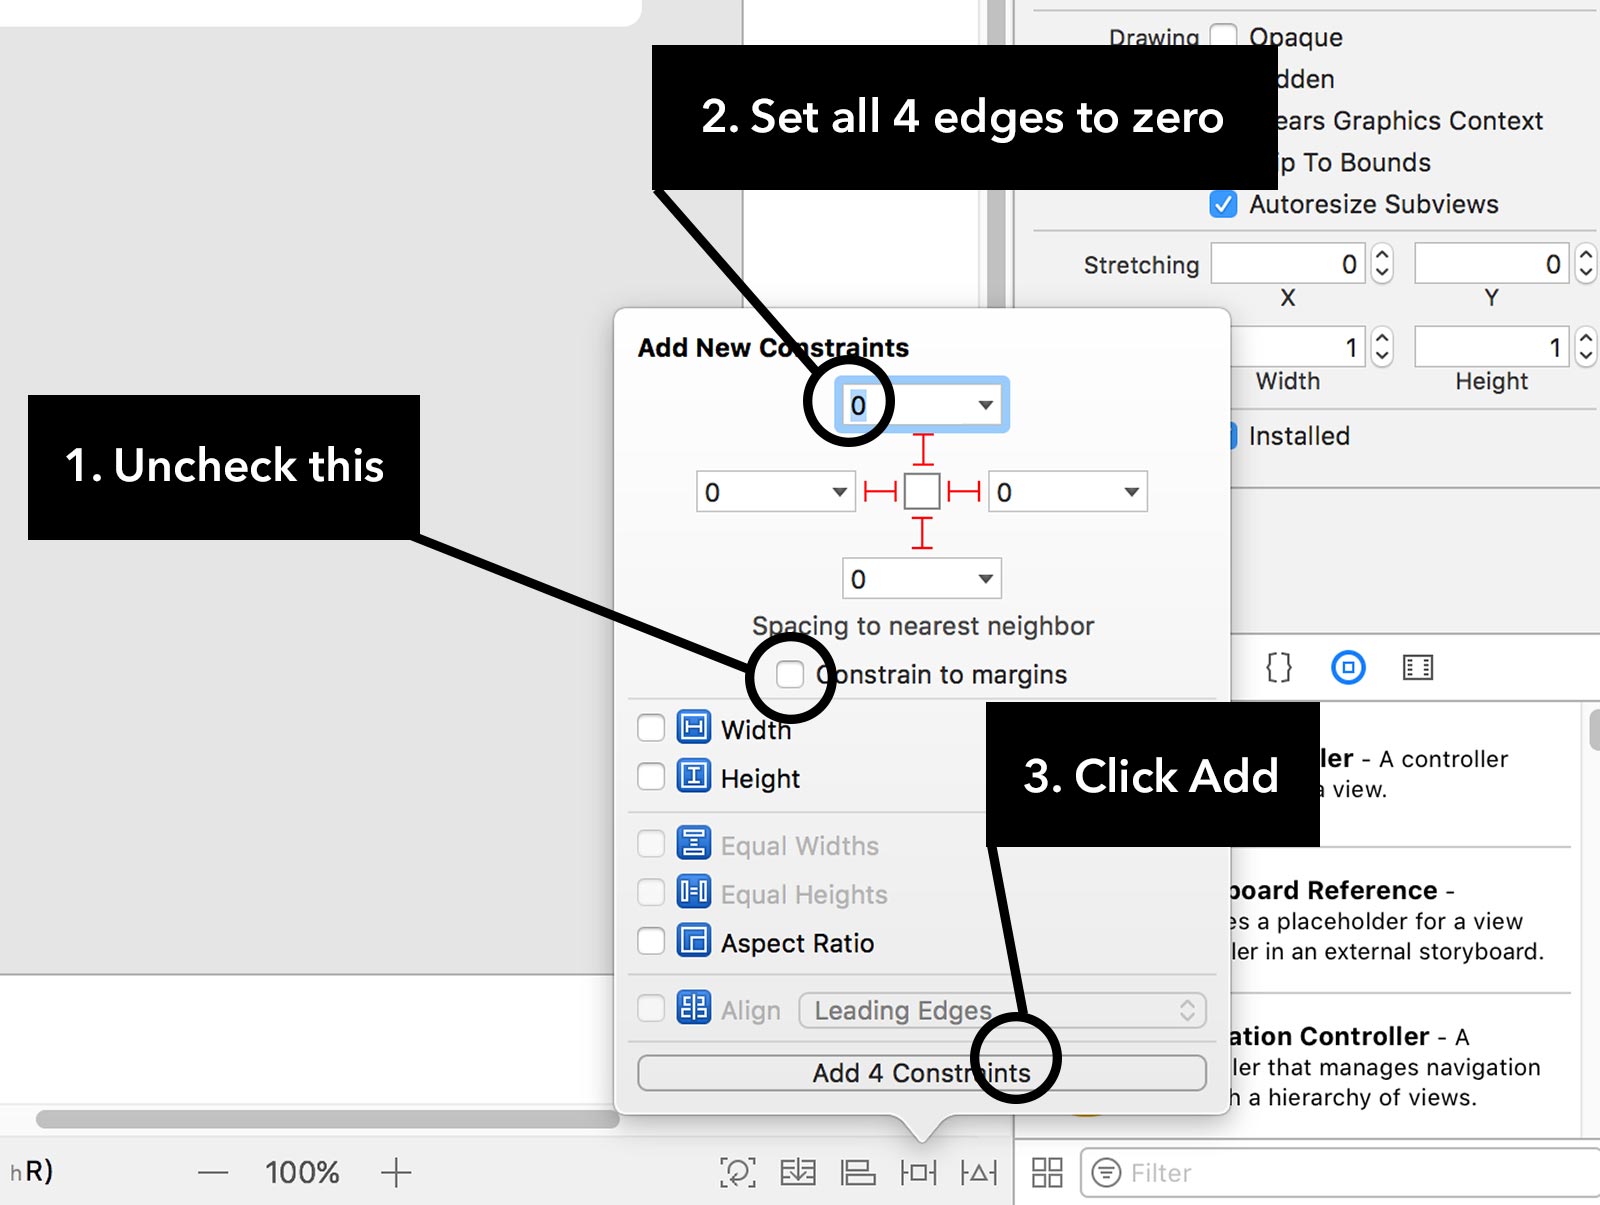
First uncheck Constrain to margins. This will ensure that the stackview can get to the edges.
Next, set all four textboxes to 0. What we’re saying here is that we want the stackview to be 0 pts away from each edge. Notice how the red lines connecting the textboxes to the center all get enabled as soon as you enter a value into the textbox.
Finally, click the “Add 4 Constraints” button.
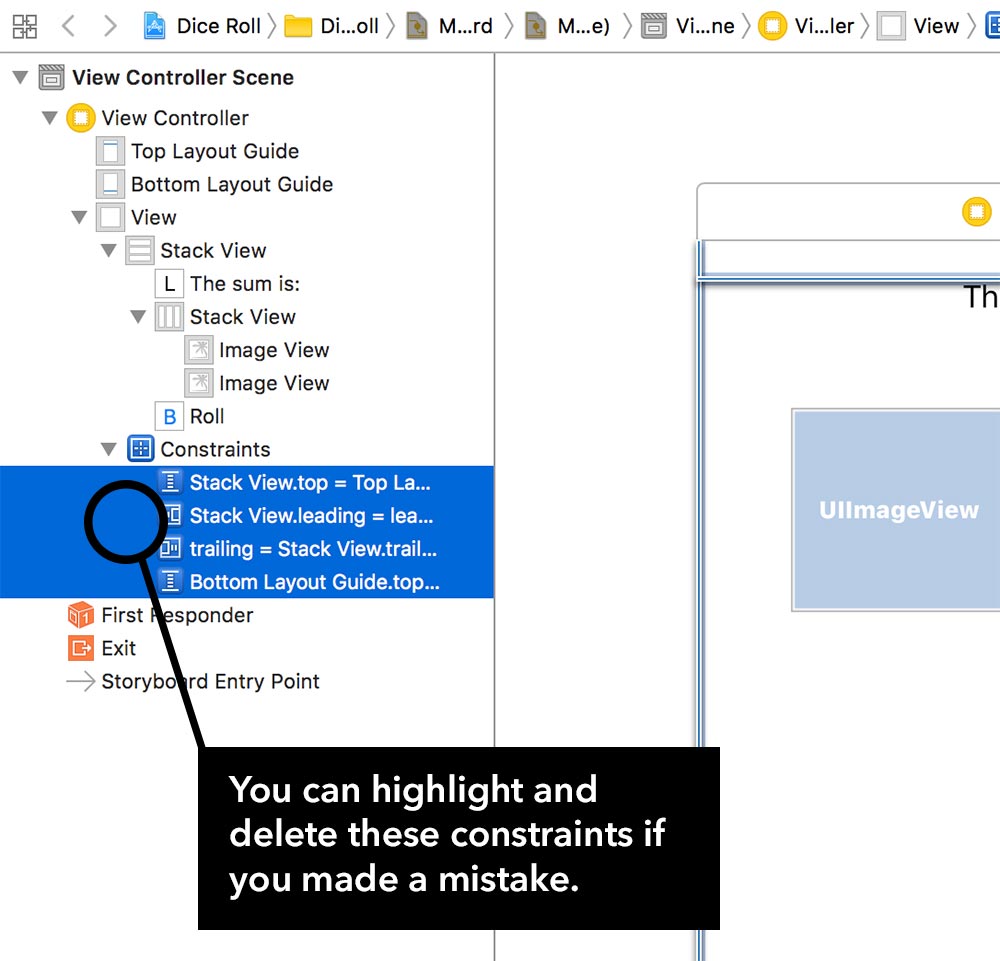
You should end up with four blue Auto Layout constraints that you can see in the Document Outline.
If you made a mistake, simply highlight the four blue constraints in the Document Outline, delete them and try again.
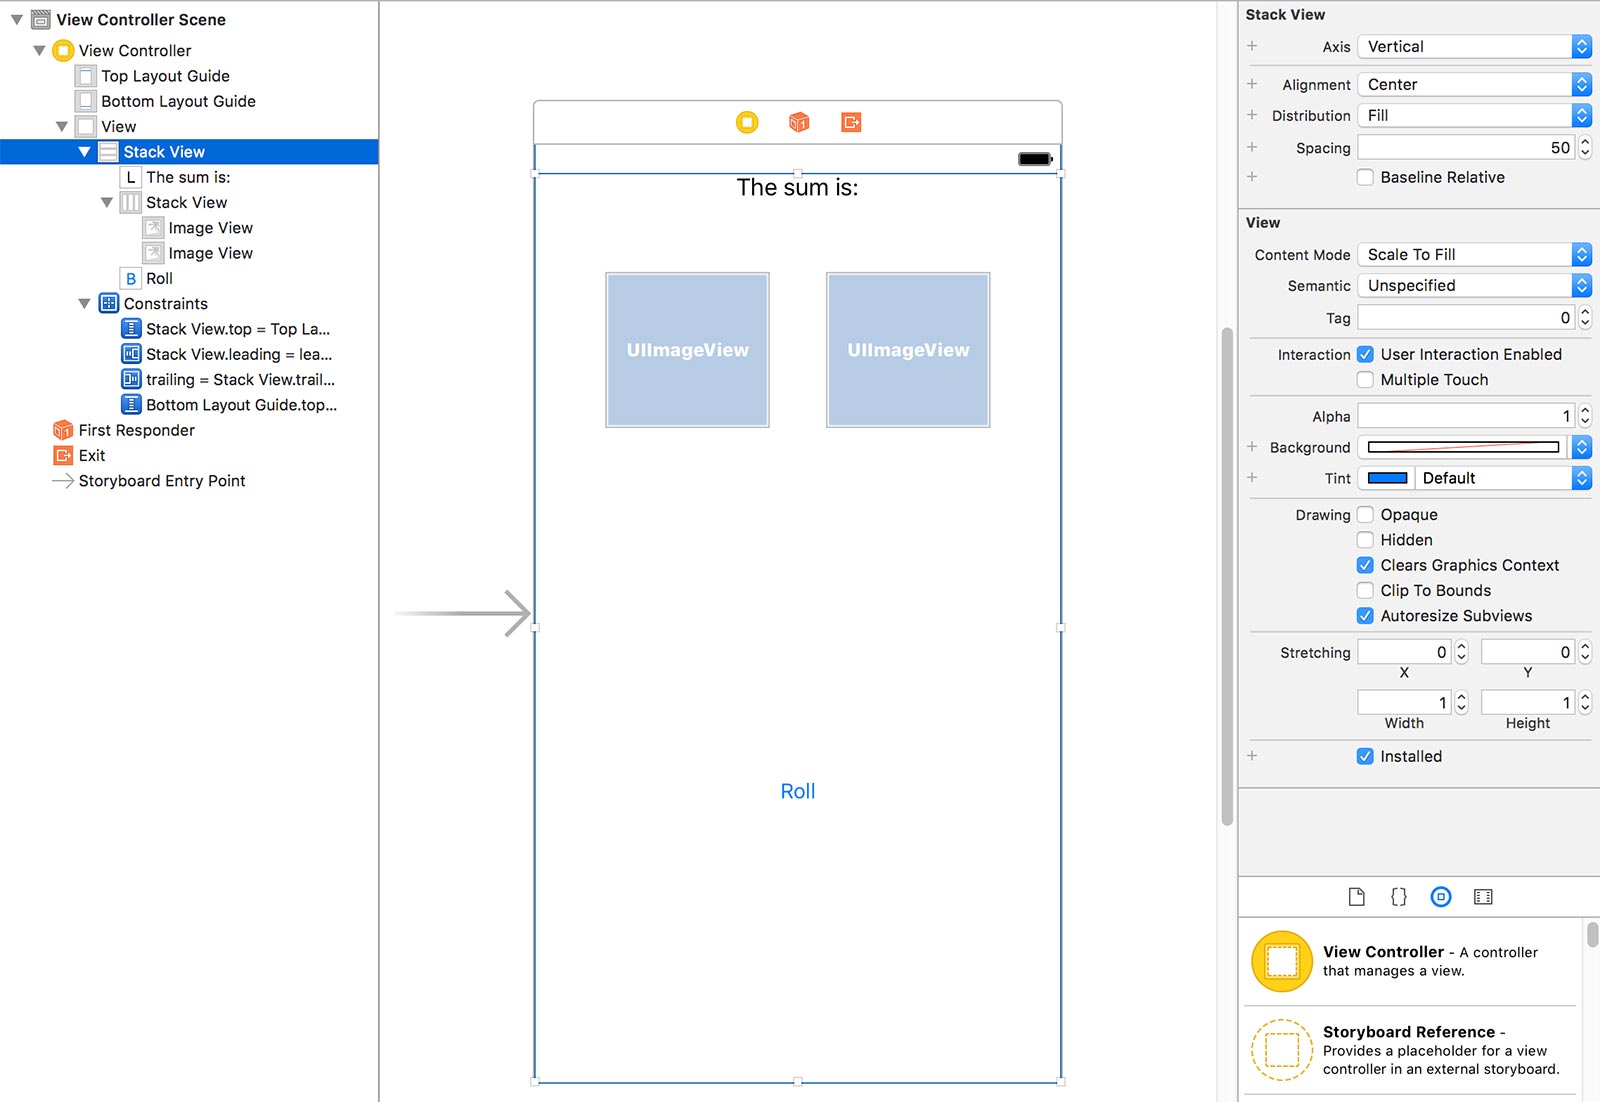
Now, lets add some space in-between the vertical elements.
Click the vertical stackview in the document outline so that the configurable properties show up in the Inspector Pane on the right hand pane.
Then change the Spacing property to 50.
Now we should have something that looks like this:
Connecting The Elements to Code
In order to write code that can access the elements we’ve added to the view, we need to expose these elements as IBOutlet Properties.
There are multiple ways to connect the elements as IBOutlet properties and this part is by far the most common area for mistakes by beginners.
To keep things simple, I’ll show you one technique and I’ll also show you how to make a correction if you make a mistake.
Connecting IBOutlet Properties
Click on the Assistant Editor button in the upper right hand corner to open up the two pane view.
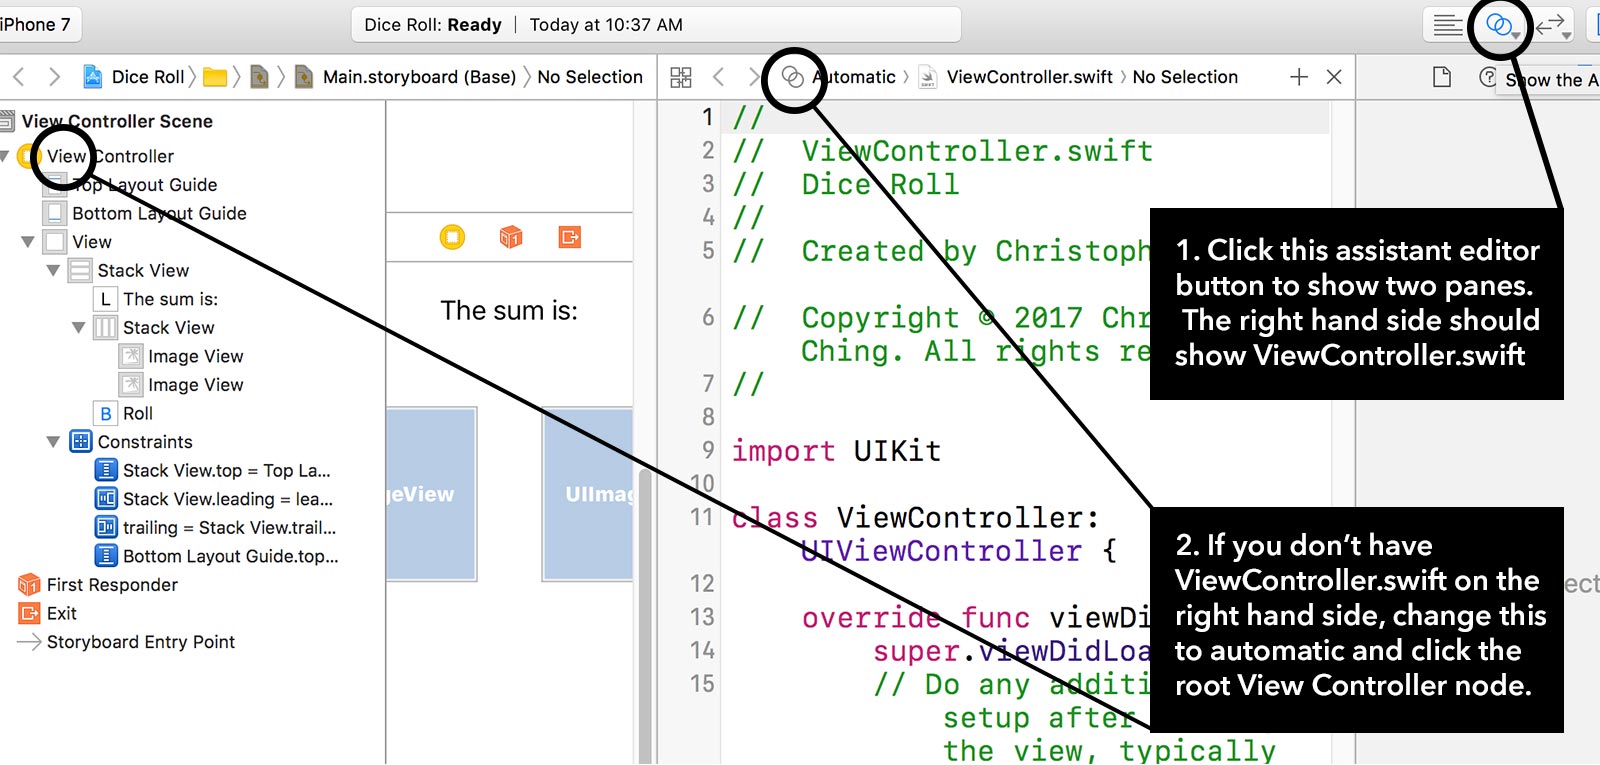
On your left should be the storyboard with the Document Outline and on the right, you should see ViewController.swift.
If you don’t see ViewController.swift on the right, make sure it says “Automatic” in the breadcrumb navigation (see screenshot above).
Now that you have both panes open, hold down CTRL on your keyboard and while continuing to hold CTRL, click the label element in the Document Outline and start dragging it into the ViewController.swift pane on the right.
Hover your mouse right above the line of code “override func viewDidLoad” and you should see a little message by your mouse that says “Insert Outlet or Outlet Collection”.
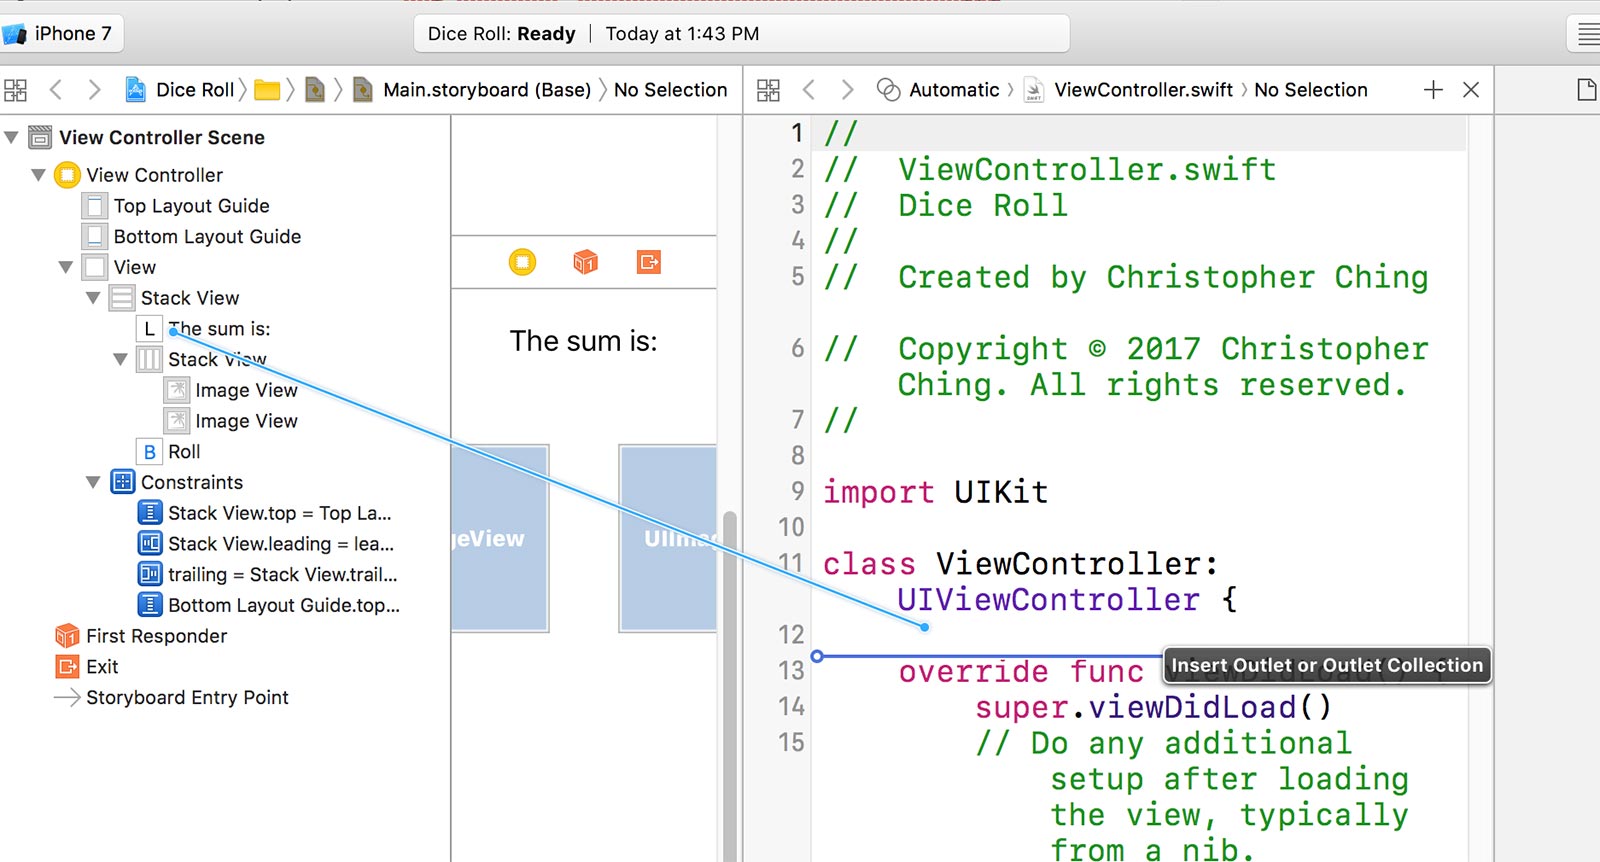
While still holding CTRL, release your mouse button and you should get a dialog box that will prompt you for the name of the new IBOutlet property.
I named mine “label”.
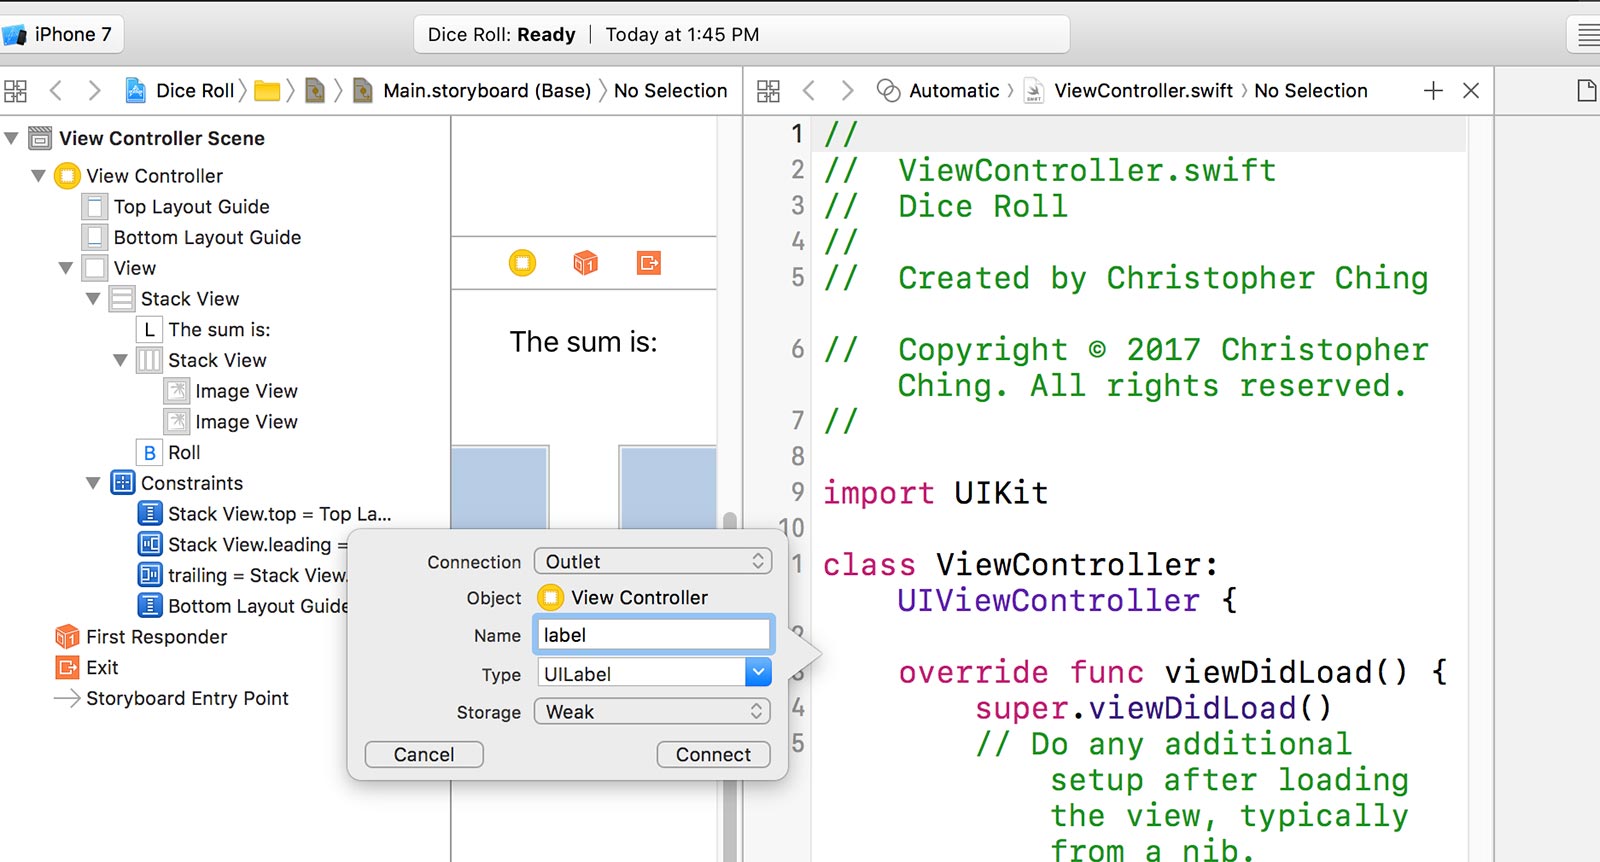
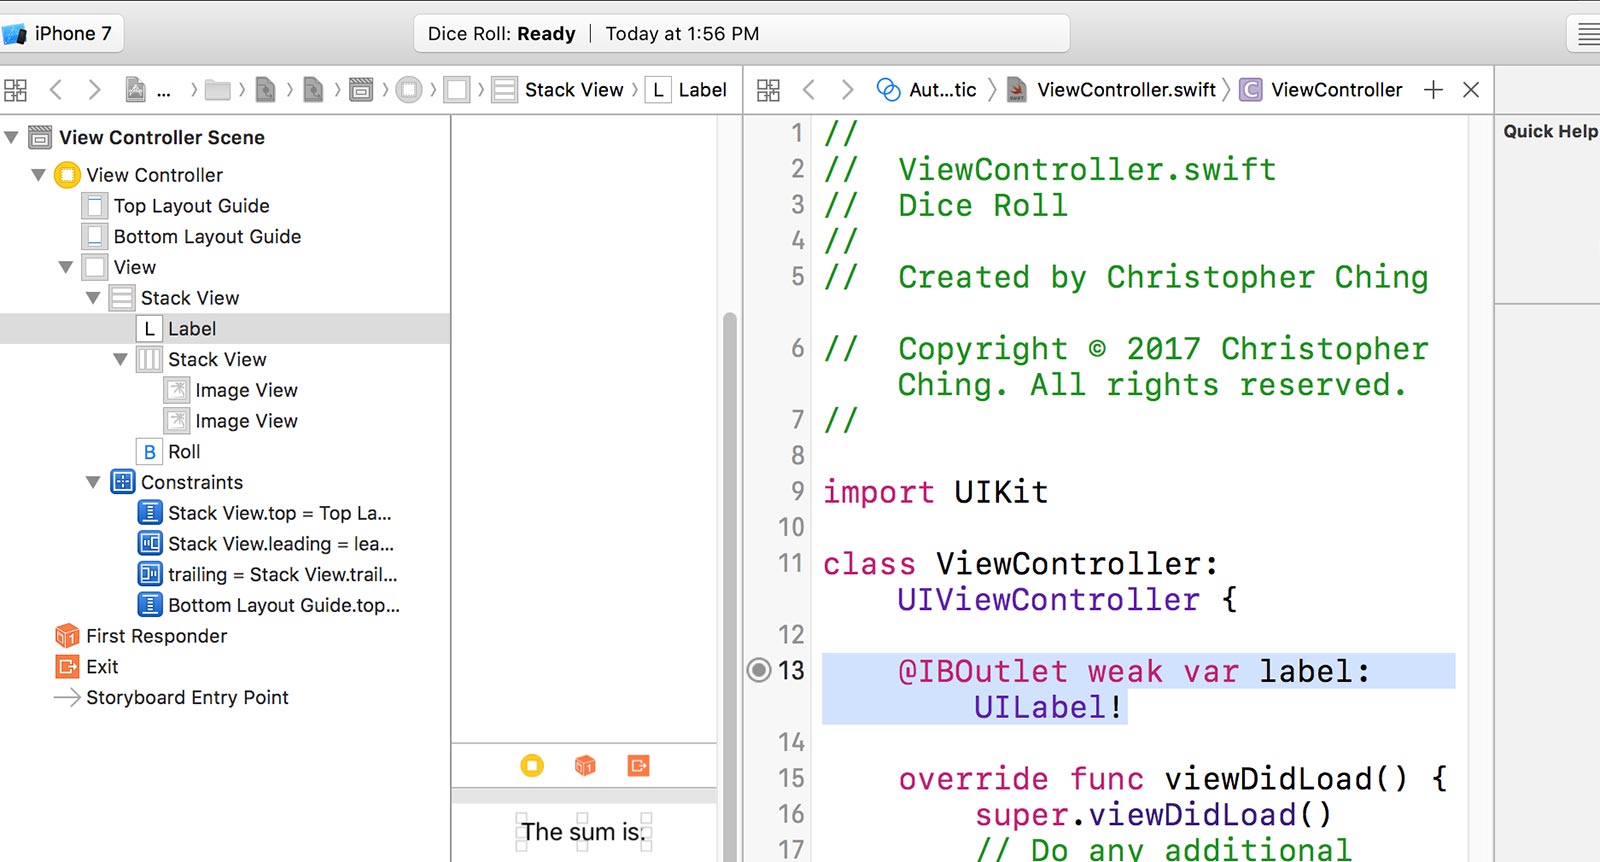
Click Connect and you should end up with an IBOutlet property like this:
Lets double check out work because a common rookie mistake is connecting the wrong element.
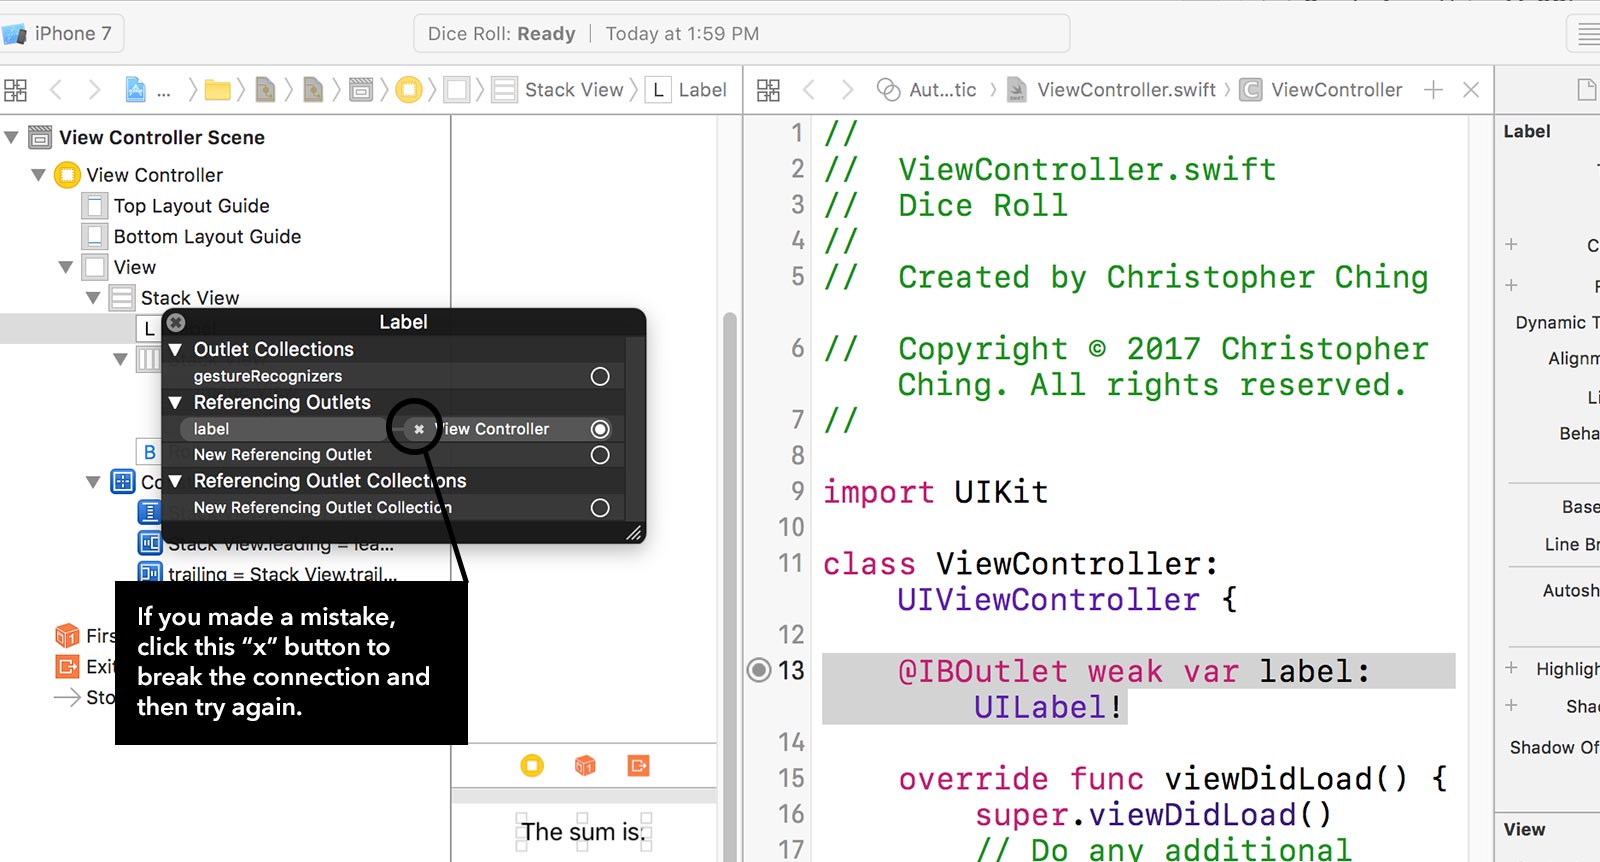
In the Document Outline, right click the label element to pop open a dialog (If you have a one button mouse, hold CTRL on your keyboard and click on the label element).
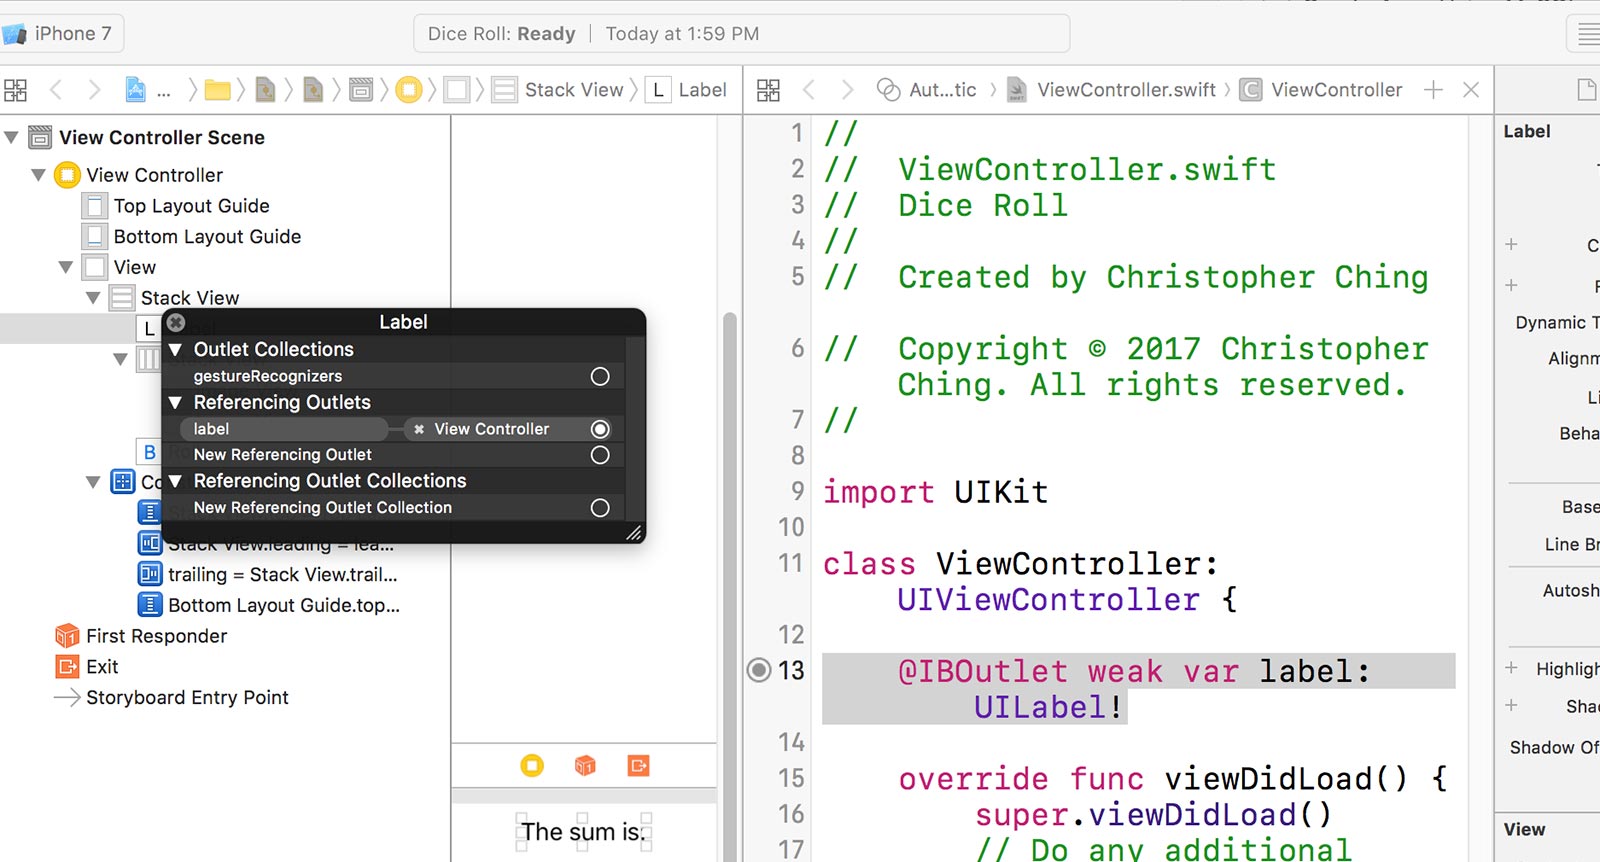
You should see a connection from the IBOutlet property name to the view controller like the above.
If you don’t then you might have accidentally connected another element (not the label) as an IBOutlet property. If this is the case, you’ll have to open up this dialog menu for each element, one at a time, and see which element you might have connected.
When you find the culprit, just click the “x” to break the connection, delete the IBOutlet line of code from ViewController.swift and try connecting the label again.
Common Mistakes With Connecting IBOutlets
Mistake #1: Making a typo with the IBOutlet property name
Sometimes when you’re naming the IBOutlet property, you might make a typo.
Many beginners will simply delete the IBOutlet property line of code and then try to reconnect the label element.
What they don’t realize is that the label is still connected to the typo version of the property.
You need to open up that connections dialog by right clicking the element in the Document Outline and then clicking the little “x” to break the connection of that element to the typo property that doesn’t exist anymore.
Mistake #2: Connecting the wrong element
Sometimes you might accidentally click and drag that blue line from the wrong element, resulting in creating an IBOutlet connection that is connecting the wrong thing.
If this is the case, you’ll have to delete the IBOutlet property line of code and then in your Document Outline, open up the connections dialog box for each element, one by one, and find out which element you accidentally connected.
When you find it, just click “x” beside that connection to break it. Now try to connect the label again.
Connecting The ImageViews
Now that you’ve connected the label, lets do the same thing for each of the image views.
I find it helpful to create some open space below the label IBOutlet so that I have some empty space I can drag elements to when connecting elements.
Click your mouse cursor to underneath the line of code for the label IBOutlet property and press “Enter” on your keyboard a few times to create some extra new lines.
First connect the left ImageView to an IBOutlet property. You can name this property to whatever you’d like.
Create some extra new lines underneath that outlet.
Then connect the right ImageView to an IBOutlet property.
You’ll end up with something like this:

IBActions
IBActions are similar to IBOutlets but the difference is that an IBAction is a function that lets you write some code to respond to an event caused by the element connected to the IBAction.
So in this case, we’re going to connect the “Touch Up Inside” event (this is the event that occurs when the user taps on the button) of our Roll button to an IBAction function.
This way, we can write some code in the IBAction function to run anytime the Roll button is tapped on.
Connecting an IBAction is very similar to connecting IBOutlets which you’ve done already.
Hold down CTRL on your keyboard and while holding it down, click and drag the button over to the right hand side.
However, this time, we’ll want to drag the line lower.
Move your mouse to just above the line “override func didReceiveMemoryWarning()”.
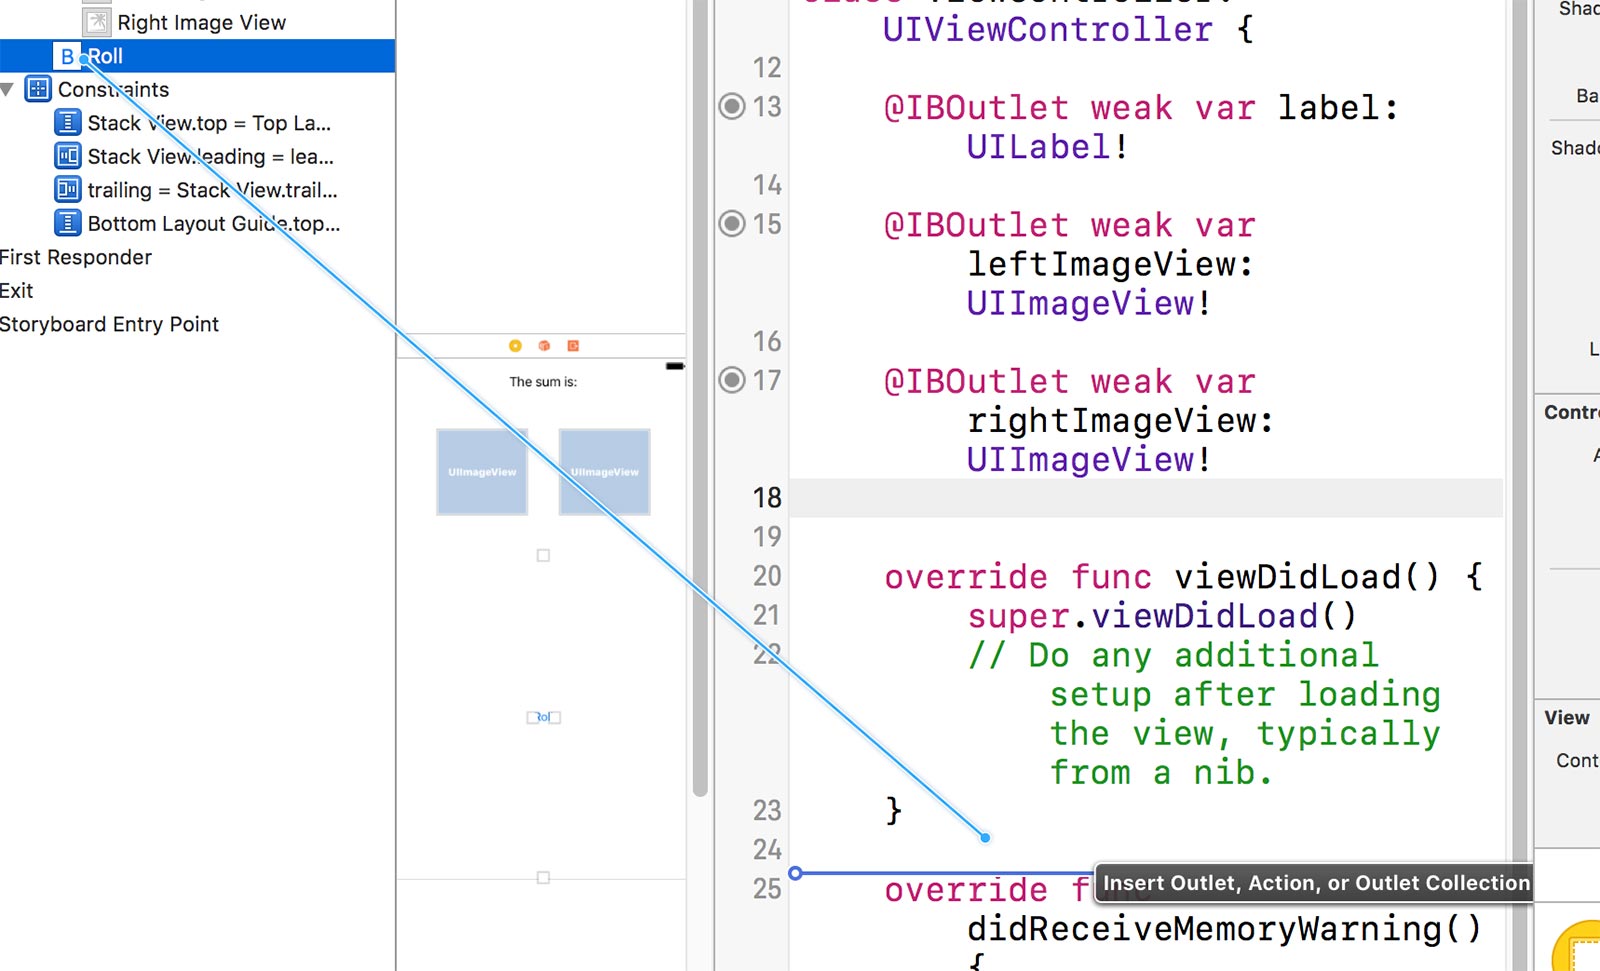
While still holding CTRL, release your mouse button and you should get a pop up box to create a connection.
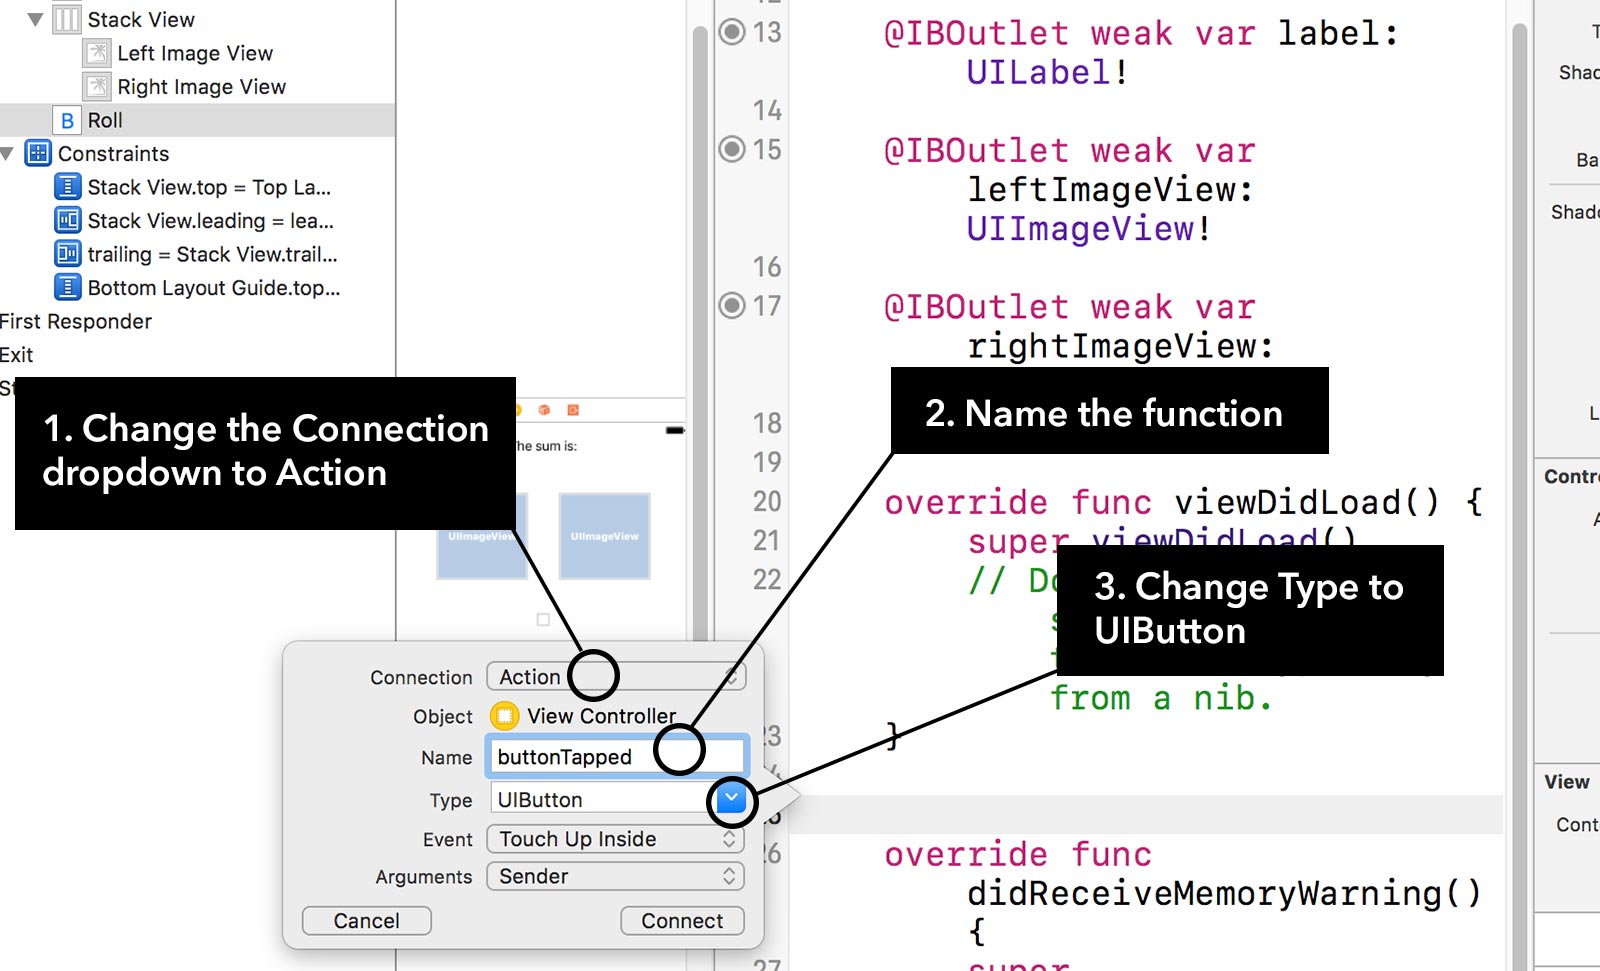
Be careful here, there are a few things to watch out for:
1. Change the Connection dropdown to Action
2. Fill in a name for the function. I named mine “buttonTapped”
3. Change the Type dropdown to UIButton
4. Click Connect
You should end up with something like this (I’ve highlighted the line in blue):

5. Graphic Assets
Now it’s time to add the graphic assets! You’ll be amazed at how much it can transform the app.
Download the zip file of graphic assets here.
Save the file somewhere accessible because we’ll need to add the images into the Xcode project.
Once you’ve downloaded the zip file, double click it to unzip it and you’ll end up with a folder called “Images”.
If you open the folder, you’ll notice that there are sets of assets such as Dice1.png, Dice1@2x.png and Dice1@3x.png.
This is simply three different sizes of the same image because iOS screens comes in different resolutions. Luckily, we simply have to supply the different sizes and the correct one is used depending on what type of screen the user has.
You’ll also notice another folder inside called icon. We’re going to ignore this folder for now.
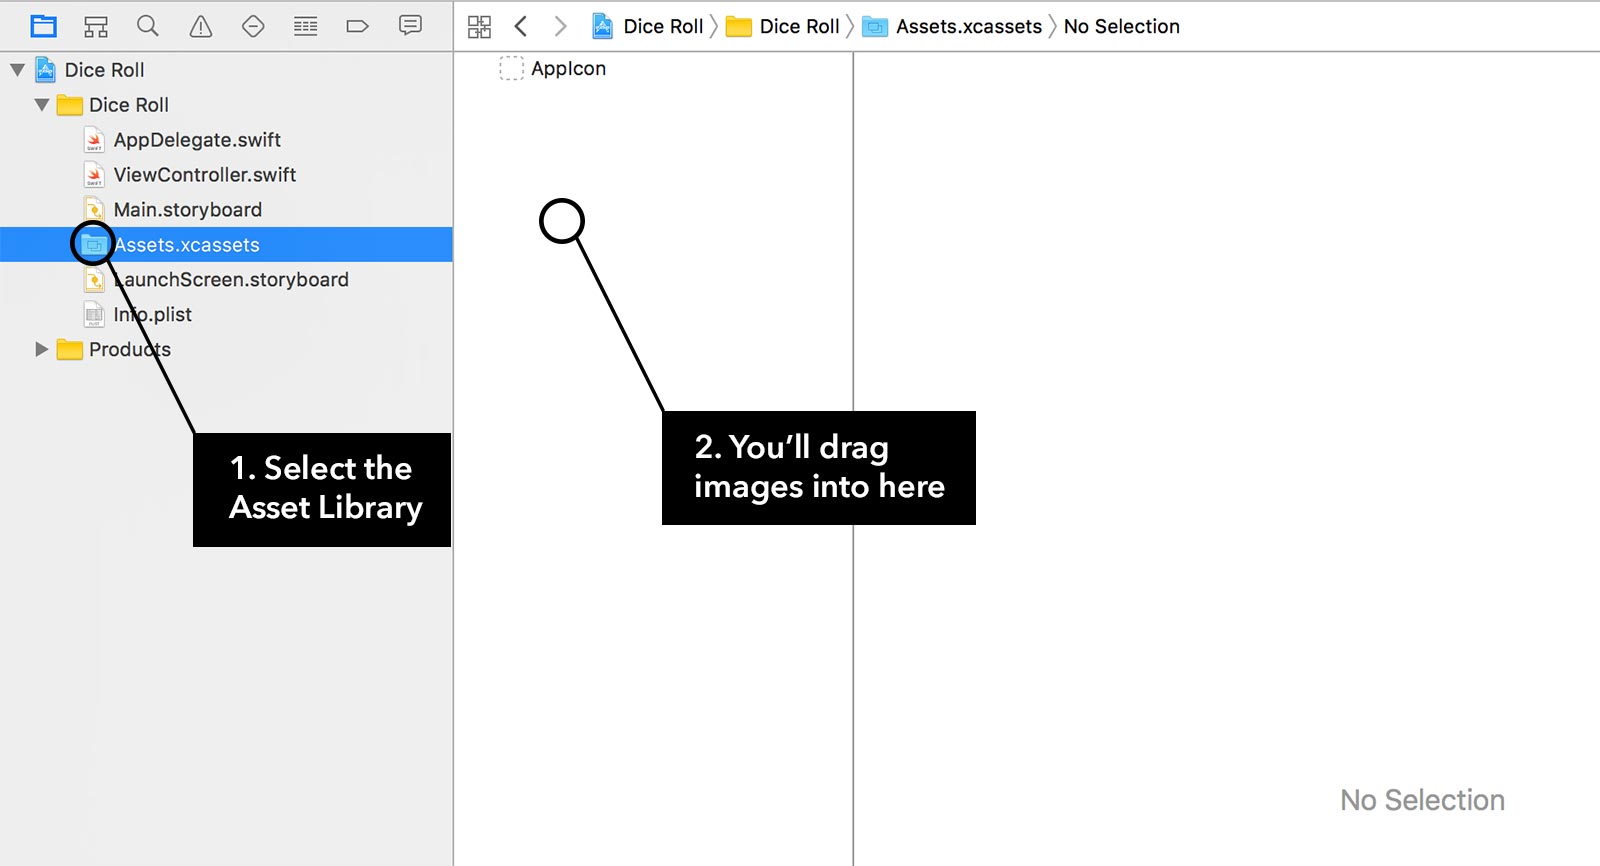
Back in Xcode, in the File Navigator, select Assets.xcassets. This is the asset library where we’ll drag the image files into.
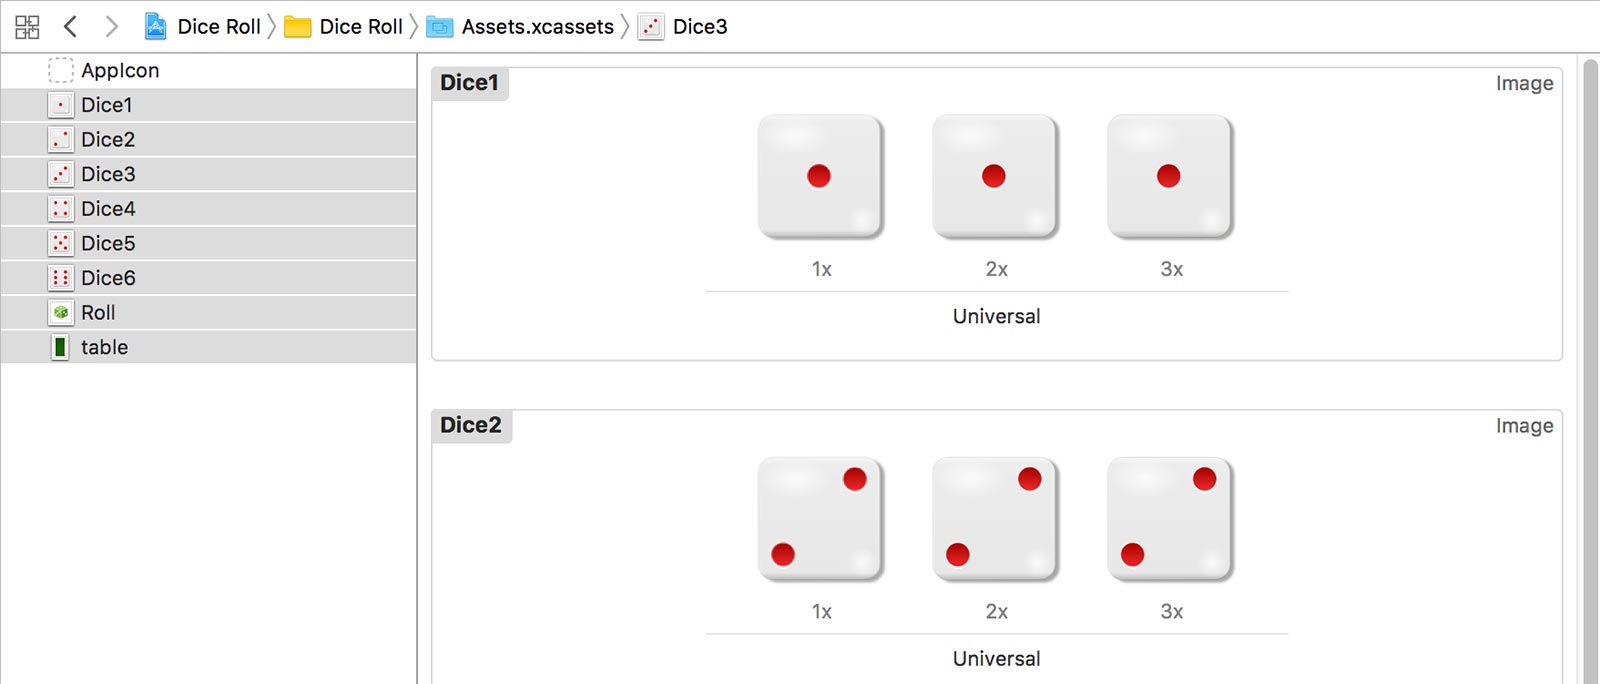
The Asset Library is a place to organize our image files for the project.
Notice that the Asset Library has two panes. The left pane lists your image asset groups and the right side (empty right now) shows you the actual images inside that group.
The left column is where you’ll drag the images into.
Adding The Images
Go back to the folder with the image assets. I want you to select and highlight all of the other image assets (don’t select the “icon” folder).
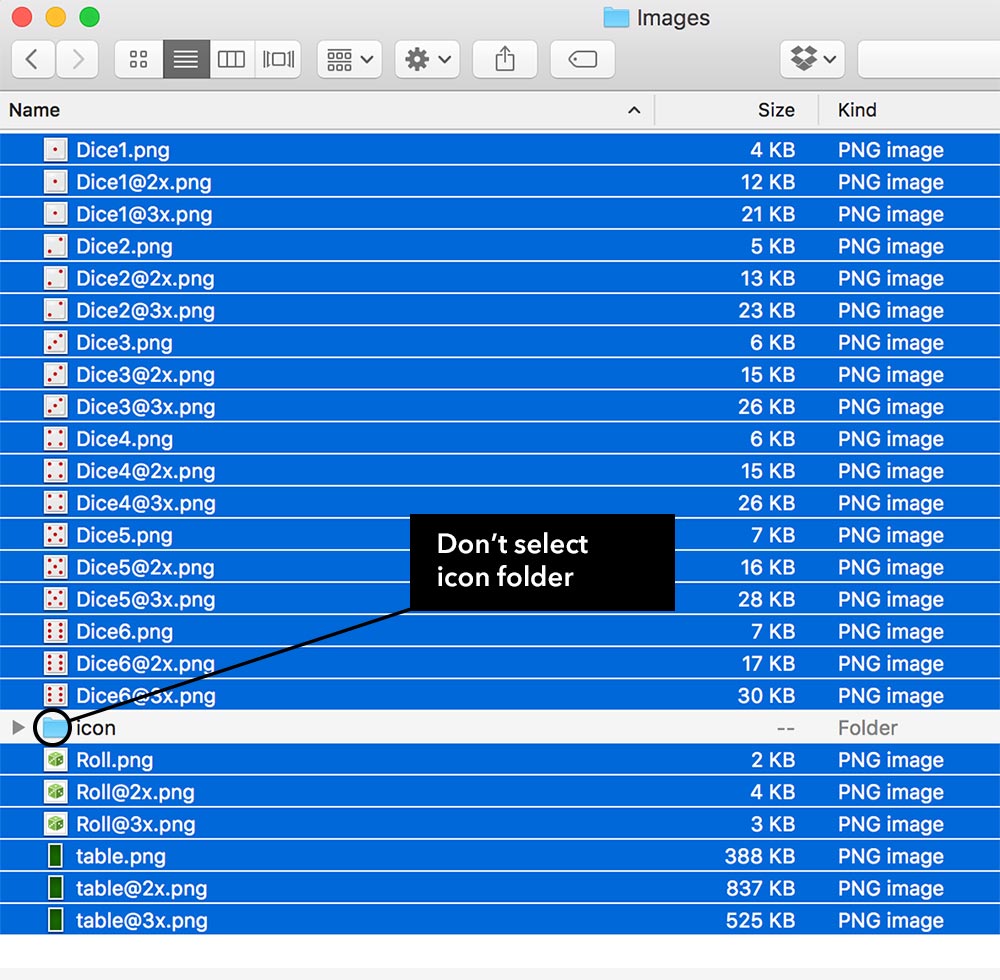
Now drag and drop all of those image assets into that left column of the Asset Library
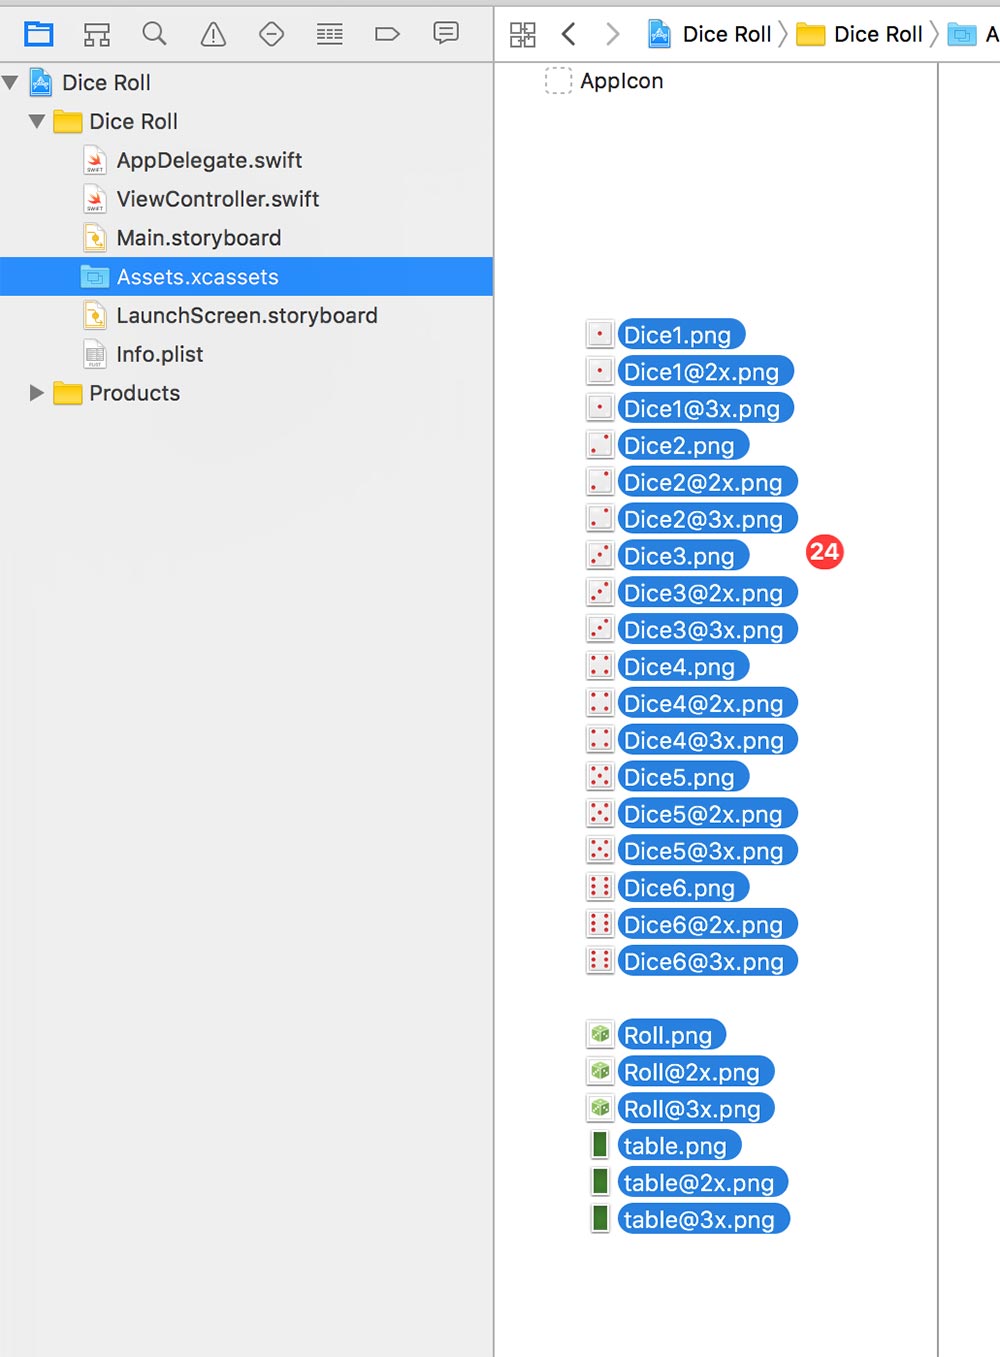
You should end up with something like this:
Displaying The Images
Now that you’ve added the images, we can go back to the storyboard and start displaying them!
Select Main.Storyboard from the File Navigator to go to your storyboard.
If your view is pretty small, there are zoom buttons near the bottom center of the screen on your storyboard.
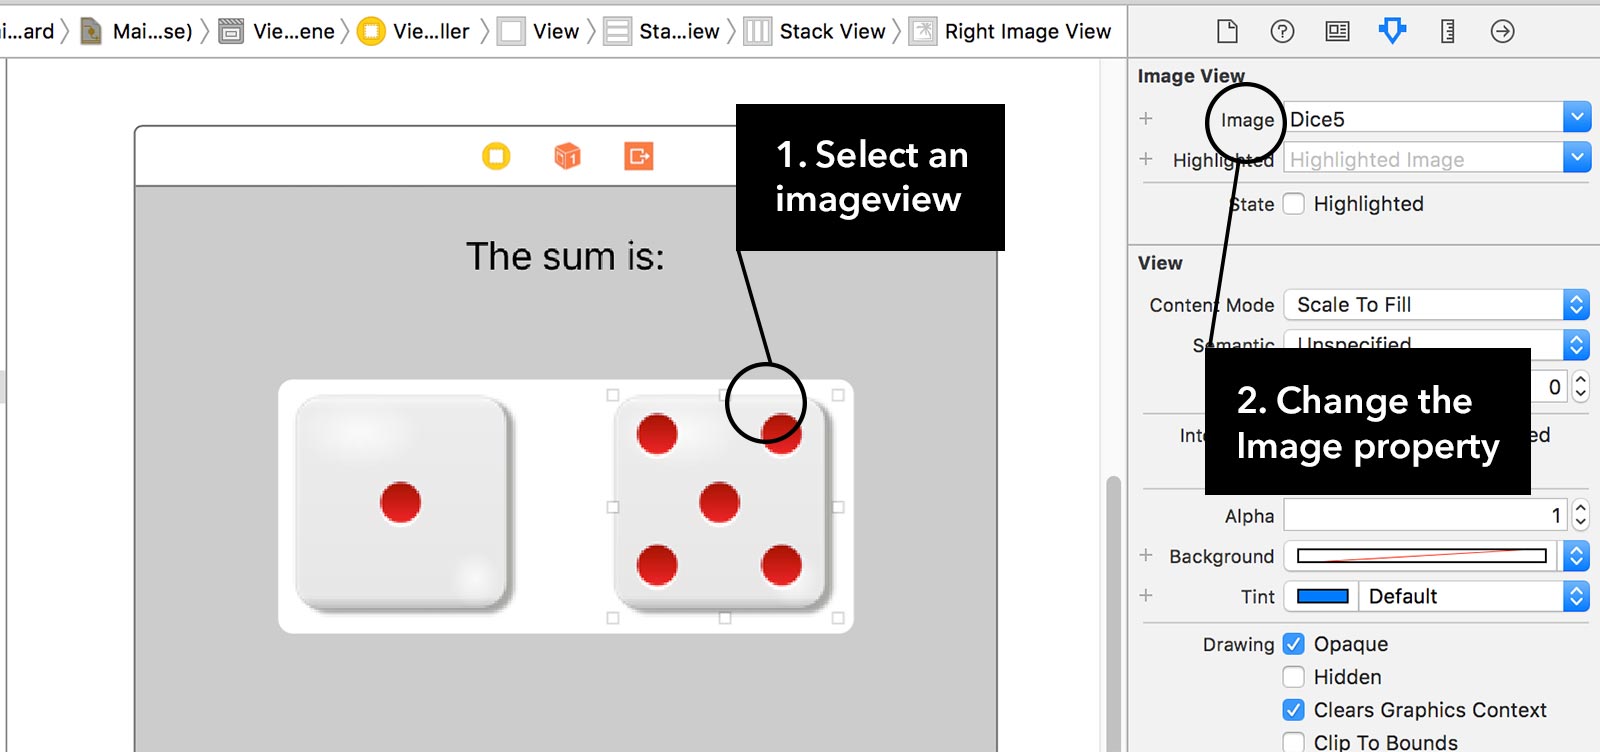
Select the left imageview and check the right hand side Inspector Pane.
You should see a property called “Image”. Pull down the dropdown and you’ll see the image assets you added.
Choose any of the Dice images (such as “Dice1”).
You should see the image in your imageview now. Don’t worry if it looks stretched.
Select the right imageview and do the same. You can select a different image (such as “Dice5”)
Adding The Background
Next, we’re going to add a brand new imageview that sits behind everything. This is going to be our background.
In the Object Library in the lower right corner, filter for “imageview”.
Before you drag and drop this new imageview element onto your storyboard, I would suggest that you instead, drag it to your Document Outline because it’ll let you more precisely place it where you want it to go.
Specifically, we want this imageview to sit behind the stackview that contains all the elements since it’s going to be a background.
We need to insert it in-between the root View and the vertical stackview like in this image:
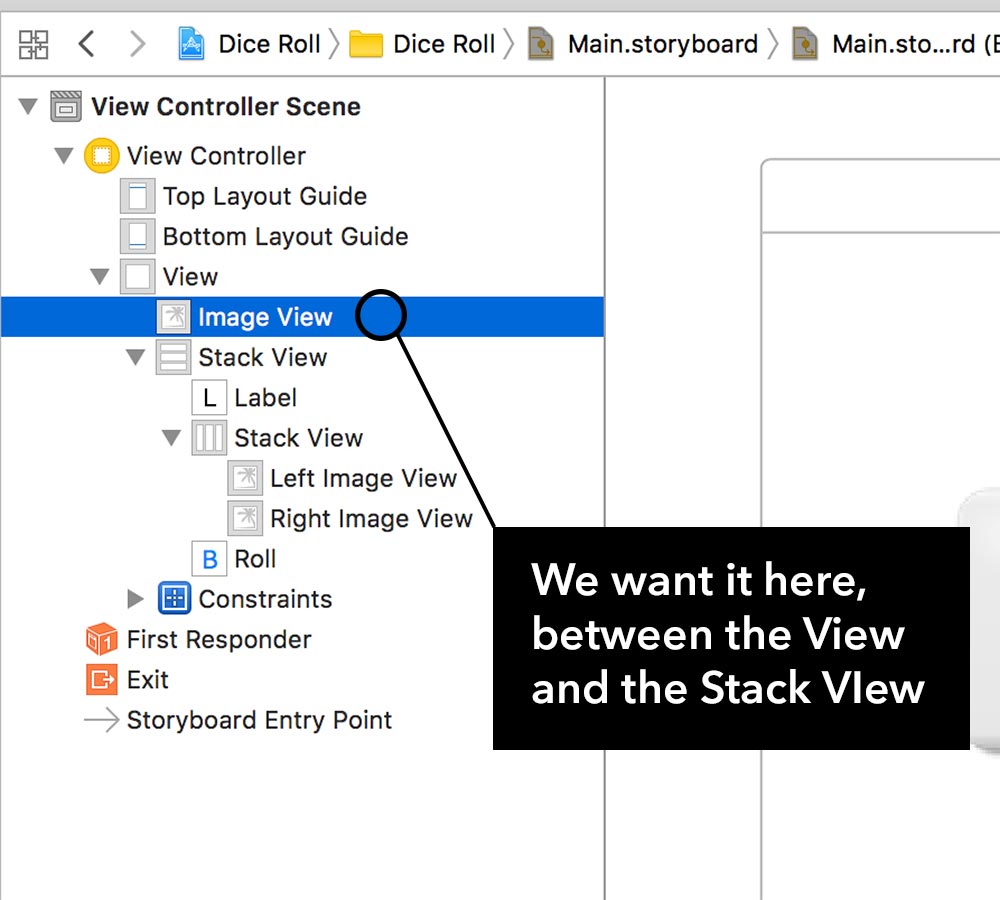
Be careful that you don’t accidentally replace the root View itself. If you do this accidentally, just press CMD+Z to undo and then try again.
While this imageview is selected, lets go ahead and add some constraints to it so that we can anchor it to all four edges.
Click the Add New Constraints button and uncheck “Constrain to Margins”.
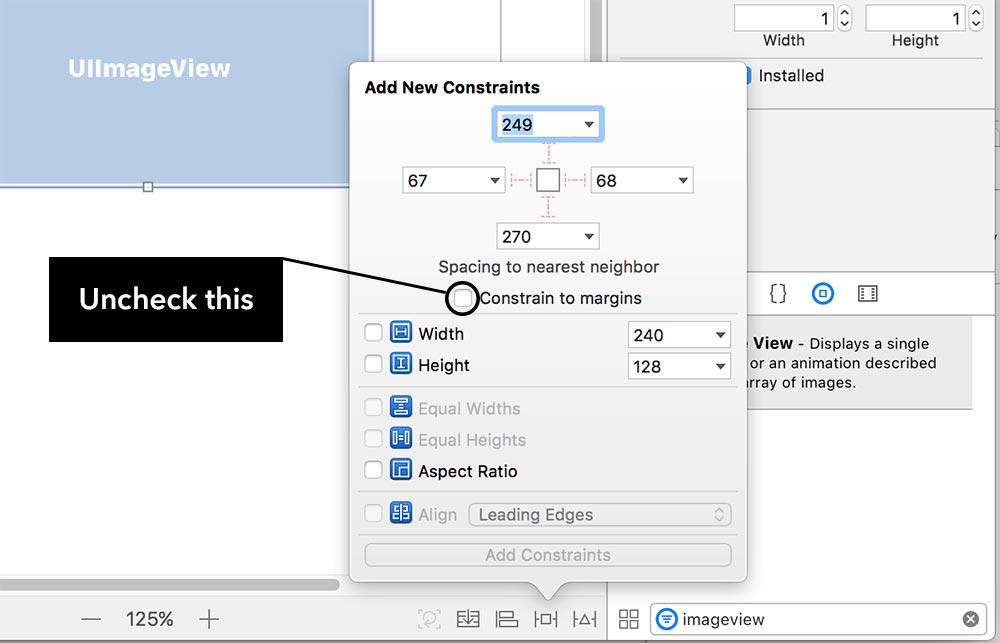
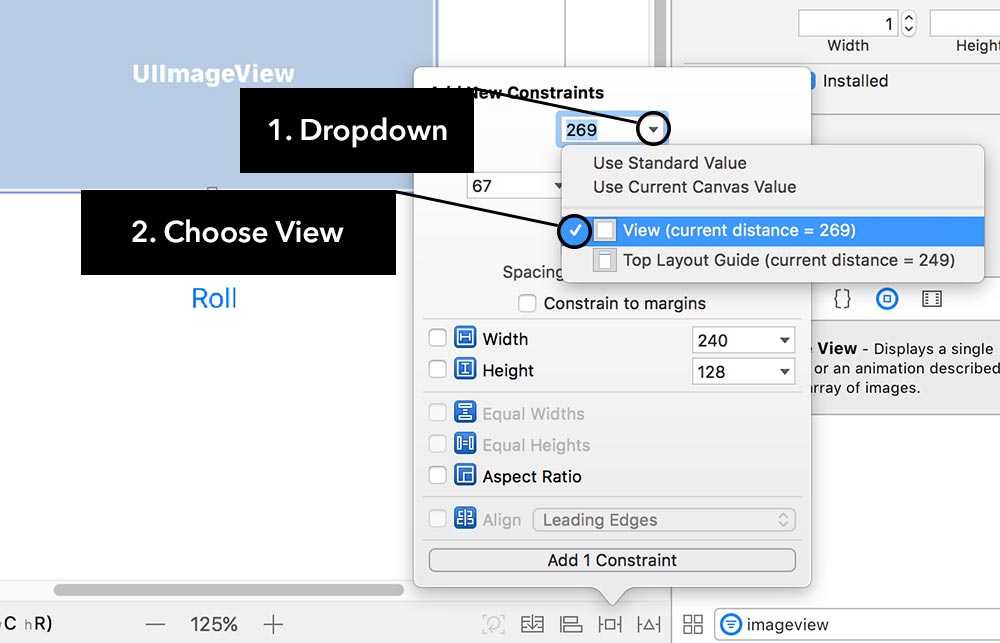
Furthermore, I want you to pull the down the dropdown beside all four sides and make sure the neighbor is set to “View”. This will ensure that you’re specifying the constraint to be relative to the very edge of the view and not the margin or layout guides.
After you do that for all four edges, set all four to zero.
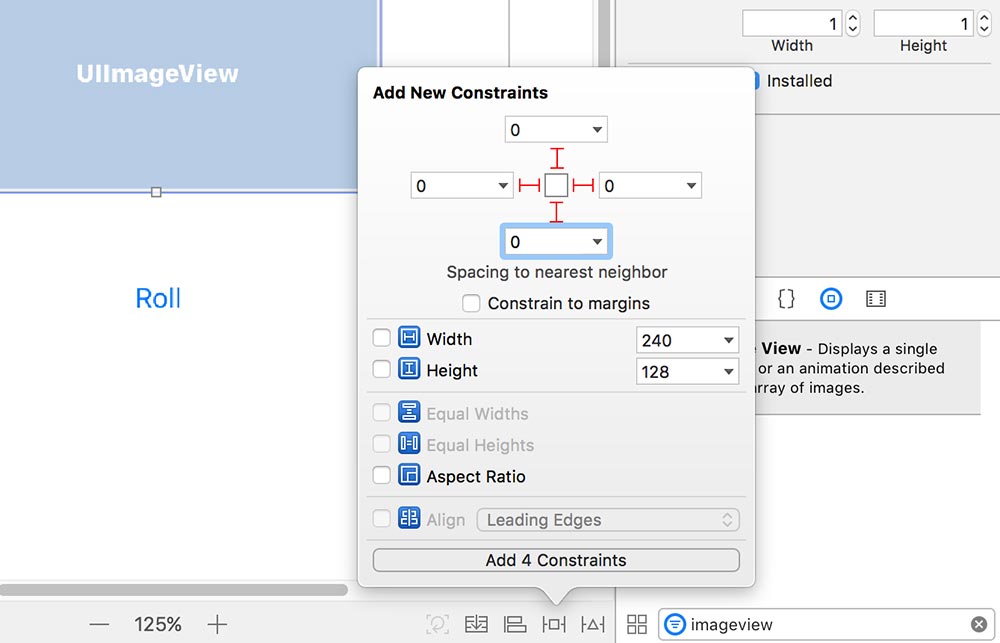
Then click “Add 4 Constraints”.
You’ll see your imageview stick to all four edges (if not, try deleting the four constraints and re-adding them).
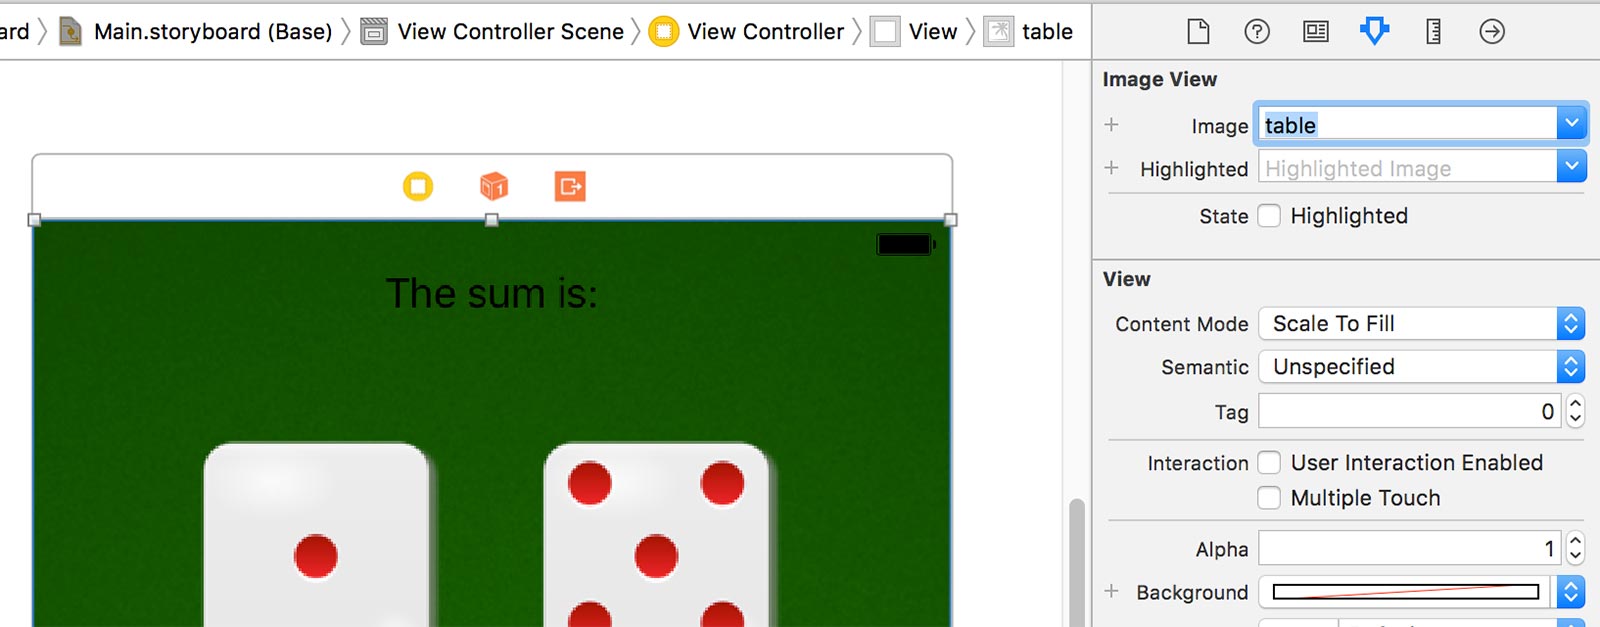
While your background imageview is selected, go to the Inspector Pane and change the image property to the “table” image.
Customizing The Label
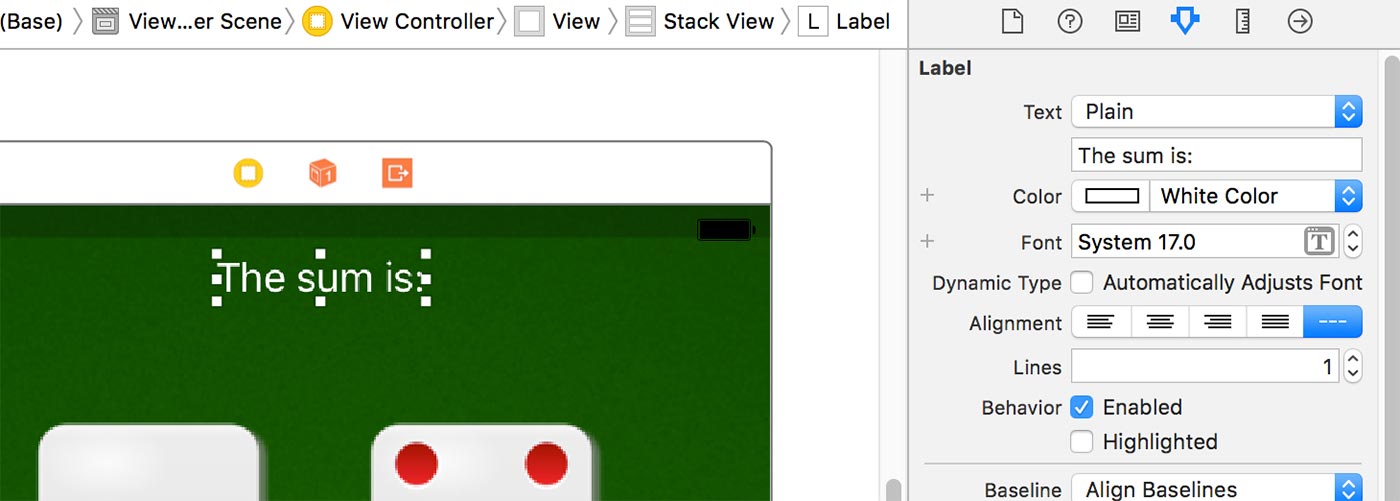
The black label is hard to read against the green background so we’re going to change the text to a white color.
Select the label and in the Inspector Pane, change the color to White.
Customizing The Button
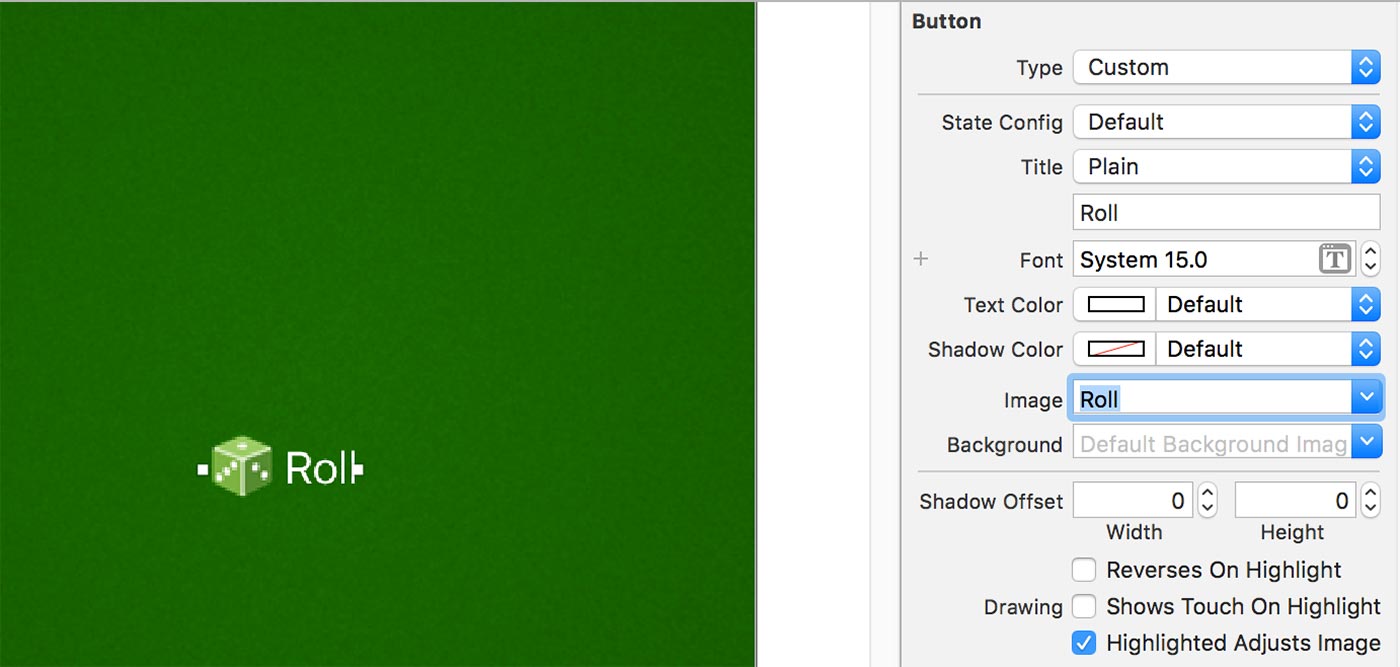
Now lets customize the way the button looks.
Select the button and go over to the Inspector Pane.
Change the Image property to use the “Roll” image.
6. Writing Code
We’re almost there! Now we need to write the logic for the the Roll button when it’s tapped.
Select ViewController.swift from the File Navigator.
Scroll down to the buttonTapped IBAction function (you may have named yours something else).
In between the two curly brackets is where we want to write our code so put some line breaks between them if you need to in order to create some space.
First we’re going to try changing the label and the images inside the imageviews.
Changing The Label And Images
Here’s the code I want you to put in between the curly brackets of that function:
label.text = "Hello Dice"

leftImageView.image = UIImage(named: "Dice6")

rightImageView.image = UIImage(named: "Dice6")
All together inside the curly brackets of your function, it should look like this:
@IBAction func buttonTapped(_ sender: UIButton) {

    label.text = "Hello Dice"

    leftImageView.image = UIImage(named: "Dice6")

    rightImageView.image = UIImage(named: "Dice6")
}
If you’ve gone through the Learn Swift beginner series, you’ll probably understand some or all of this code.
Let me explain what we’re doing here.
In line 3, we’re referencing the label property which is connected to the label element on our storyboard.
Just like how you set its “text” property in the storyboard to “The sum is:”, we can programmatically set it here through code as well.
So that’s exactly what we’re doing. We’re assigning a String, “Hello Dice”, to the text property of the label and thus changing the label to display that text.
In line 5, we’re doing something similar. We’re assigning a different image to the “image” property of the leftImageView. However, we need to assign a UIImage object into it so we create a new UIImage object and initialize it to the image asset, “Dice6”. Then we assign it to the image property of leftImageView.
Then in line 7, we’re doing the same thing as line 5 except we’re doing it to rightImageView instead.
Lets run the project and see the code in action!
Click the little “play” icon in the upper left corner of Xcode.

Now Xcode will compile your code and run your app in the iOS Simulator. This may take a while for the first time.
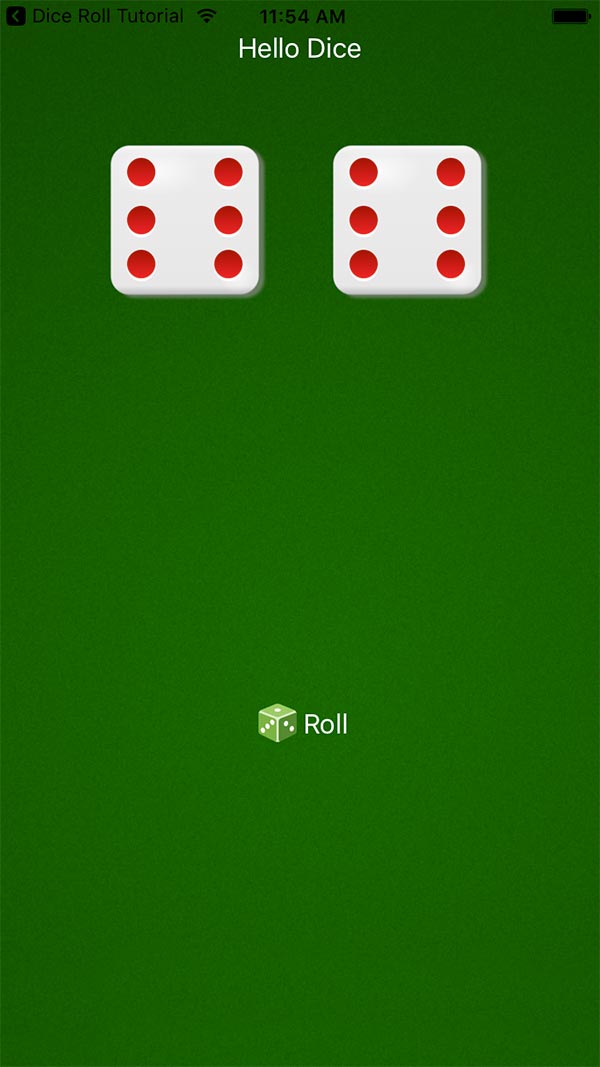
When your simulator is launched, you’ll see your handiwork.
Click on the Roll button to execute the code you wrote in the IBAction function.
When you click it, you should see the label change to “Hello Dice” and the two imageviews change to Dice #6.
Unfortunately, nothing happens when you click on the Roll button subsequent times because the same code is always running.
We need to add a random aspect!
Adding Randomness
Let’s modify our IBAction function a little bit and add some random numbers.
@IBAction func buttonTapped(_ sender: UIButton) {

    let numberOne = arc4random_uniform(6) + 1

    let numberTwo = arc4random_uniform(6) + 1

    label.text = "The sum is: \(numberOne + numberTwo)"

    leftImageView.image = UIImage(named: "Dice\(numberOne)")

    rightImageView.image = UIImage(named: "Dice\(numberTwo)")
}
Ok, wow we changed a lot here! Let’s go through it line by line again.
In line 3, we’re using the built-in function arc4random_uniform to generate a random number.
Inside of the rounded brackets, you can specify an upper limit which we’ve set to 6. The only problem is that it generates a number from 0 to 5 and our dice numbers go from 1 to 6. That’s why I’ve added 1 to the generated number. Effectively this turns the random range from 1 to 6.
Then we’re taking that randomized number and assigning it to the constant “numberOne” so that we can reference it later on in the code.
In line 5, we’re generating another random number and storing it as “numberTwo”.
In line 7, we’re still setting the text of the label, except this time we’re using a technique to place dynamic data into the text.
This is done using the “\()” notation inside of the String where you place the dynamic data in-between the rounded brackets.
We’ve placed “numberOne + numberTwo” inside which is just the sum of the two random numbers.
In line 9, we’re using the same technique to dynamically specify the image asset name. By using this replacement technique, we’ll be able to specify the image assets “Dice1” all the way to “Dice6” because the random number is inserted into the asset name.
This is for the leftImageView.
In line 11, we’re doing the same thing except for rightImageView and instead using the other random number stored in the “numberTwo” constant.
It’s time again to run the project!
Conclusion
If you did everything correctly, each time you click on the Roll button, you should see the dice images change as well as the Sum label.
If you got this far, congratulations!
I hope that you learned a lot from this tutorial. I made an effort to use lots of images, annotations and to point out potential pitfalls to hopefully give beginners a great experience building one of their first apps.
This specific project was one of the very first tutorials I published on my site and updating it made be think about how far the site has come.
It’s all thanks to every one of you who is learning with me. Thank you!
If you’d like to inspire others to learn app development and also to declare your victory, check out the Wall of Fame section below!
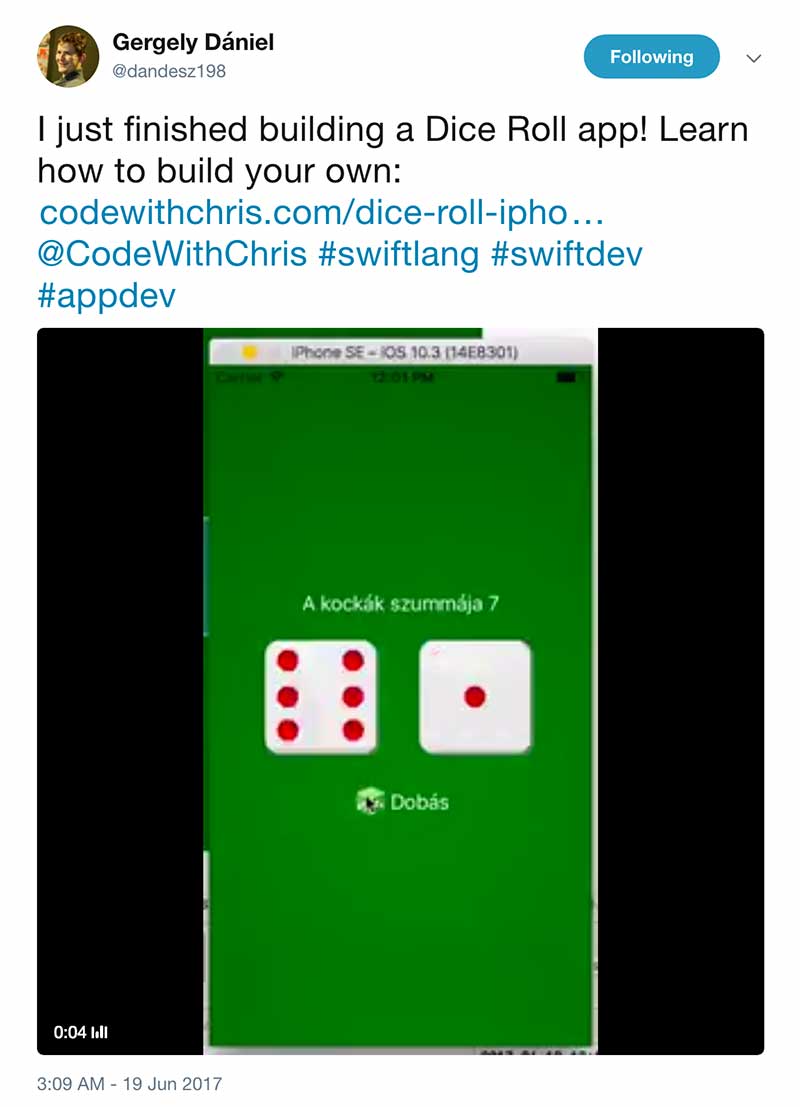
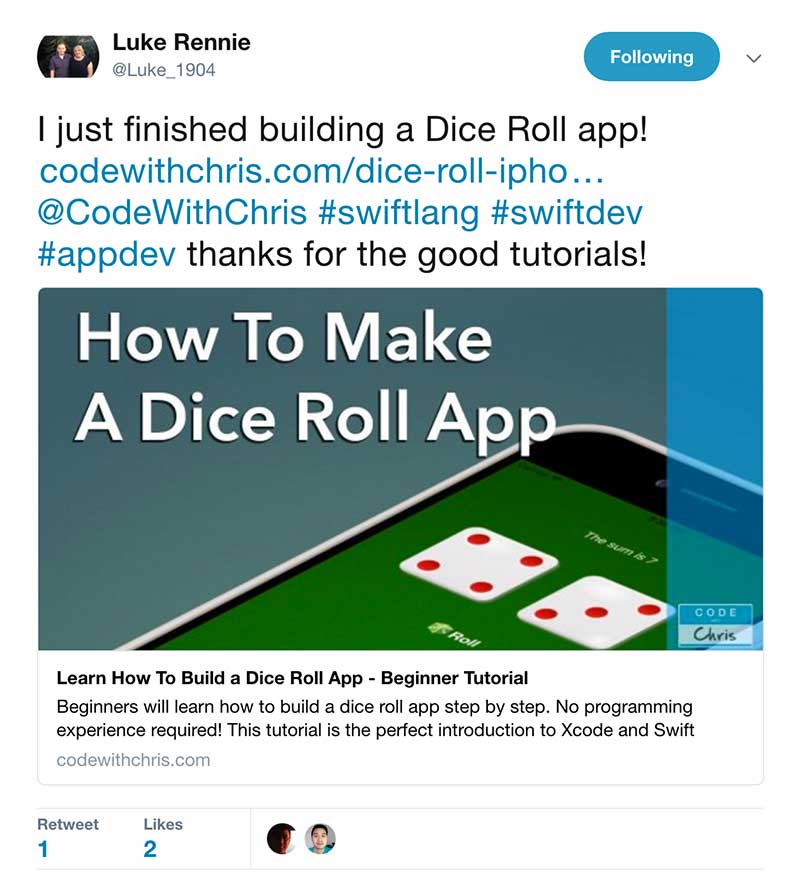
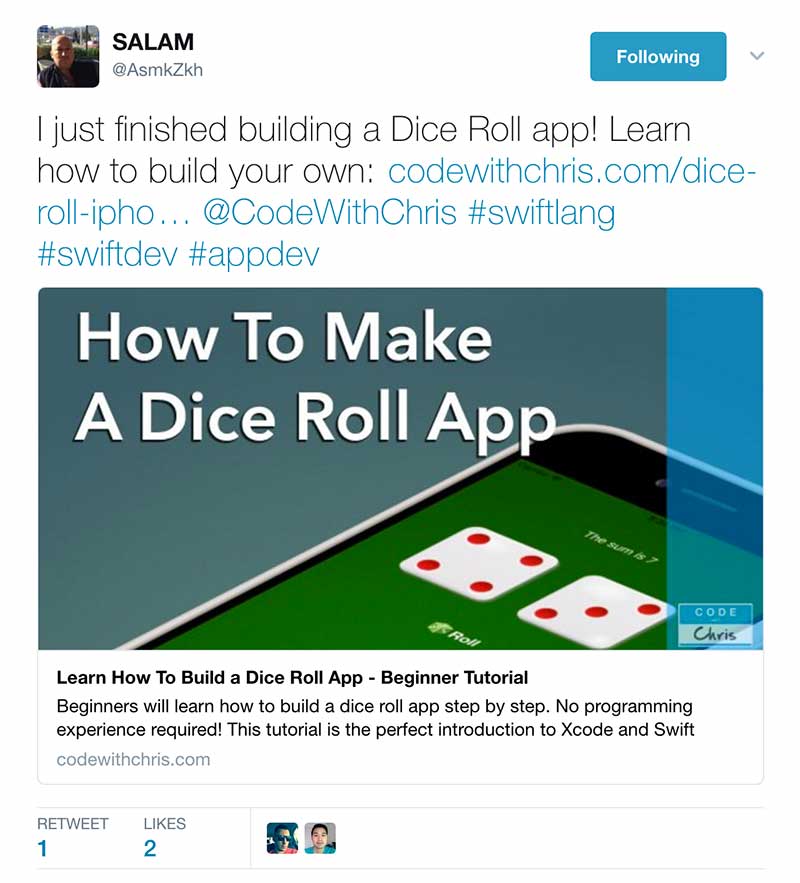
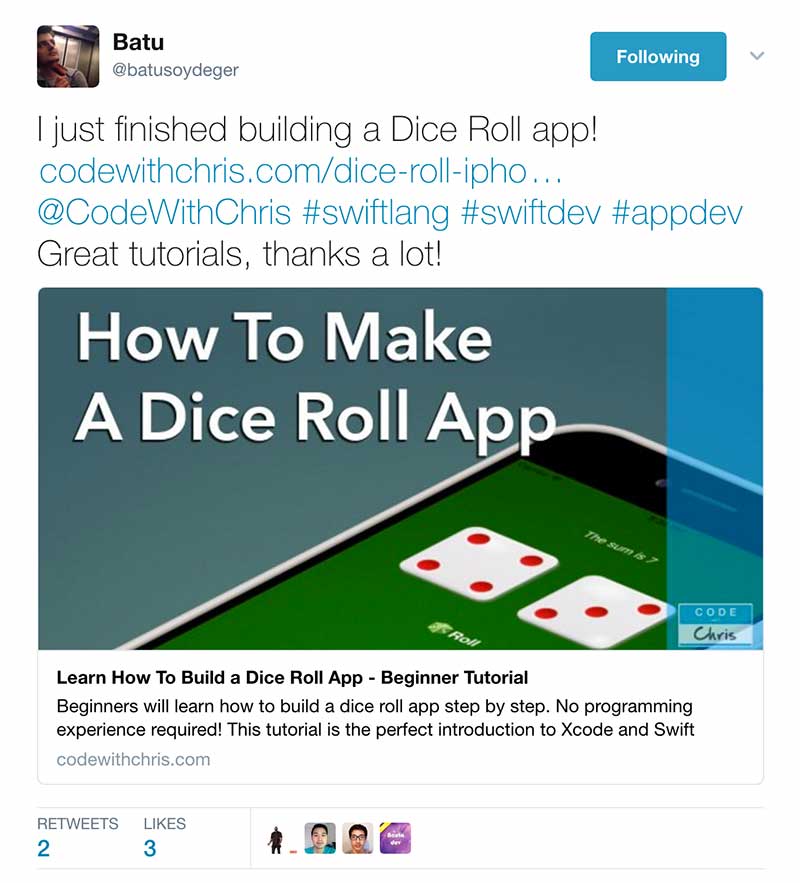
7. Wall of Fame
By completing this tutorial, you’ve done more than 99% of the people who dream of building their own app but never take any action.
Give yourself a pat on the back and then click the card below to send out a tweet to inspire others!
I’ll see your tweet and I’ll add your name below and a link to your Twitter profile.
I just finished building a Dice Roll app! Learn how to build your own: https://codewithchris.wpengine.com/dice-roll-iphone-app @CodeWithChrisClick To TweetAfter you complete the tutorial, Click to Tweet above and pronounce your victory! I’ll add your name below:


Source Code
P.S.
Leave me a comment below to let me know what you think about this tutorial!
Also comment below if you have any questions or other feedback. Thanks!