Note: Newly updated for the latest version of Swift and Xcode!
If you’re used to working on websites and web apps, you might think that your iPhone app can connect directly to MySQL but unfortunately that isn’t the case.
We need a middle layer that sits in between the app and the database which will manage the transactions between them.
Don’t worry, we’ll go through all of that in this tutorial.
Here’s what we’re going to go through:
For web hosting, I choose to go with Bluehost because of their excellent customer support (I can get ahold of a real person pretty easily). Furthermore, I can create multiple MySQL databases and attach unlimited domains to one hosting plan which means that I can use this single plan for multiple websites or projects.
If you already have web hosting then feel free to use that. As long as you’re able to create MySQL databases, then you’re good to go!

Otherwise if you’re thinking of creating your own website or MySQL powered iPhone app, Bluehost is a great choice and you can also get a discounted price by going through the link below:
Just to be transparent with you guys, at no extra cost to you, I’ll earn a commission if you decide to sign up so thank you for your support! It allows me to continue to provide high quality tutorials for you guys free of charge.
So if you’ve already got your own hosting, you can skip this next part; otherwise, I’m going to walk you through how to sign up for your hosting and set up your MySQL database so that later on, we can use our iPhone app to connect to the data we store inside of it.
1.1 Bluehost landing page
On this page, click the green “get started now” button.

On the next screen, you’ll be able to select a hosting tier.
Typically I just choose the cheapest option because you can always upgrade later on if you need more power.

Select a tier (I chose Basic) and you’ll see the next screen:
1.2 Sign up page
On this page, you can either choose to sign up for a new domain or use an existing one that you have.
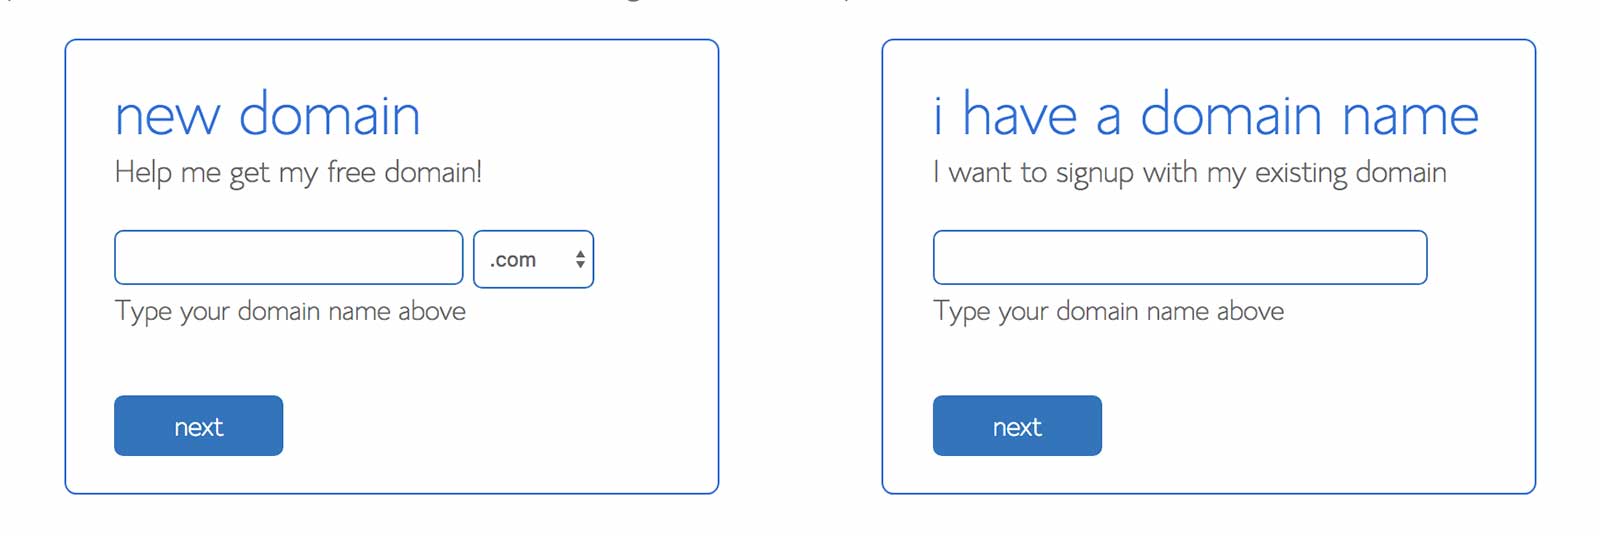
A free domain name is included with your plan, so I would recommend creating a new one as it’s worth about $10 a year.
The second option to “transfer your domain” is worded a little strangely because you don’t actually have to transfer the domain to Bluehost. Rather, you just have to go to your registrar where you registered your existing domain name and then change some configuration settings to point to Bluehost.
In this tutorial, I already have an existing domain name to use so I’m going to type it into the “I have a domain” box and click next.
If you need a new domain name, then type in your desired domain into the “new domain” box and click next.
1.3 Account information and web hosting plan selection
This is the final page of the sign up process and you’ll have to provide your account information, select a web hosting plan and enter your billing information.
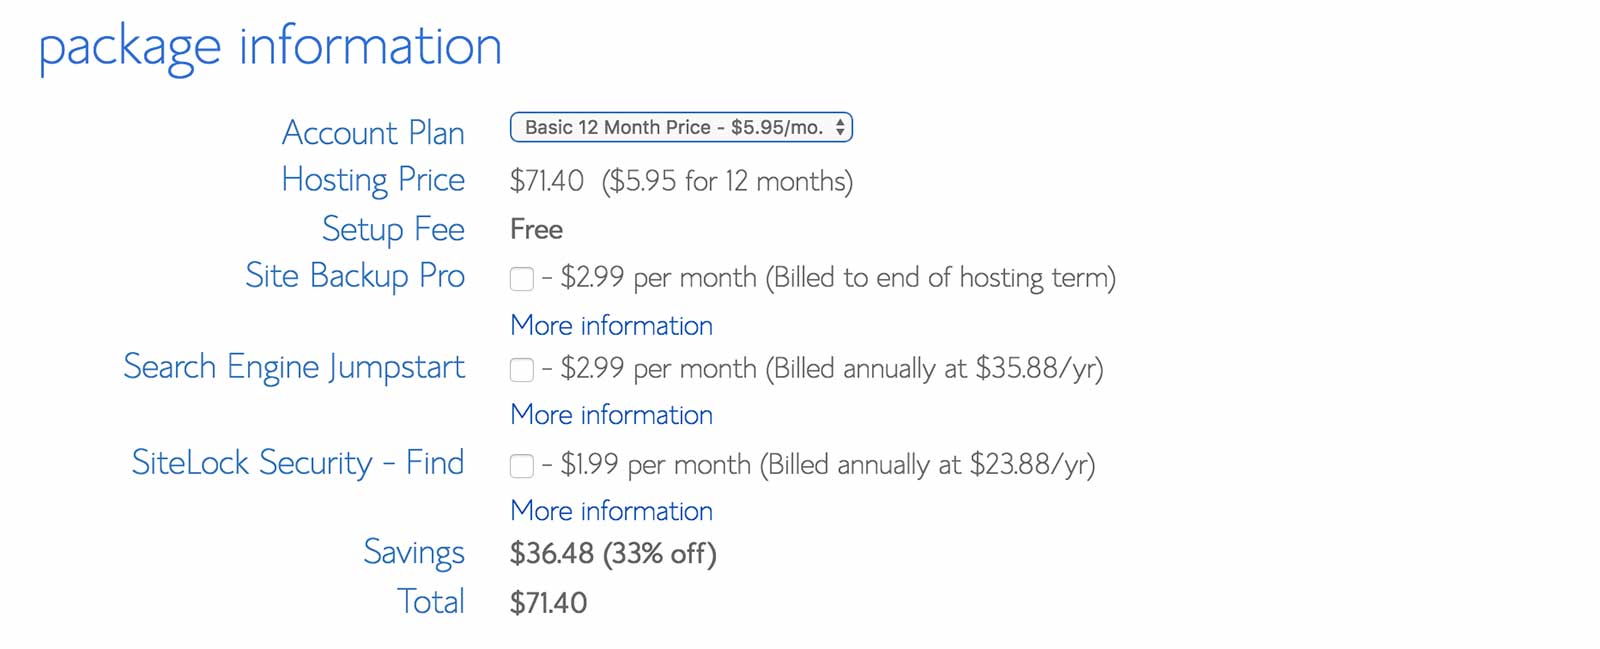
The account information part is pretty straight forward but I will say that you need to provide a real telephone number because they’ll give you a call to confirm your order (they’re on the ball with fraud and security!).
For the hosting plan, you’ll get the best rate if you go with a 3 year plan but it depends on your budget. One thing to note is that the payment is up front, however it’s not a contract and you can cancel at anytime (you’ll get a full refund within 30 days or after 30 days, you’ll get a refund for the unused portion of your selected plan).
If you choose to go with the 1 year plan, you end up paying less up front but more in the long run if your app or website is successful and you need to renew it in a year.
As for the other options like SiteLock or Site Backup, I usually opt out of those but for the Domain Whois Privacy option, I do consider getting that to keep my domain registration information private. You can click the “more information” link to see a comparison of what your domain registrant information would look like with and without whois privacy.
After you enter your billing information, you’ll be directed to a confirmation page.
1.4 Confirmation page
Congratulations! You’re nearly finished with setting up your account. The next step is to set a password. Follow the link to create a password.

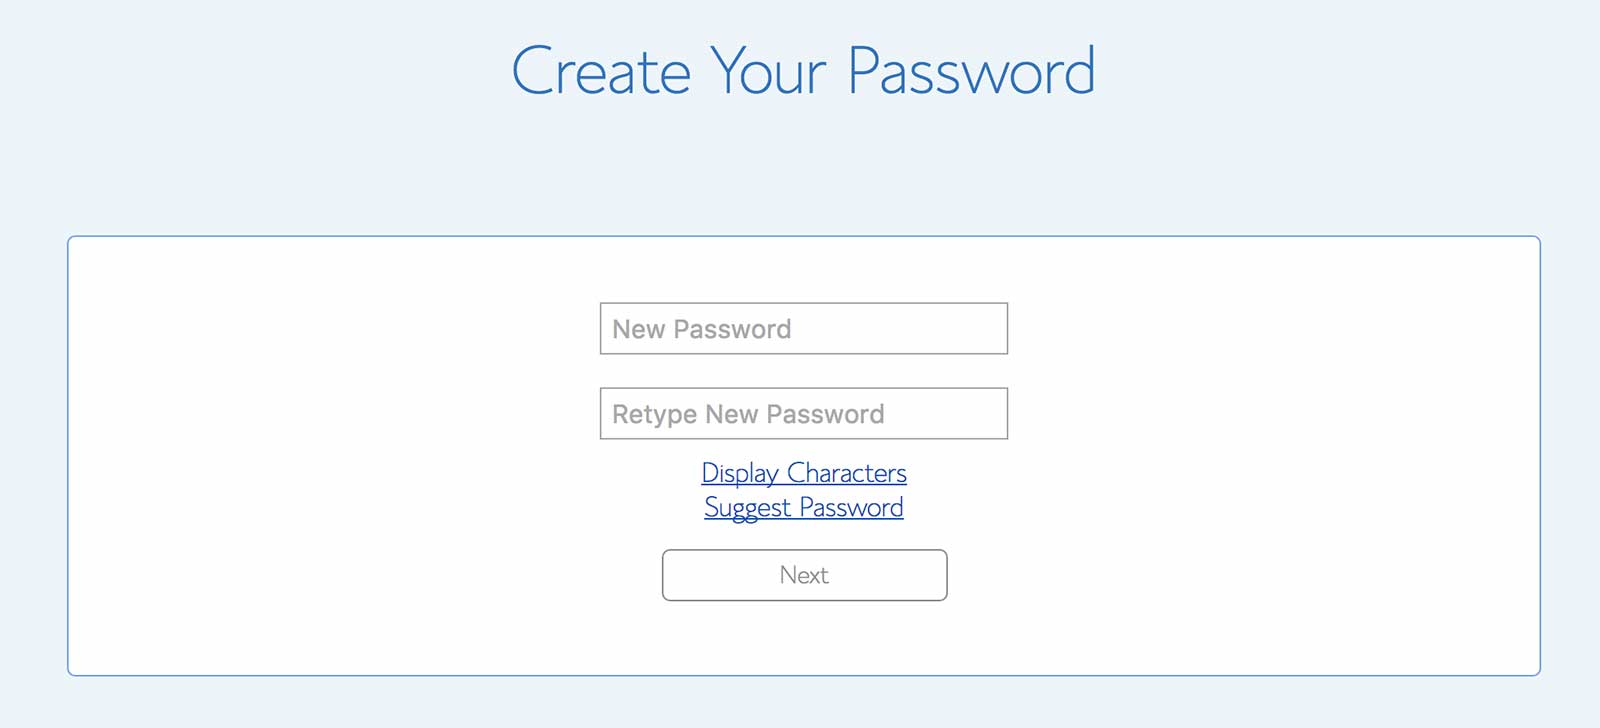
Be careful to choose a password that will satisfy all the conditions it outlines.
You won’t be able to save your password until the “password strength” bar is green.
Once you come up with a worthy password, click “Save”.
1.5 Setting up your account
Now that you’ve signed up and set your password, all you have to do is wait for your activation email to arrive in your inbox.
Until then, there are certain areas of your control panel which you won’t be able to access because they’re still setting up your account. Unfortunately, setting up a new database is one of those tasks where you have to wait until you get your confirmation email in order to do.
Usually it’ll take about 15 minutes but if you don’t receive it after a while, don’t hesitate to contact support via live chat. You can get a hold of a live person in a few minutes and they’ll help you resolve any issues!
What’s next
Now you’re ready to create some sites and databases to power your iPhone apps.
Let’s move forward!
Once you’ve received your confirmation email from signing up, you can now login:
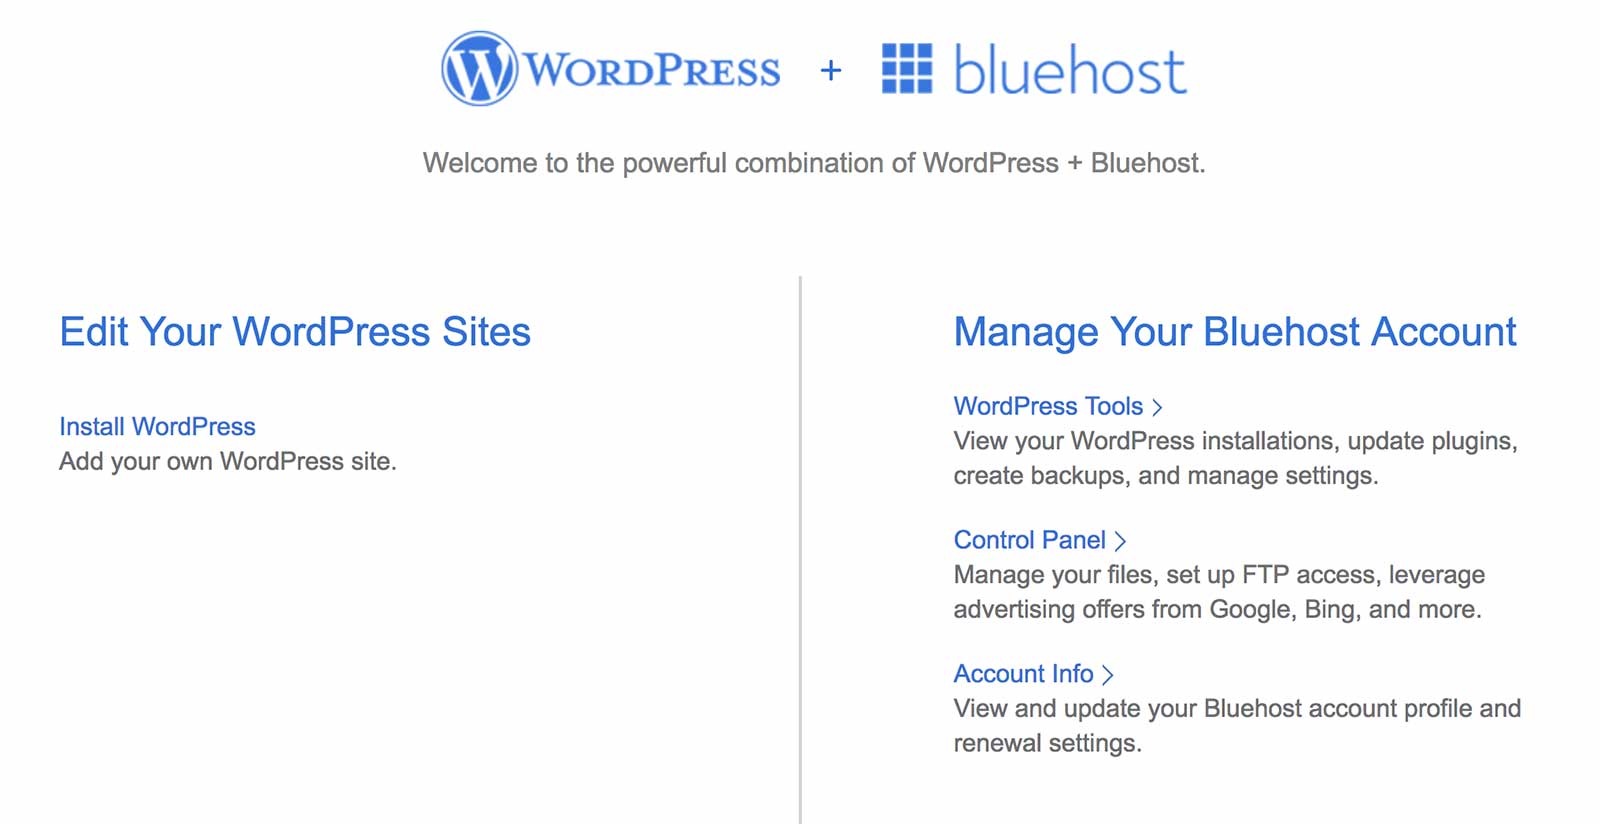
Click the “Control Panel” link.
You’ll be brought to a screen with lots of options and icons.
Scroll down until you find the “Database Tools” option and then click “MySQL Databases“:
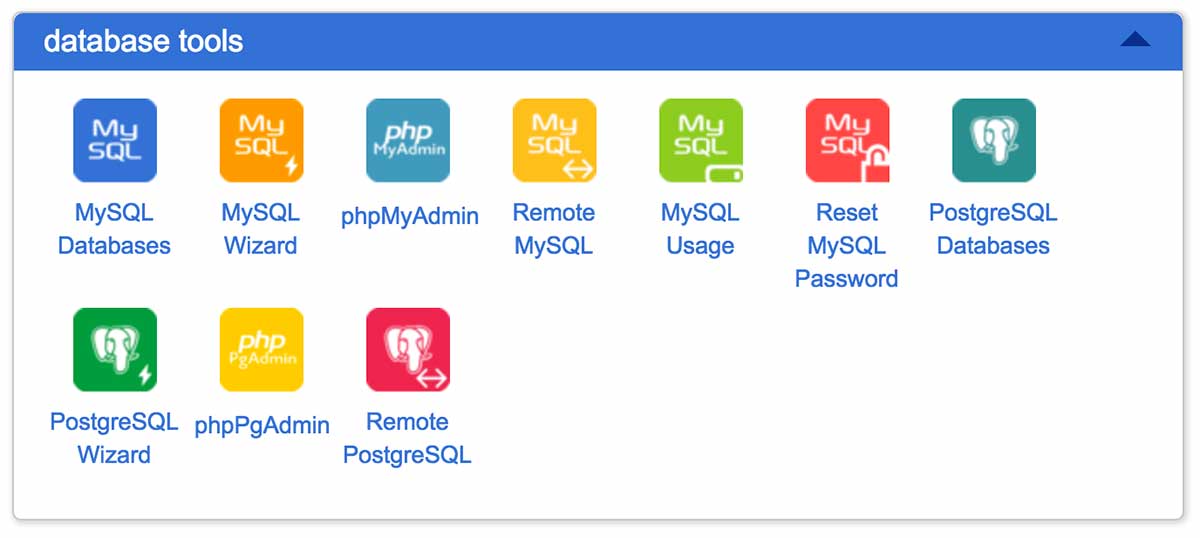
Next you’ll get to the database screen where you’ll do 3 things:
– Create a new database
– Create a new database user
– Add the user to the database
So in the screenshot below, I’ve named my database “sampledb“.
Then click “Create Database”.

2.2 Create a new database user
Next, we need to create a new database user.
Give the user a name and password and click “Create User”.
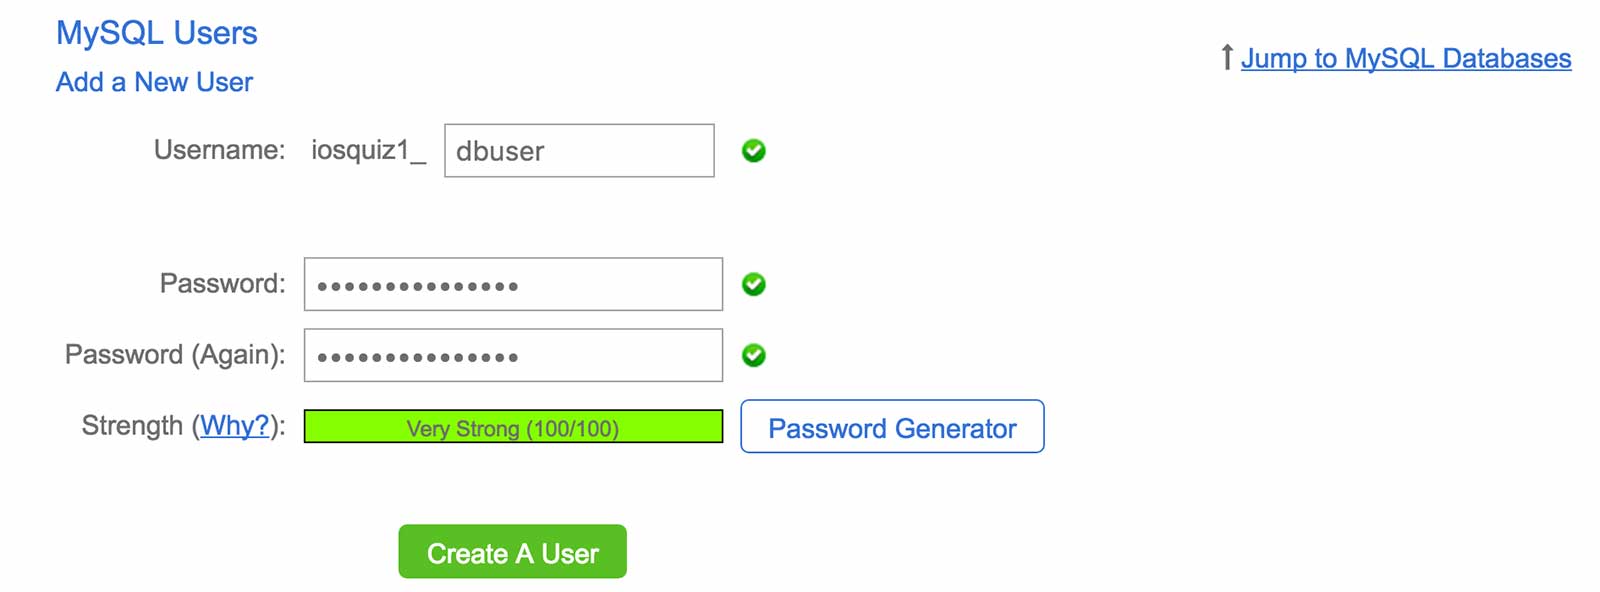
2.3 Add the user to the database
Finally, we need to give this user access to the newly created database so in the form below, choose the database you created from the dropdown and choose the user that you just created and click “Add”.

For now, let’s grant this user all the privileges so that we can set up our database tables.
Later on, we’ll remove most of these privileges and limit the user to just reading data to secure it.
Alternatively, you can create two new database users, one with only read privileges and one with all privileges to act as an administrator.
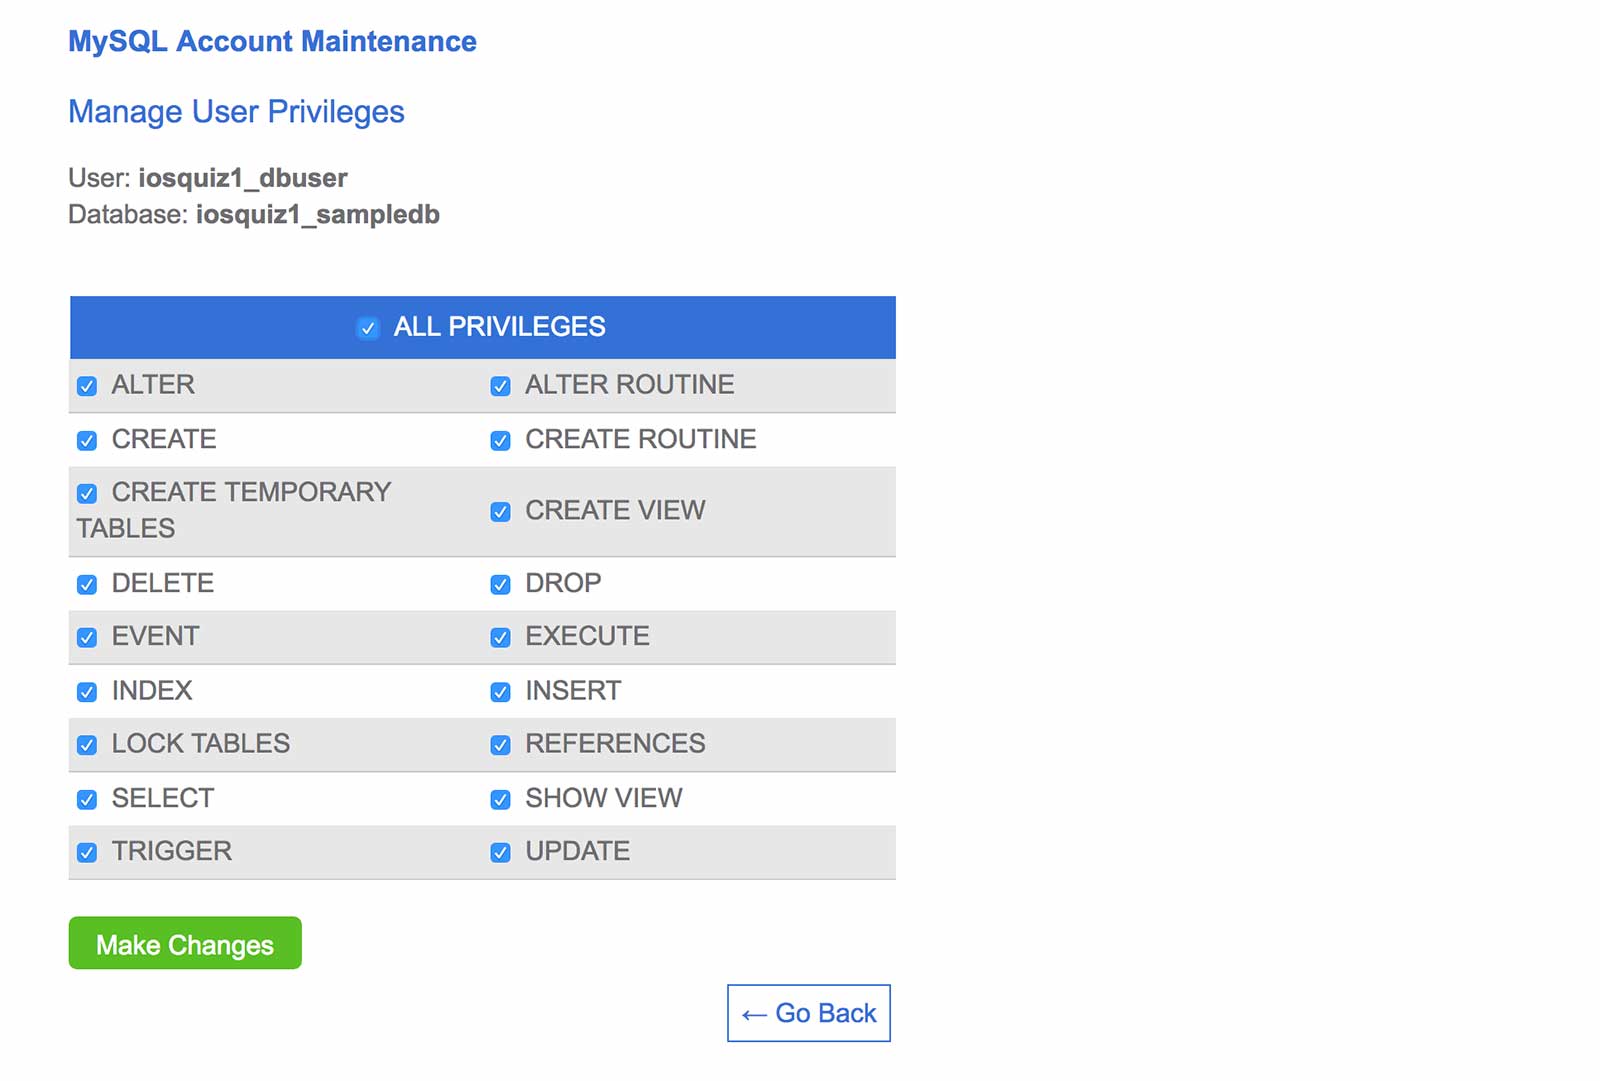
Click “Make Changes” and now we’re ready to go!
2.4 Setting up database tables and users
In this section, I’m going to explain how we’re going to get our iPhone app to connect to the MySQL database and we’ll also create some database tables and fill it with some data.
First, let’s explain how we’re going to do this.
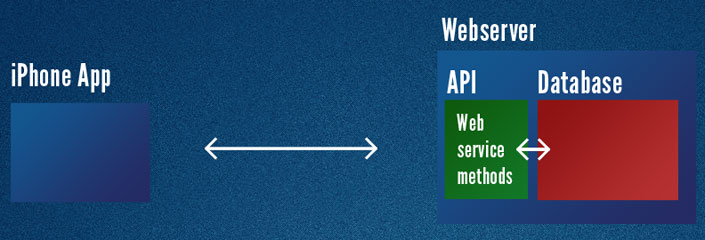
Unfortunately the iPhone app is not going to be able to connect directly to our MySQL database. What we need is to create a middle-man that will facilitate the database operations.
This is where the PHP web service comes in. The web service is going to sit on our web server and when the iPhone app sends a request to it, it’s going to query the database for the requested data and then return it to the iPhone app in a format that it can understand.
Now, you’re not limited to using PHP to write your web service but PHP and MySQL usually go hand in hand so that’s what we’ll be doing today.
Here’s a diagram of what the system looks like:
So before we build the iPhone app or the PHP web service, let’s create some database tables and fill it with data.
In this example app, I’m going to demonstrate a common scenario of pulling a list of locations down from the database and displaying the locations in a tableview (scrollable list).
When the user taps on a location, it will show a map view with a pin indicating the location.
So, in our database we’re going to want to store a list of locations.
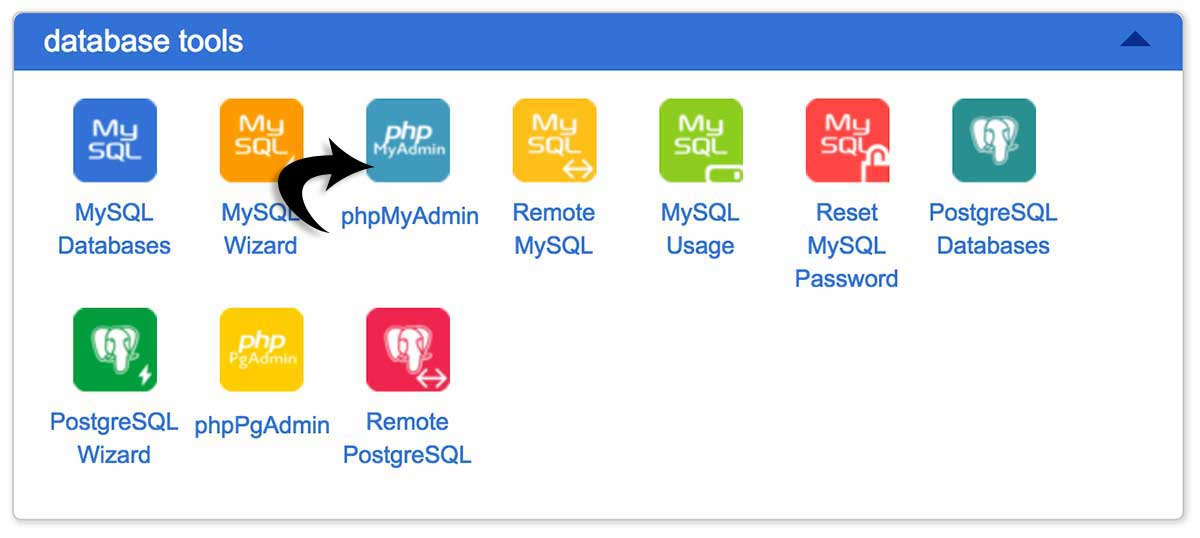
Start by going back out to your Bluehost control panel and looking for the phpMyAdmin icon.
It should be under the “Database Tools” section. When you find it, click it to go into the database management tool.
(If you don’t see the icon, double check the menu at the top that you’re in the “cPanel” tab and not “Home”)
If you encounter a login screen, you should login with the same database user credentials that you created earlier.
If it doesn’t prompt you to login, you’ll arrive at a screen like this:
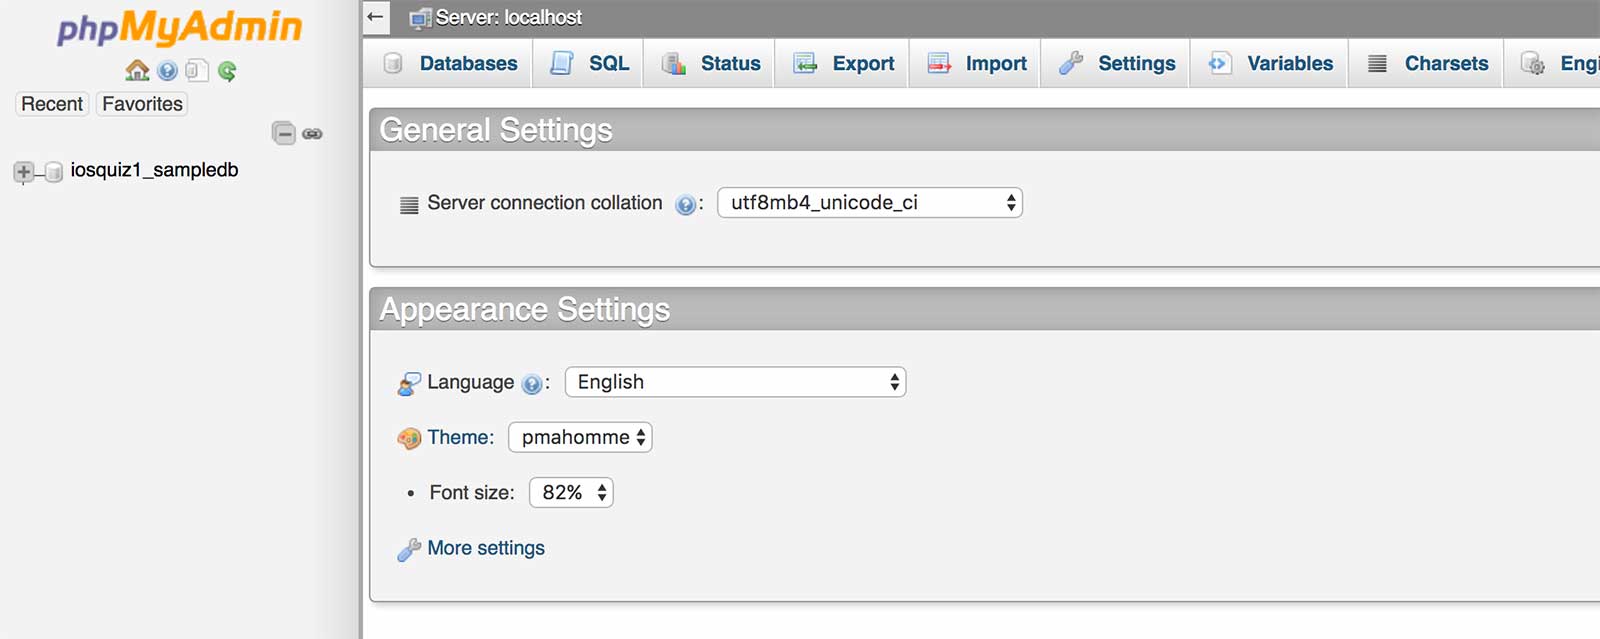
If you notice in the left hand side, it’s the database we created!
Click that database that we created and then the right hand pane will change to show us its details.
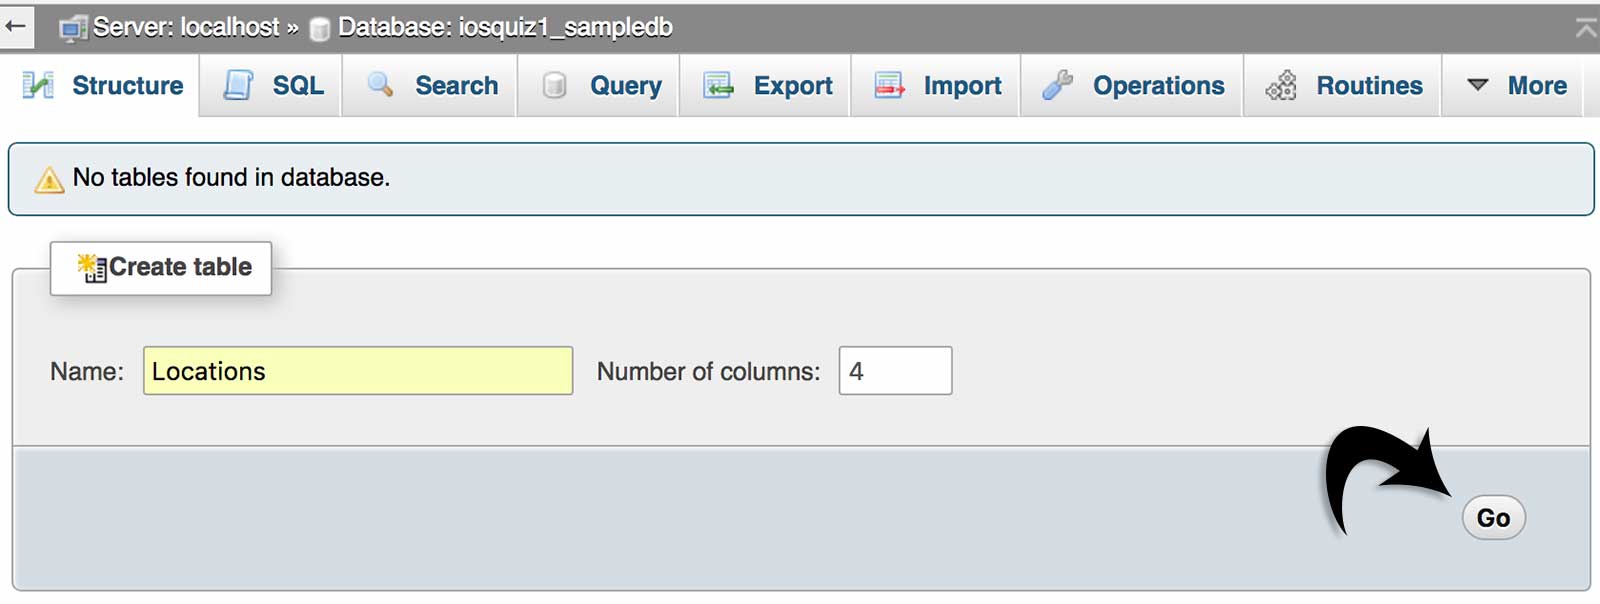
Call your new database table “Locations”, enter “4” for the number of columns and click “Go”.
In the pop up dialog, you’ll be able to customize the 4 table columns. Follow the screenshot below and then click “Save”.
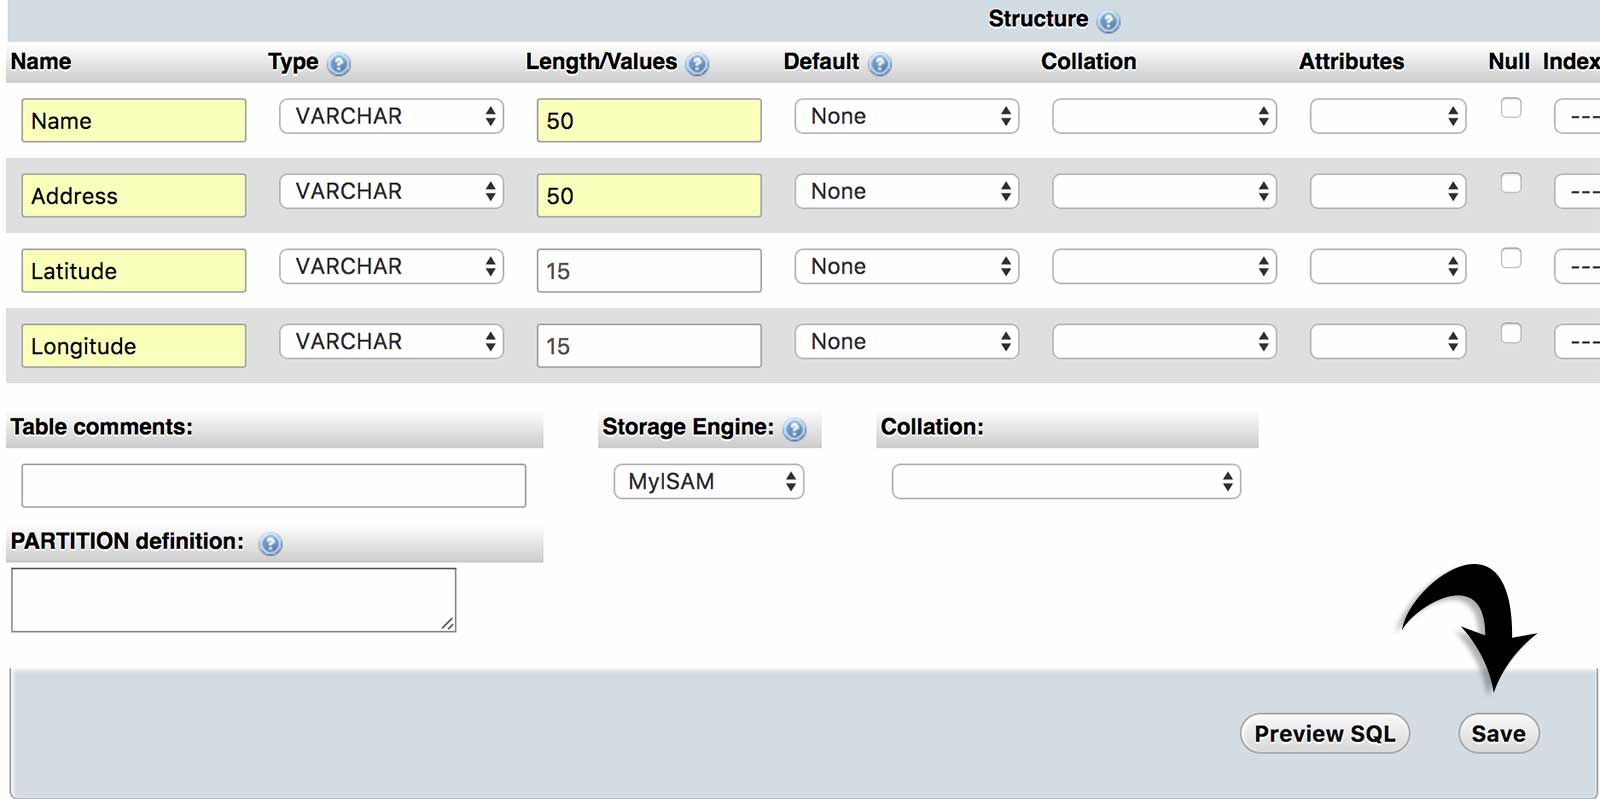
On the next screen, you’ll see your newly created database table.
2.7 Inserting data into the database table
We’re going to insert a couple of locations into the table now so click “Insert” as shown below:

I decided to add the locations of the Apple and Google headquarters. You can fill in the same thing or fill in some different locations of your own!
If you need to find the lat long of an address, just use this website.
When you’re ready, click the last “Go” button to insert both rows into your database table.
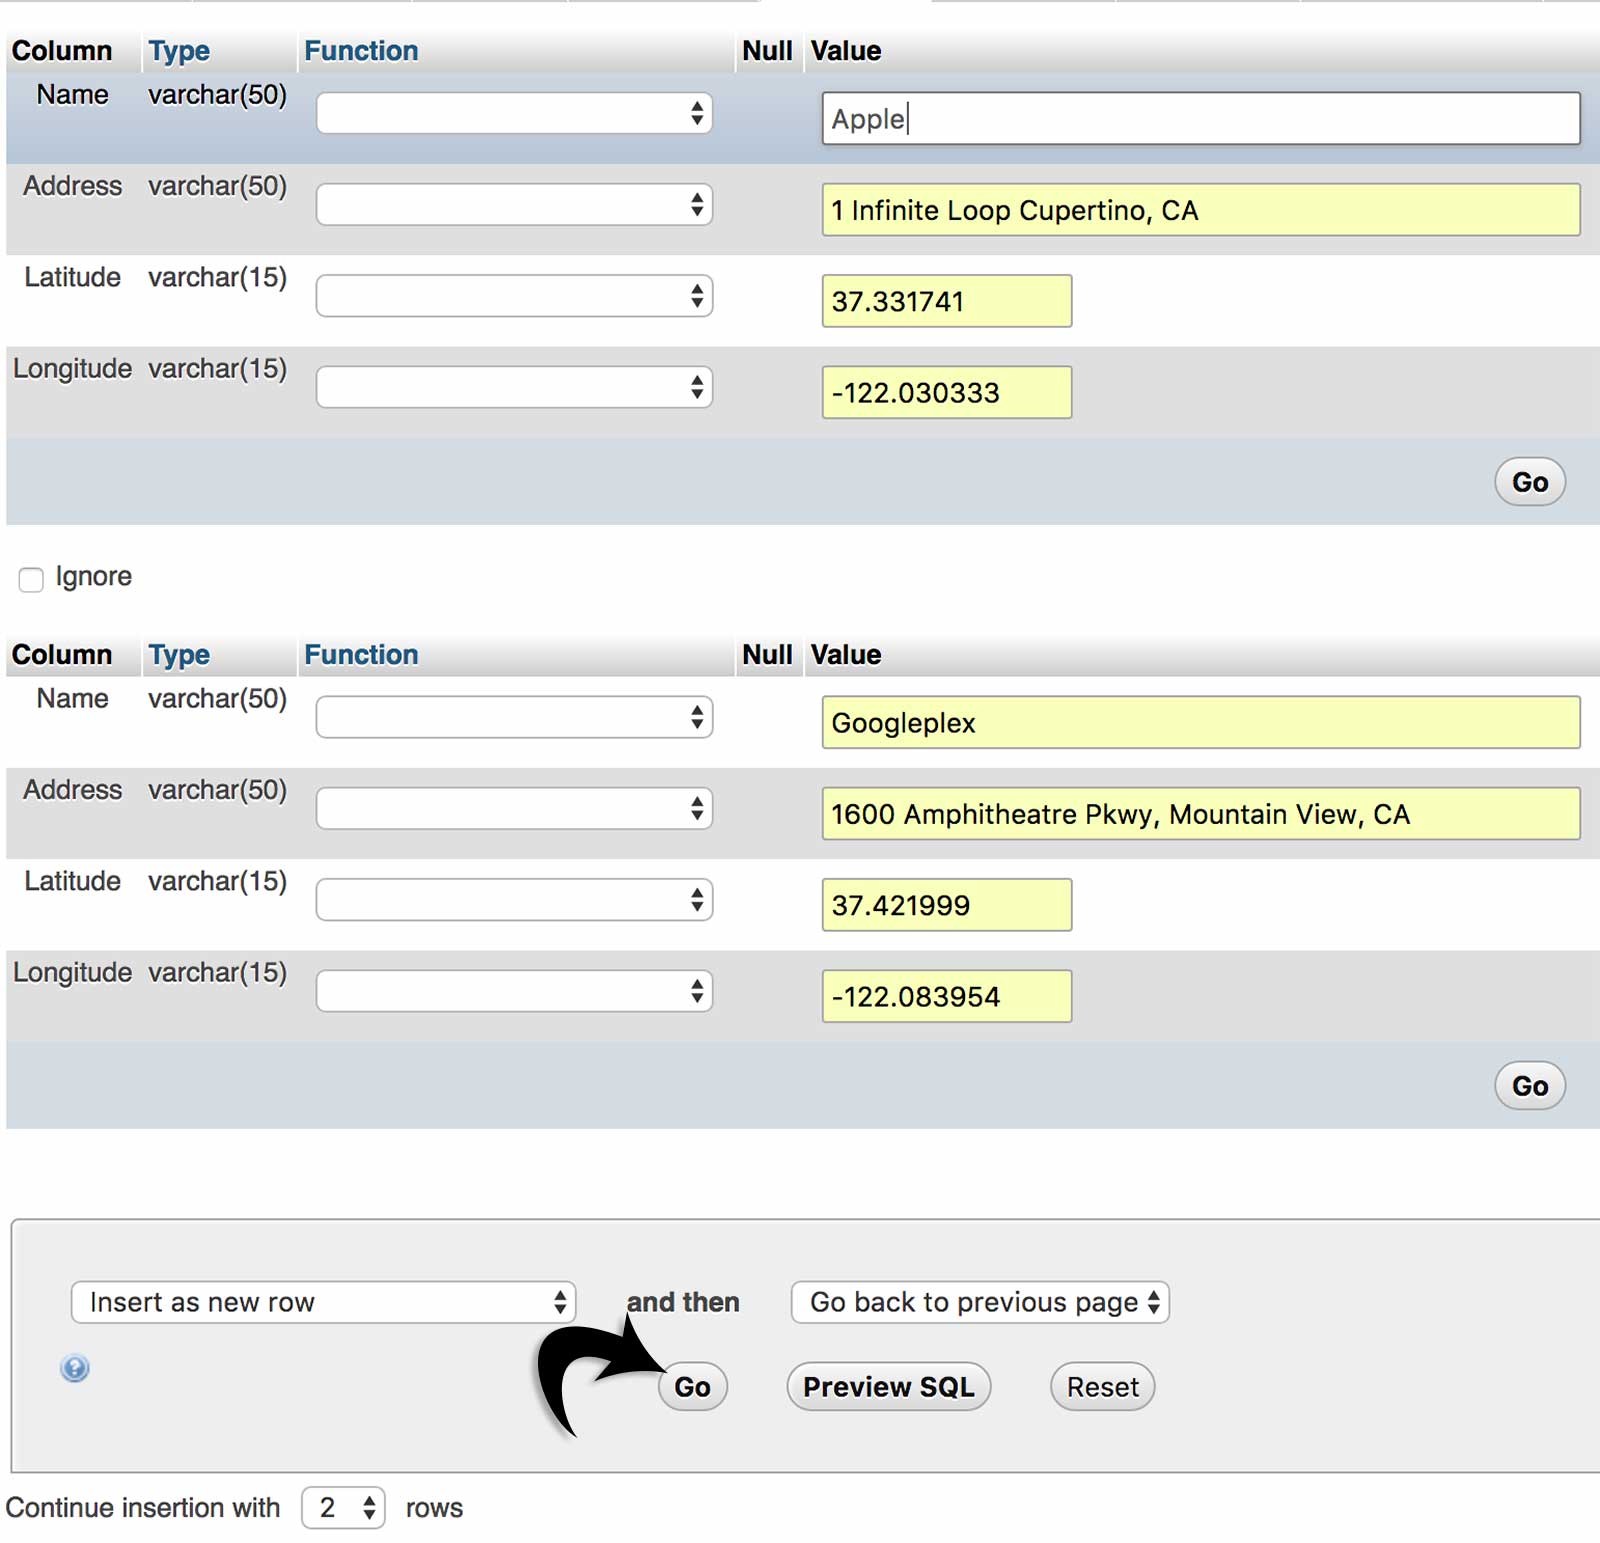
Now you’ll see the actual SQL statement which added the data!
SQL stands for Structured Query Language and it’s a programming language to express queries from simple ones to really complex ones that involve multiple tables and constraints.
When you’re using this web interface, phpMyAdmin, to work with your database, you’re running SQL statements in the background when you click a “Go” or “Save” button.
If you’re working with databases a lot, it would really pay to learn SQL!

Next, click the “Browse” button and see the data in the table.

Now that we have some sample data in the MySQL database, let’s move on to creating that PHP web service that’ll connect to the MySQL database and query it for the list of locations (and then return the results to the iPhone app).
Now let’s create a simple PHP service to query our database for the results.
Open up a text editor and paste the following code into it, then save it as service.php:
<?php

// Create connection
$con=mysqli_connect("localhost","username","password","dbname");

// Check connection
if (mysqli_connect_errno())
{
  echo "Failed to connect to MySQL: " . mysqli_connect_error();
}

// This SQL statement selects ALL from the table 'Locations'
$sql = "SELECT * FROM Locations";

// Check if there are results
if ($result = mysqli_query($con, $sql))
{
	// If so, then create a results array and a temporary one
	// to hold the data
	$resultArray = array();
	$tempArray = array();

	// Loop through each row in the result set
	while($row = $result->fetch_object())
	{
		// Add each row into our results array
		$tempArray = $row;
	    array_push($resultArray, $tempArray);
	}

	// Finally, encode the array to JSON and output the results
	echo json_encode($resultArray);
}

// Close connections
mysqli_close($con);
?>
In line 4, you’ll want to change the following placeholders:
-username : use the username of the db user that you set up in step 1
-password : use the password for the db user
-dbname : use the name of the database you created in step 1
Read the comments in the code above to see what each line does.
When you save the file, it should have a .php extension like this:

3.2 Uploading the PHP file to the server
Now you can use your favorite FTP client to upload this file to the root of your web host so that you can access this file from: http://yourdomain.com/service.php.
If you’re unsure of what FTP means, you can also upload this file from your Bluehost control panel.
Login to your cPanel and look for the “File Manager” icon:

Click into that icon and it’ll pop up a dialog screen to ask where you want to start:
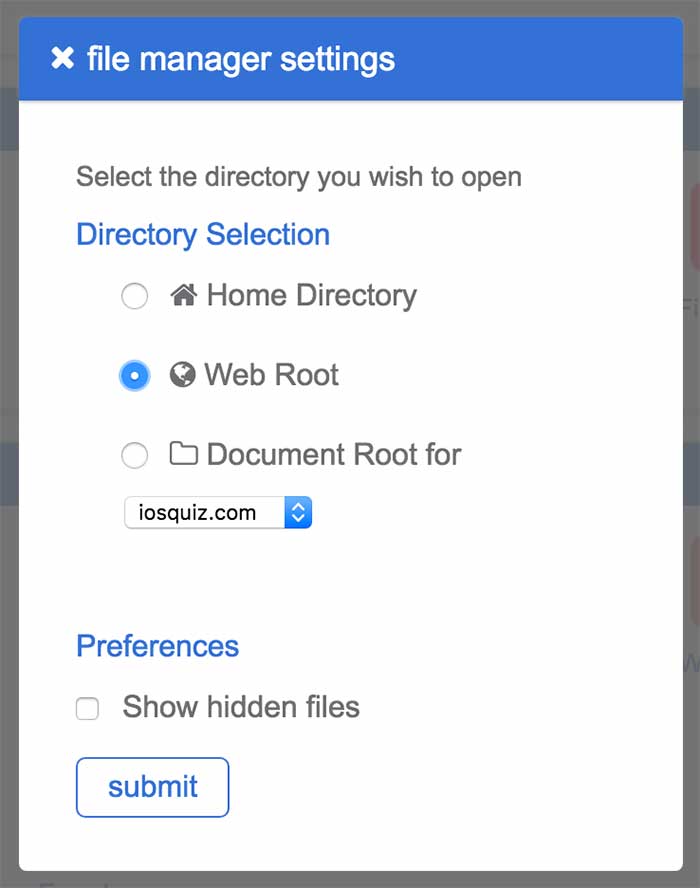
After clicking “Submit“, it’ll bring you to a screen where you can see all the files on your web root.
In the left side panel, you’ll see a tree view navigation.
You want to click “public_html” which will open up the folder, then click “Upload” as shown below:
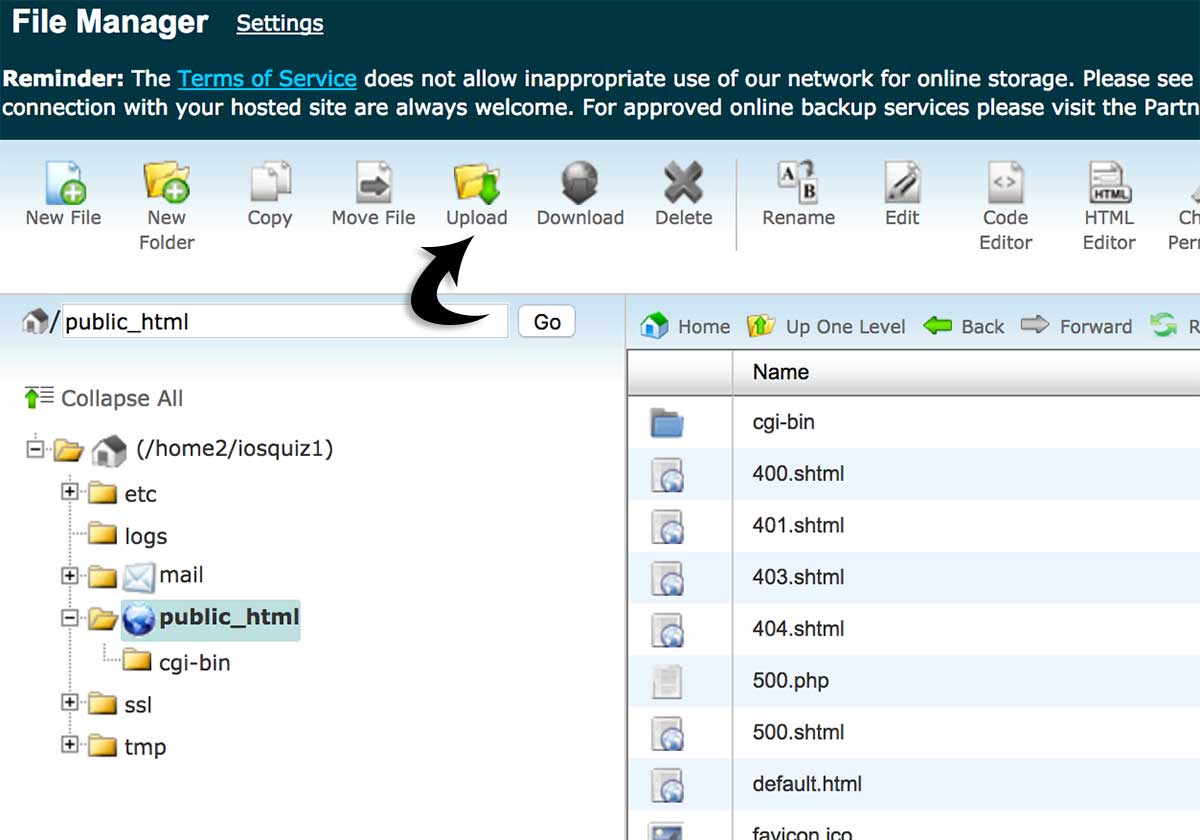
On the next screen, choose “service.php” from your local system and upload the file.
Now you’ll be able to access it from: http://yourdomain.com/service.php.
Test this by going to that URL in your browser.
You should see something like this:

Now we’re ready to build the iPhone app that will read this feed!
4.1 Creating a new Xcode project
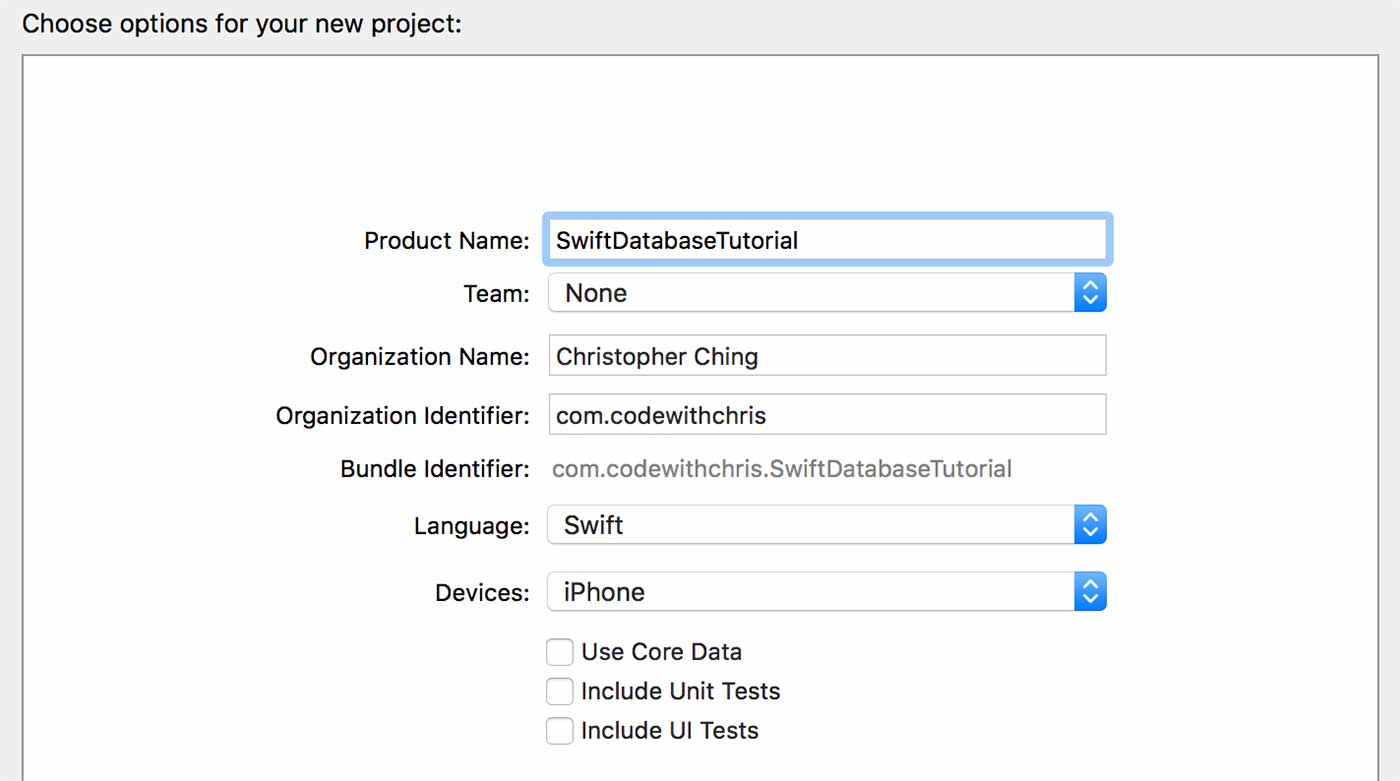
We’re going to start by creating a new single view application Xcode project.

Make sure Swift is selected as the language and we are going to be creating this app for the iPhone.
Our next step is to edit our Info.plist file to make sure it allows us to pull data from an external source. Click on Info.plist, then right click to add a new row and type “App Transport Security Settings”. Inside of that we want to add another row, (make sure the down arrow is clicked on the first row) “Allow Arbitrary Loads” and set that to “YES”.

Done correctly, it will look like this. Also note that it should autofill to the correct name.
Next, go to Main.storyboard and we are going to add a table view element to the view controller’s view.
In the lower right hand corner, search for table view in the library pane and you should see the Table View and Table View Cell elements come up.
If you don’t see them, double check that you’re looking at the correct tab as indicated by the screenshot below.
First drag and drop the Table View element over the view(not the “table view controller” element) and resize it to fit the whole view. You will actually want to position it just under the battery symbol, there should be a blue dotted line letting you know where to drag down to.
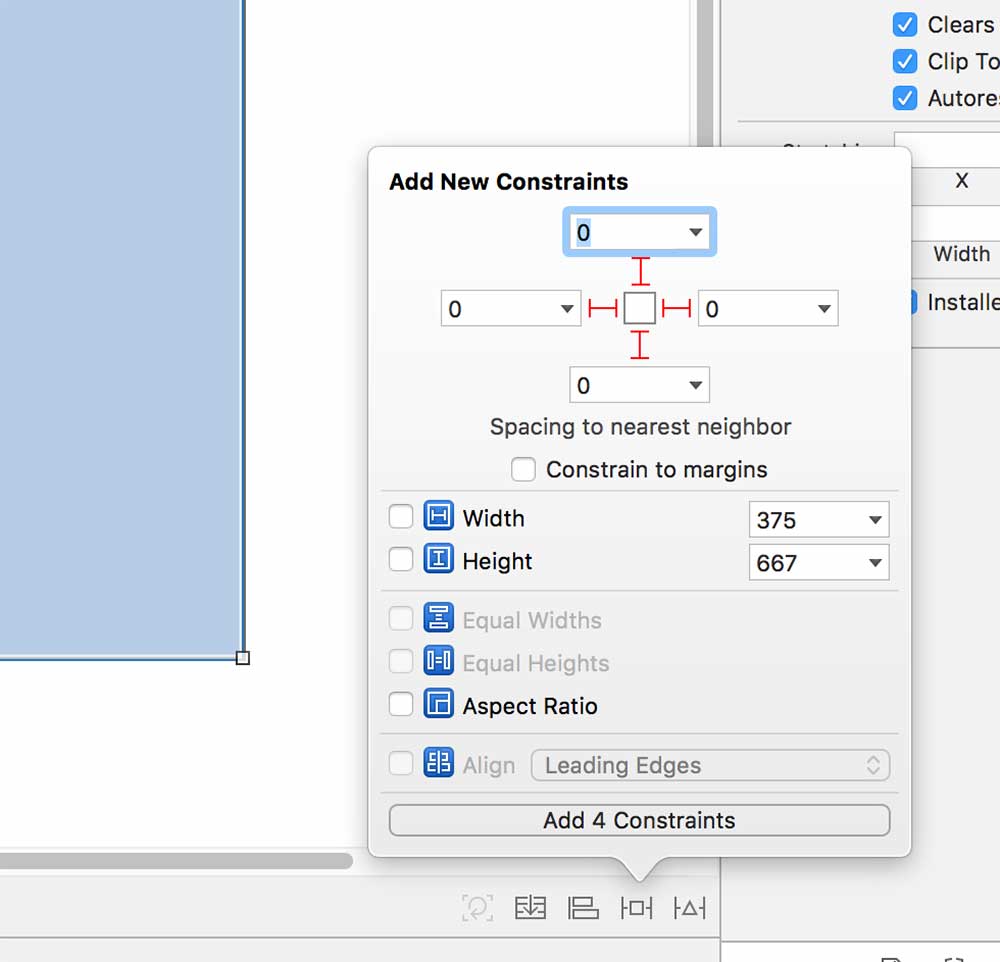
While still having the Table View element highlighted, click the add constraints button shown in the screenshot below and then click each of the margins so it activates (it’ll become red). Make sure all the margins are 0 and “constrain to margins” is unchecked. Then click Add 4 constraints.
Next, drag and drop a Table View Cell over the Table View.
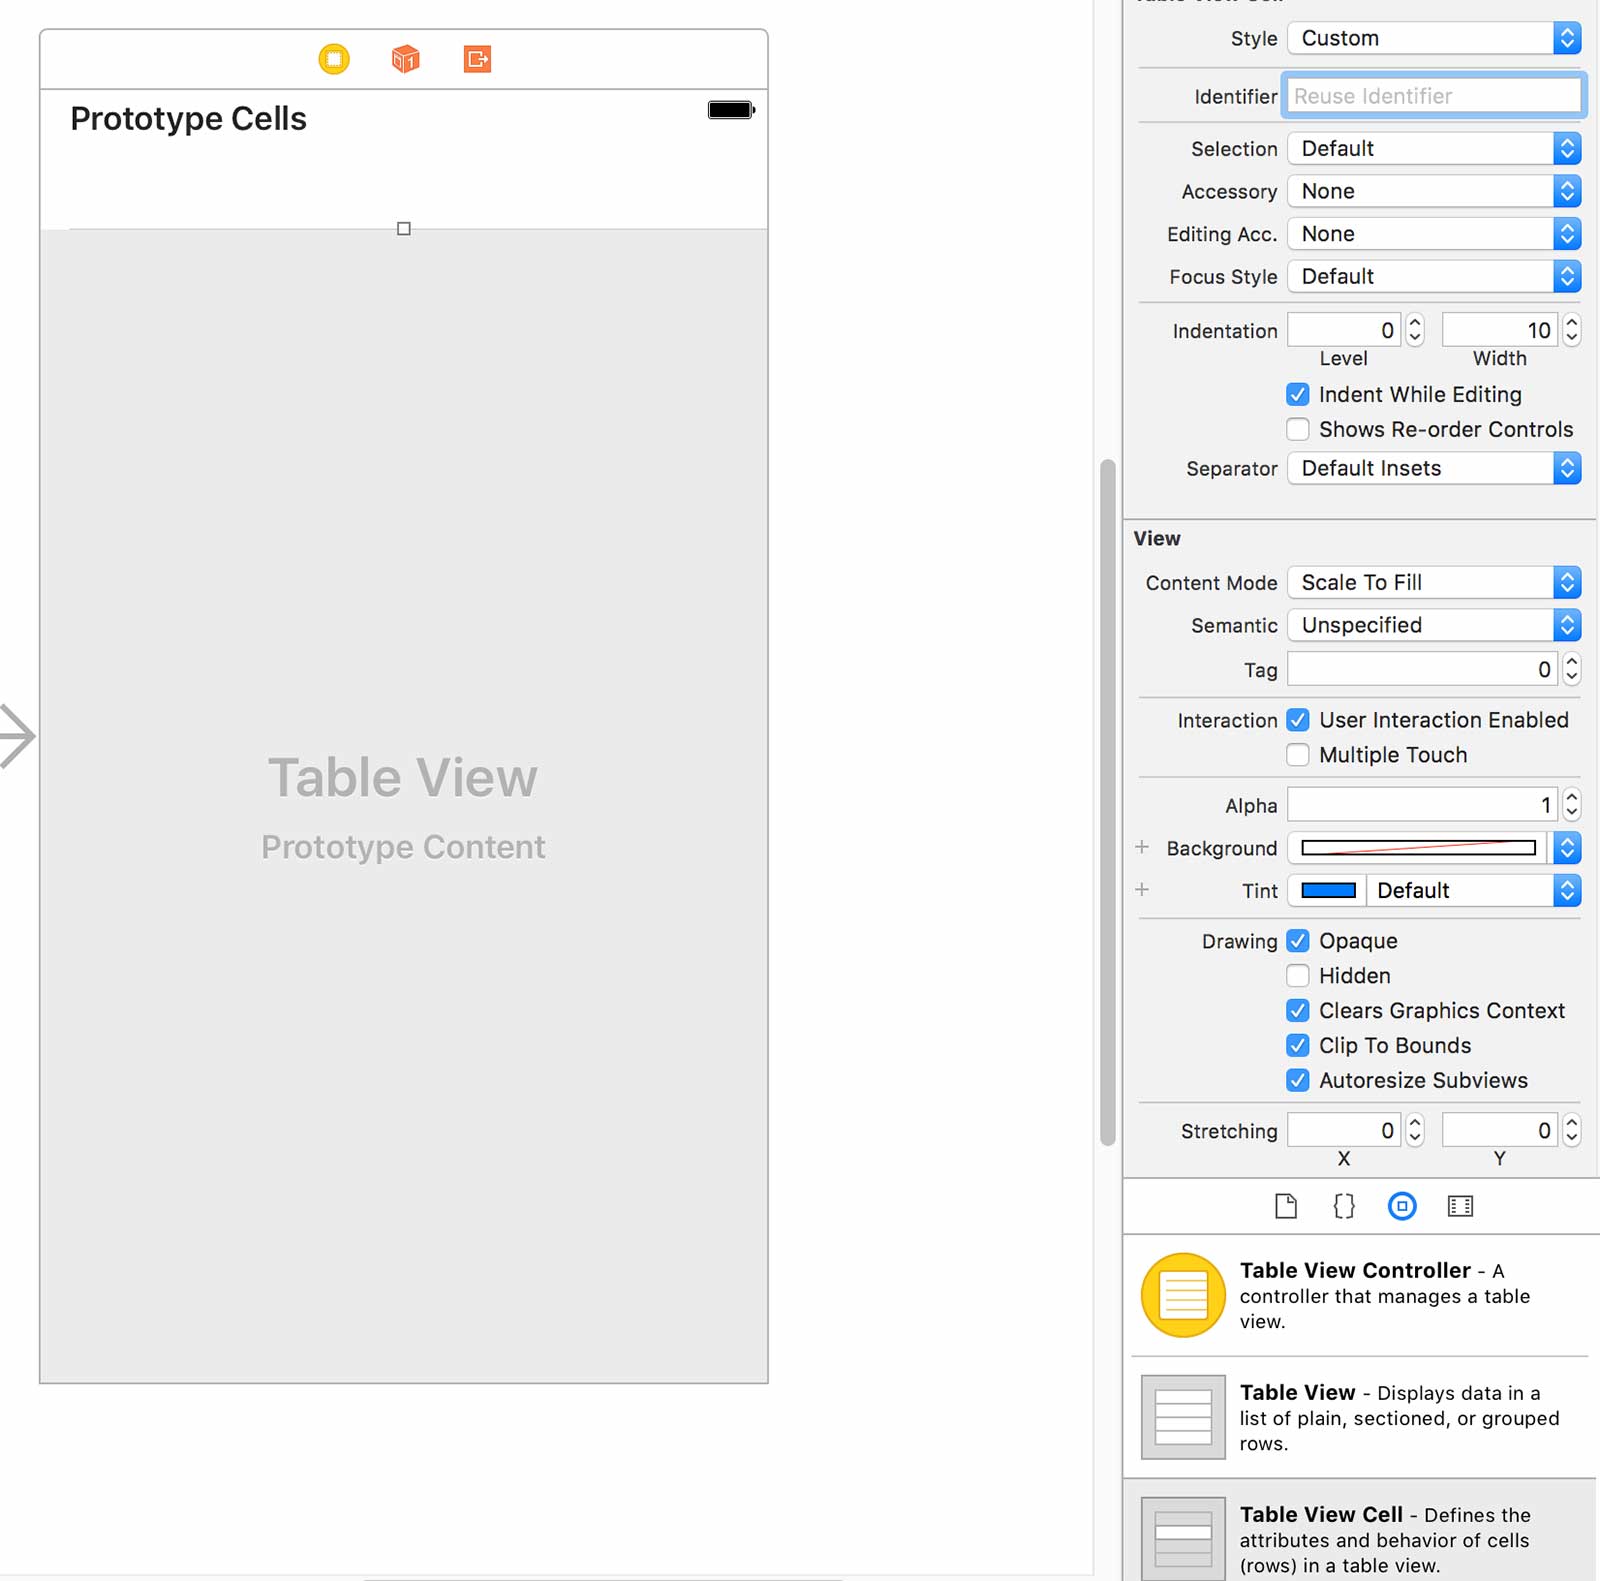
We also need to give the table cell a reuse identifier which we’re going to use later down the line. Click the cell, then on the right panel in the “attributes inspector”, change the Identifier to “BasicCell”.

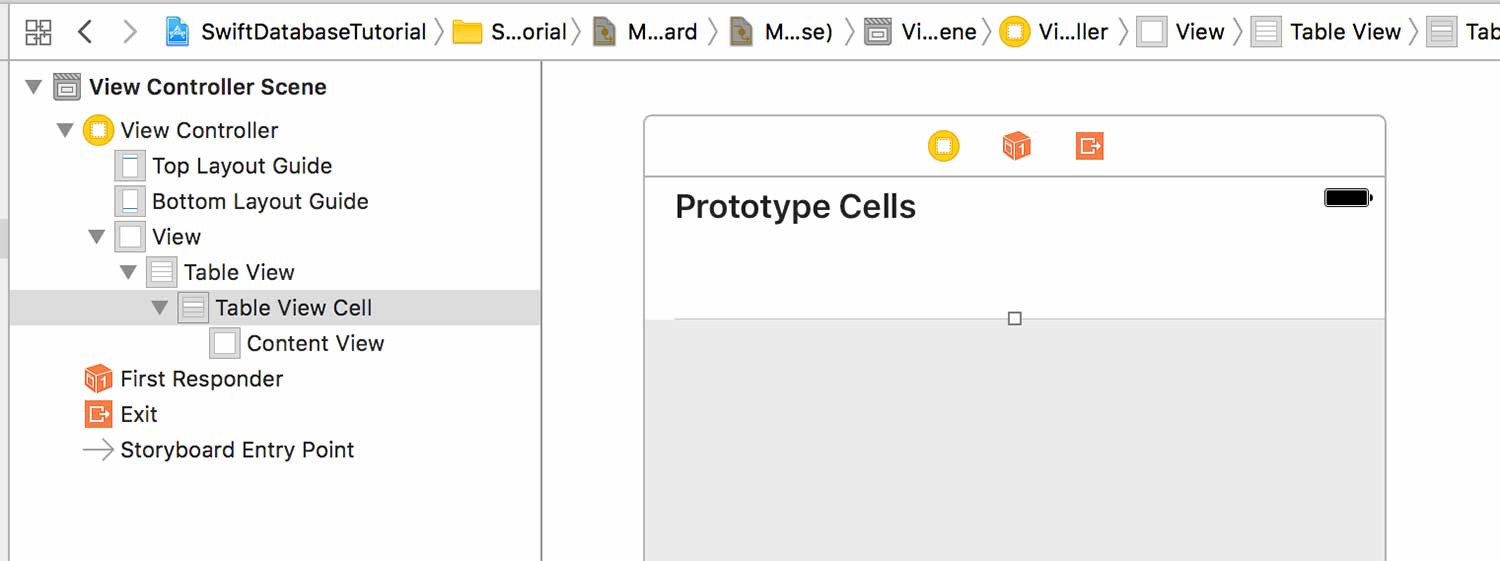
Also, a good way to see where you are in your view controller is to to check the hierarchy of elements. You can do this by clicking on this icon at the bottom of your scene.

This will bring up the following hierarchal view in the left pane.
The next step is to connect our Table View element to our View Controller so that we can reference it when writing our Swift code.
To do this, we first need to split our session into two panes, one containing the Main.storyboard, and the other containing our ViewController.swift.
Click on the Assistant Editor button illustrated in the screenshot below:
If you cannot find the ViewController.swift on the right hand pane, follow the breadcrumbs at the very top of the file.
Now to perform the connection, hold control, click the table view element from the storyboard, and then drag the blue line to the view controller.
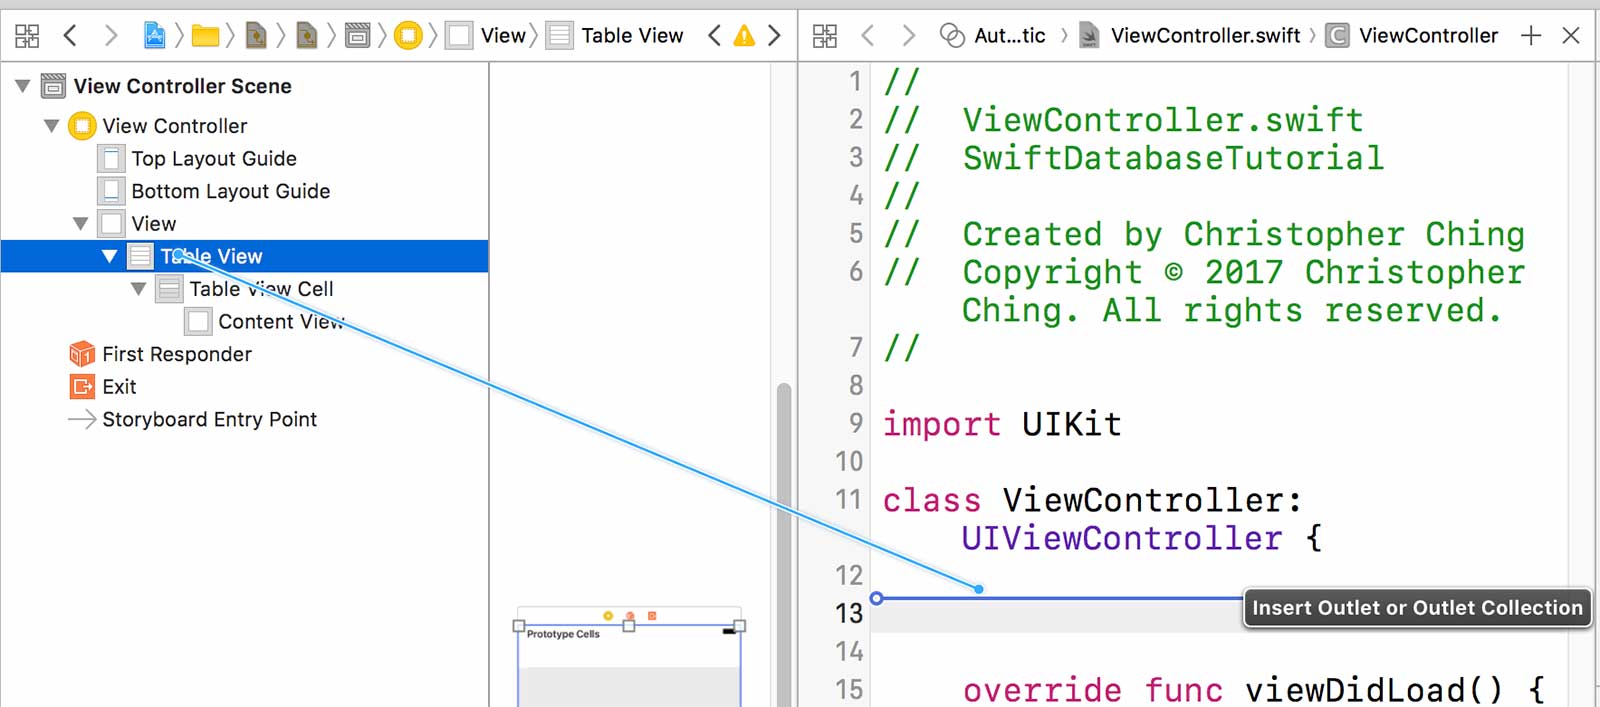
A prompt should pop up and you should name the table view “listTableView” . At this point you can use this name to refer to the table view element as you write your Swift code.

Note that this creates a UITableView which is already unwrapped. In other words, this table view definitely exists, it will never be nil.
At this point, this should be the only variable in your ViewController.swift.

4.2 Creating the model for the data
We want to follow the model, view, controller (MVC) convention in this tutorial and create separate classes to handle and store the data. Let’s create two new Swift files (classes) to help us with these tasks, HomeModel and LocationModel.
Right click or CMD + Left click and select new file from the File Inspector.
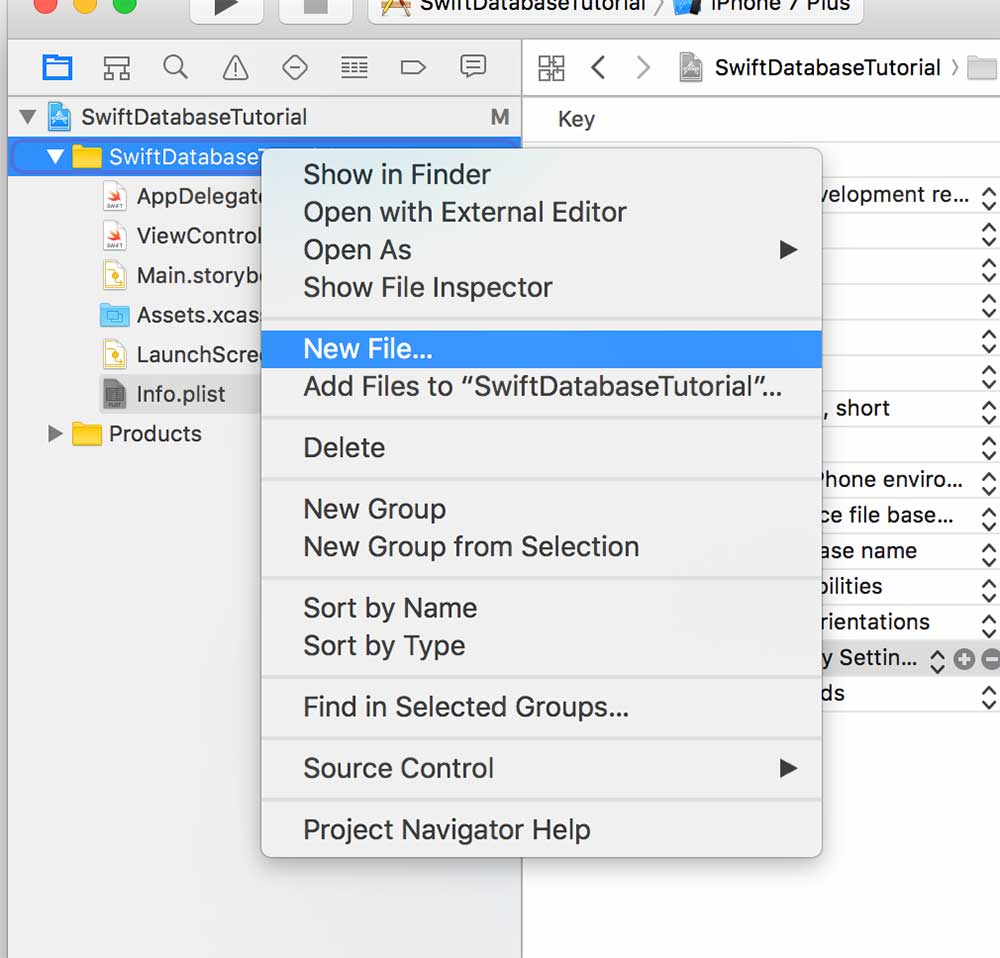
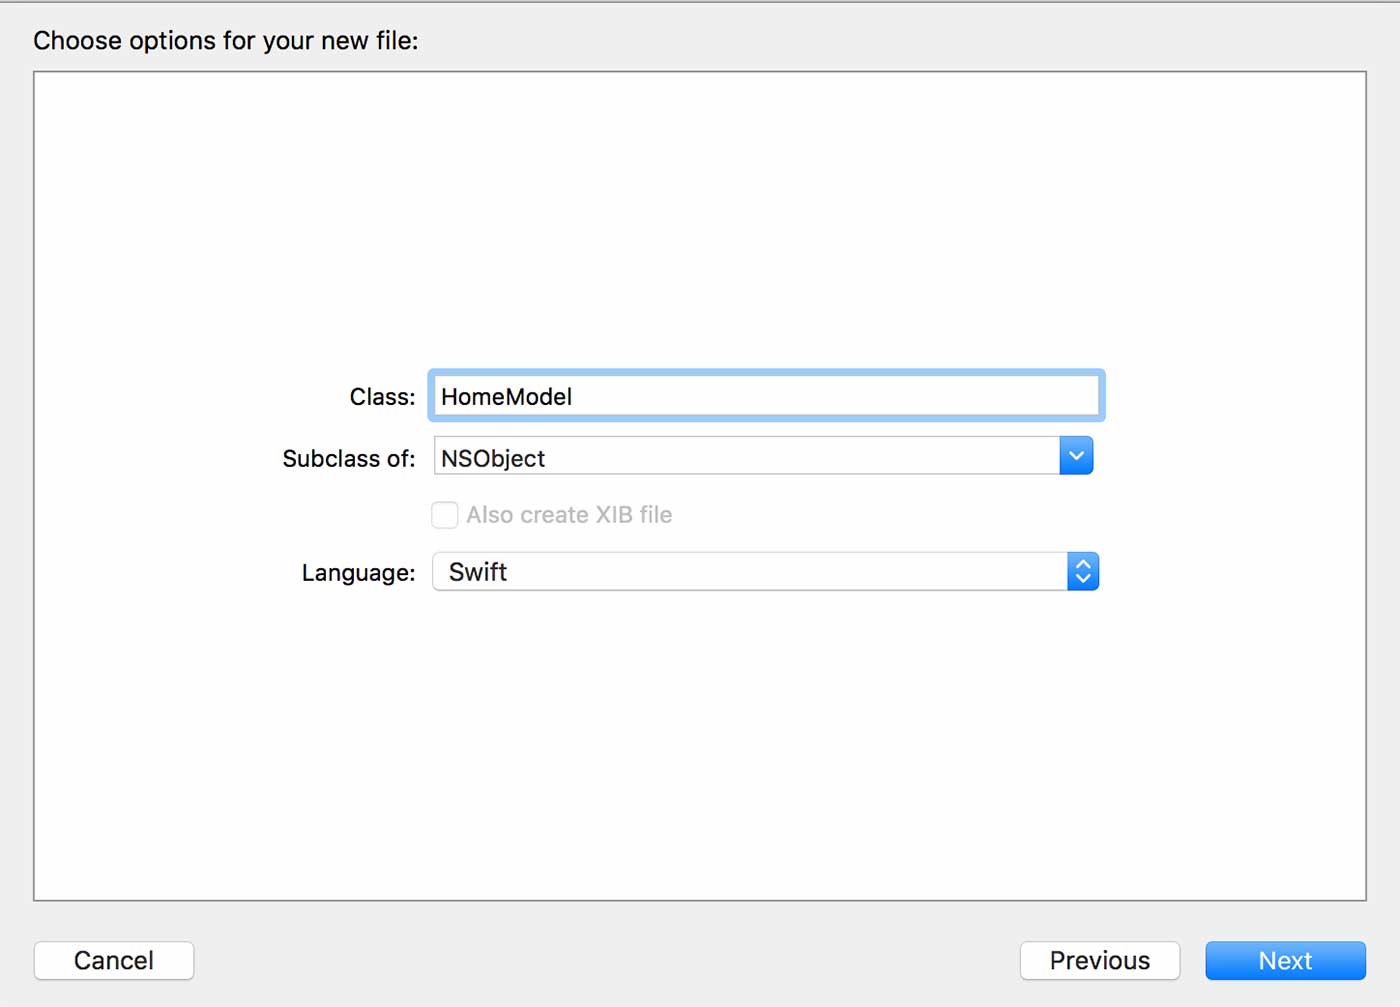
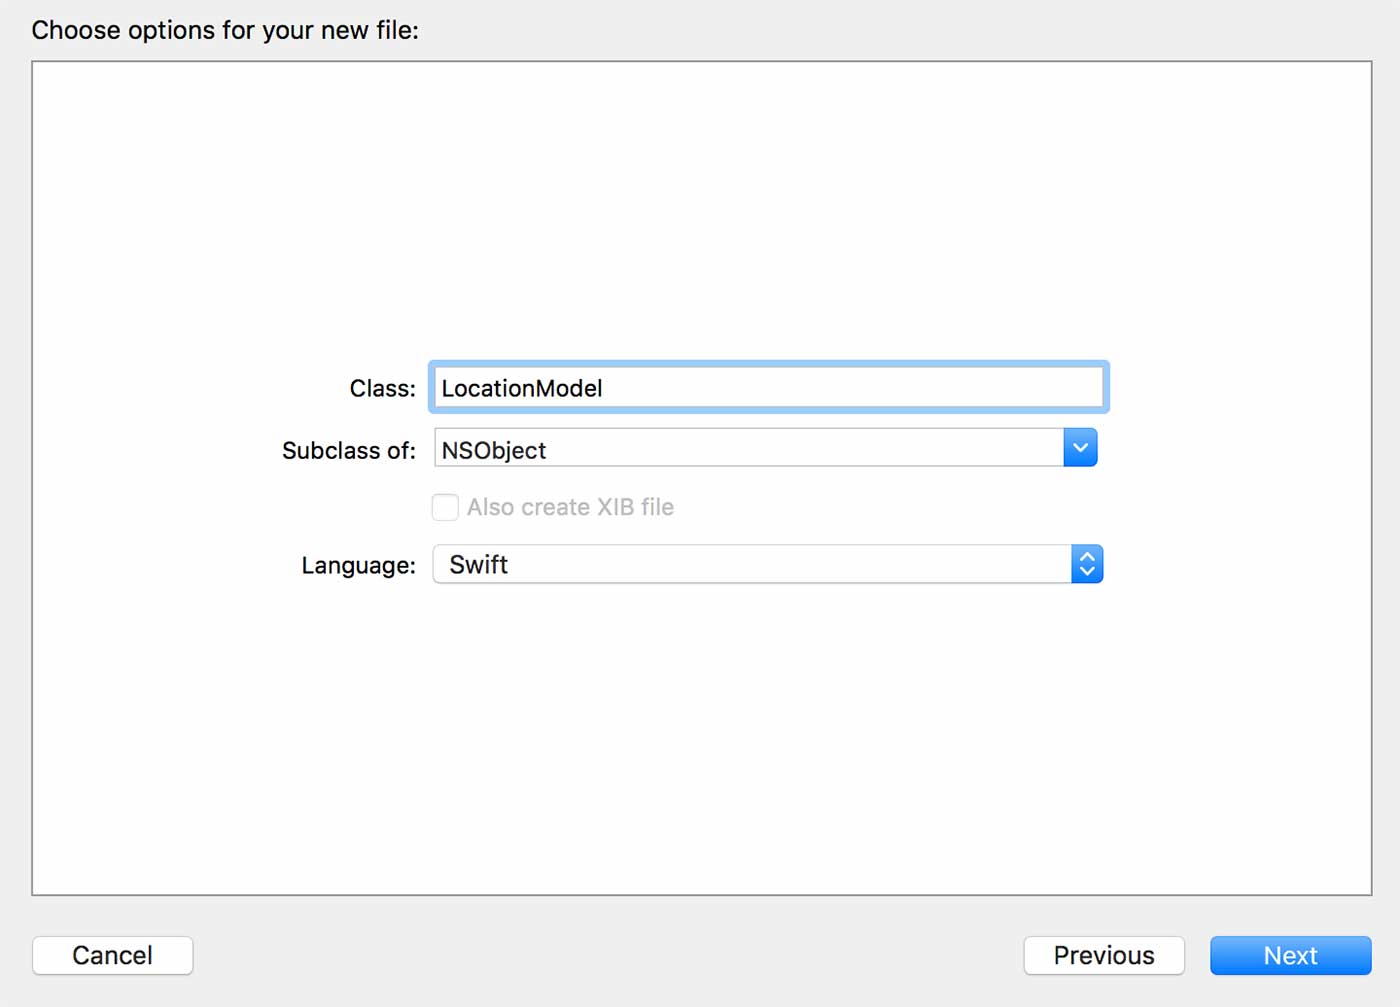
Let’s start with our location model class, this will serve as our container to store the incoming data.
import Foundation

class LocationModel: NSObject {

    //properties

    var name: String?
    var address: String?
    var latitude: String?
    var longitude: String?


    //empty constructor

    override init()
    {

    }

    //construct with @name, @address, @latitude, and @longitude parameters

    init(name: String, address: String, latitude: String, longitude: String) {

        self.name = name
        self.address = address
        self.latitude = latitude
        self.longitude = longitude

    }


    //prints object's current state

    override var description: String {
        return "Name: \(name), Address: \(address), Latitude: \(latitude), Longitude: \(longitude)"

    }


}
Notice that this class inherits from the root NSObject, and has four variables which represent our properties. Each of these are optionals because we do not know if they will contain a value or not, however, in this tutorial we will make sure that each property does indeed contain a value.
This class also conventionally has an empty constructor, a parameter accepting constructor, and a function to output it’s state.
Now we can set up HomeModel.swift, which will pull the JSON data from our service.php file, parse it accordingly, and send it to our view.
We’ll need to declare a protocol to broadcast to our view controller which method it should expect to handle if it receives a notification. Specifically, this protocol will serve to transfer data from the home model to the view controller.
Let’s also set up a few variables that we will need.
import Foundation

protocol HomeModelProtocol: class {
    func itemsDownloaded(items: NSArray)
}


class HomeModel: NSObject, NSURLSessionDataDelegate {

    //properties

    weak var delegate: HomeModelProtocol!

    var data = Data()

    let urlPath: String = "http://hourofswift.com/service.php" //this will be changed to the path where service.php lives
In lines 3-7, we declare our HomeModel protocol and we also declare a delegate property in line 11 which is explicitly of type HomeModelProtocol.
This let’s other classes know that if they want to handle the delegate method in this protocol, they must conform to the protocol to set themselves as the delegate (assign themselves to the delegate property).
You’ll see this in action later on.
Line 14 declares our data variable which will be responsible for storing the incoming bits and Line 16 declares the urlPath to connect to.
Remember to change the URL to your own PHP service.
4.3 Downloading and parsing the JSON feed
In the previous section when we worked on the PHP service, we returned the results as JSON.
Now we are actually going to parse those items here in the HomeModel class. To do this, we are going to create a function “downloadItems”, which will be responsible for the process of retrieving the data from the MySQL database and handling it.
We’re going to use the NSURLSession class to download the JSON feed, and conform it to the NSURLSessionDataDelegate which will let us implement the appropriate delegate methods that get fired when certain events happen during the download process.
Let’s see what our HomeModel.Swift should look like now:
import Foundation

protocol HomeModelProtocol: class {
    func itemsDownloaded(items: NSArray)
}


class HomeModel: NSObject, NSURLSessionDataDelegate {

    //properties

    weak var delegate: HomeModelProtocol!

    let urlPath = "http://hourofswift.com/service.php" //this will be changed to the path where service.php lives

    func downloadItems() {

        let url: URL = URL(string: urlPath)!
        let defaultSession = Foundation.URLSession(configuration: URLSessionConfiguration.default)

        let task = defaultSession.dataTask(with: url) { (data, response, error) in

            if error != nil {
                print("Failed to download data")
            }else {
                print("Data downloaded")
                self.parseJSON(data!)
            }

        }

        task.resume()
    }
}
Ok let’s notice a few things here. On line 8 we are now conforming to the NSURLSessionDataDelegate, and line 18 declares the downloadItems function.
Lines 20-27 initialize the NSURLSession, assign it a task, and start the data retrieval process.
Line 31 is a delegate method which appends the data to our NSMutableData instance variable as it receives the data from the source. This function is responsible for storing the incoming data.
Line 36 is also a delegate method that checks to see if the data was received without error, and if so, calls the parseJSON method which we will see in the next screenshot. Note that it checks to see if the optional parameter error is nil, meaning that it has not been set, and then acts upon that accordingly. This a is a good example of the advantage of using optionals.
    func parseJSON(_ data:Data) {

        var jsonResult = NSArray()

        do{
            jsonResult = try JSONSerialization.jsonObject(with: data, options:JSONSerialization.ReadingOptions.allowFragments) as! NSArray

        } catch let error as NSError {
            print(error)

        }

        var jsonElement = NSDictionary()
        let locations = NSMutableArray()

        for i in 0 ..< jsonResult.count
        {

            jsonElement = jsonResult[i] as! NSDictionary

            let location = LocationModel()

            //the following insures none of the JsonElement values are nil through optional binding
            if let name = jsonElement["Name"] as? String,
                let address = jsonElement["Address"] as? String,
                let latitude = jsonElement["Latitude"] as? String,
                let longitude = jsonElement["Longitude"] as? String
            {

                location.name = name
                location.address = address
                location.latitude = latitude
                location.longitude = longitude

            }

            locations.add(location)

        }

        DispatchQueue.main.async(execute: { () -> Void in

            self.delegate.itemsDownloaded(items: locations)

        })
    }
Line 53 actually parses the JSON using the data that was received from our NSURLSession.
Line 64 loops through the JSON objects and stores them in an NSDictionary object so that they can be split into key-value pairs.
Line 69 instantiates a LocationModel object which will be used to store each element in the specific JSON object.
Lines 72-75 use optional binding, the “if let” checking mechanism, to make sure none of the JSON elements are nil. After the check, if all elements have values, the location object is set.
Line 85 adds the current location object to a mutable array and is now ready to be sent to the view controller via the protocol method.
Lines 89-91 pass the locations array to the protocol method making it available for the view controller to use.
Notice on line 89, the “dispatch_asynch” closure that wraps the delegate call. This is a thread issue, and it is the convention for methods that call UI updates to be wrapped with this particular closure to access the main queue. If you are also unfamiliar with the syntax, make sure to review closures in the Swift docs.
The next thing we have to do is implement the “downloadItems” method in the view controller to let it know when the locations array is passed so that it can populate the table view.
4.4 Populating the table view with locations
Now our focus is back to the view controller.
Let’s navigate to ViewController.swift and set up a few things. Just like we are going to conform to the HomeModelProtocol to get notified when the locations array is ready, we need to also conform to the UITableView protocols to interact with the table view.
import UIKit

class ViewController: UIViewController, UITableViewDataSource, UITableViewDelegate, HomeModelProtocol  {

    //Properties

    var feedItems: NSArray = NSArray()
    var selectedLocation : LocationModel = LocationModel()
    @IBOutlet weak var listTableView: UITableView!

    override func viewDidLoad() {
        super.viewDidLoad()

        //set delegates and initialize homeModel

        self.listTableView.delegate = self
        self.listTableView.dataSource = self

        let homeModel = HomeModel()
        homeModel.delegate = self
        homeModel.downloadItems()

    }

    func itemsDownloaded(items: NSArray) {

        feedItems = items
        self.listTableView.reloadData()
    }

    func tableView(_ tableView: UITableView, numberOfRowsInSection section: Int) -> Int {
        // Return the number of feed items
        return feedItems.count

    }

    func tableView(_ tableView: UITableView, cellForRowAt indexPath: IndexPath) -> UITableViewCell {

        // Retrieve cell
        let cellIdentifier: String = "BasicCell"
        let myCell: UITableViewCell = tableView.dequeueReusableCell(withIdentifier: cellIdentifier)!
        // Get the location to be shown
        let item: LocationModel = feedItems[indexPath.row] as! LocationModel
        // Get references to labels of cell
        myCell.textLabel!.text = item.address

        return myCell
    }

}
Let’s first notice on line 3 that we are conforming to the protocols mentioned above.
Lines 7 and 8 declare a NSArray to store the location objects and also declare a reference to our location model for use down the line.
In the “ViewDidLoad” method, we’re setting the ViewController object as the data source and delegate for the table view element.
This will let us implement the table view delegate methods farther down to populate the table view with data.
We also instantiate a HomeModel object, set this ViewController object as the delegate, and call the downloadItems method which starts the data retrieval from our database.
Lines 25-28 implement the HomeModel’s protocol method, “itemsDownloaded”. In this method, we store the results passed back to us through delegation and call “reloadData” on the table view which will cause it to fire off the delegate methods down below.
Line 31, the method specified by “numberOfRowsInSection” returns the expected number of rows in the view. This will cause the table view to call the “cellForRowAtIndexPath” method on line 37 that many number times (one for each row). It will only call that method if the row is in the view.
On Line 37, this method expects us to create a table view cell, initialize it with some data, and return it for display. To do this, we get a copy of the cell we added to our storyboard which we named “BasicCell”.
This method also tells us which row of data it’s trying to display, so we can use this information to access our feed data array to get the appropriate Location object that this table row is tying to display, Line 42.
We then configure the table cell with the data from the Location object, specifically the address, and then return it, Line 44 and 46.
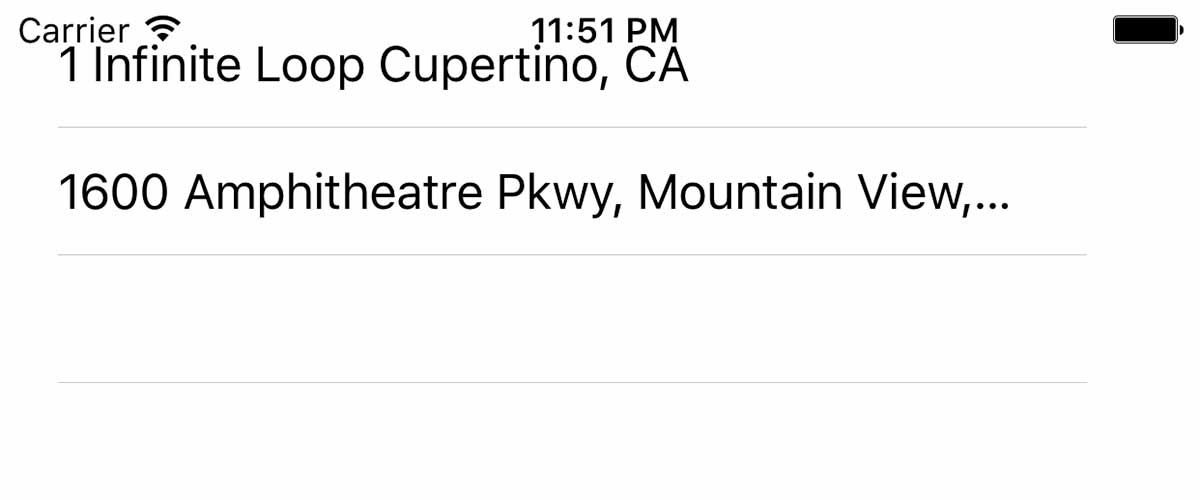
At this point if you run your application you should see your table view populate with the addresses from the MySQL database!
4.5 Adding a second view controller: the map view
The first thing we need to do here is add a second view controller.
Let’s head to our Main.Storyboard, drag the view controller element from the object library, and place into our scene. Just like we did for the first view, lets set the size to 4.7 in.
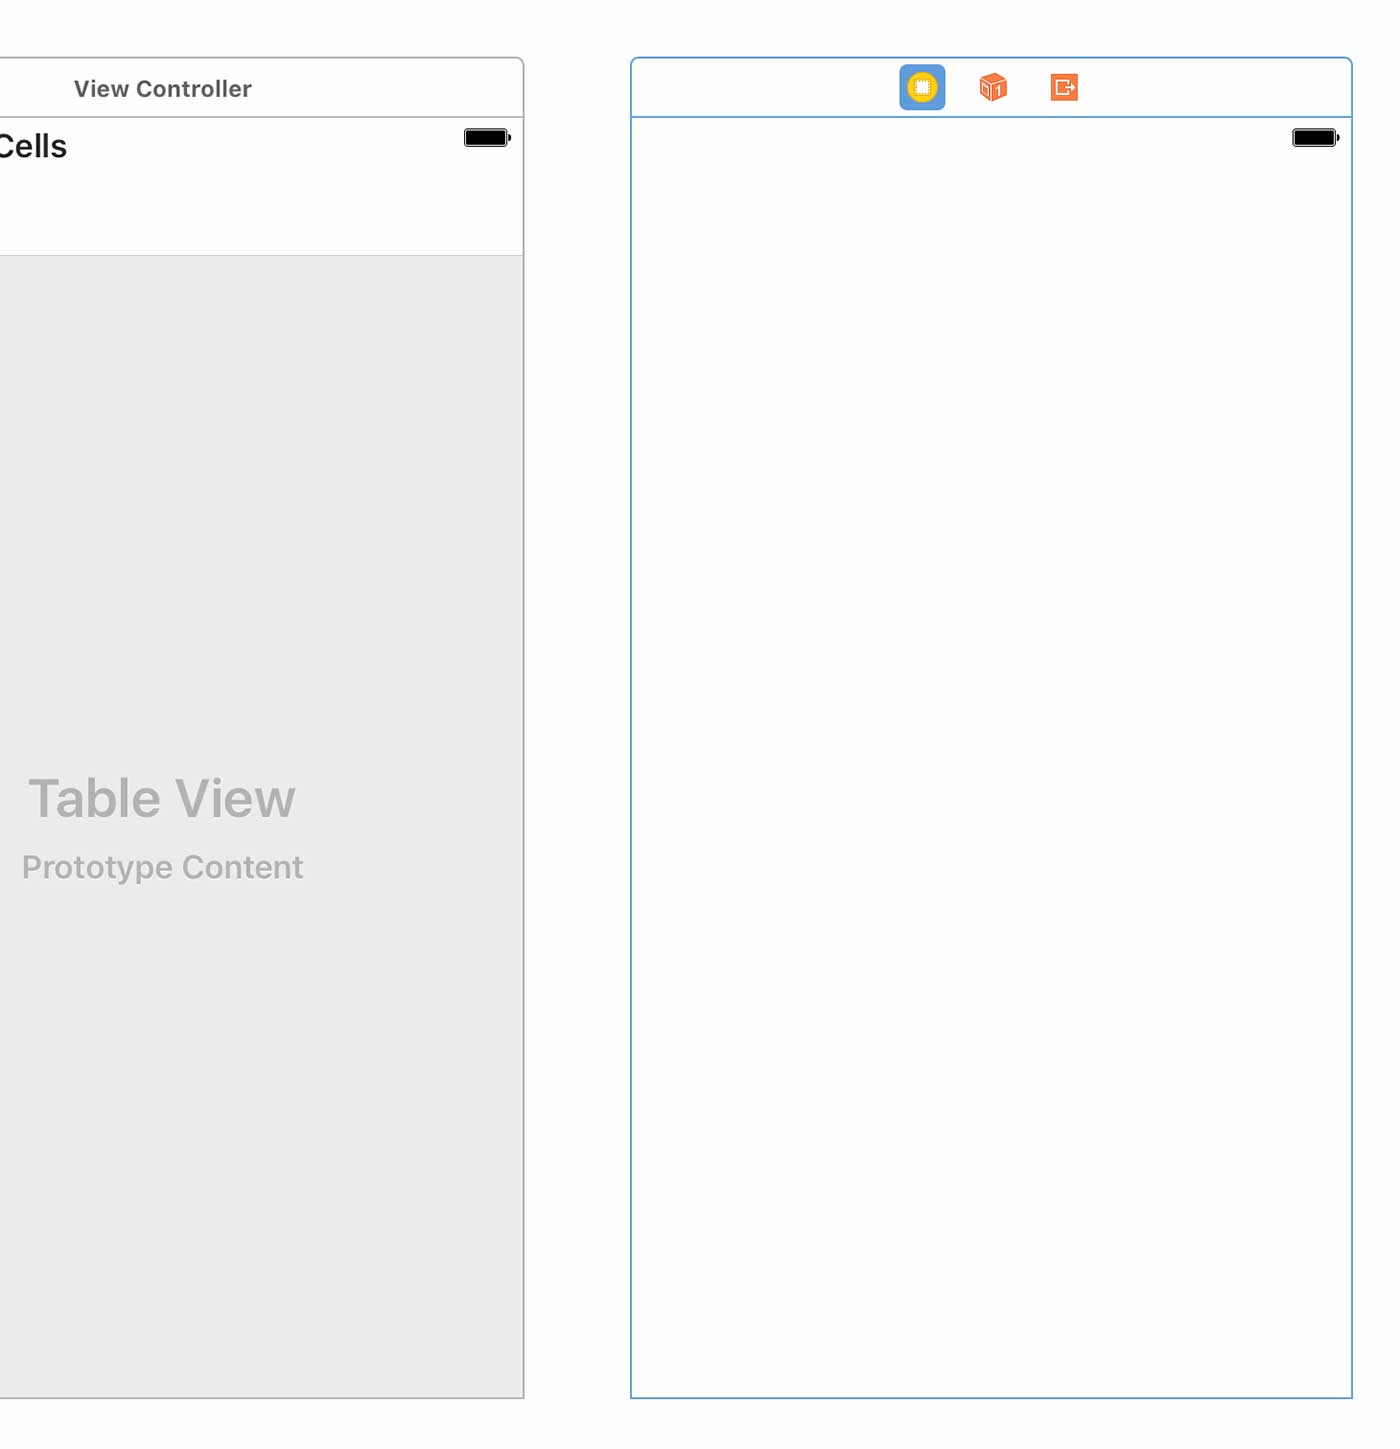
We are going to need some sort of navigation mechanism to allow us to switch from one view to the other.
To do this, click on the first ViewController we created with the table view making sure there’s a blue outline around it.
Then, go up to the “Editor” on the menu bar and select “Embed In” followed by “Navigation Controller”
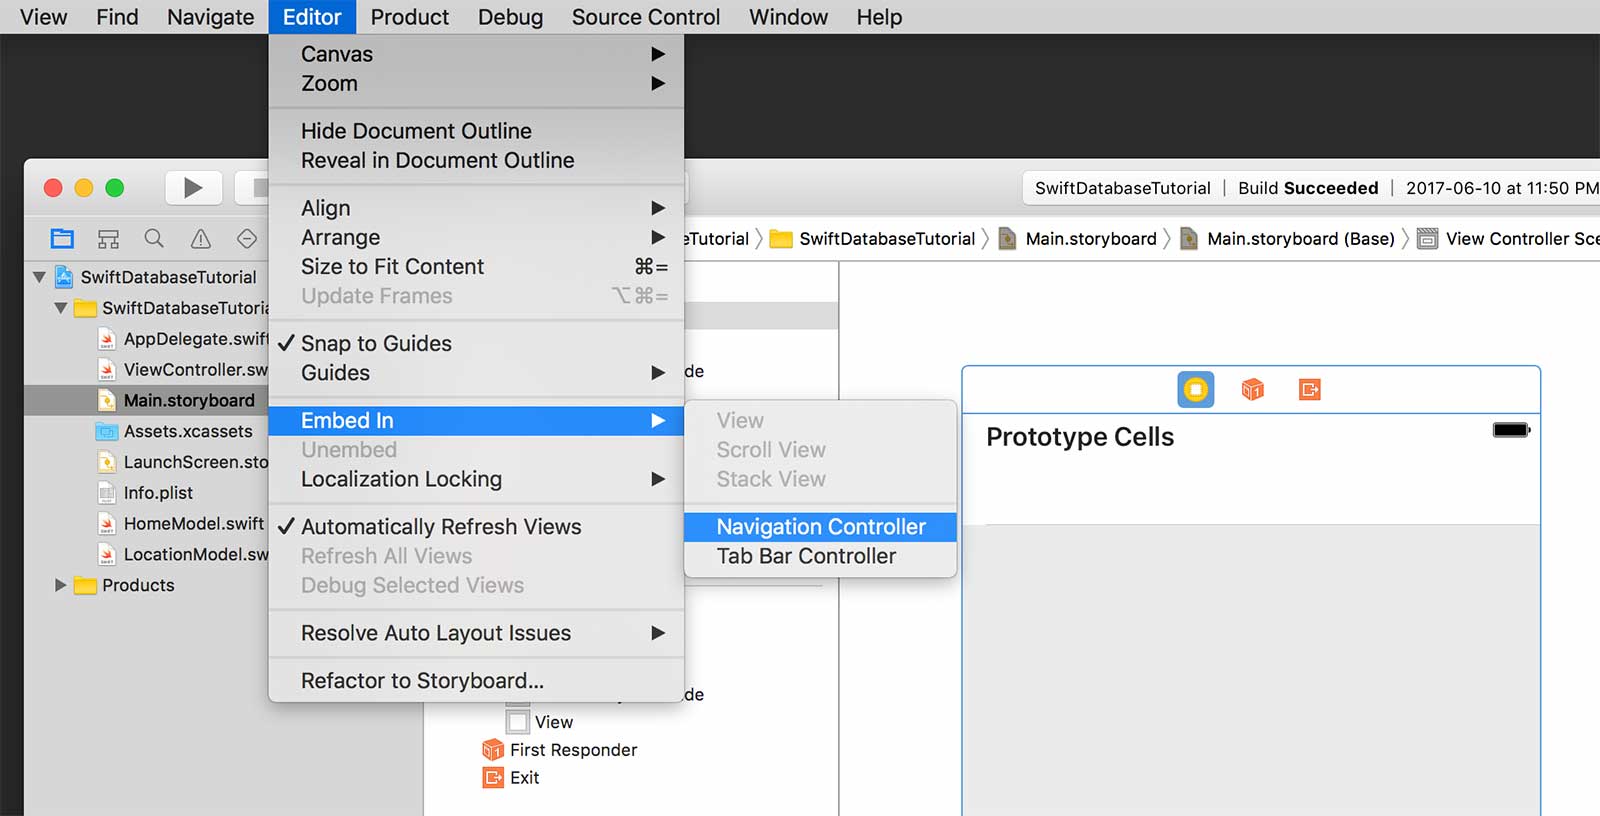
If done correctly, you should now have a navigation controller which connects to our first view controller. Also notice that there is a arrow pointing to the navigation controller, this is our entry point to our scene. As of now, there is nothing connecting our first view to our second, and we need to fix that.
Lets make sure you storyboard looks like this first:
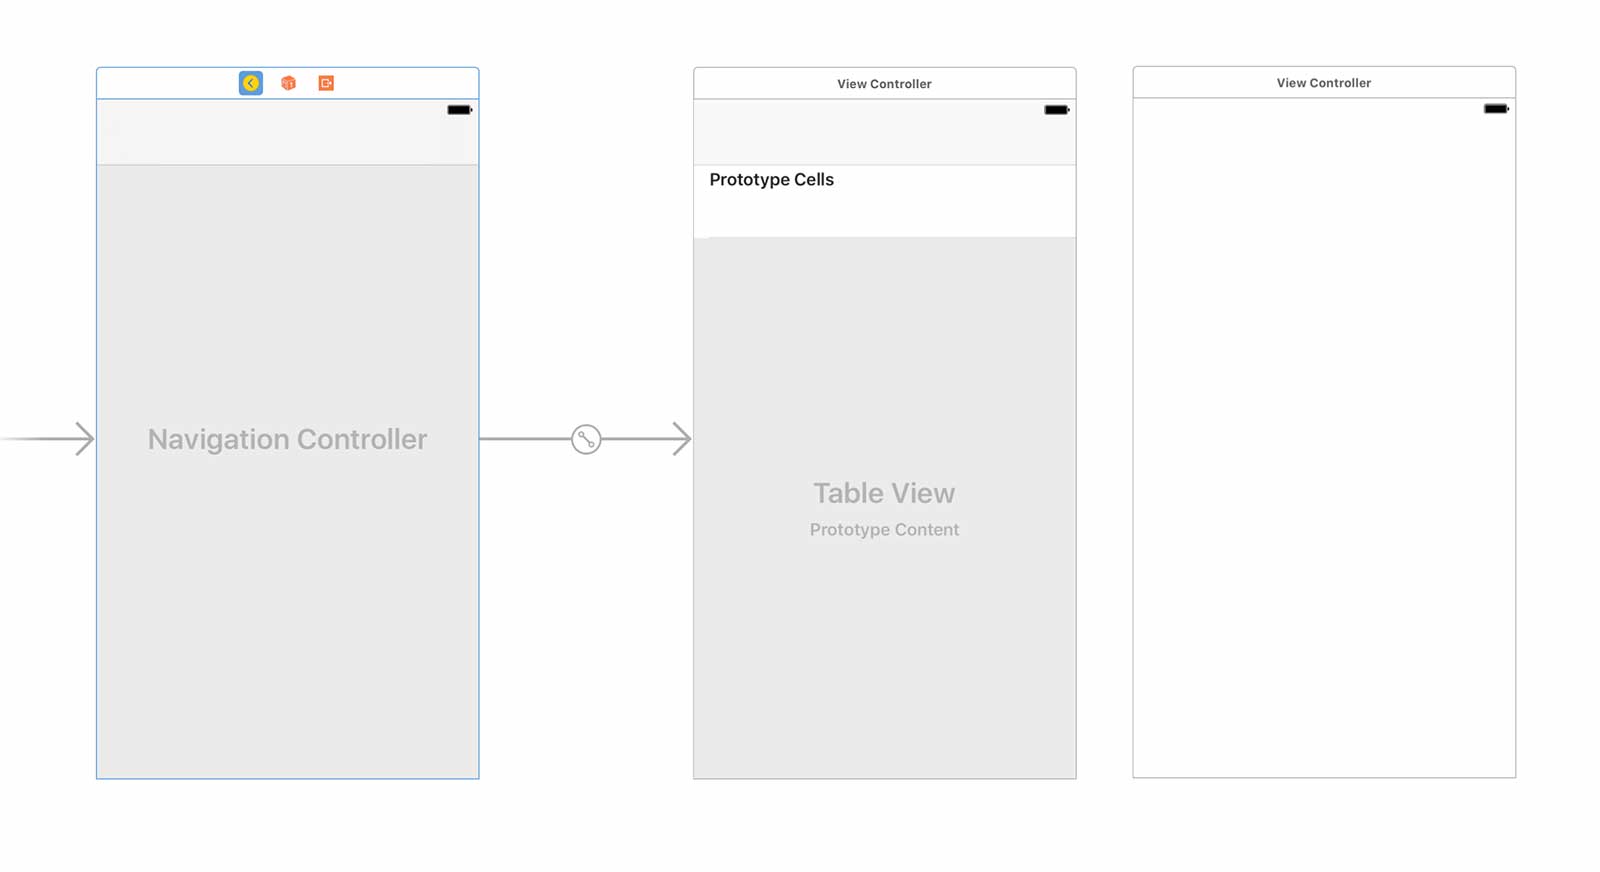
Before we actually make a connection between our two view controllers, lets add a map view to the empty view controller.
Search for the Map Kit View in the object library and drag it onto the view. Resize it so that it fills the entire view.
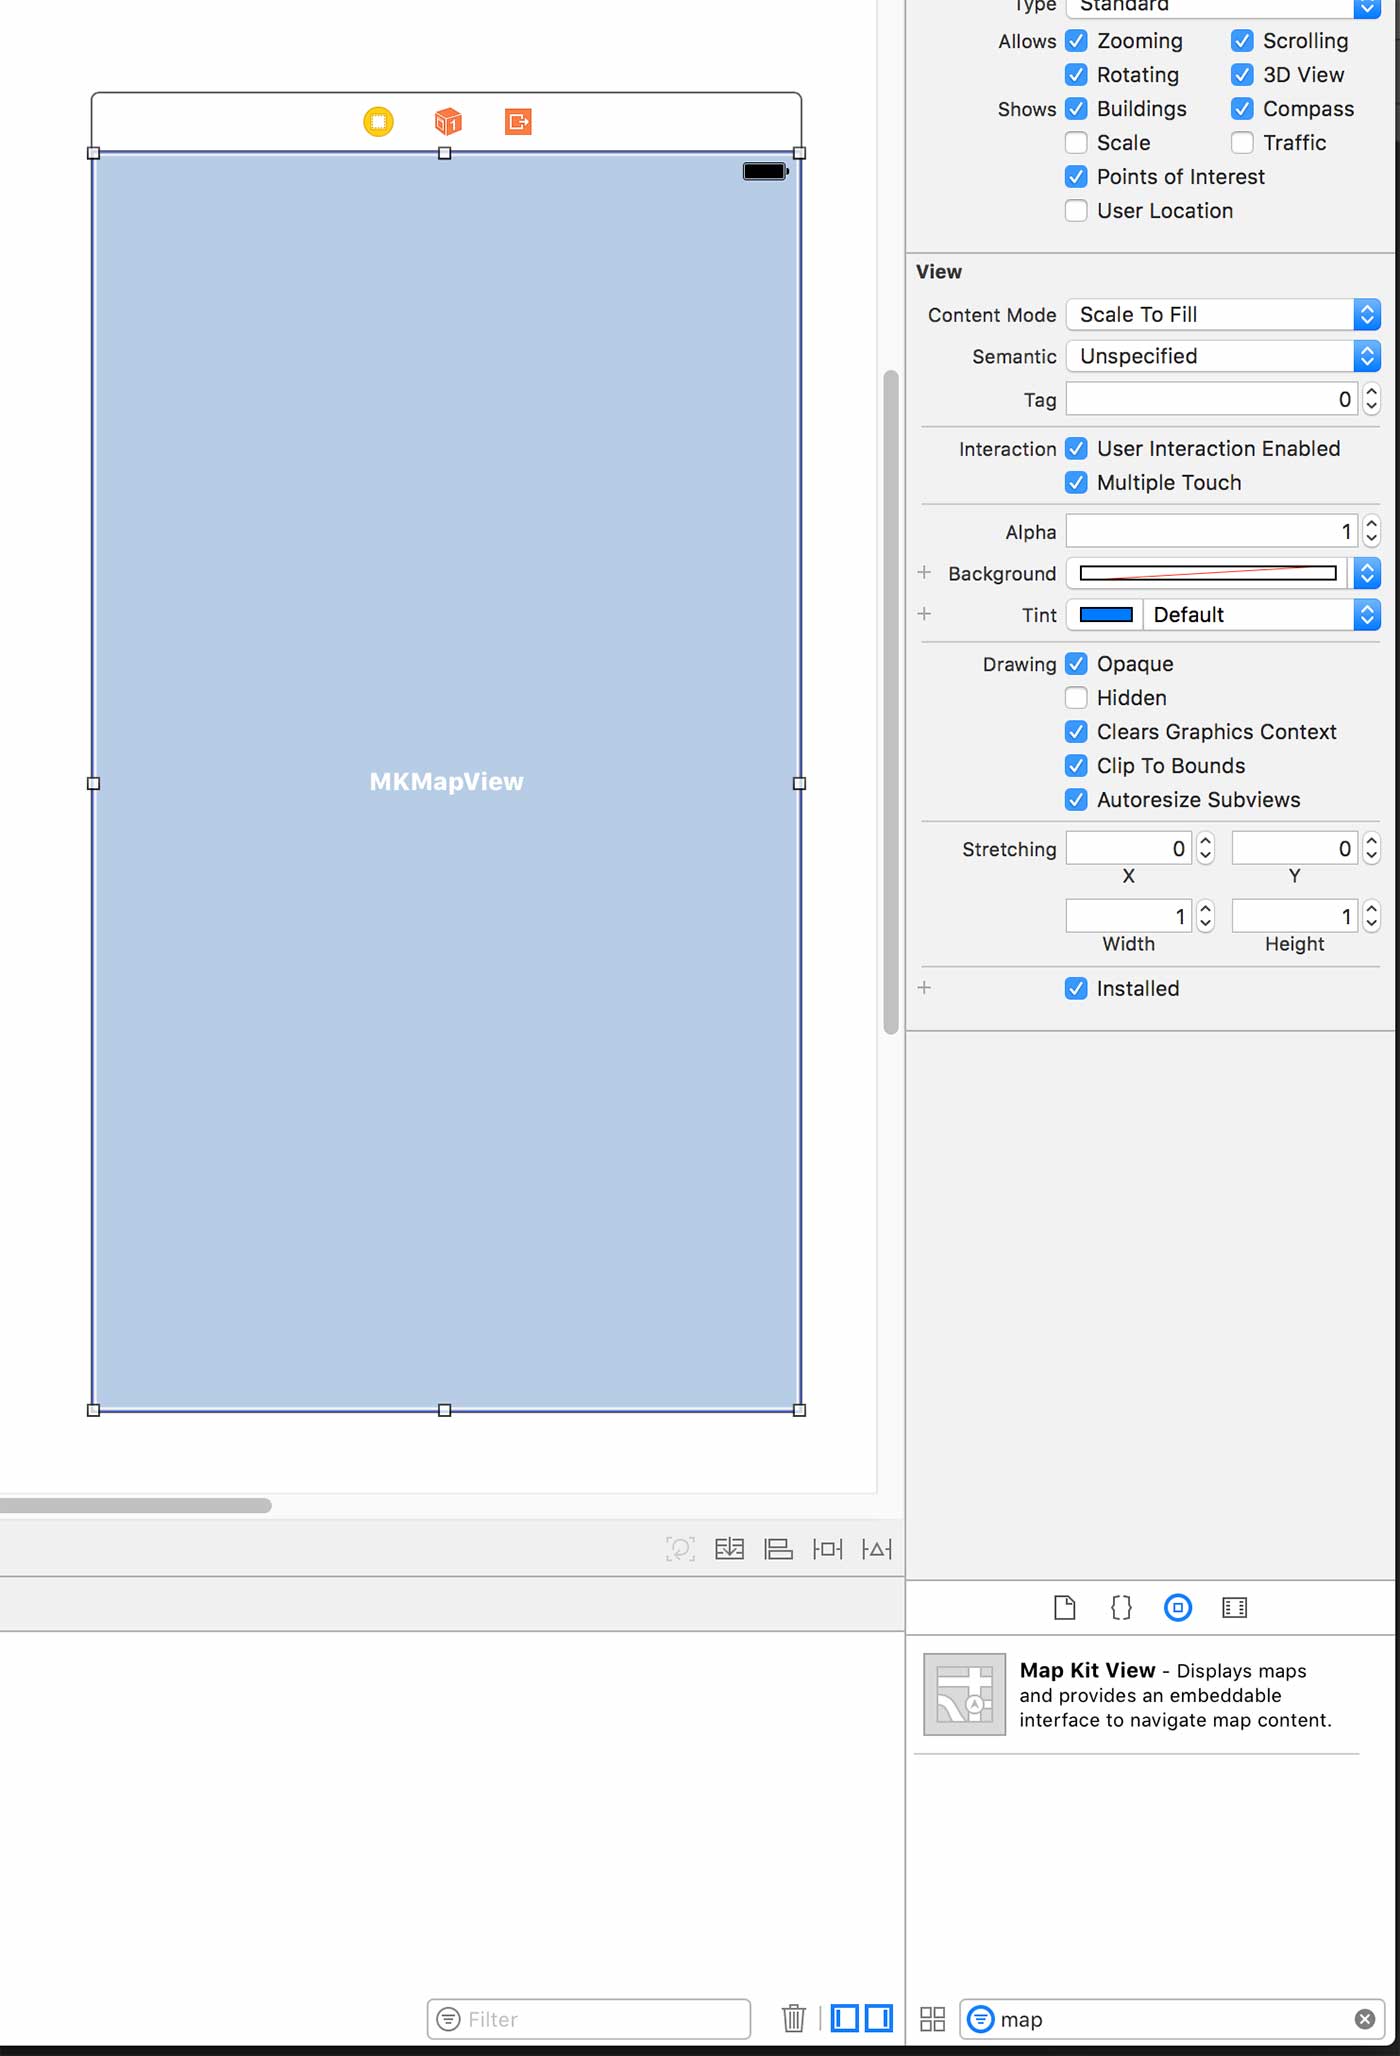
While still having the MapView highlighted, click the add constraints button shown in the screenshot below and then click each of the margins so it activates (it’ll become red). Make sure all the margins are 0 and “constrain to margins” is unchecked. Then click Add 4 constraints.

Now lets create a new Swift file so that we can interact with this Map View. Right click the root folder and create a new Swift file named “DetailViewController”
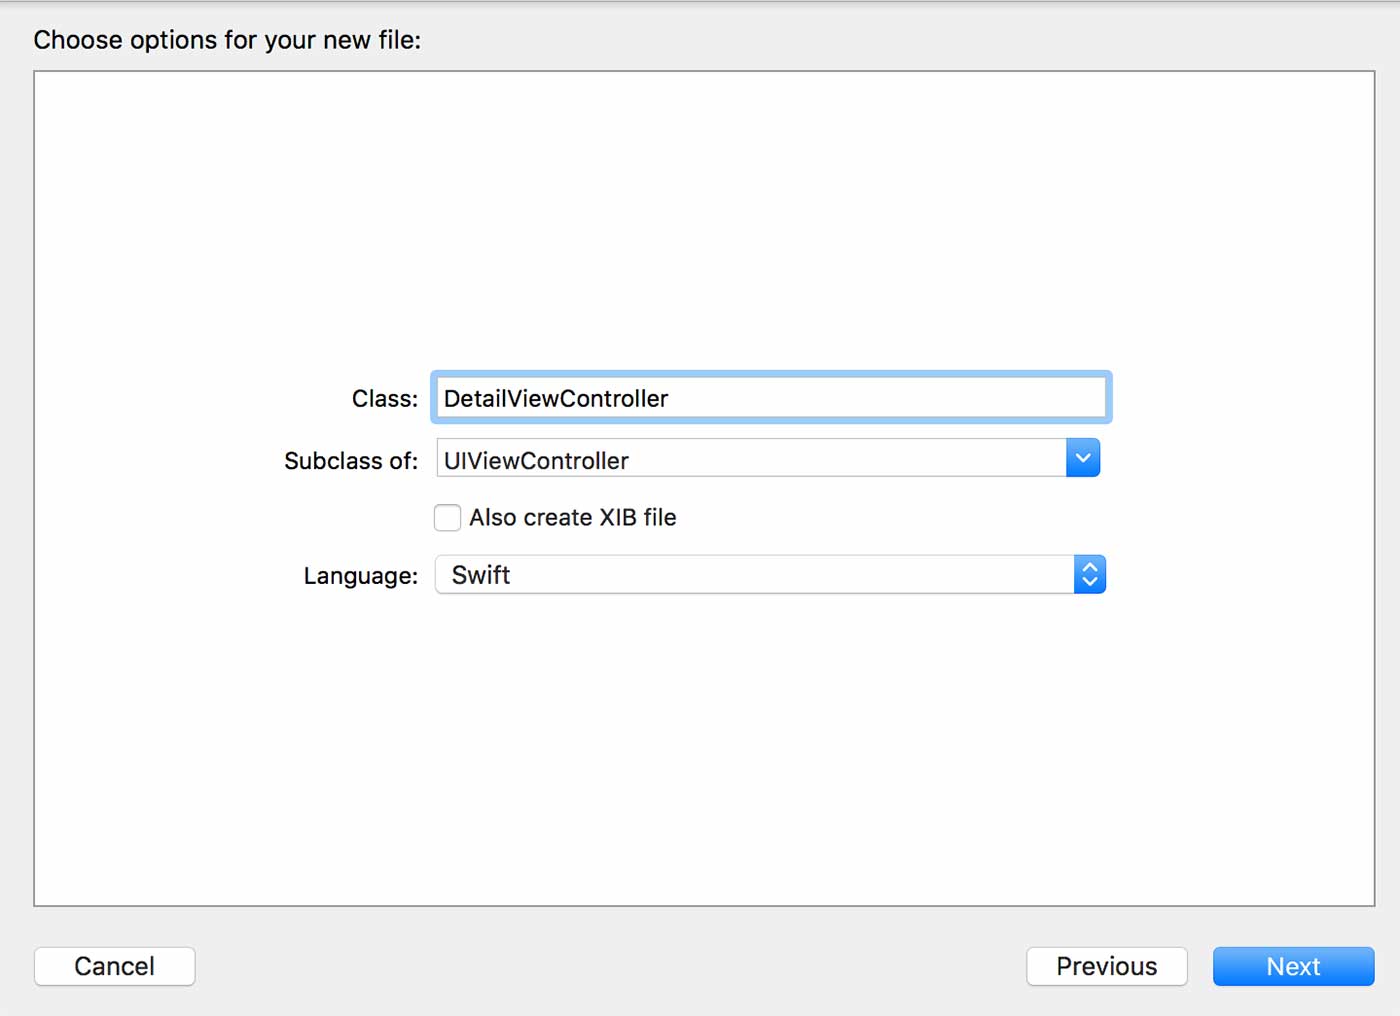
Let’s now define our class:
import Foundation
import UIKit

class DetailViewController : UIViewController {

    override func viewDidLoad() {
        super.viewDidLoad()
    }

}
Notice that we subclassing UIViewController and have the viewDidLoad method just like our other view controller.
After creating the class, go back to Main.Storyboard and select your second view controller. To make sure you are actually on the view, click on the following icon at the top of the view:

This will create that surrounding blue outline.
Now under the “Identity Inspector” in the right pane, we are going to specify that this view will be controlled by our DetailViewController.Swift class.

Now we need to control drag the map view to the our DetailViewController.Swift as we did previously when we connected our table view. If you forgot how to do this, please review the previous sections.
Name the IBOutlet “mapView”.
At this point you will notice an error, and that perfectly normal. We need to add the MapKit framework to our Xcode project so that it knows what MKMapView is.
Let’s also added a variable “selectedLocation”. This will store the location that is passed through the table view.
import Foundation
import UIKit

class DetailViewController : UIViewController {

    @IBOutlet weak var mapView: MKMapView!

    var selectedLocation : LocationModel?

    override func viewDidLoad() {
        super.viewDidLoad()
    }

}
4.6 Adding the MapKit framework
Click the project node in your file navigator and the center pane will change to the project settings.

Scroll down to “Linked Frameworks and Libraries”, click on the + sign, then search and add the MapKit.framework
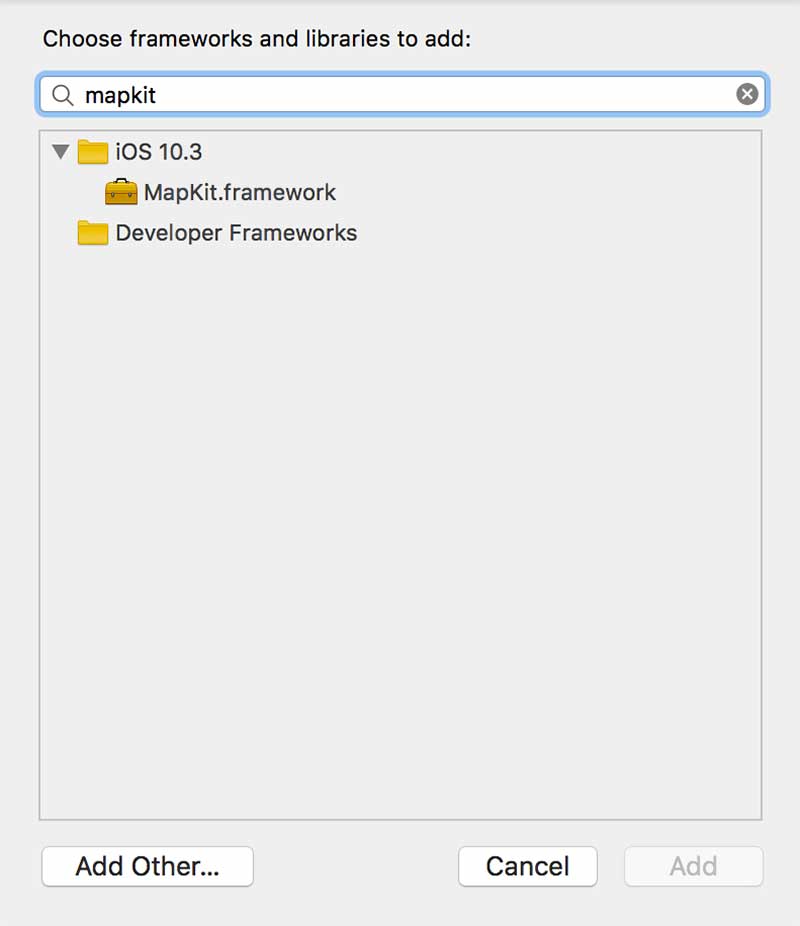
Now go back to the DetailViewController.Swift and under “import UIKit” add “import MapKit”. This will fix the previous error you were getting.
Now time to write some code!
4.7 Transitioning to the map view
Actually, there’s one more thing to do before we can start coding. We need to connect the the two view controllers so that when an address is selected from the table view, it can transition to the map view.
To accomplish this, we need to add a segue of the transition. A segue is like a transition that we call in our code to trigger between scenes.
To do this, we will control click on the yellow icon of our first view controller containing the table view, then drag the blue connection to the adjacent view controller containing out map view.
Head over to Main.Storyboard and let’s add that segue.
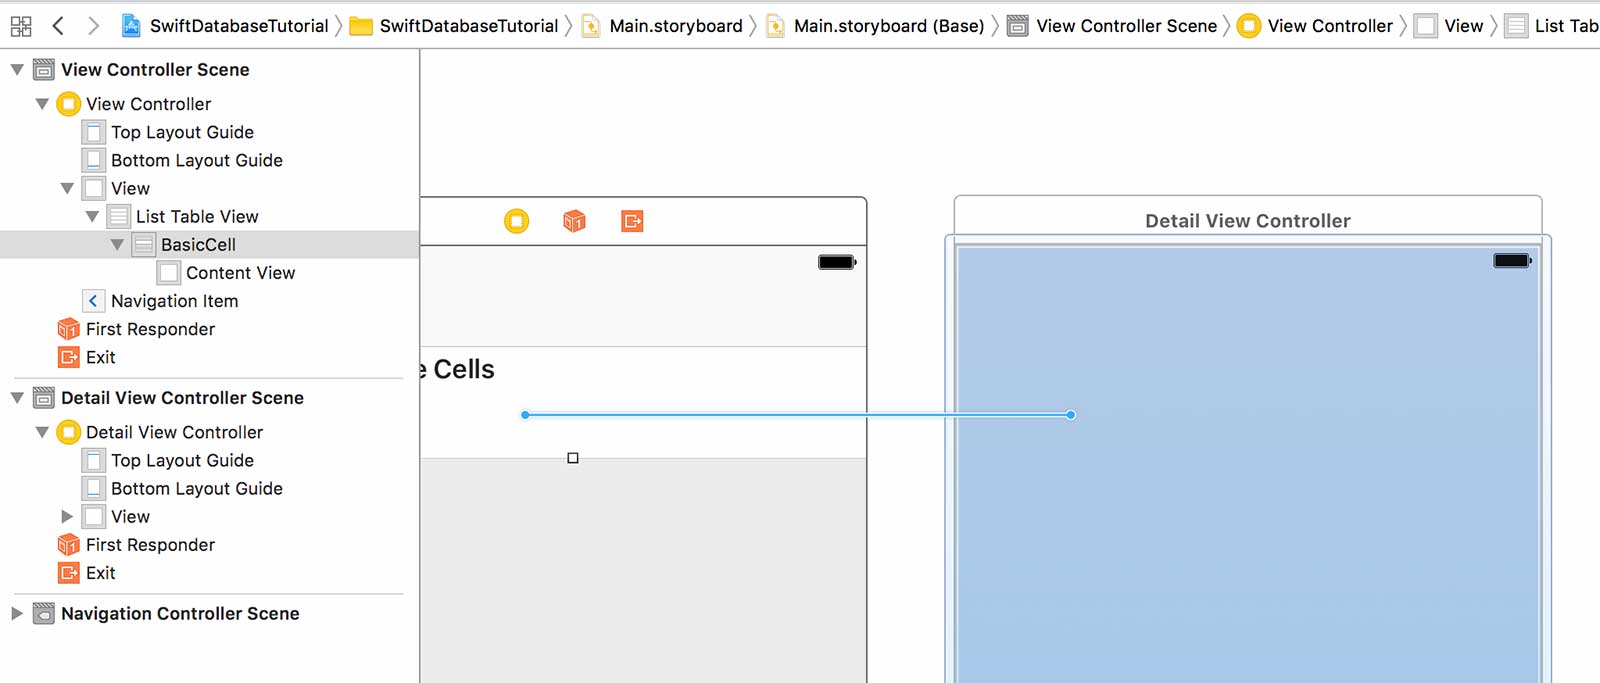
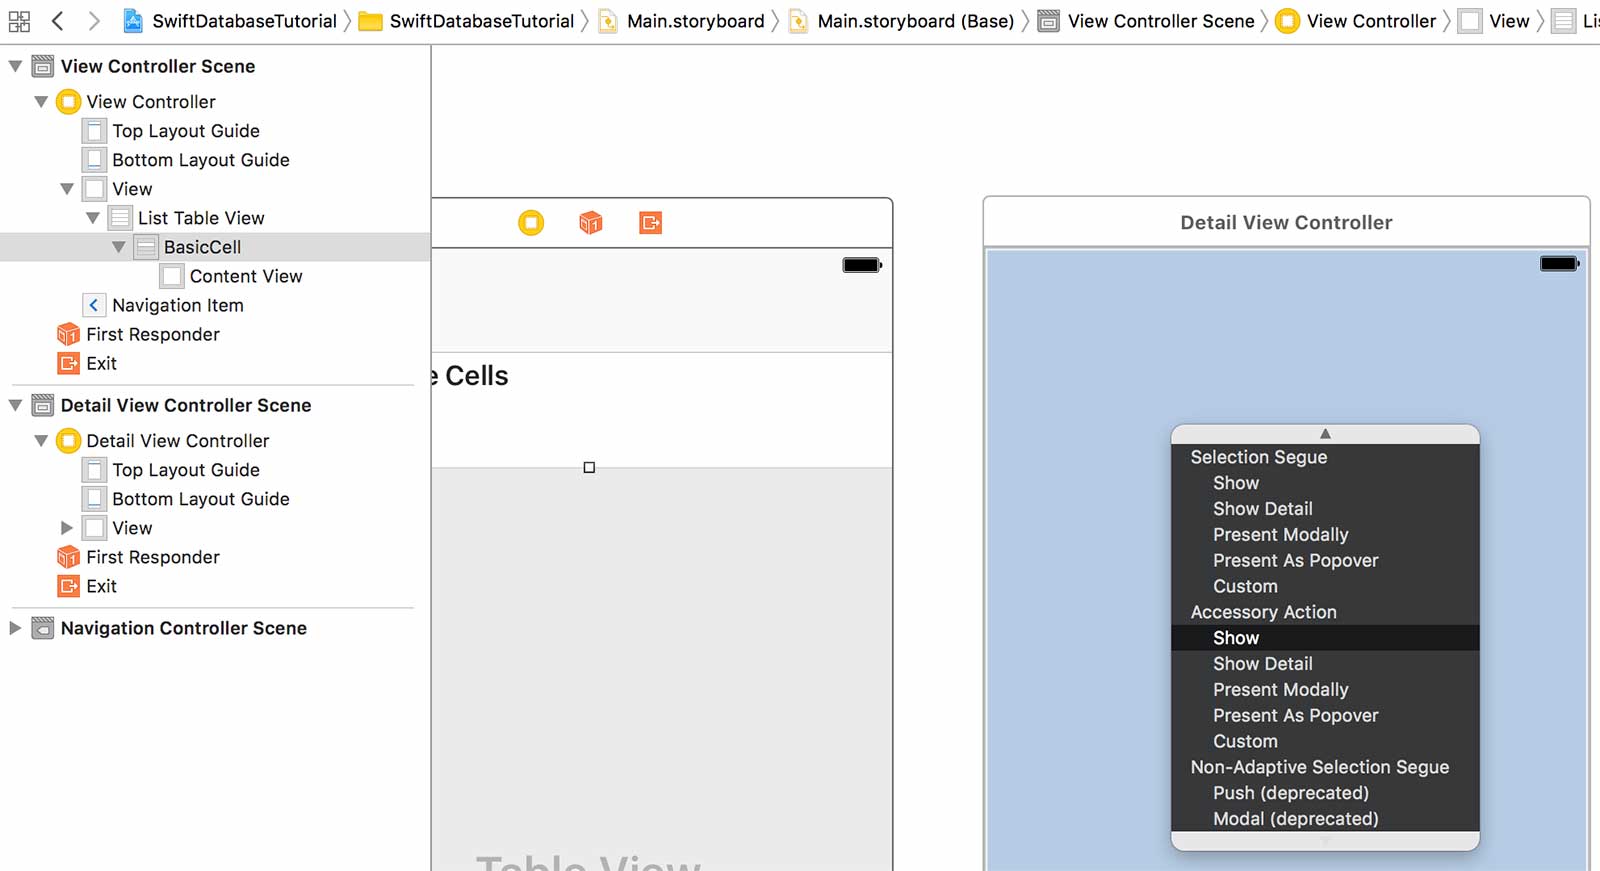
We are just going to use a “Show” segue, which essentially pushes the destination view controller onto the navigation stack and provides a back button to navigate back to the source.
After clicking “Show” on the segue menu, you should now see the connection between the two controllers.

Now we have to give this segue an identifier so that we can trigger it programmatically in our code.
Click on the actual segue and then under the “Attributes inspector” on the right pane, name the identifier “detailSegue”
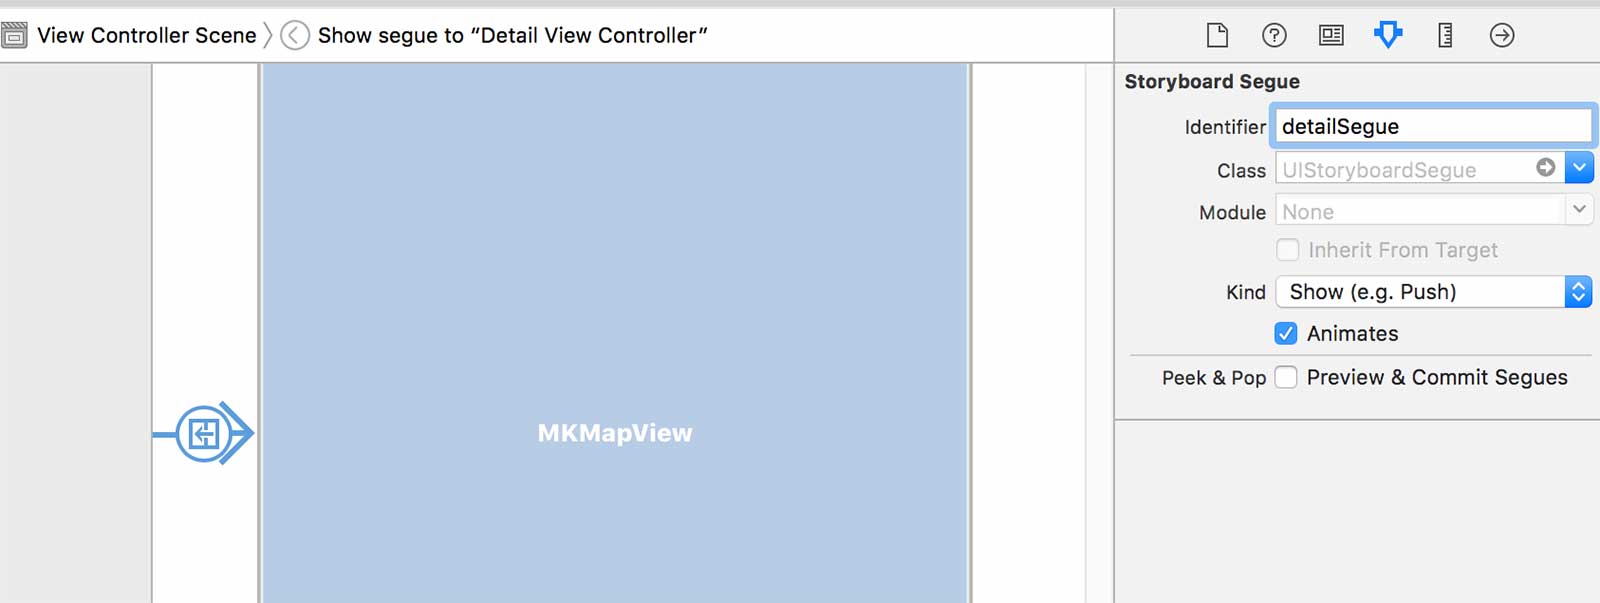
Let’s navigate back to our ViewController.swift so that we can add the code behind the segue.
    func tableView(_ tableView: UITableView, didSelectRowAt indexPath: IndexPath) {

        // Set selected location to var
        selectedLocation = feedItems[indexPath.row] as! LocationModel
        // Manually call segue to detail view controller
        self.performSegue(withIdentifier: "detailSegue", sender: self)

    }

    override func prepare(for segue: UIStoryboardSegue, sender: Any?) {

        // Get reference to the destination view controller
        let detailVC  = segue.destination as! DetailViewController
        // Set the property to the selected location so when the view for
        // detail view controller loads, it can access that property to get the feeditem obj
        detailVC.selectedLocation = selectedLocation
    }
On Line 50 we see another UITableView delegate method “didSelectedRowAtIndexPath”. This method gets triggered specifically when the user taps a row.
Since this ViewController has already assigned itself as the delegate of the table view element, it can implement this method.
In this method we store the Location object that the user clicks on via our “selectedLocation” instance variable.
Then we use our segue which we name “detailSegue” and call the “performSegueWithIdentifier” method listed on line 57. This method gives us the opportunity to execute some code before the view finishes transitioning.
At this point, the DetailViewController has already been created and we are referencing it via “segue.destinationViewController” on line 59.
Line 62 passes the Location object that was set in the previous method to our DetailViewController instance variable “selectedLocation”.
Now when the user taps an address, the view will transition to the second view controller containing the mapView.
It’s time to implement the code that will map the location!
Let’s head over to our DetailViewController.swift. We have access to the location object that we need to map thanks to the “prepareForSegue” method in our ViewController.
However, if we try to set the map location in the “viewDidLoad”, the map may have not finished initializing yet and we will not be able to see the animation to our desired location.
To fix this, we’re going to override the “viewDIdAppear” method and place the code there to allow a zoom in animation to our desire coordinates.
Here is the code you should add to your DetailViewController to make this happen:
import Foundation
import UIKit
import MapKit

class DetailViewController : UIViewController {

    @IBOutlet weak var mapView: MKMapView!

    var selectedLocation : LocationModel?

    override func viewDidLoad() {
        super.viewDidLoad()
    }

    override func viewDidAppear(animated: Bool) {
        // Create coordinates from location lat/long
        var poiCoodinates: CLLocationCoordinate2D = CLLocationCoordinate2D()

        poiCoodinates.latitude = CDouble(self.selectedLocation!.latitude!)!
        poiCoodinates.longitude = CDouble(self.selectedLocation!.longitude!)!
        // Zoom to region
        let viewRegion: MKCoordinateRegion = MKCoordinateRegionMakeWithDistance(poiCoodinates, 750, 750)
        self.mapView.setRegion(viewRegion, animated: true)
        // Plot pin
        let pin: MKPointAnnotation = MKPointAnnotation()
        pin.coordinate = poiCoodinates
        self.mapView.addAnnotation(pin)

        //add title to the pin
        pin.title = selectedLocation!.name
    }

}
Looking at the viewDidAppear method on line 15, we see the code that sets up our map.
Lines 17-20 set up the coordinates using the latitude and longitude properties of our location object.
Lines 22 and 23 initialize the mapView property and specify it to the appropriate region.
Lines 25-27 set up a pin and place it at the appropriate place on the mapView, and line 30 creates a name title for the pin when clicked.
Now try building your application and you should be able to transition from the table view to the map view where you will see a pin located at the address tapped.
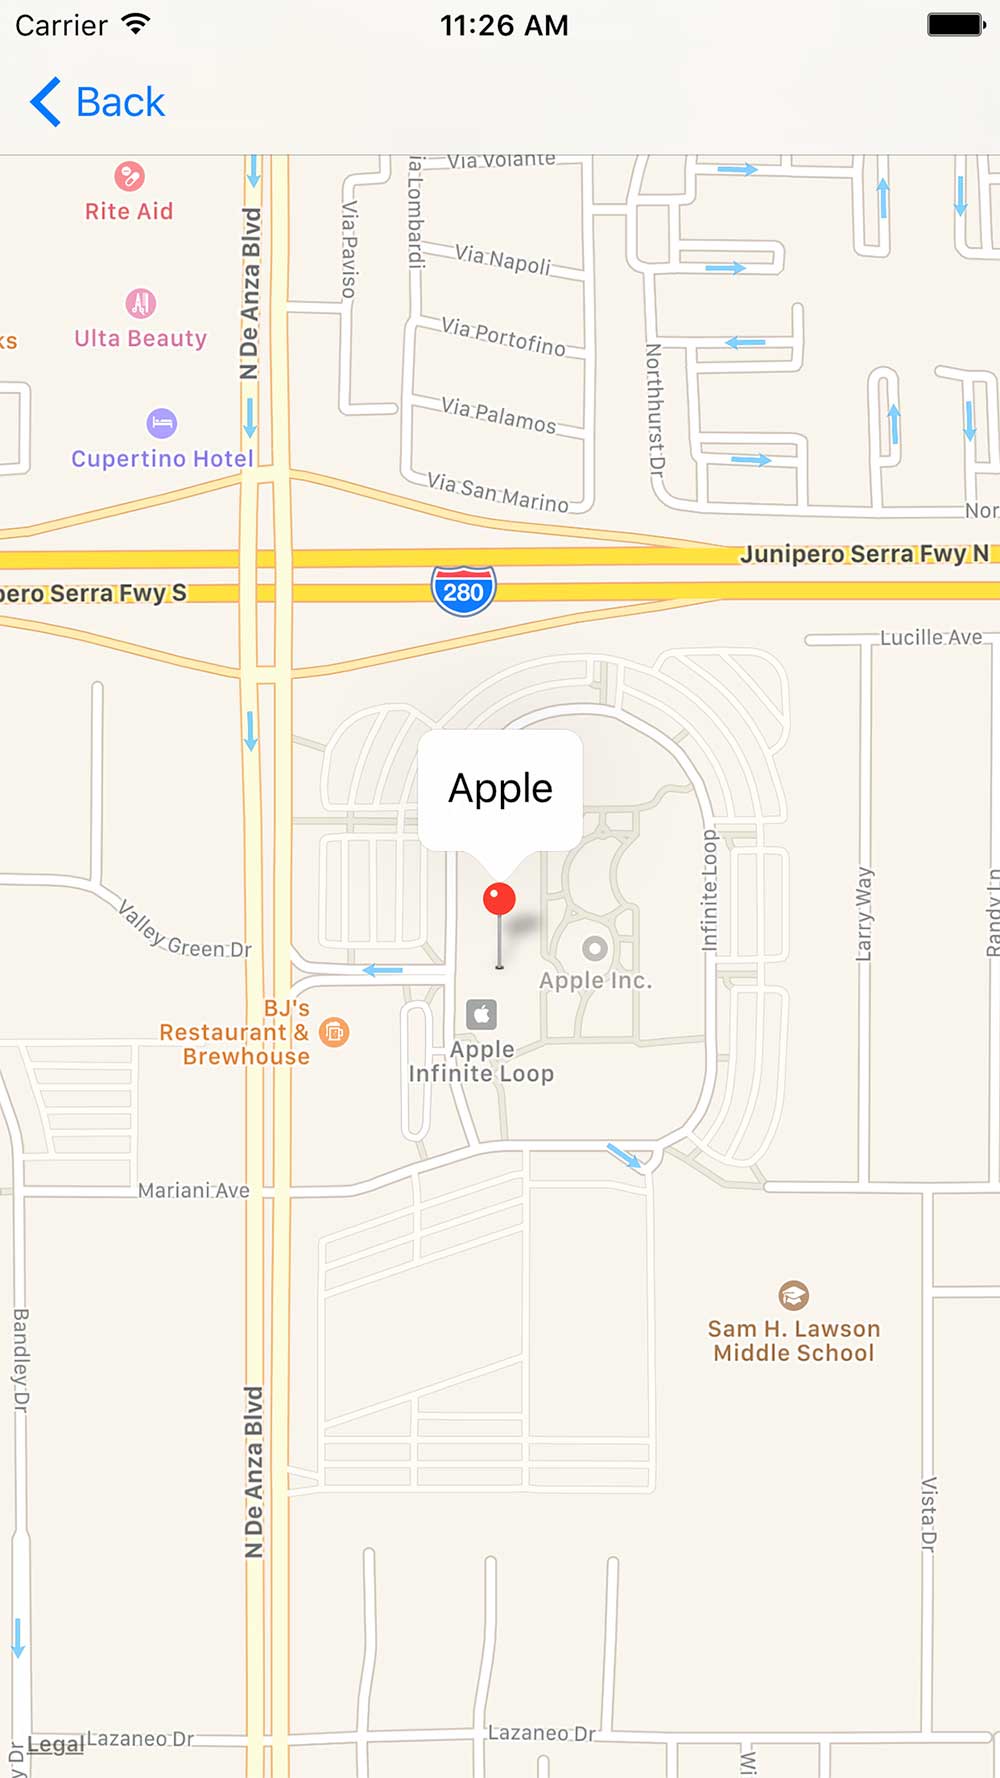
Let’s go ahead and do a little customization for the fun of it.
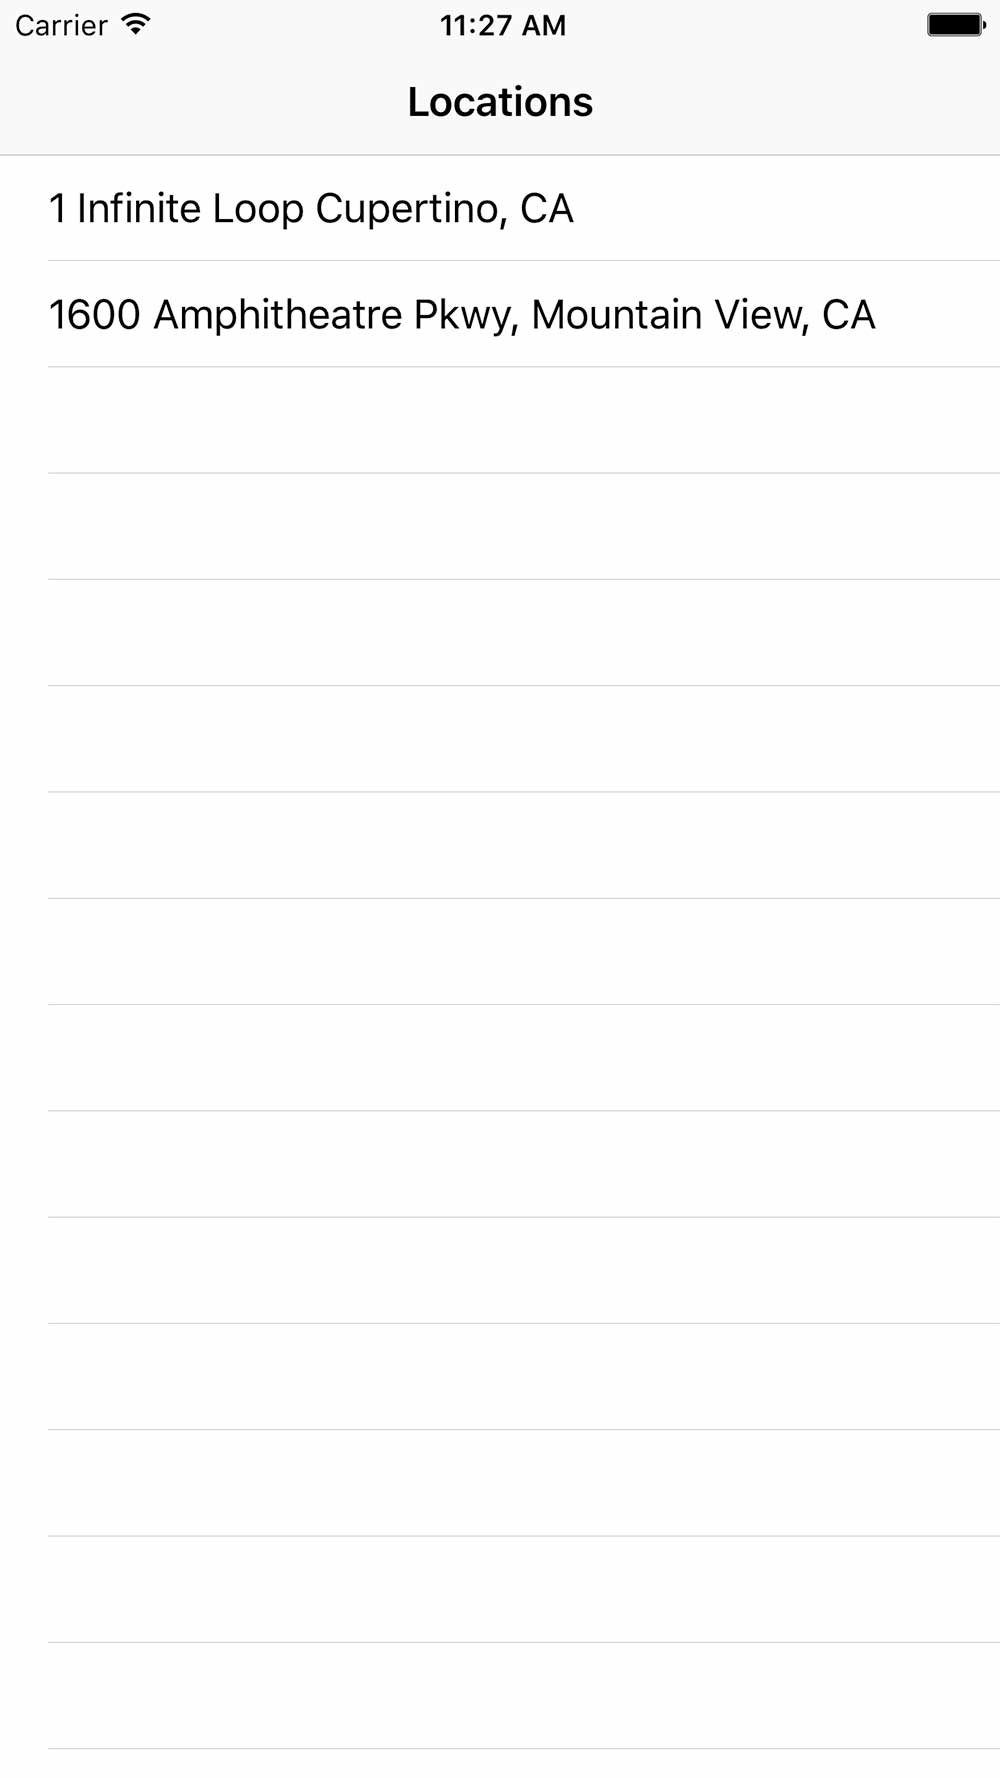
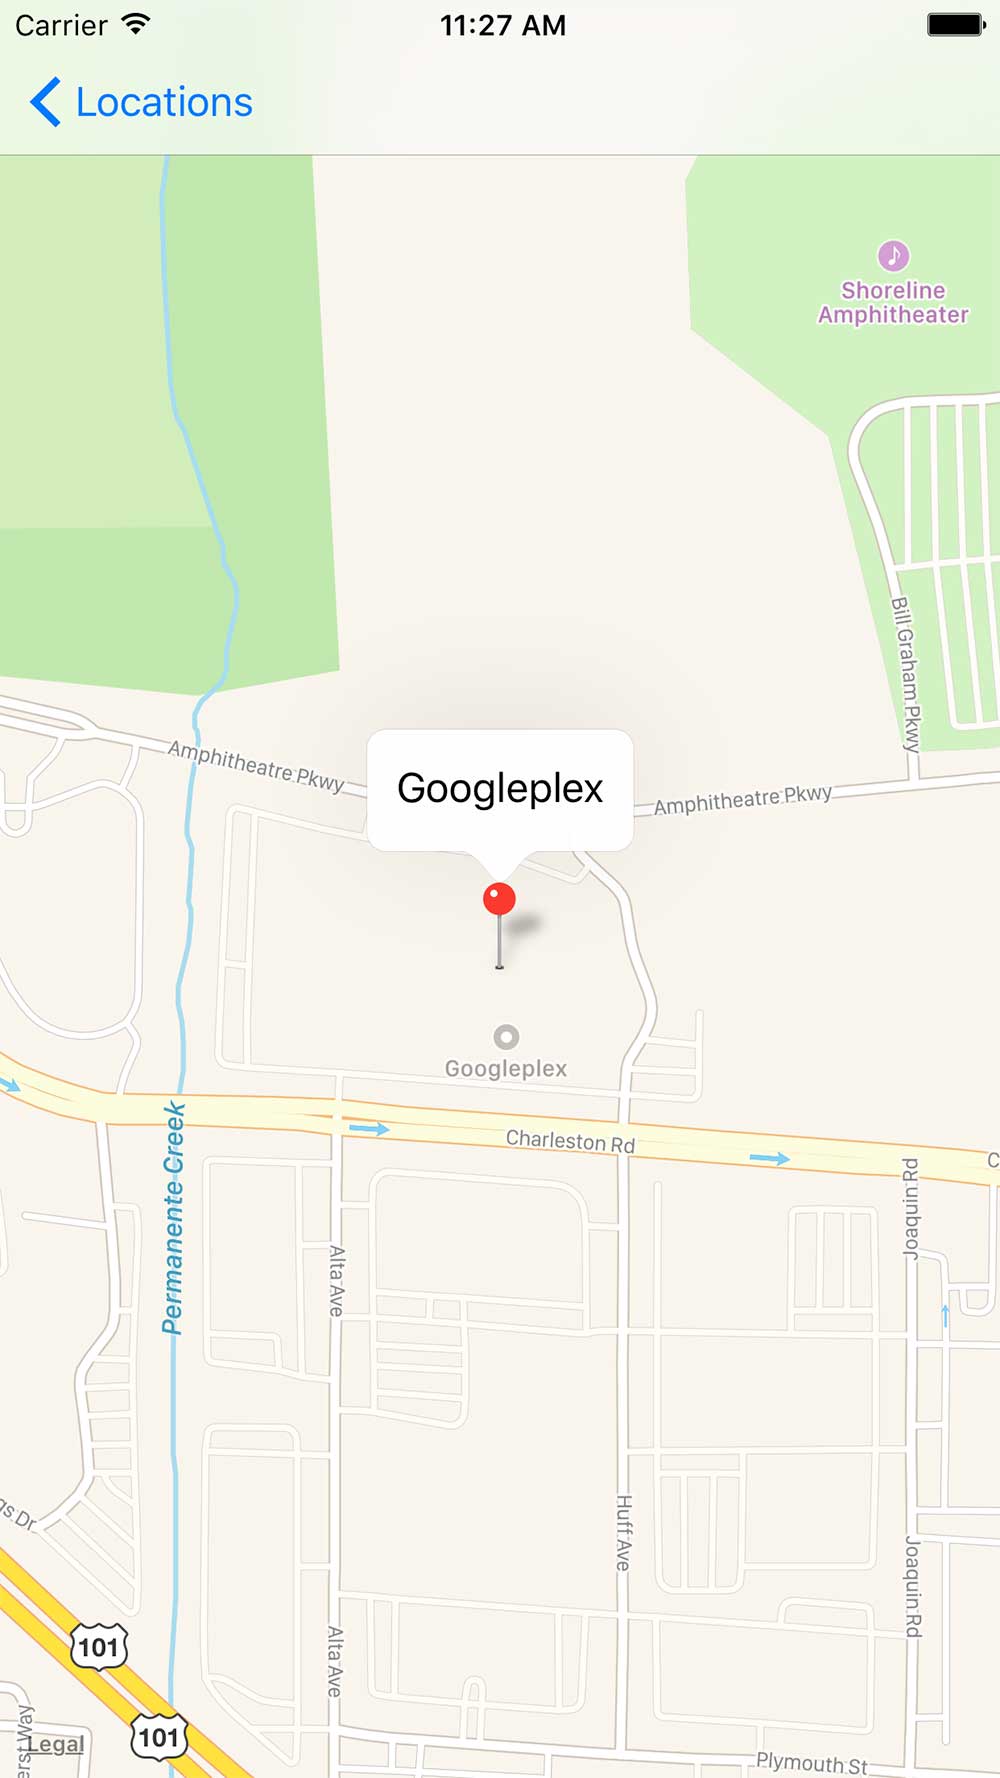
Head over to the Main.storyboard and click on the top portion of the view controller containing the table view. This should pull up the “Navigation Item” menu under the “Attributes inspector” in the top right pane.
You can adjust the title of this view controller and the title of the back button located on the other view controller containing the map view.

Conclusion
So there you have it! How to connect to a MySQL database from an iPhone app or more accurately put, how to retrieve data from a MySQL databased from your app.
I realize that some of the Swift code in this article may be foreign to you but for students of my course, this is all code which they have learned already.
I highly encourage you to check out the course or start with the basics if you haven’t done that yet.
Please help me by sharing, tweeting and liking it with the social buttons below. I really appreciate it!


