Note: Newly updated for the latest version of Swift and Xcode!
If you’re used to working on websites and web apps, you might think that your iPhone app can connect directly to MySQL but unfortunately that isn’t the case.
We need a middle layer that sits in between the app and the database which will manage the transactions between them.
Don’t worry, we’ll go through all of that in this tutorial.
Here’s what we’re going to go through:
For web hosting, I choose to go with Bluehost because of their excellent customer support (I can get ahold of a real person pretty easily). Furthermore, I can create multiple MySQL databases and attach unlimited domains to one hosting plan which means that I can use this single plan for multiple websites or projects.
If you already have web hosting then feel free to use that. As long as you’re able to create MySQL databases, then you’re good to go!
Otherwise if you’re thinking of creating your own website or MySQL powered iPhone app, Bluehost is a great choice and you can also get a discounted price by going through the link below:
Just to be transparent with you guys, at no extra cost to you, I’ll earn a commission if you decide to sign up so thank you for your support! It allows me to continue to provide high quality tutorials for you guys free of charge.
So if you’ve already got your own hosting, you can skip this next part; otherwise, I’m going to walk you through how to sign up for your hosting and set up your MySQL database so that later on, we can use our iPhone app to connect to the data we store inside of it.
1.1 Bluehost landing page
On this page, click the green “get started now” button.
On the next screen, you’ll be able to select a hosting tier.
Typically I just choose the cheapest option because you can always upgrade later on if you need more power.
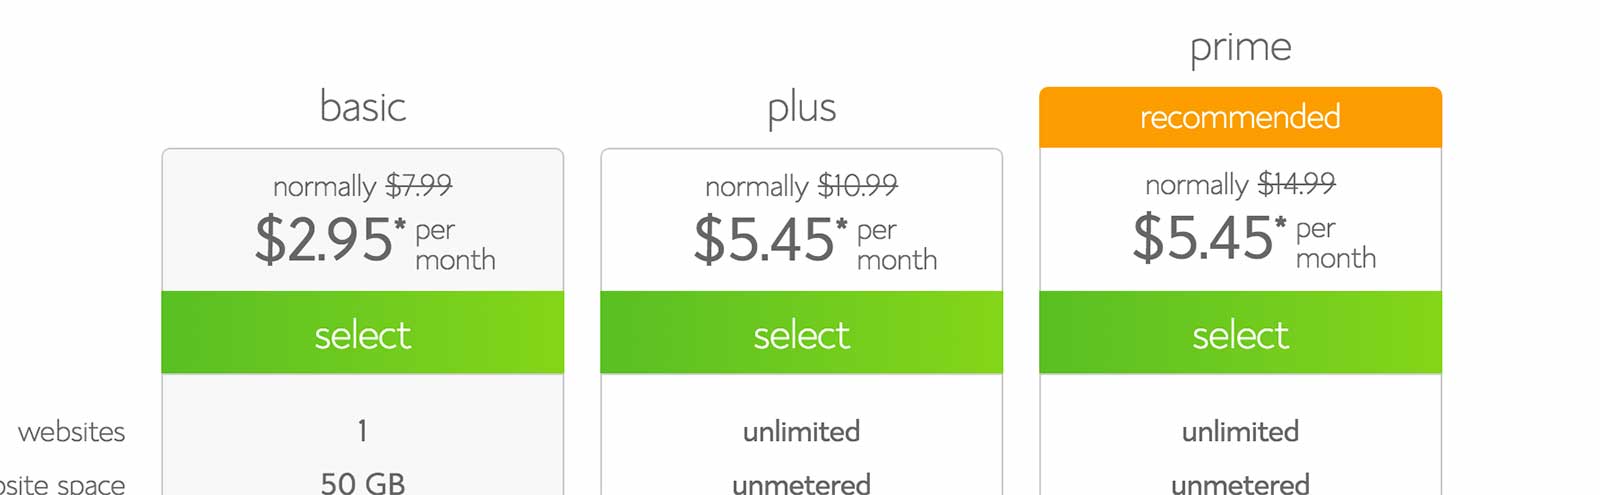
Select a tier (I chose Basic) and you’ll see the next screen:
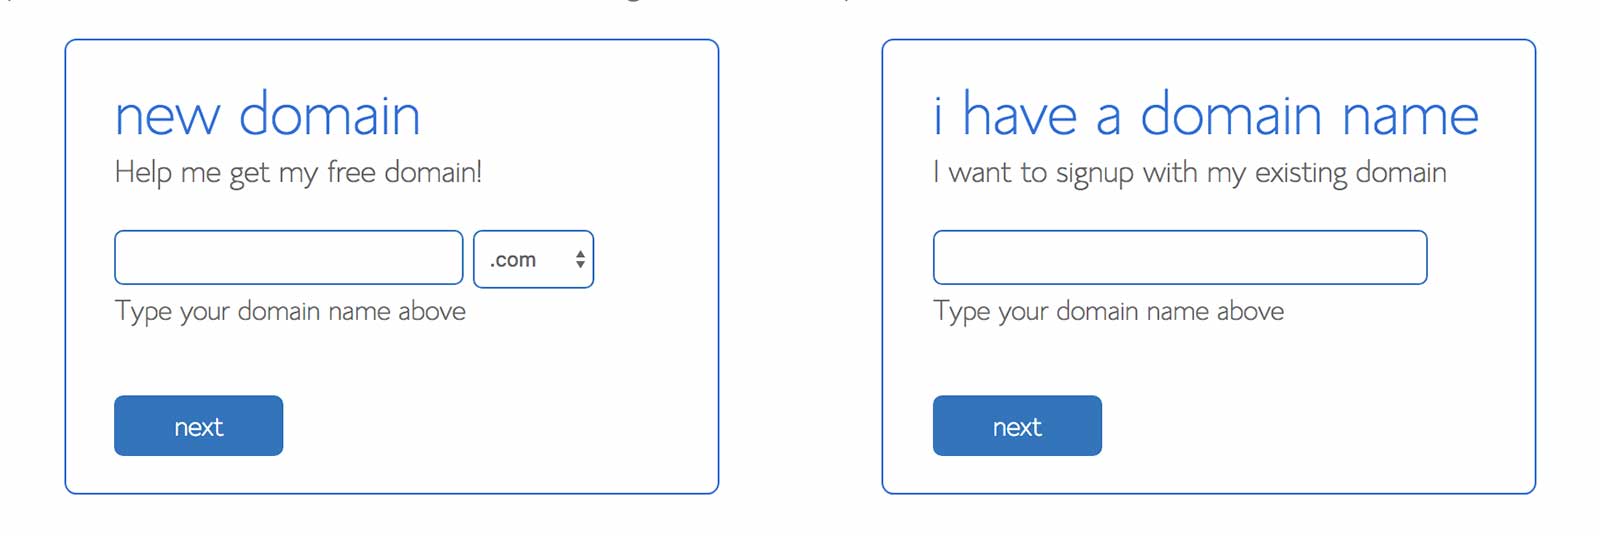
1.2 Sign up page
On this page, you can either choose to sign up for a new domain or use an existing one that you have.
A free domain name is included with your plan, so I would recommend creating a new one as it’s worth about $10 a year.
The second option to “transfer your domain” is worded a little strangely because you don’t actually have to transfer the domain to Bluehost. Rather, you just have to go to your registrar where you registered your existing domain name and then change some configuration settings to point to Bluehost.
In this tutorial, I already have an existing domain name to use so I’m going to type it into the “I have a domain” box and click next.
If you need a new domain name, then type in your desired domain into the “new domain” box and click next.
1.3 Account information and web hosting plan selection
This is the final page of the sign up process and you’ll have to provide your account information, select a web hosting plan and enter your billing information.
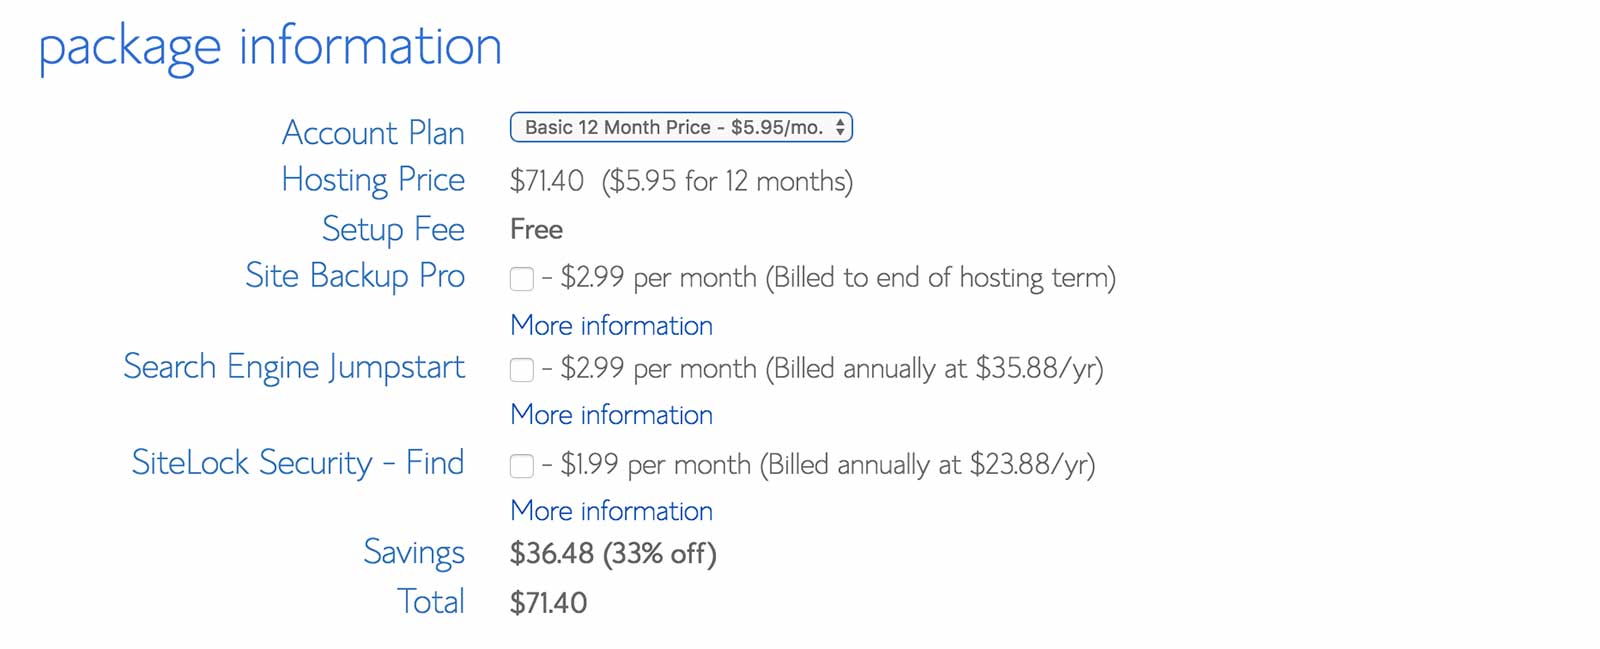
The account information part is pretty straight forward but I will say that you need to provide a real telephone number because they’ll give you a call to confirm your order (they’re on the ball with fraud and security!).
For the hosting plan, you’ll get the best rate if you go with a 3 year plan but it depends on your budget. One thing to note is that the payment is up front, however it’s not a contract and you can cancel at anytime (you’ll get a full refund within 30 days or after 30 days, you’ll get a refund for the unused portion of your selected plan).
If you choose to go with the 1 year plan, you end up paying less up front but more in the long run if your app or website is successful and you need to renew it in a year.
As for the other options like SiteLock or Site Backup, I usually opt out of those but for the Domain Whois Privacy option, I do consider getting that to keep my domain registration information private. You can click the “more information” link to see a comparison of what your domain registrant information would look like with and without whois privacy.
After you enter your billing information, you’ll be directed to a confirmation page.
1.4 Confirmation page
Congratulations! You’re nearly finished with setting up your account. The next step is to set a password. Follow the link to create a password.
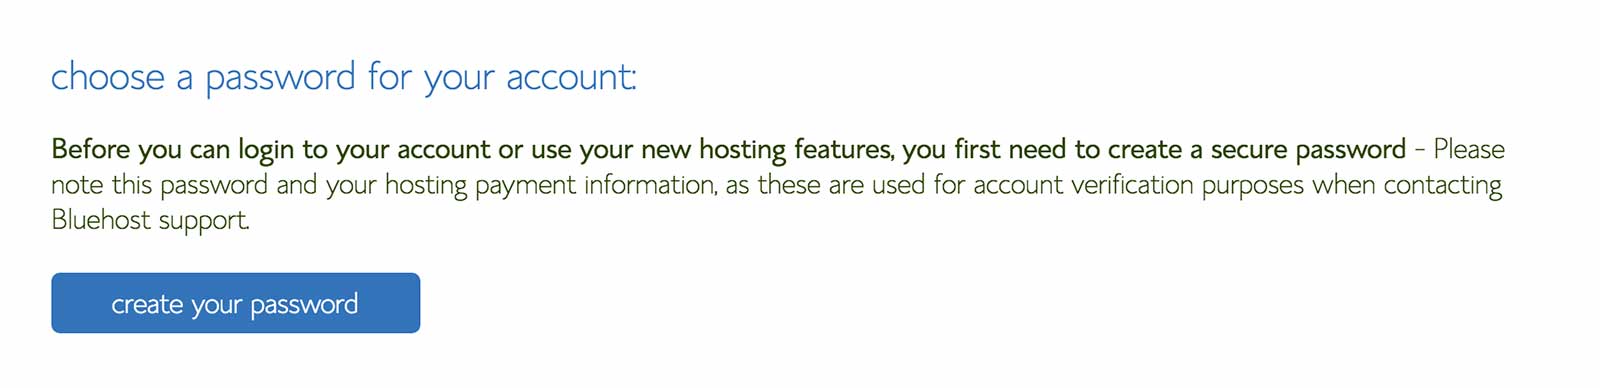
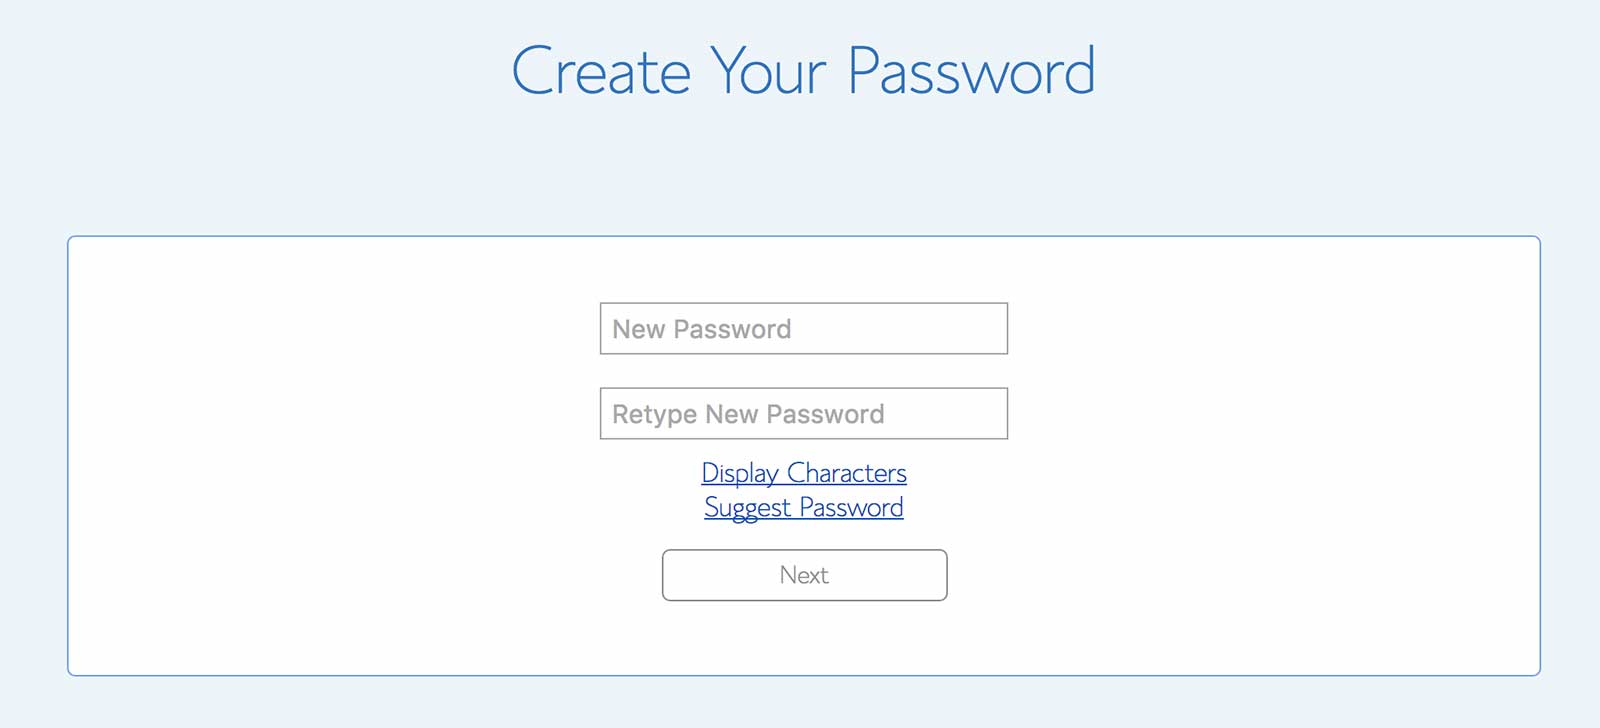
Be careful to choose a password that will satisfy all the conditions it outlines.
You won’t be able to save your password until the “password strength” bar is green.
Once you come up with a worthy password, click “Save”.
1.5 Setting up your account
Now that you’ve signed up and set your password, all you have to do is wait for your activation email to arrive in your inbox.
Until then, there are certain areas of your control panel which you won’t be able to access because they’re still setting up your account. Unfortunately, setting up a new database is one of those tasks where you have to wait until you get your confirmation email in order to do.
Usually it’ll take about 15 minutes but if you don’t receive it after a while, don’t hesitate to contact support via live chat. You can get a hold of a live person in a few minutes and they’ll help you resolve any issues!
What’s next
Now you’re ready to create some sites and databases to power your iPhone apps.
Let’s move forward!
Once you’ve received your confirmation email from signing up, you can now login:
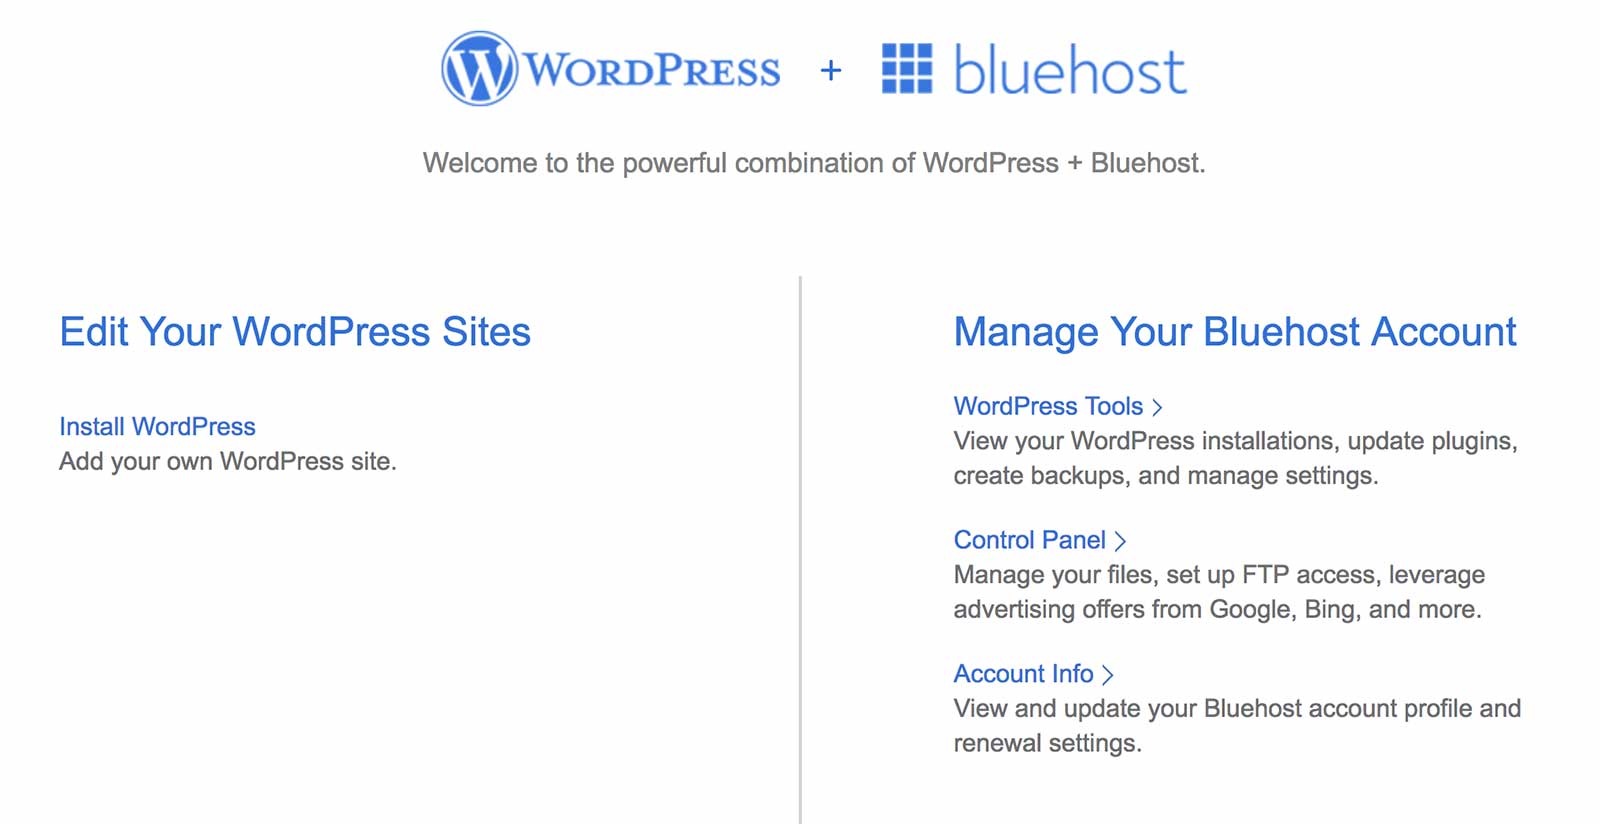
Click the “Control Panel” link.
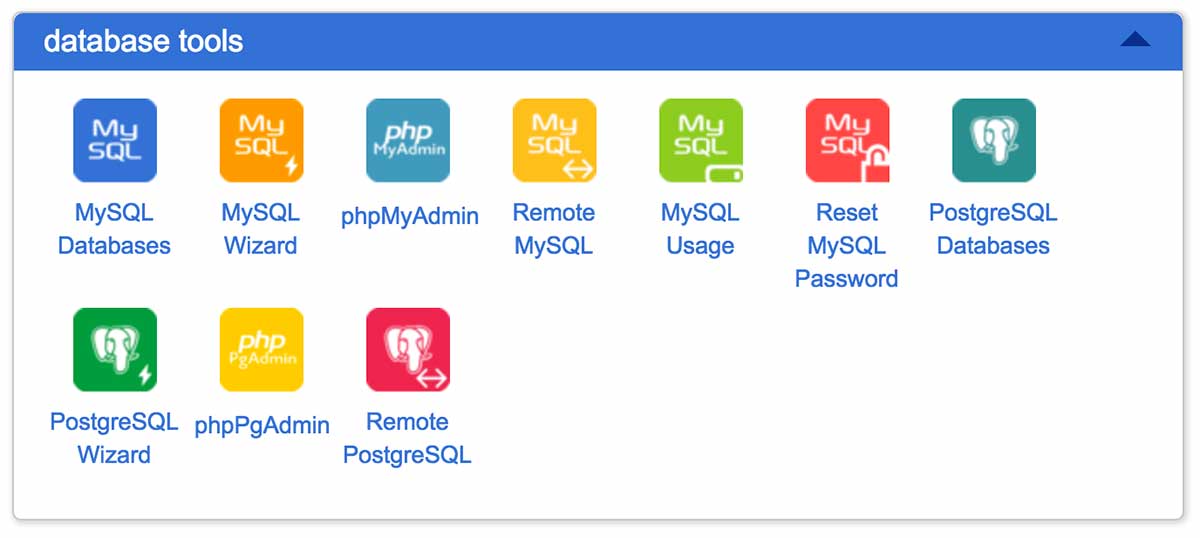
You’ll be brought to a screen with lots of options and icons.
Scroll down until you find the “Database Tools” option and then click “MySQL Databases“:

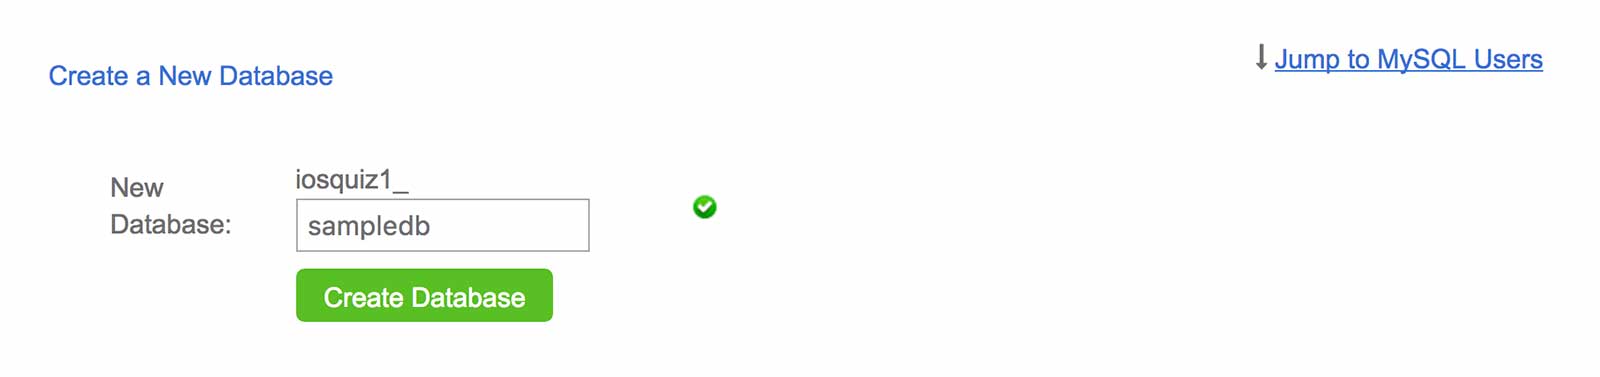
Next you’ll get to the database screen where you’ll do 3 things:
– Create a new database
– Create a new database user
– Add the user to the database
So in the screenshot below, I’ve named my database “sampledb“.
Then click “Create Database”.
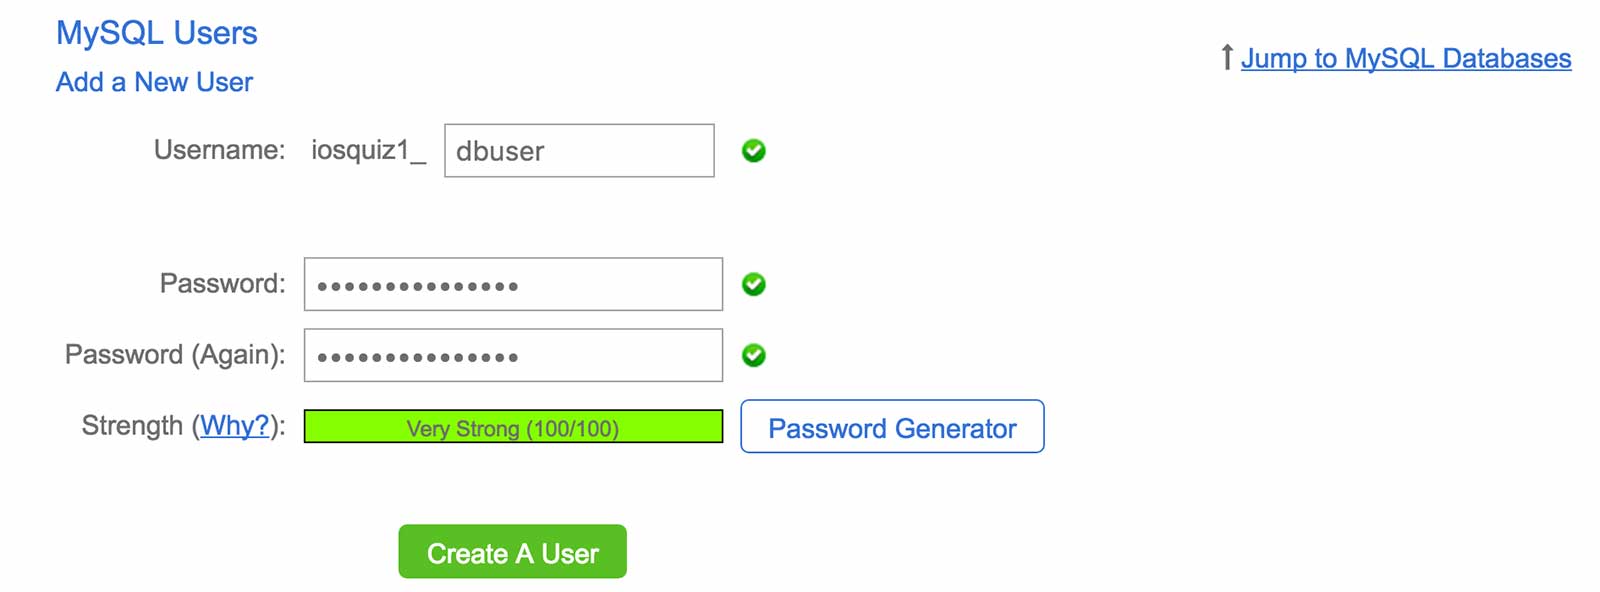
2.2 Create a new database user
Next, we need to create a new database user.
Give the user a name and password and click “Create User”.
2.3 Add the user to the database
Finally, we need to give this user access to the newly created database so in the form below, choose the database you created from the dropdown and choose the user that you just created and click “Add”.
For now, let’s grant this user all the privileges so that we can set up our database tables.
Later on, we’ll remove most of these privileges and limit the user to just reading data to secure it.
Alternatively, you can create two new database users, one with only read privileges and one with all privileges to act as an administrator.
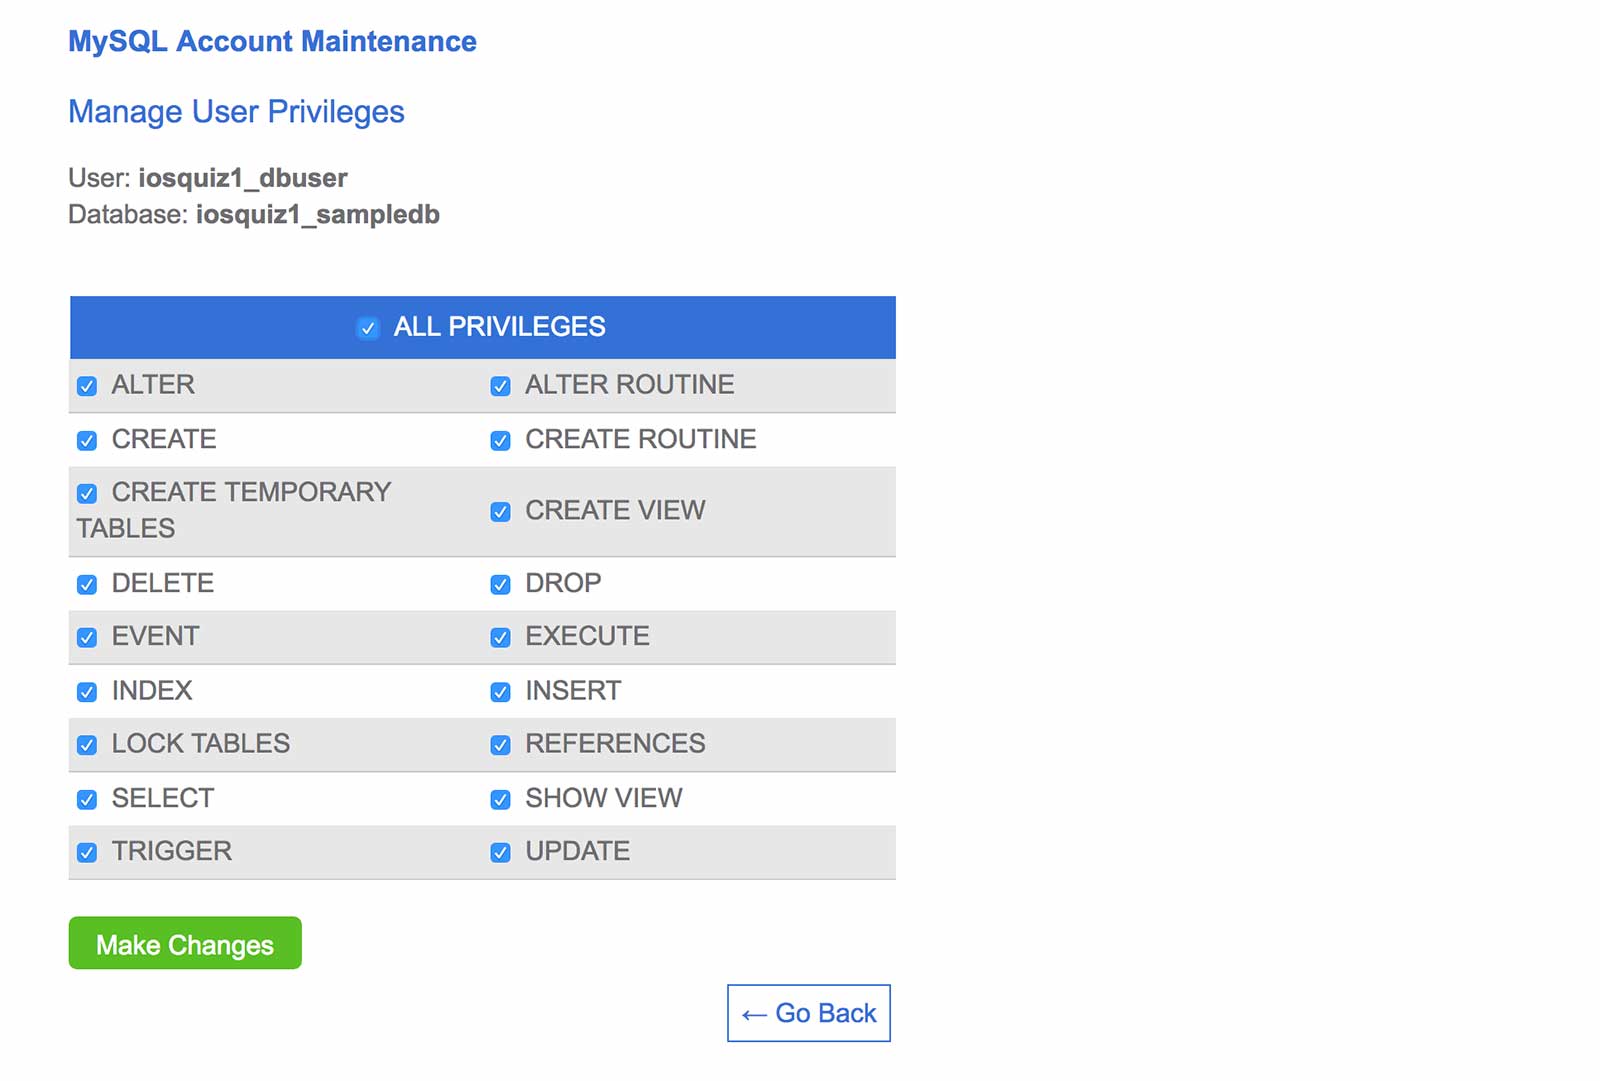
Click “Make Changes” and now we’re ready to go!
2.4 Setting up database tables and users
In this section, I’m going to explain how we’re going to get our iPhone app to connect to the MySQL database and we’ll also create some database tables and fill it with some data.
First, let’s explain how we’re going to do this.
Unfortunately the iPhone app is not going to be able to connect directly to our MySQL database. What we need is to create a middle-man that will facilitate the database operations.
This is where the PHP web service comes in. The web service is going to sit on our web server and when the iPhone app sends a request to it, it’s going to query the database for the requested data and then return it to the iPhone app in a format that it can understand.
Now, you’re not limited to using PHP to write your web service but PHP and MySQL usually go hand in hand so that’s what we’ll be doing today.
Here’s a diagram of what the system looks like:
So before we build the iPhone app or the PHP web service, let’s create some database tables and fill it with data.
In this example app, I’m going to demonstrate a common scenario of pulling a list of locations down from the database and displaying the locations in a tableview (scrollable list).
When the user taps on a location, it will show a map view with a pin indicating the location.
So, in our database we’re going to want to store a list of locations.
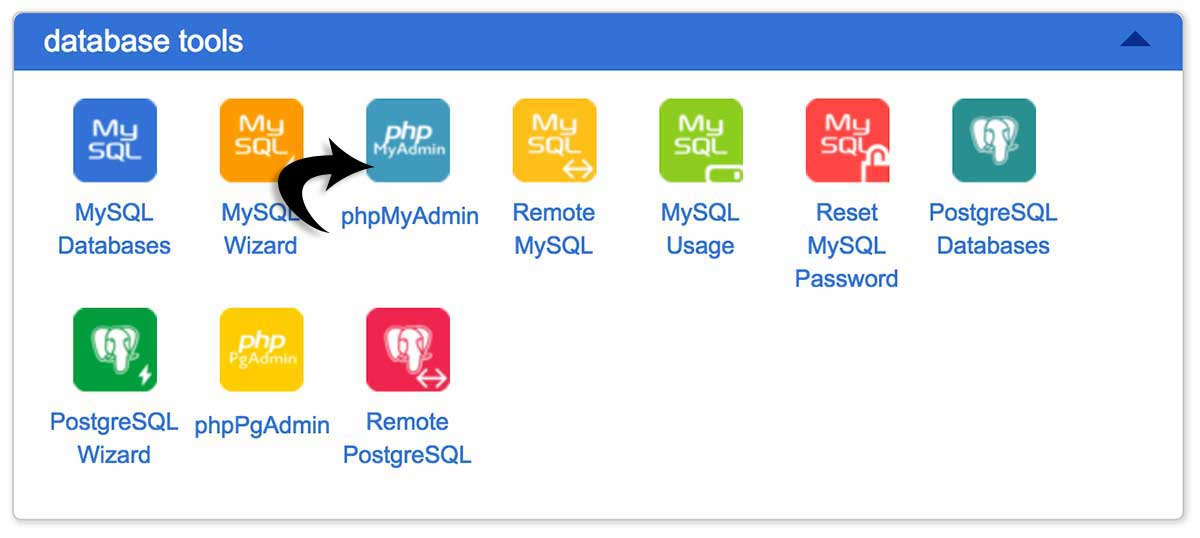
Start by going back out to your Bluehost control panel and looking for the phpMyAdmin icon.
It should be under the “Database Tools” section. When you find it, click it to go into the database management tool.
(If you don’t see the icon, double check the menu at the top that you’re in the “cPanel” tab and not “Home”)

If you encounter a login screen, you should login with the same database user credentials that you created earlier.
If it doesn’t prompt you to login, you’ll arrive at a screen like this:
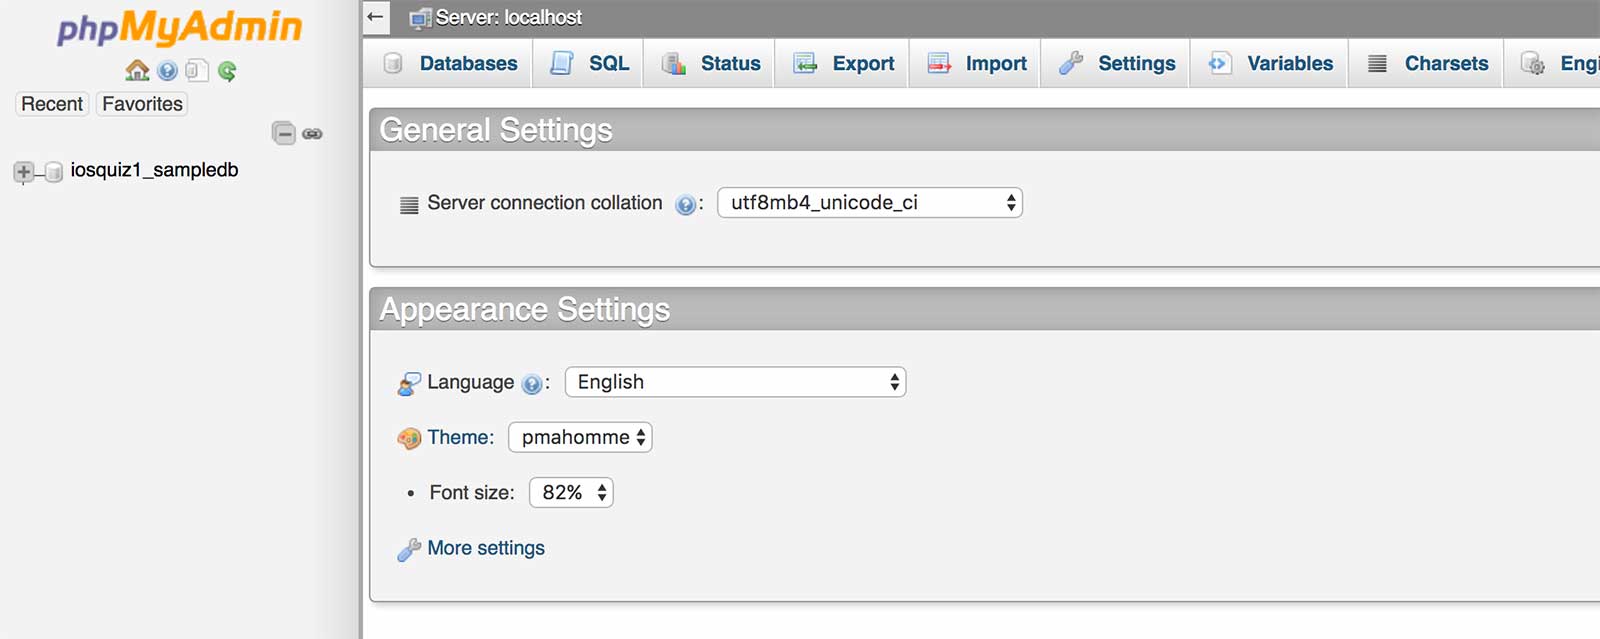
If you notice in the left hand side, it’s the database we created!
Click that database that we created and then the right hand pane will change to show us its details.
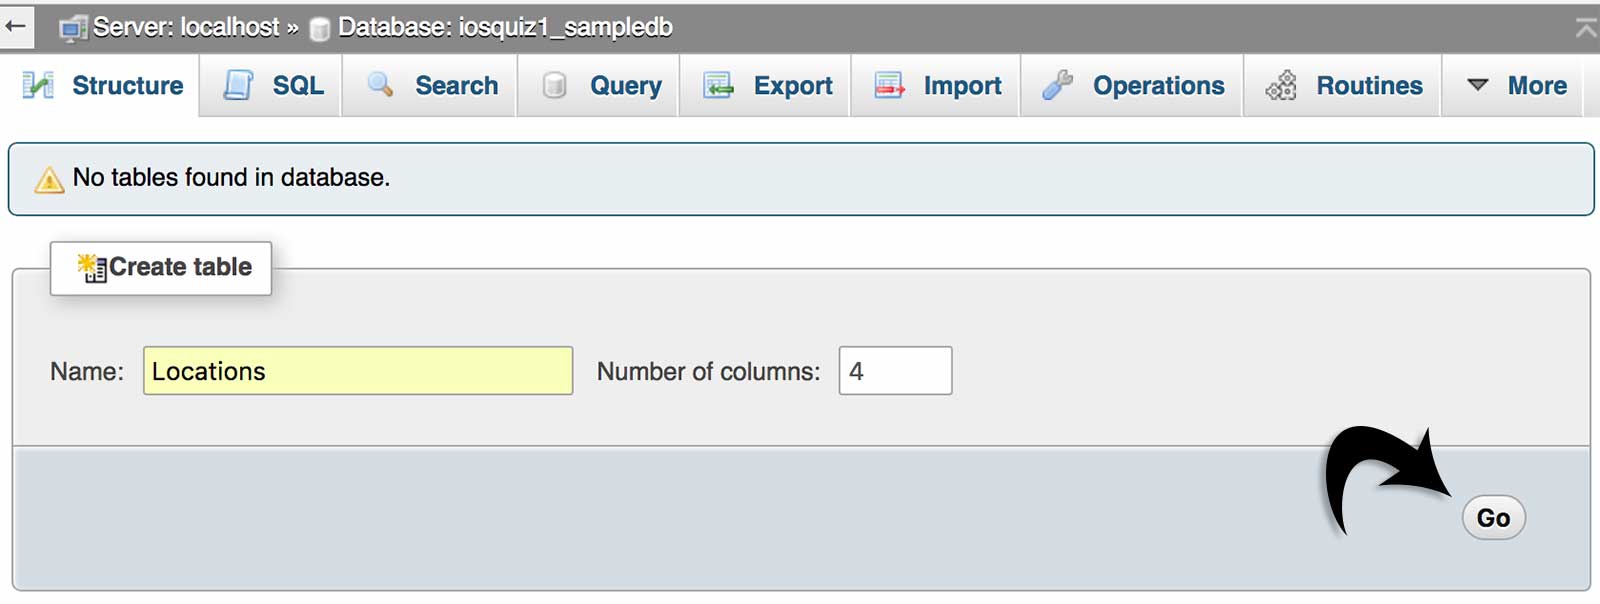
Call your new database table “Locations”, enter “4” for the number of columns and click “Go”.
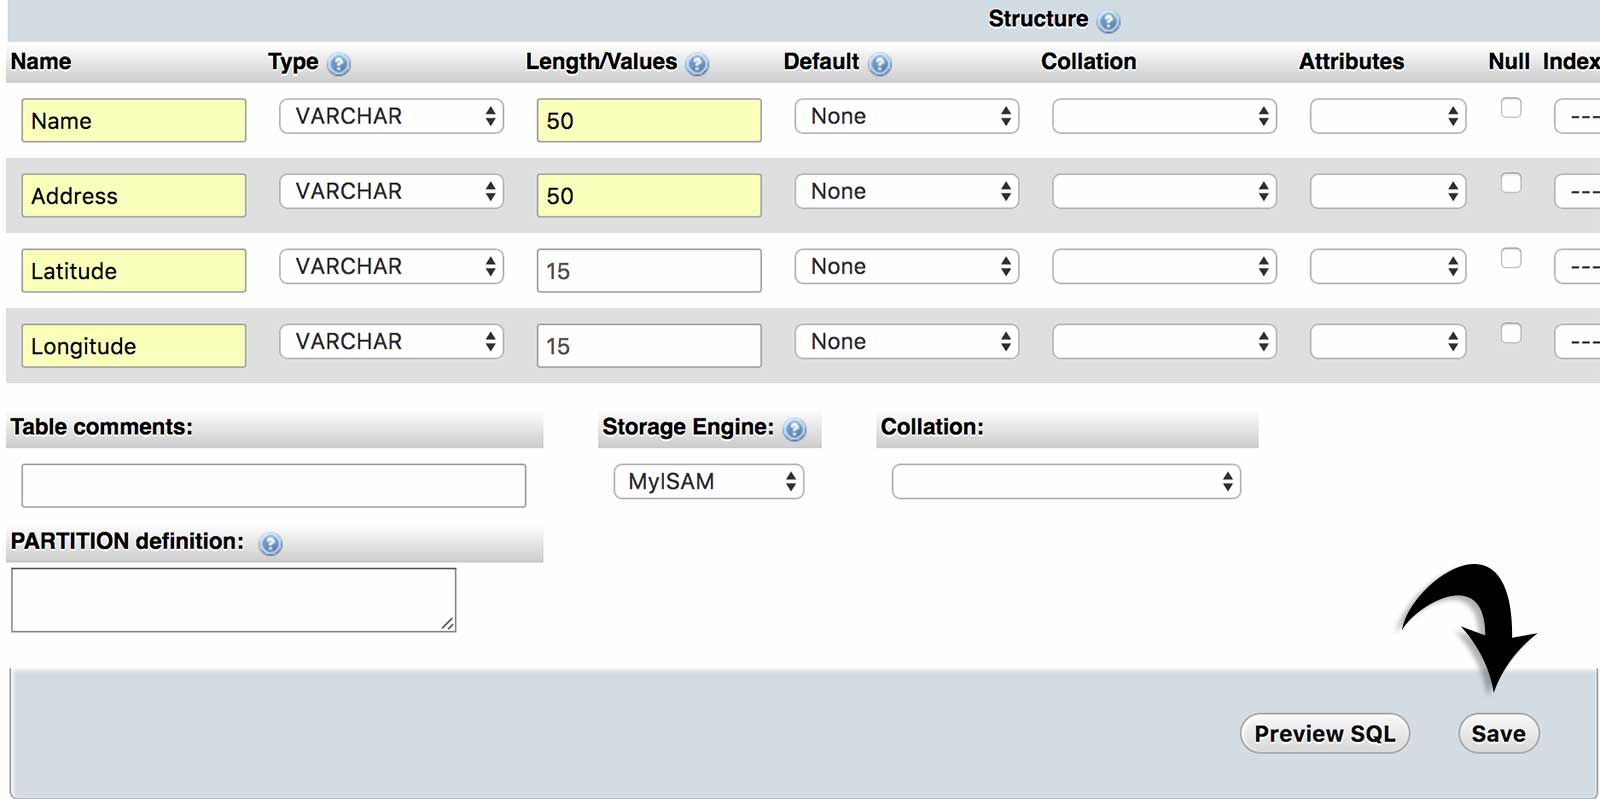
In the pop up dialog, you’ll be able to customize the 4 table columns. Follow the screenshot below and then click “Save”.
On the next screen, you’ll see your newly created database table.
2.7 Inserting data into the database table
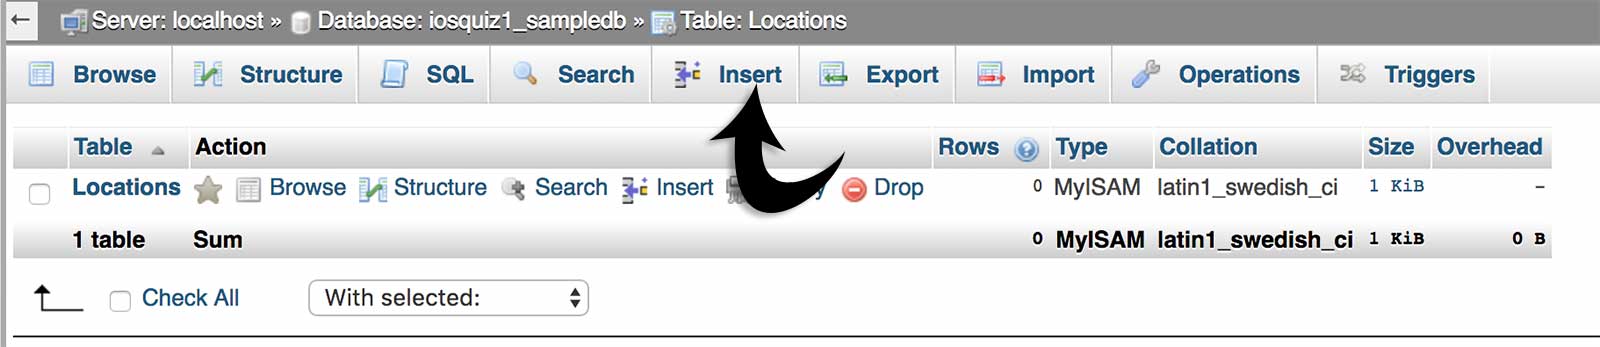
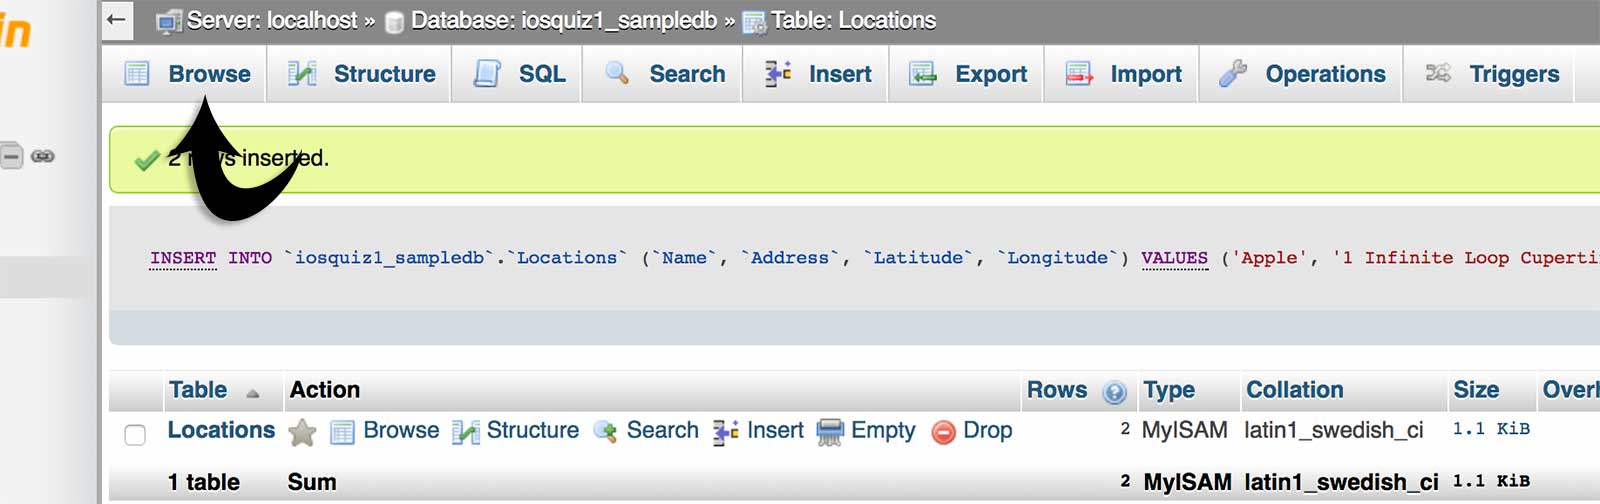
We’re going to insert a couple of locations into the table now so click “Insert” as shown below:
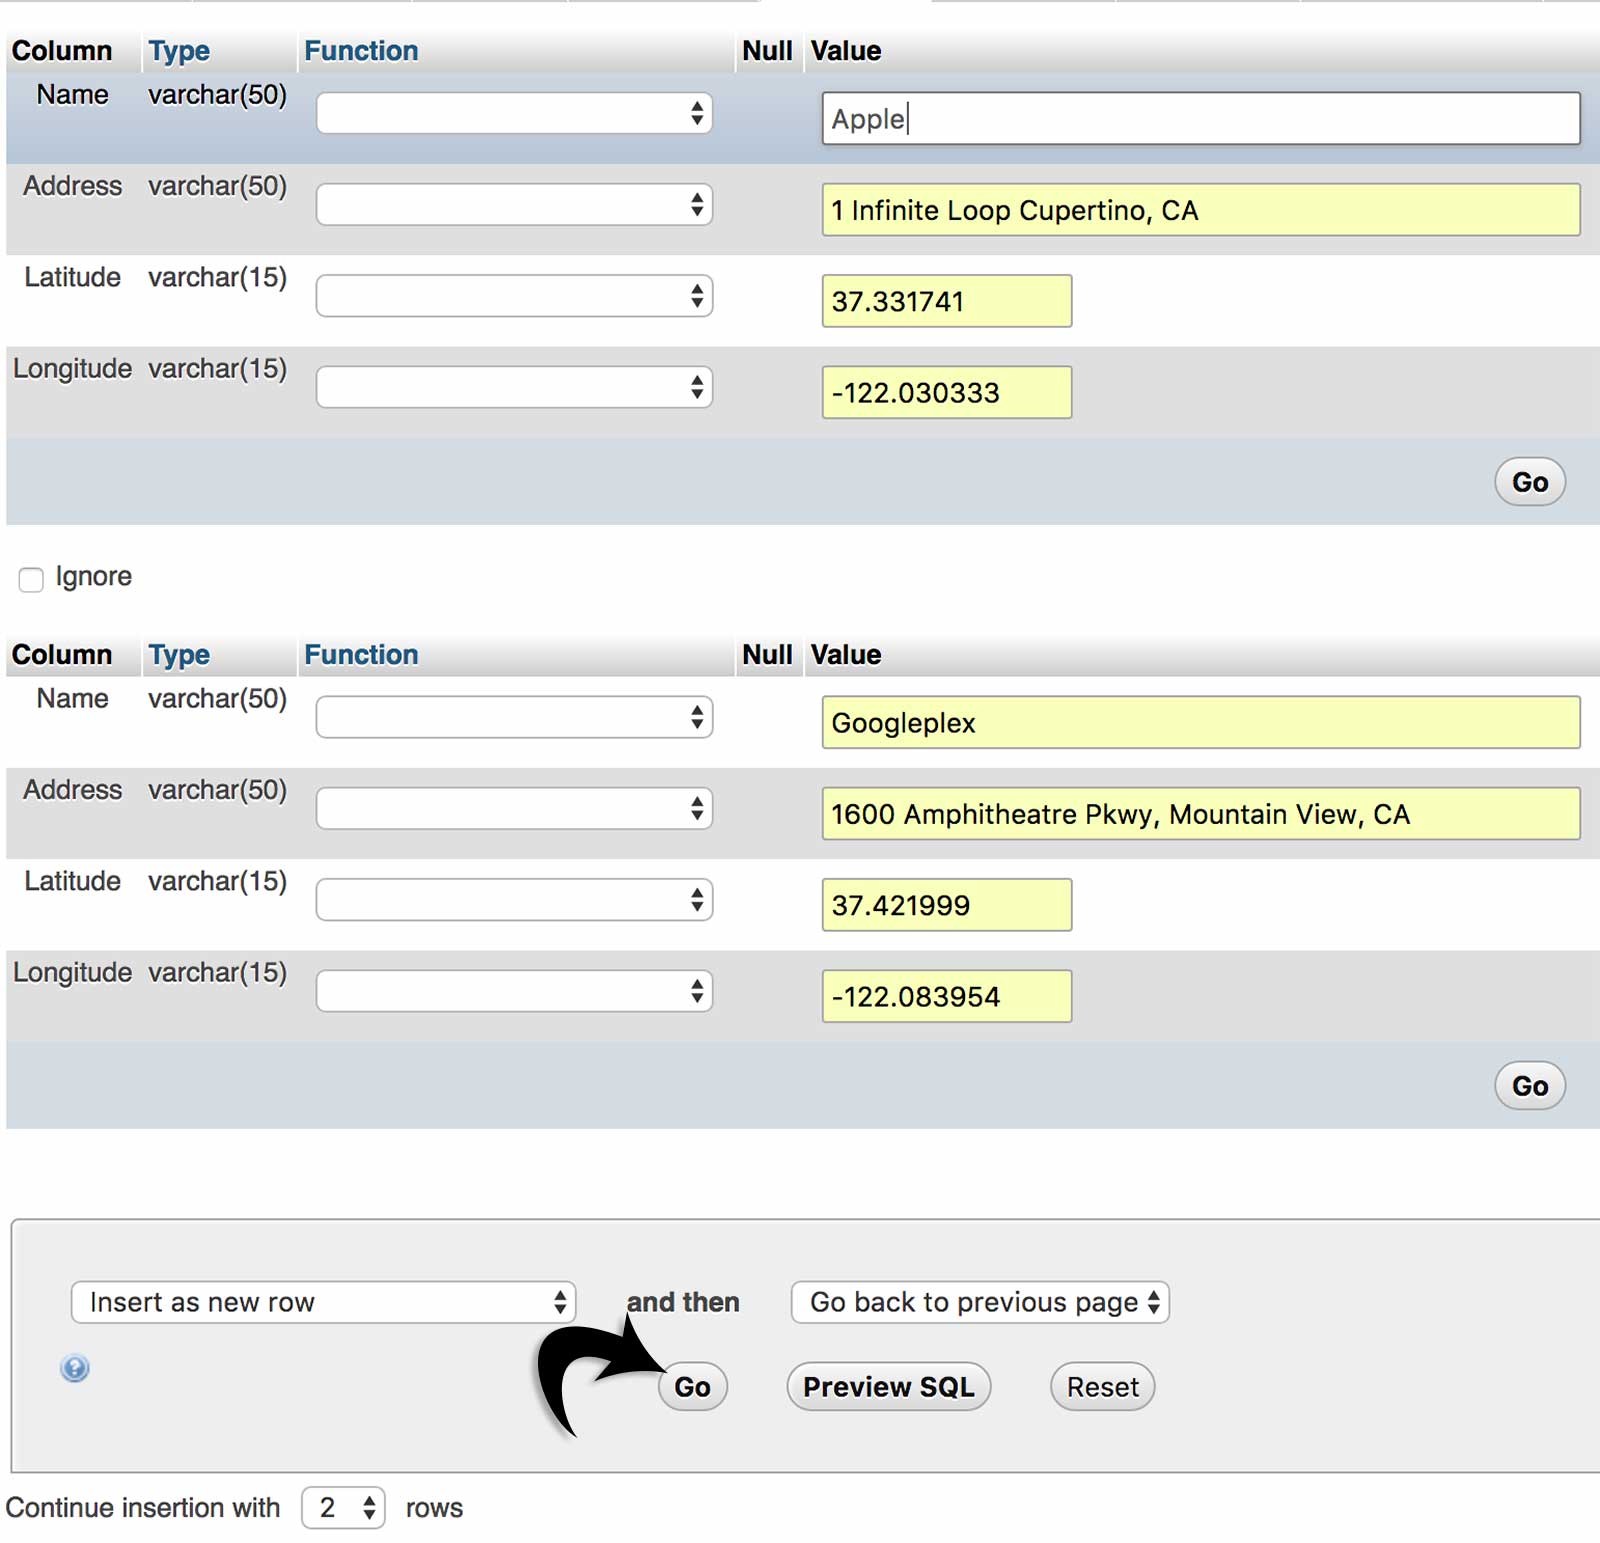
I decided to add the locations of the Apple and Google headquarters. You can fill in the same thing or fill in some different locations of your own!
If you need to find the lat long of an address, just use this website.
When you’re ready, click the last “Go” button to insert both rows into your database table.
Now you’ll see the actual SQL statement which added the data!
SQL stands for Structured Query Language and it’s a programming language to express queries from simple ones to really complex ones that involve multiple tables and constraints.
When you’re using this web interface, phpMyAdmin, to work with your database, you’re running SQL statements in the background when you click a “Go” or “Save” button.
If you’re working with databases a lot, it would really pay to learn SQL!
Next, click the “Browse” button and see the data in the table.

Now that we have some sample data in the MySQL database, let’s move on to creating that PHP web service that’ll connect to the MySQL database and query it for the list of locations (and then return the results to the iPhone app).
Now let’s create a simple PHP service to query our database for the results.
Open up a text editor and paste the following code into it, then save it as service.php:
<?php
// Create connection
$con=mysqli_connect("localhost","username","password","dbname");
// Check connection
if (mysqli_connect_errno())
{
echo "Failed to connect to MySQL: " . mysqli_connect_error();
}
// This SQL statement selects ALL from the table 'Locations'
$sql = "SELECT * FROM Locations";
// Check if there are results
if ($result = mysqli_query($con, $sql))
{
// If so, then create a results array and a temporary one
// to hold the data
$resultArray = array();
$tempArray = array();
// Loop through each row in the result set
while($row = $result->fetch_object())
{
// Add each row into our results array
$tempArray = $row;
array_push($resultArray, $tempArray);
}
// Finally, encode the array to JSON and output the results
echo json_encode($resultArray);
}
// Close connections
mysqli_close($con);
?>
In line 4, you’ll want to change the following placeholders:
-username : use the username of the db user that you set up in step 1
-password : use the password for the db user
-dbname : use the name of the database you created in step 1
Read the comments in the code above to see what each line does.
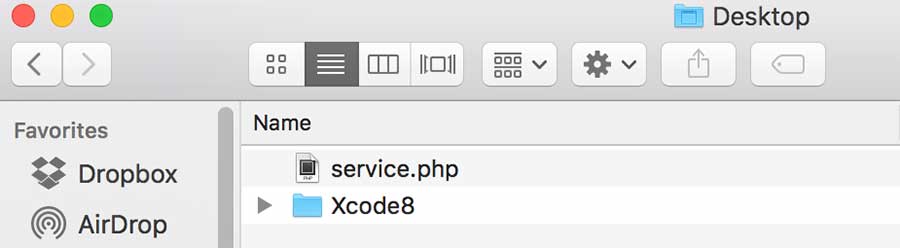
When you save the file, it should have a .php extension like this:

3.2 Uploading the PHP file to the server
Now you can use your favorite FTP client to upload this file to the root of your web host so that you can access this file from: http://yourdomain.com/service.php.
If you’re unsure of what FTP means, you can also upload this file from your Bluehost control panel.
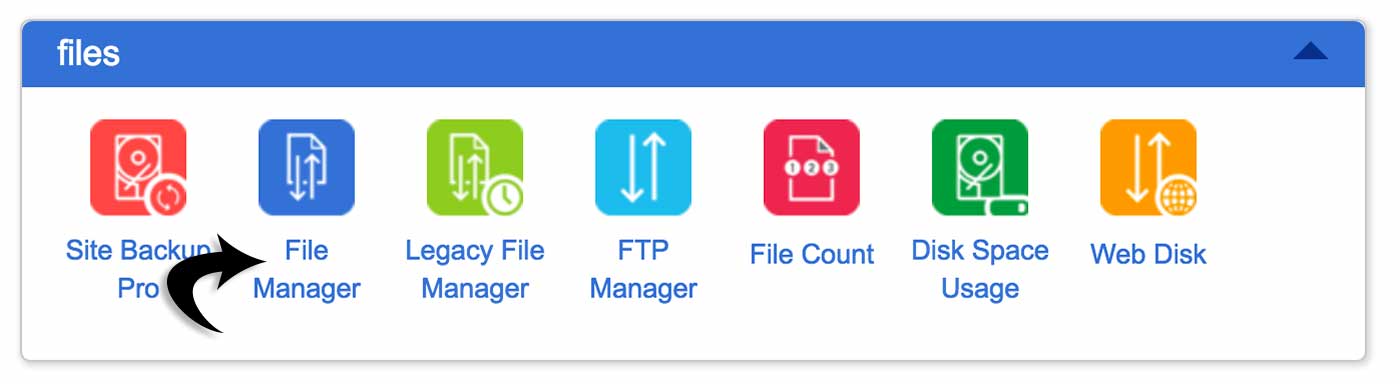
Login to your cPanel and look for the “File Manager” icon:

Click into that icon and it’ll pop up a dialog screen to ask where you want to start:

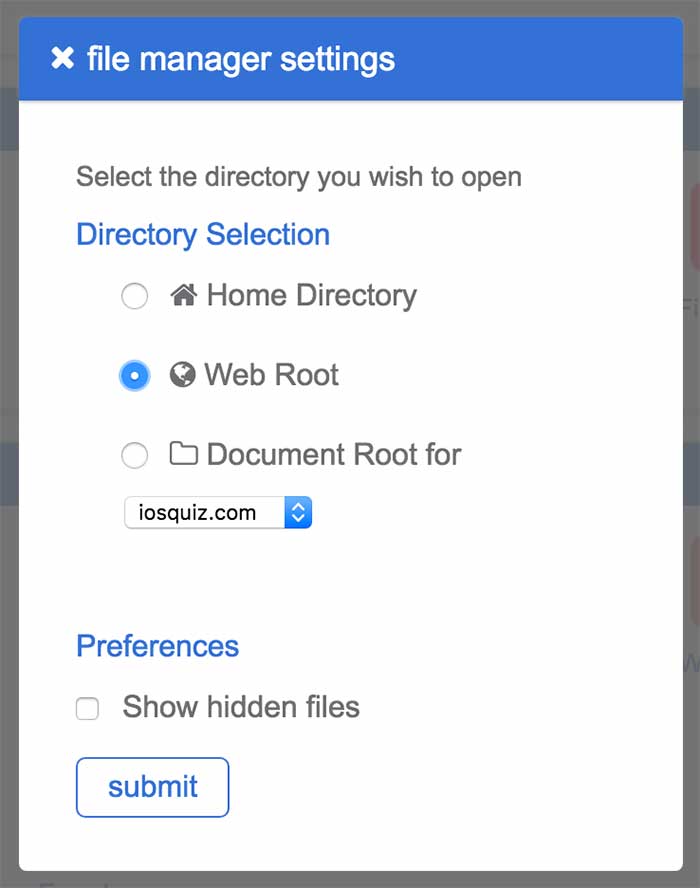
After clicking “Submit“, it’ll bring you to a screen where you can see all the files on your web root.
In the left side panel, you’ll see a tree view navigation.
You want to click “public_html” which will open up the folder, then click “Upload” as shown below:

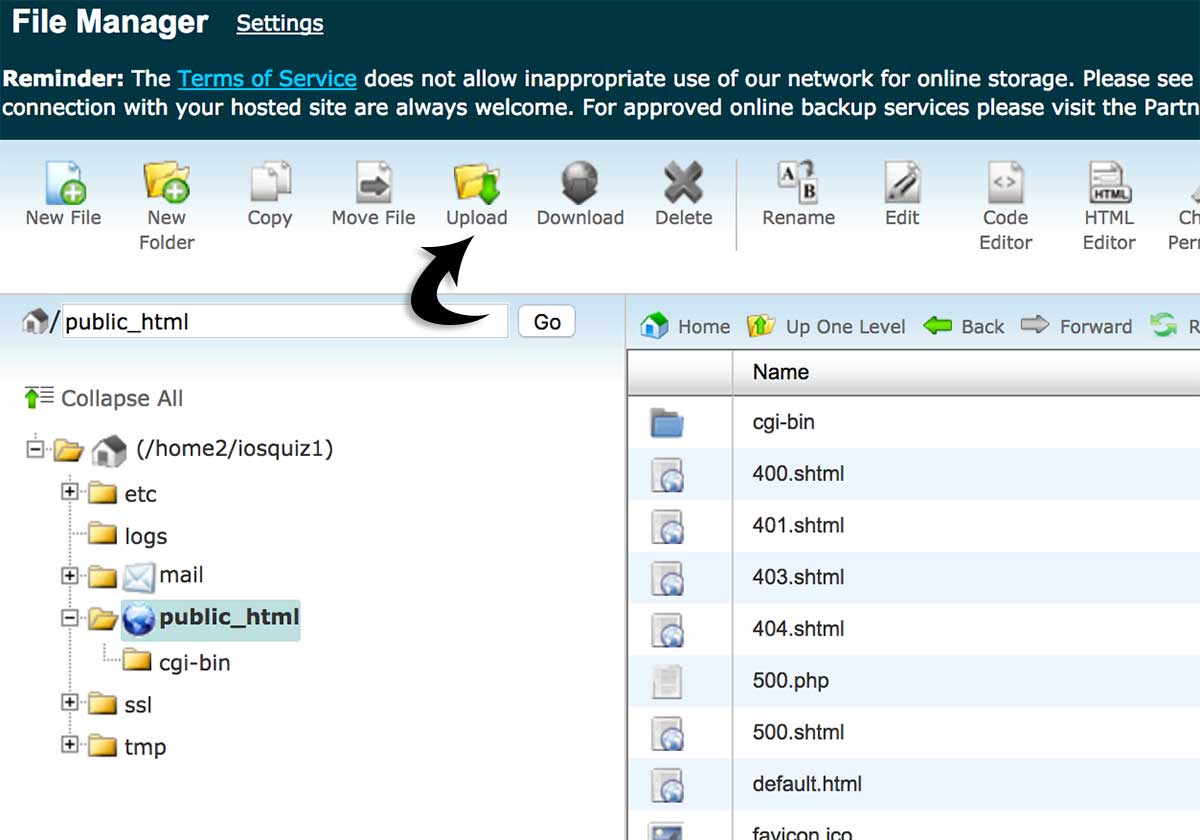
On the next screen, choose “service.php” from your local system and upload the file.
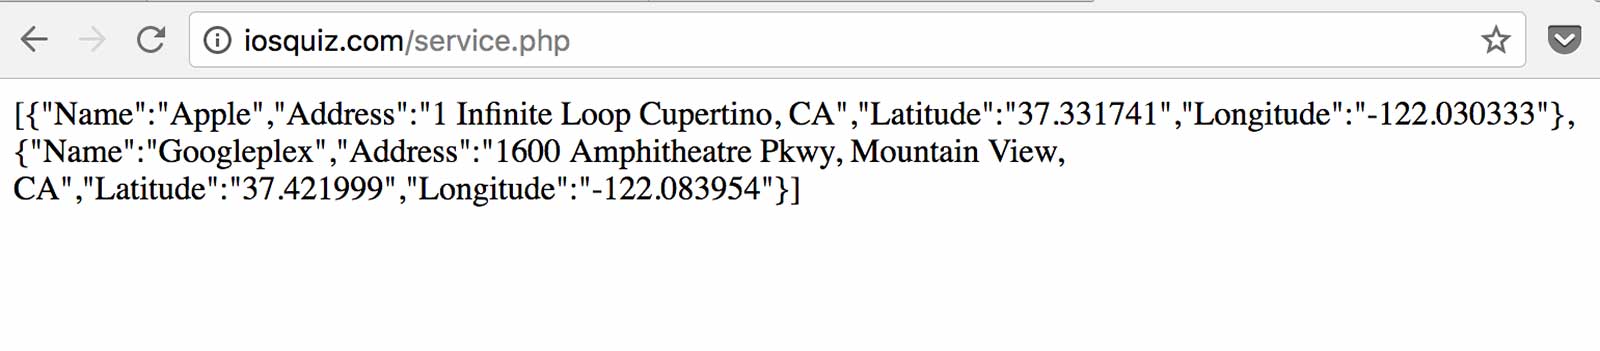
Now you’ll be able to access it from: http://yourdomain.com/service.php.
Test this by going to that URL in your browser.
You should see something like this:
Now we’re ready to build the iPhone app that will read this feed!
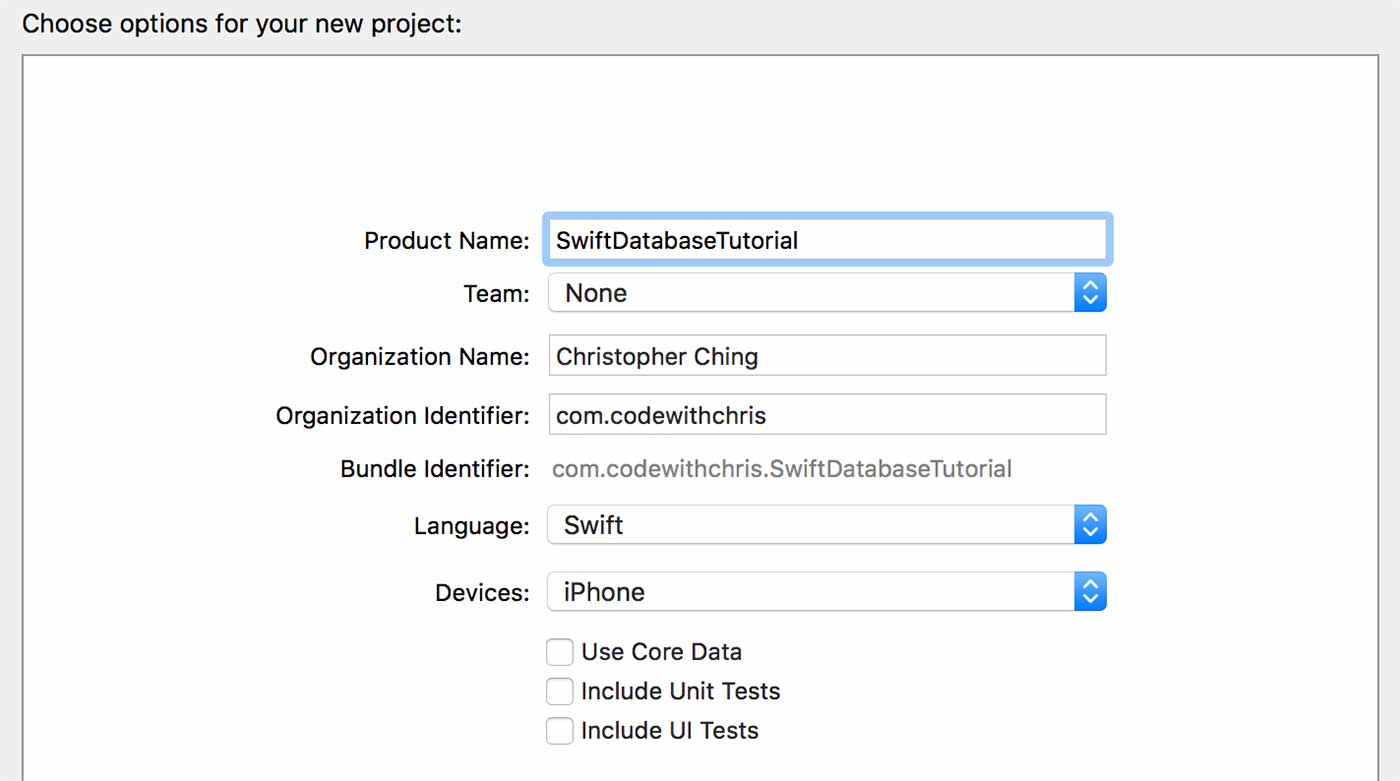
4.1 Creating a new Xcode project
We’re going to start by creating a new single view application Xcode project.

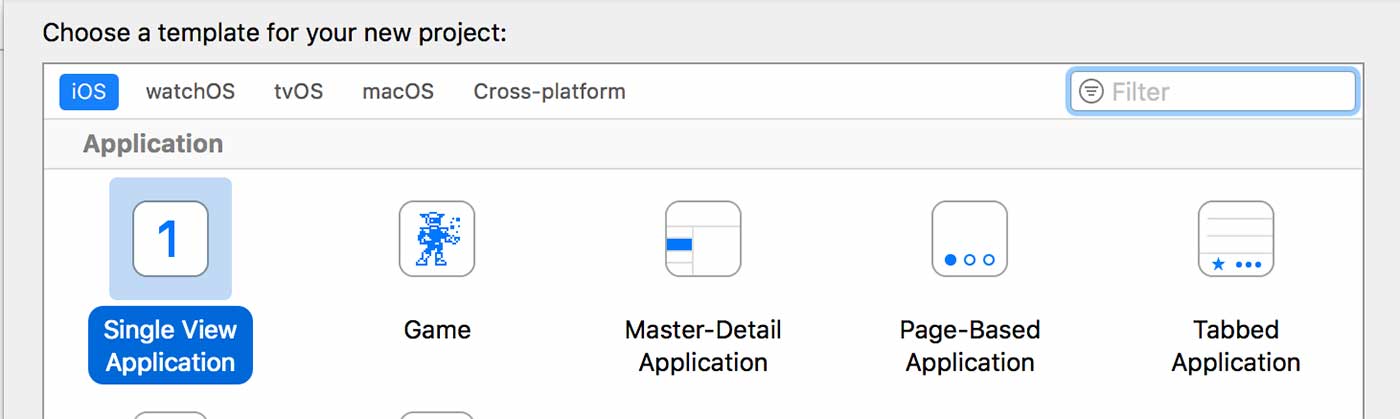
Make sure Swift is selected as the language and we are going to be creating this app for the iPhone.

Our next step is to edit our Info.plist file to make sure it allows us to pull data from an external source. Click on Info.plist, then right click to add a new row and type “App Transport Security Settings”. Inside of that we want to add another row, (make sure the down arrow is clicked on the first row) “Allow Arbitrary Loads” and set that to “YES”.

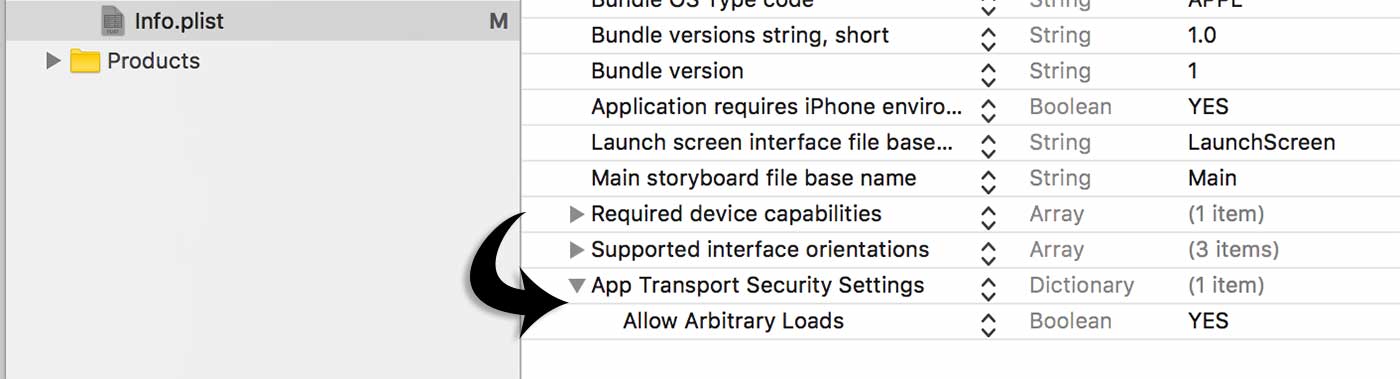
Done correctly, it will look like this. Also note that it should autofill to the correct name.
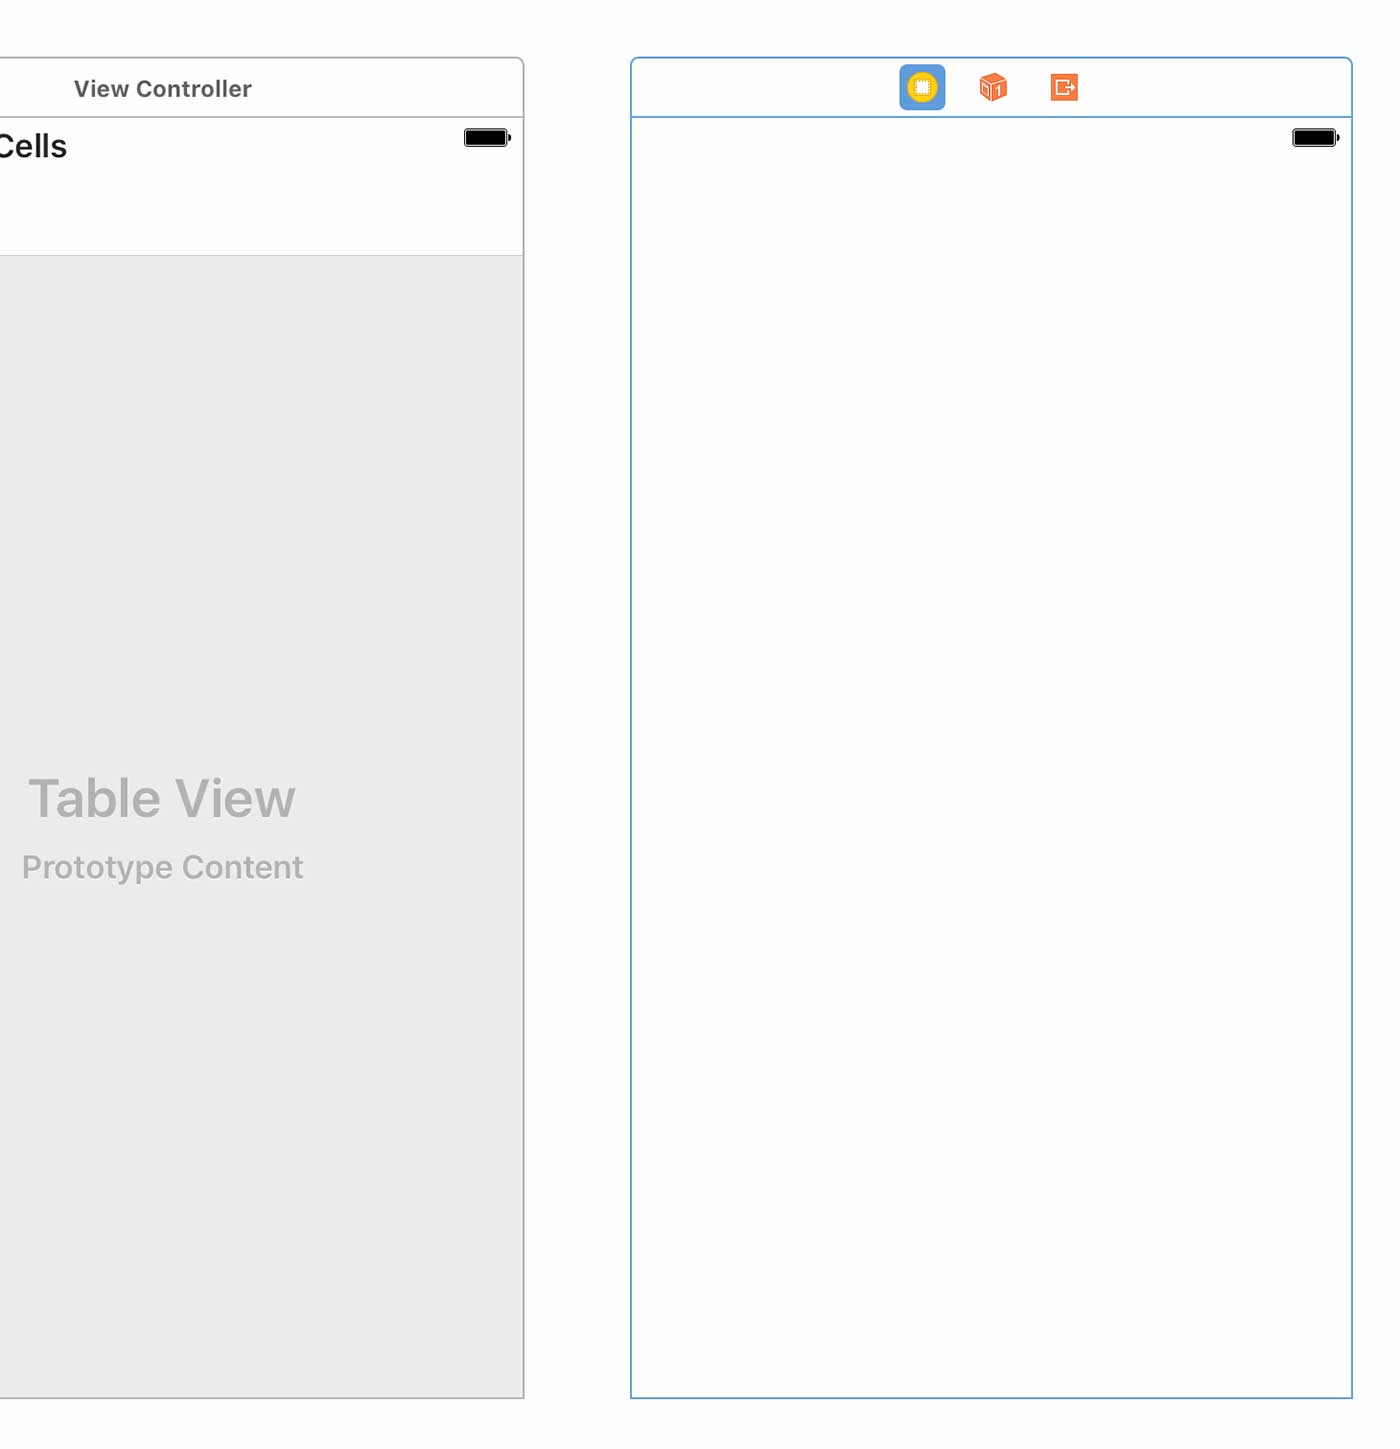
Next, go to Main.storyboard and we are going to add a table view element to the view controller’s view.
In the lower right hand corner, search for table view in the library pane and you should see the Table View and Table View Cell elements come up.
If you don’t see them, double check that you’re looking at the correct tab as indicated by the screenshot below.
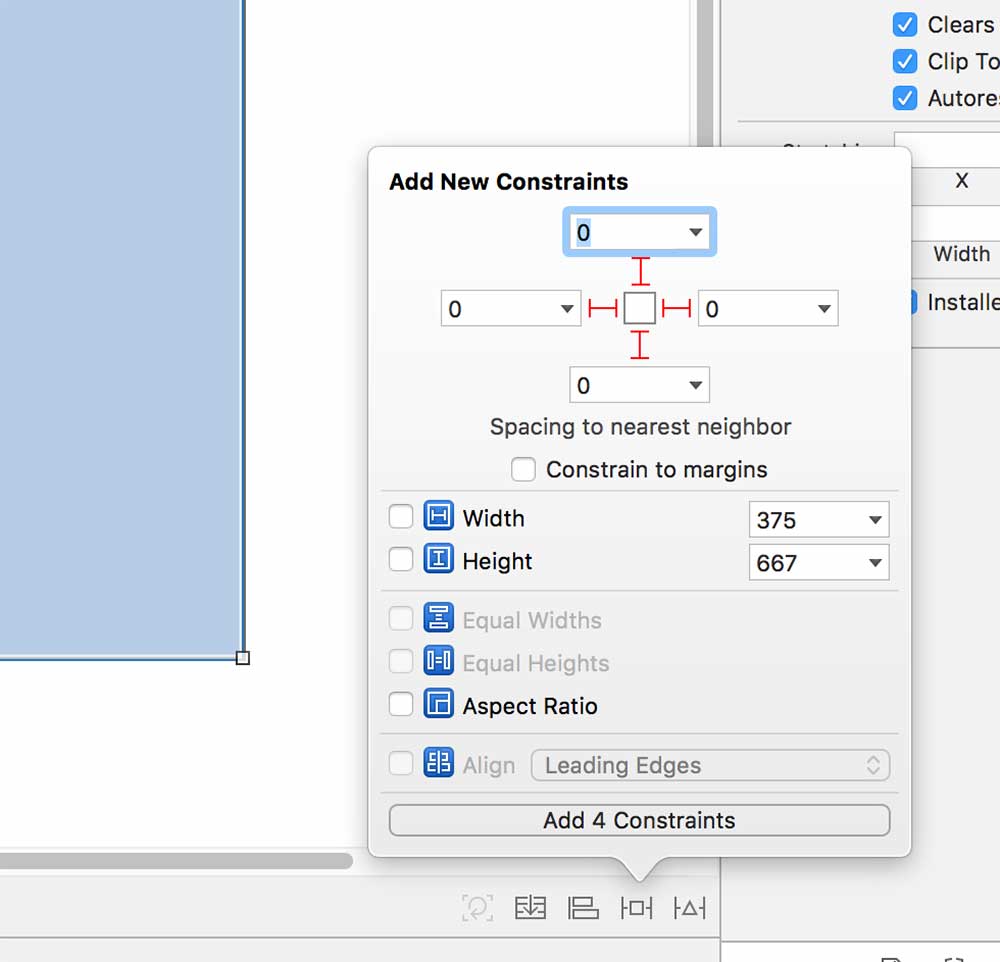
First drag and drop the Table View element over the view(not the “table view controller” element) and resize it to fit the whole view. You will actually want to position it just under the battery symbol, there should be a blue dotted line letting you know where to drag down to.
While still having the Table View element highlighted, click the add constraints button shown in the screenshot below and then click each of the margins so it activates (it’ll become red). Make sure all the margins are 0 and “constrain to margins” is unchecked. Then click Add 4 constraints.

Next, drag and drop a Table View Cell over the Table View.
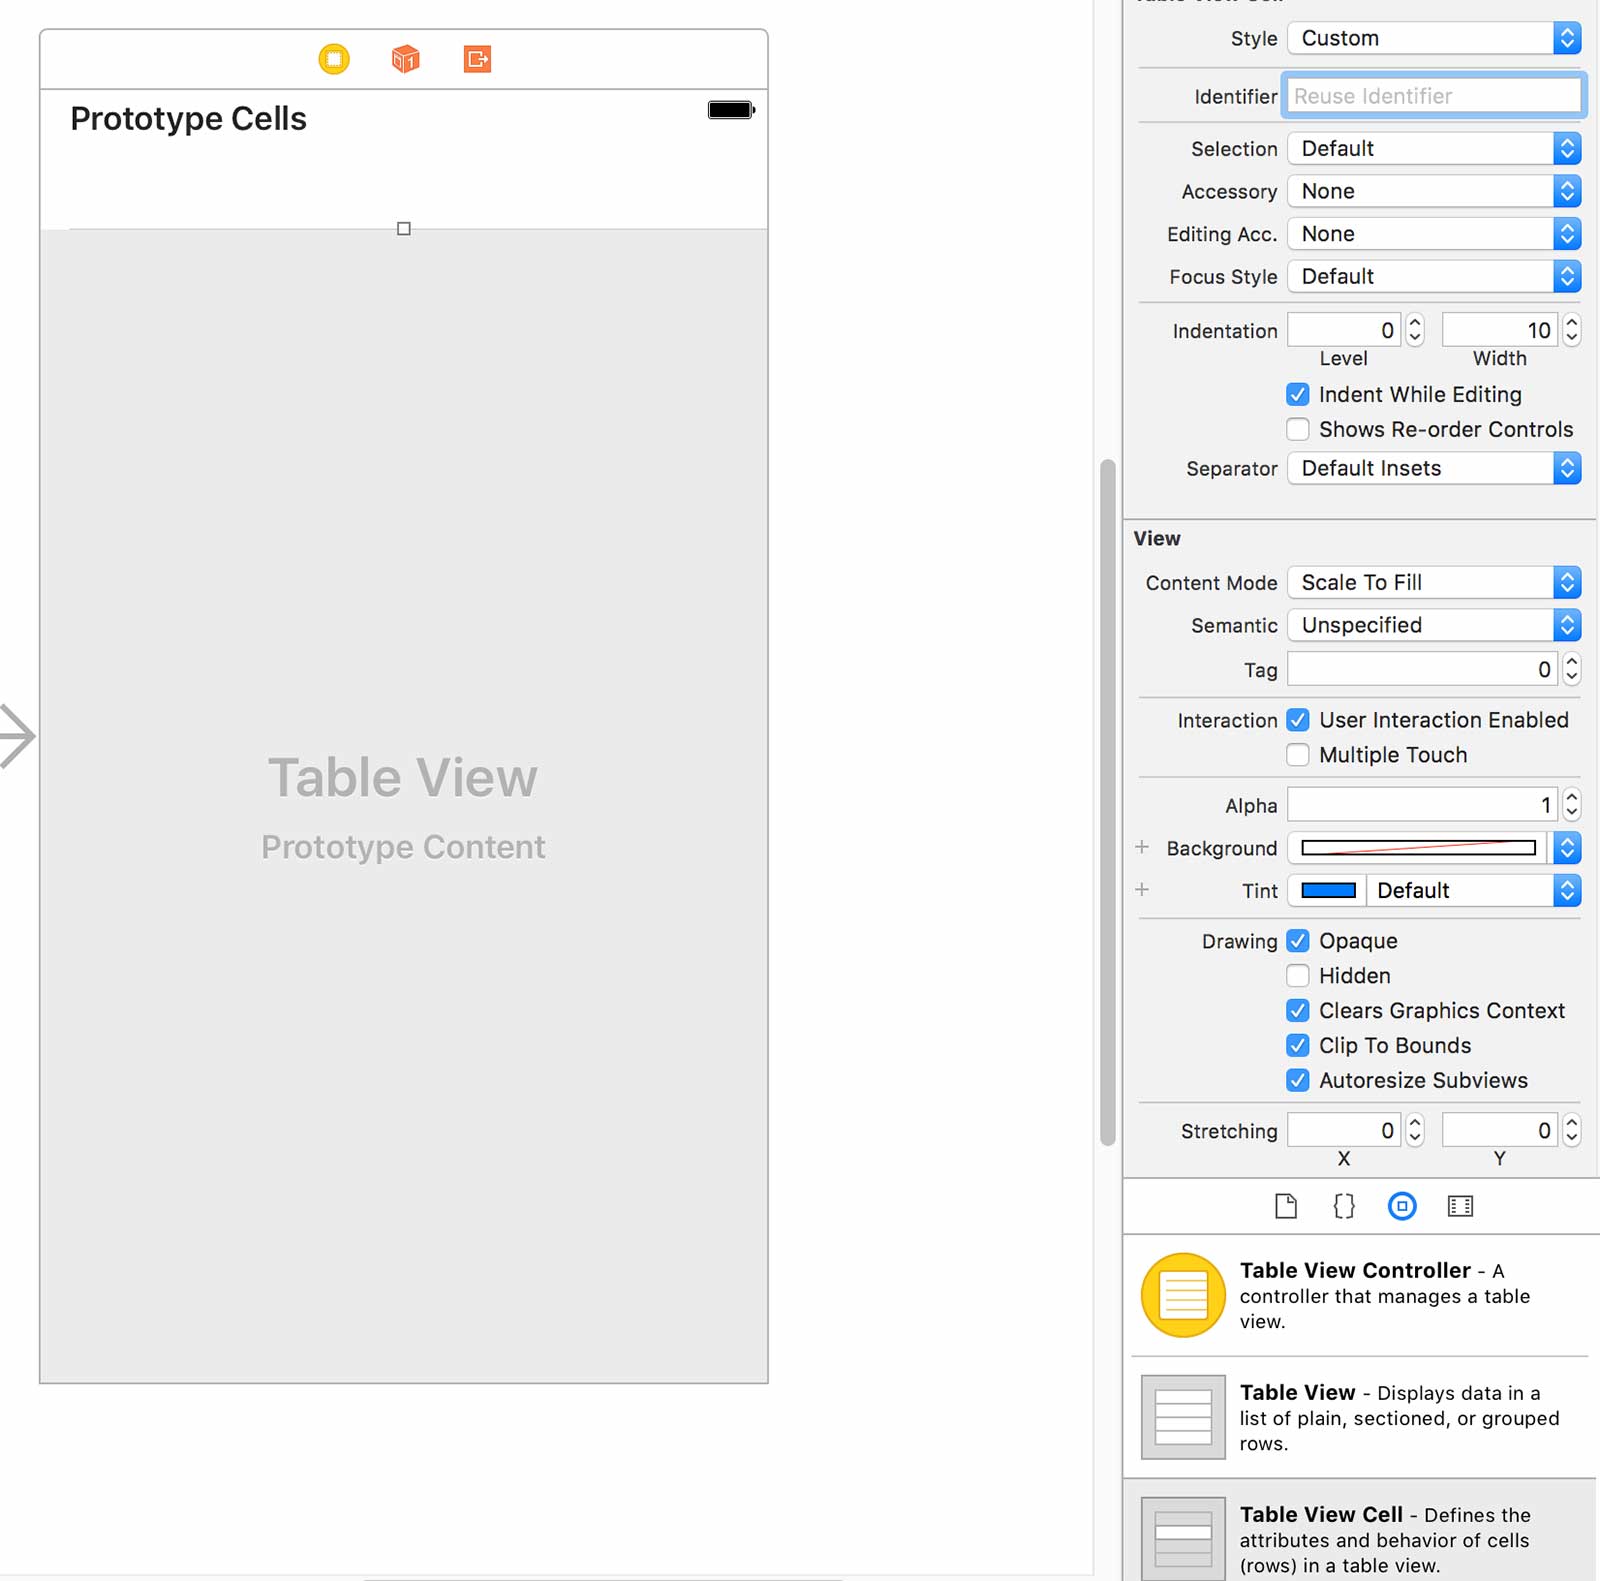
We also need to give the table cell a reuse identifier which we’re going to use later down the line. Click the cell, then on the right panel in the “attributes inspector”, change the Identifier to “BasicCell”.
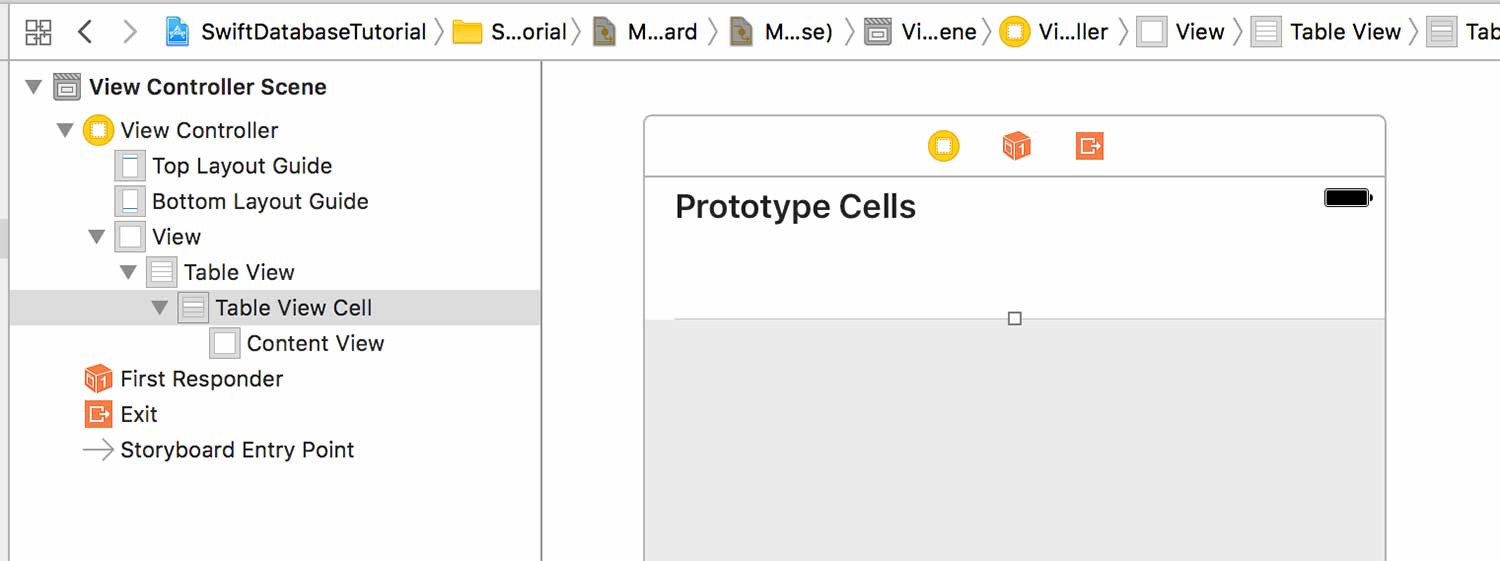
Also, a good way to see where you are in your view controller is to to check the hierarchy of elements. You can do this by clicking on this icon at the bottom of your scene.

This will bring up the following hierarchal view in the left pane.

The next step is to connect our Table View element to our View Controller so that we can reference it when writing our Swift code.
To do this, we first need to split our session into two panes, one containing the Main.storyboard, and the other containing our ViewController.swift.
Click on the Assistant Editor button illustrated in the screenshot below:
If you cannot find the ViewController.swift on the right hand pane, follow the breadcrumbs at the very top of the file.
Now to perform the connection, hold control, click the table view element from the storyboard, and then drag the blue line to the view controller.
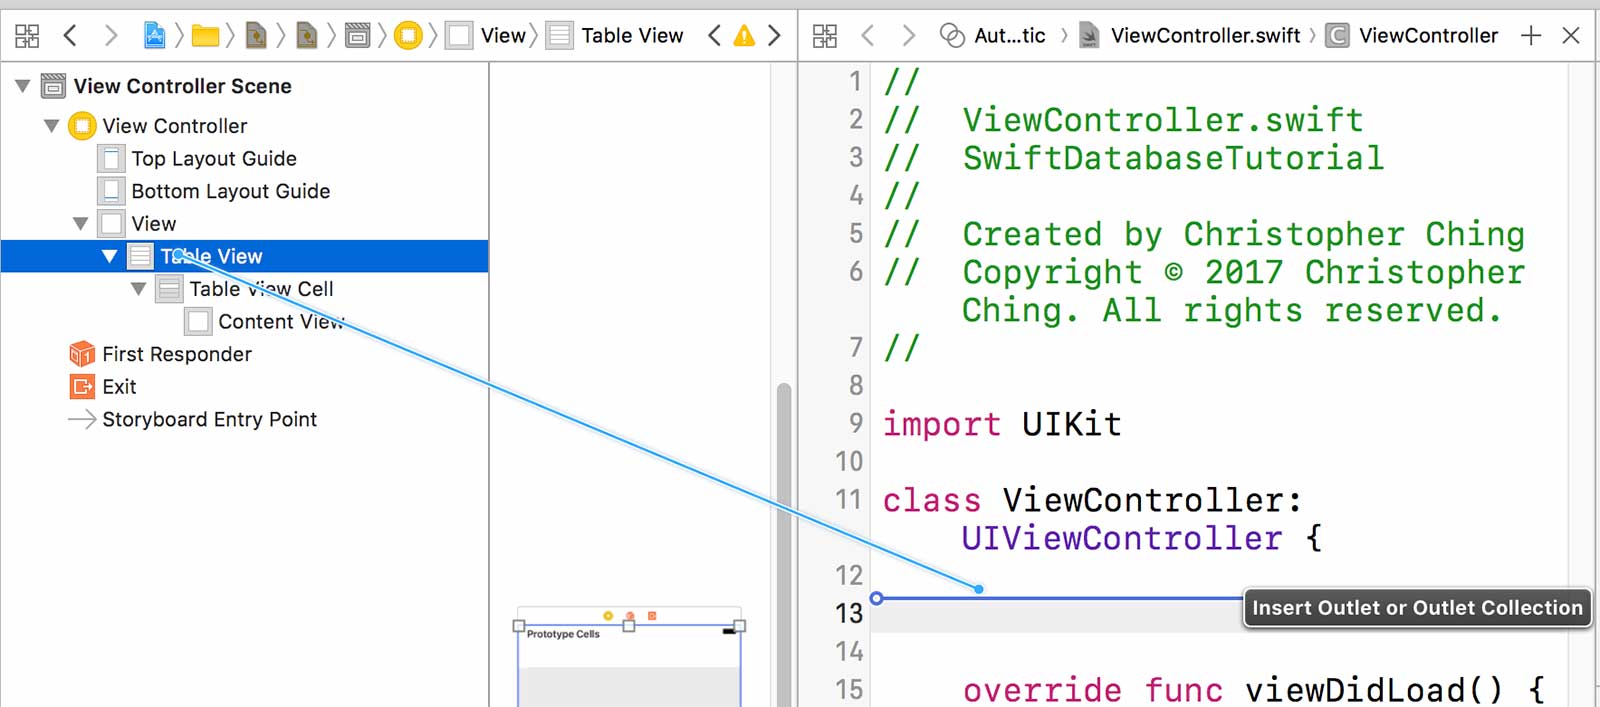
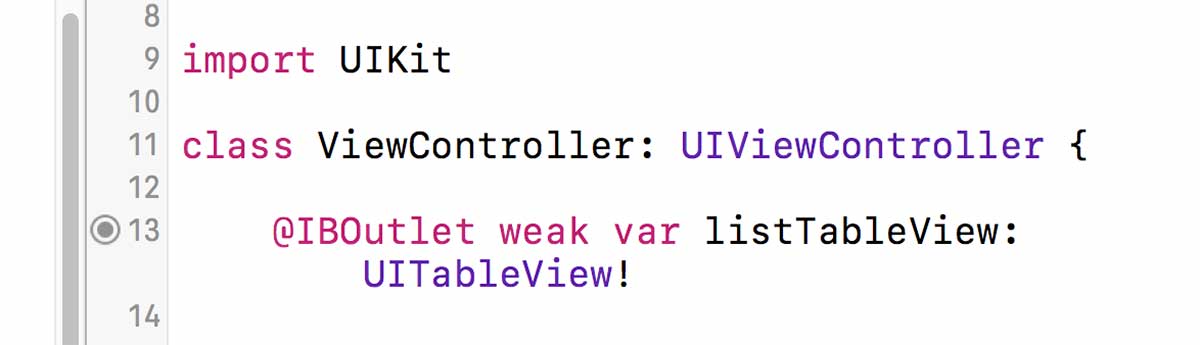
A prompt should pop up and you should name the table view “listTableView” . At this point you can use this name to refer to the table view element as you write your Swift code.

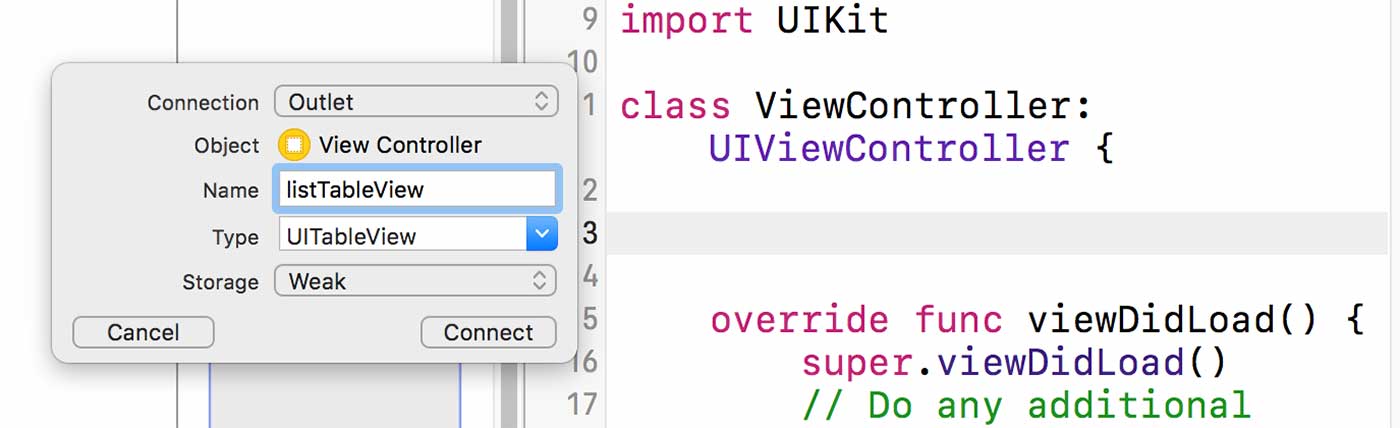
Note that this creates a UITableView which is already unwrapped. In other words, this table view definitely exists, it will never be nil.
At this point, this should be the only variable in your ViewController.swift.

4.2 Creating the model for the data
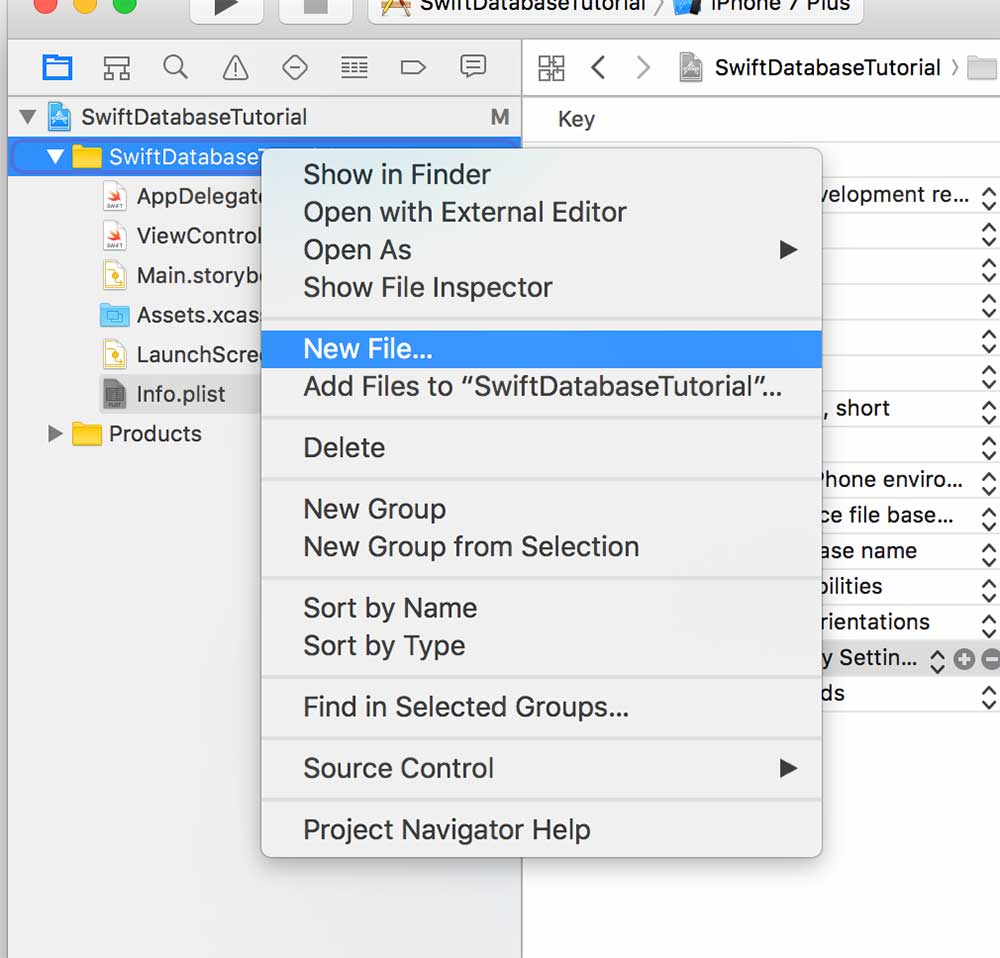
We want to follow the model, view, controller (MVC) convention in this tutorial and create separate classes to handle and store the data. Let’s create two new Swift files (classes) to help us with these tasks, HomeModel and LocationModel.
Right click or CMD + Left click and select new file from the File Inspector.


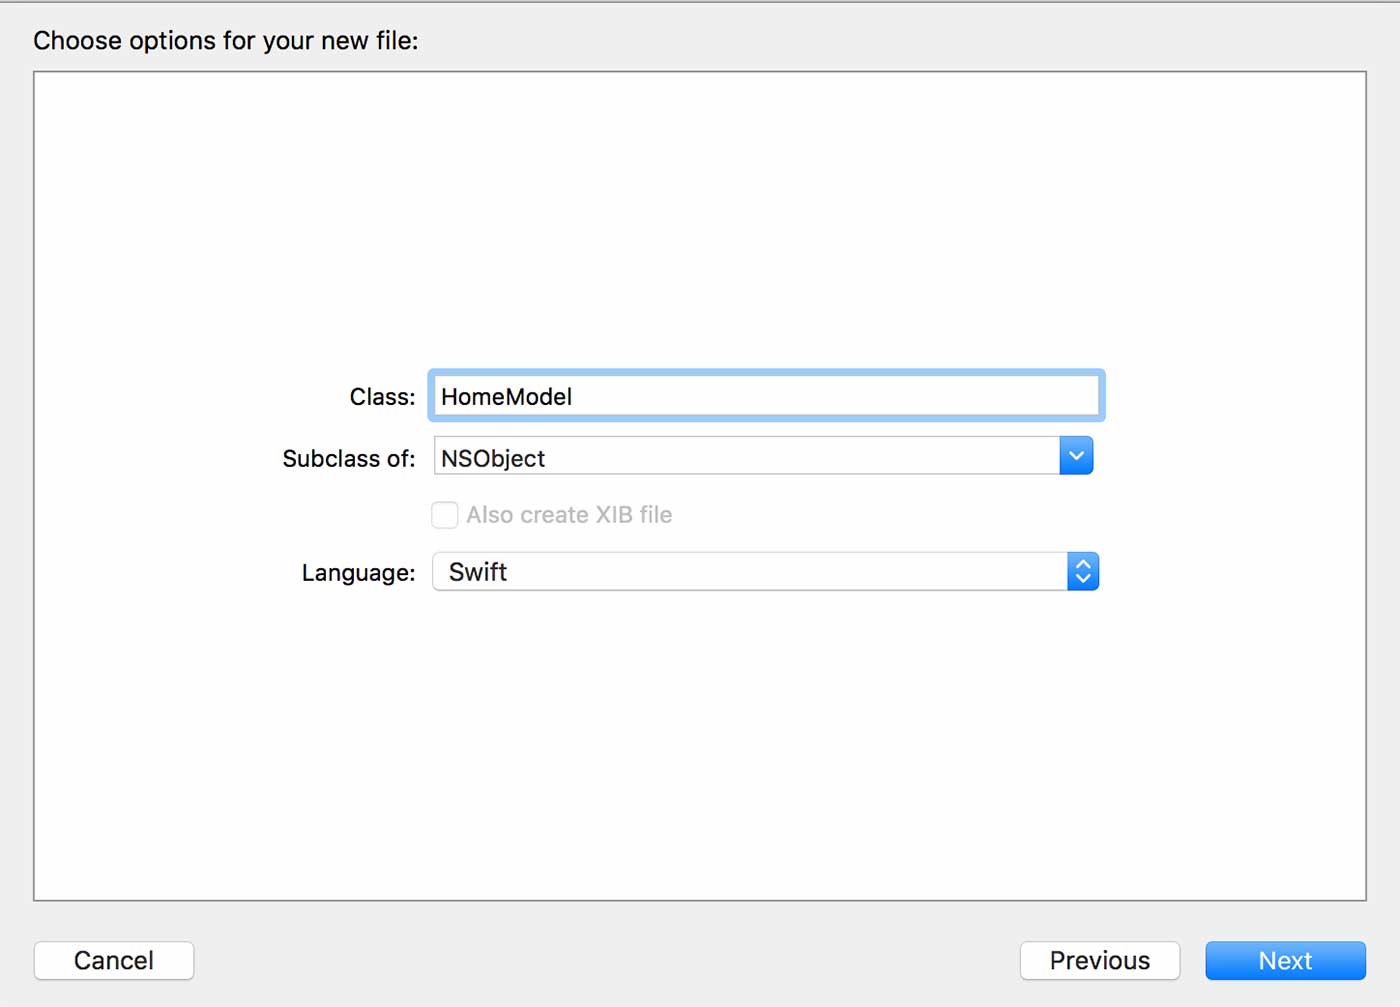
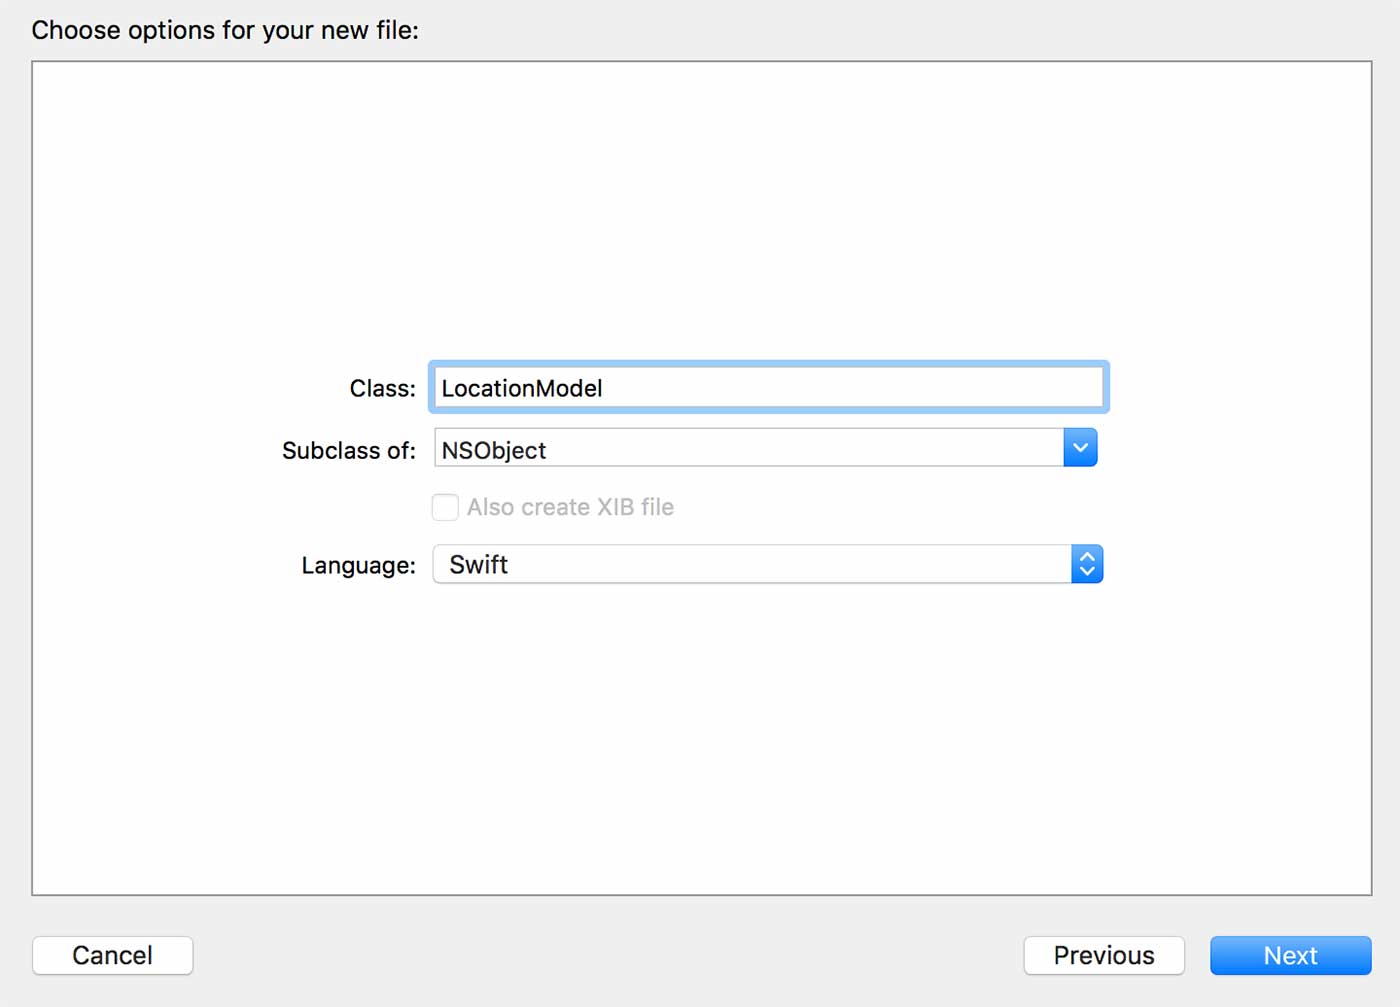
Let’s start with our location model class, this will serve as our container to store the incoming data.
import Foundation
class LocationModel: NSObject {
//properties
var name: String?
var address: String?
var latitude: String?
var longitude: String?
//empty constructor
override init()
{
}
//construct with @name, @address, @latitude, and @longitude parameters
init(name: String, address: String, latitude: String, longitude: String) {
self.name = name
self.address = address
self.latitude = latitude
self.longitude = longitude
}
//prints object's current state
override var description: String {
return "Name: \(name), Address: \(address), Latitude: \(latitude), Longitude: \(longitude)"
}
}
Notice that this class inherits from the root NSObject, and has four variables which represent our properties. Each of these are optionals because we do not know if they will contain a value or not, however, in this tutorial we will make sure that each property does indeed contain a value.
This class also conventionally has an empty constructor, a parameter accepting constructor, and a function to output it’s state.
Now we can set up HomeModel.swift, which will pull the JSON data from our service.php file, parse it accordingly, and send it to our view.
We’ll need to declare a protocol to broadcast to our view controller which method it should expect to handle if it receives a notification. Specifically, this protocol will serve to transfer data from the home model to the view controller.
Let’s also set up a few variables that we will need.
import Foundation
protocol HomeModelProtocol: class {
func itemsDownloaded(items: NSArray)
}
class HomeModel: NSObject, NSURLSessionDataDelegate {
//properties
weak var delegate: HomeModelProtocol!
var data = Data()
let urlPath: String = "http://hourofswift.com/service.php" //this will be changed to the path where service.php lives
In lines 3-7, we declare our HomeModel protocol and we also declare a delegate property in line 11 which is explicitly of type HomeModelProtocol.
This let’s other classes know that if they want to handle the delegate method in this protocol, they must conform to the protocol to set themselves as the delegate (assign themselves to the delegate property).
You’ll see this in action later on.
Line 14 declares our data variable which will be responsible for storing the incoming bits and Line 16 declares the urlPath to connect to.
Remember to change the URL to your own PHP service.
4.3 Downloading and parsing the JSON feed
In the previous section when we worked on the PHP service, we returned the results as JSON.
Now we are actually going to parse those items here in the HomeModel class. To do this, we are going to create a function “downloadItems”, which will be responsible for the process of retrieving the data from the MySQL database and handling it.
We’re going to use the NSURLSession class to download the JSON feed, and conform it to the NSURLSessionDataDelegate which will let us implement the appropriate delegate methods that get fired when certain events happen during the download process.
Let’s see what our HomeModel.Swift should look like now:
import Foundation
protocol HomeModelProtocol: class {
func itemsDownloaded(items: NSArray)
}
class HomeModel: NSObject, NSURLSessionDataDelegate {
//properties
weak var delegate: HomeModelProtocol!
let urlPath = "http://hourofswift.com/service.php" //this will be changed to the path where service.php lives
func downloadItems() {
let url: URL = URL(string: urlPath)!
let defaultSession = Foundation.URLSession(configuration: URLSessionConfiguration.default)
let task = defaultSession.dataTask(with: url) { (data, response, error) in
if error != nil {
print("Failed to download data")
}else {
print("Data downloaded")
self.parseJSON(data!)
}
}
task.resume()
}
}
Ok let’s notice a few things here. On line 8 we are now conforming to the NSURLSessionDataDelegate, and line 18 declares the downloadItems function.
Lines 20-27 initialize the NSURLSession, assign it a task, and start the data retrieval process.
Line 31 is a delegate method which appends the data to our NSMutableData instance variable as it receives the data from the source. This function is responsible for storing the incoming data.
Line 36 is also a delegate method that checks to see if the data was received without error, and if so, calls the parseJSON method which we will see in the next screenshot. Note that it checks to see if the optional parameter error is nil, meaning that it has not been set, and then acts upon that accordingly. This a is a good example of the advantage of using optionals.
func parseJSON(_ data:Data) {
var jsonResult = NSArray()
do{
jsonResult = try JSONSerialization.jsonObject(with: data, options:JSONSerialization.ReadingOptions.allowFragments) as! NSArray
} catch let error as NSError {
print(error)
}
var jsonElement = NSDictionary()
let locations = NSMutableArray()
for i in 0 ..< jsonResult.count
{
jsonElement = jsonResult[i] as! NSDictionary
let location = LocationModel()
//the following insures none of the JsonElement values are nil through optional binding
if let name = jsonElement["Name"] as? String,
let address = jsonElement["Address"] as? String,
let latitude = jsonElement["Latitude"] as? String,
let longitude = jsonElement["Longitude"] as? String
{
location.name = name
location.address = address
location.latitude = latitude
location.longitude = longitude
}
locations.add(location)
}
DispatchQueue.main.async(execute: { () -> Void in
self.delegate.itemsDownloaded(items: locations)
})
}
Line 53 actually parses the JSON using the data that was received from our NSURLSession.
Line 64 loops through the JSON objects and stores them in an NSDictionary object so that they can be split into key-value pairs.
Line 69 instantiates a LocationModel object which will be used to store each element in the specific JSON object.
Lines 72-75 use optional binding, the “if let” checking mechanism, to make sure none of the JSON elements are nil. After the check, if all elements have values, the location object is set.
Line 85 adds the current location object to a mutable array and is now ready to be sent to the view controller via the protocol method.
Lines 89-91 pass the locations array to the protocol method making it available for the view controller to use.
Notice on line 89, the “dispatch_asynch” closure that wraps the delegate call. This is a thread issue, and it is the convention for methods that call UI updates to be wrapped with this particular closure to access the main queue. If you are also unfamiliar with the syntax, make sure to review closures in the Swift docs.
The next thing we have to do is implement the “downloadItems” method in the view controller to let it know when the locations array is passed so that it can populate the table view.
4.4 Populating the table view with locations
Now our focus is back to the view controller.
Let’s navigate to ViewController.swift and set up a few things. Just like we are going to conform to the HomeModelProtocol to get notified when the locations array is ready, we need to also conform to the UITableView protocols to interact with the table view.
import UIKit
class ViewController: UIViewController, UITableViewDataSource, UITableViewDelegate, HomeModelProtocol {
//Properties
var feedItems: NSArray = NSArray()
var selectedLocation : LocationModel = LocationModel()
@IBOutlet weak var listTableView: UITableView!
override func viewDidLoad() {
super.viewDidLoad()
//set delegates and initialize homeModel
self.listTableView.delegate = self
self.listTableView.dataSource = self
let homeModel = HomeModel()
homeModel.delegate = self
homeModel.downloadItems()
}
func itemsDownloaded(items: NSArray) {
feedItems = items
self.listTableView.reloadData()
}
func tableView(_ tableView: UITableView, numberOfRowsInSection section: Int) -> Int {
// Return the number of feed items
return feedItems.count
}
func tableView(_ tableView: UITableView, cellForRowAt indexPath: IndexPath) -> UITableViewCell {
// Retrieve cell
let cellIdentifier: String = "BasicCell"
let myCell: UITableViewCell = tableView.dequeueReusableCell(withIdentifier: cellIdentifier)!
// Get the location to be shown
let item: LocationModel = feedItems[indexPath.row] as! LocationModel
// Get references to labels of cell
myCell.textLabel!.text = item.address
return myCell
}
}
Let’s first notice on line 3 that we are conforming to the protocols mentioned above.
Lines 7 and 8 declare a NSArray to store the location objects and also declare a reference to our location model for use down the line.
In the “ViewDidLoad” method, we’re setting the ViewController object as the data source and delegate for the table view element.
This will let us implement the table view delegate methods farther down to populate the table view with data.
We also instantiate a HomeModel object, set this ViewController object as the delegate, and call the downloadItems method which starts the data retrieval from our database.
Lines 25-28 implement the HomeModel’s protocol method, “itemsDownloaded”. In this method, we store the results passed back to us through delegation and call “reloadData” on the table view which will cause it to fire off the delegate methods down below.
Line 31, the method specified by “numberOfRowsInSection” returns the expected number of rows in the view. This will cause the table view to call the “cellForRowAtIndexPath” method on line 37 that many number times (one for each row). It will only call that method if the row is in the view.
On Line 37, this method expects us to create a table view cell, initialize it with some data, and return it for display. To do this, we get a copy of the cell we added to our storyboard which we named “BasicCell”.
This method also tells us which row of data it’s trying to display, so we can use this information to access our feed data array to get the appropriate Location object that this table row is tying to display, Line 42.
We then configure the table cell with the data from the Location object, specifically the address, and then return it, Line 44 and 46.
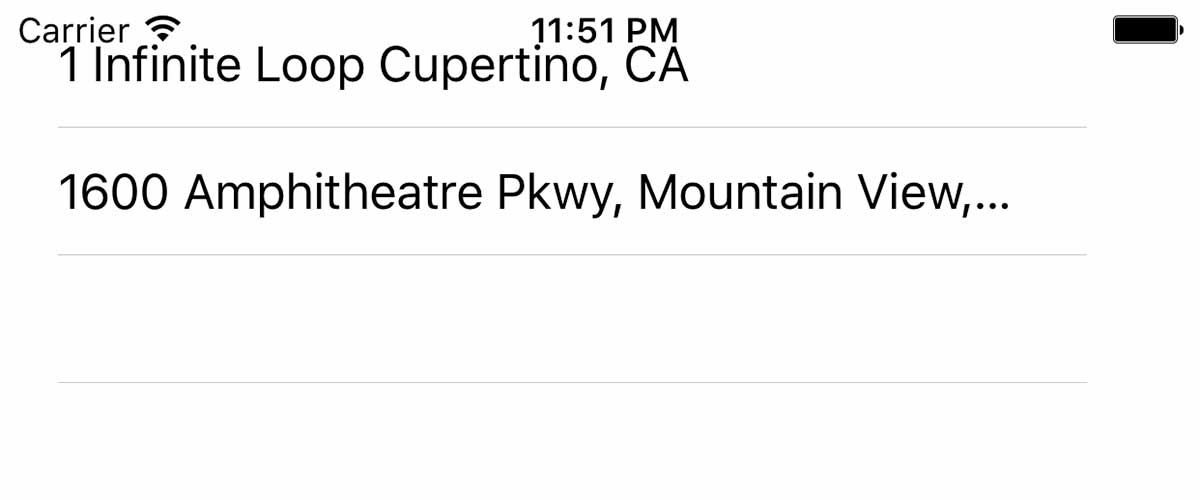
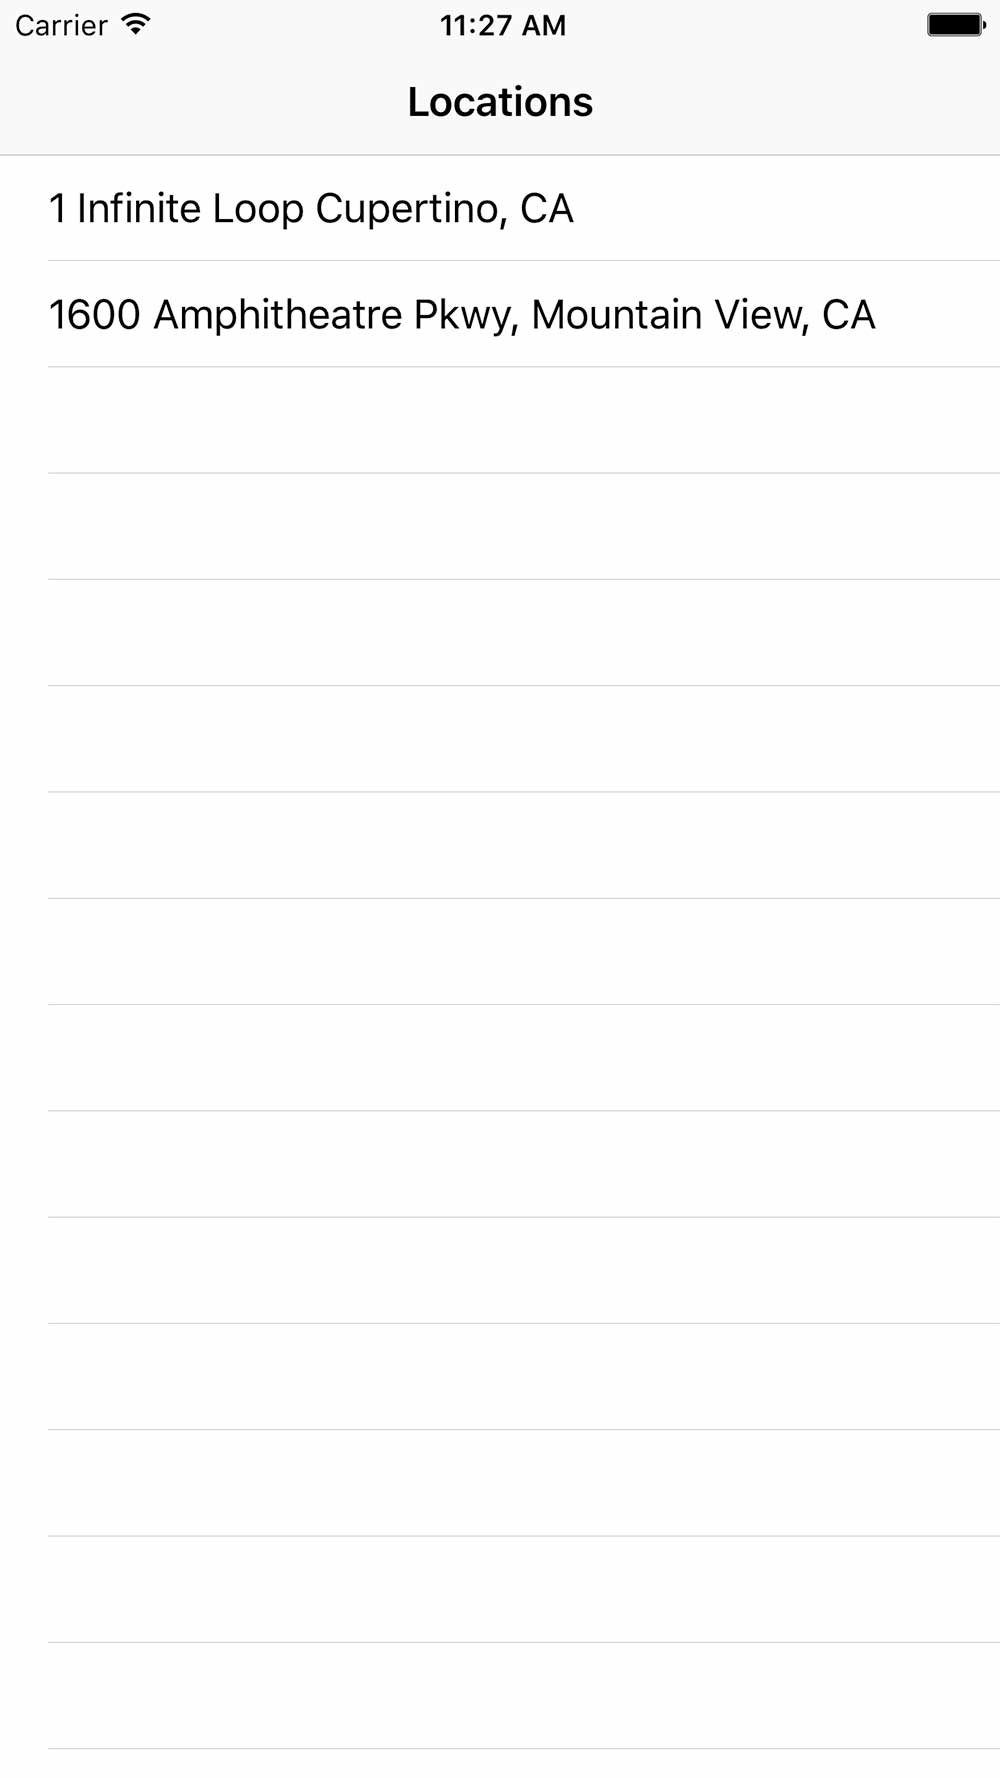
At this point if you run your application you should see your table view populate with the addresses from the MySQL database!

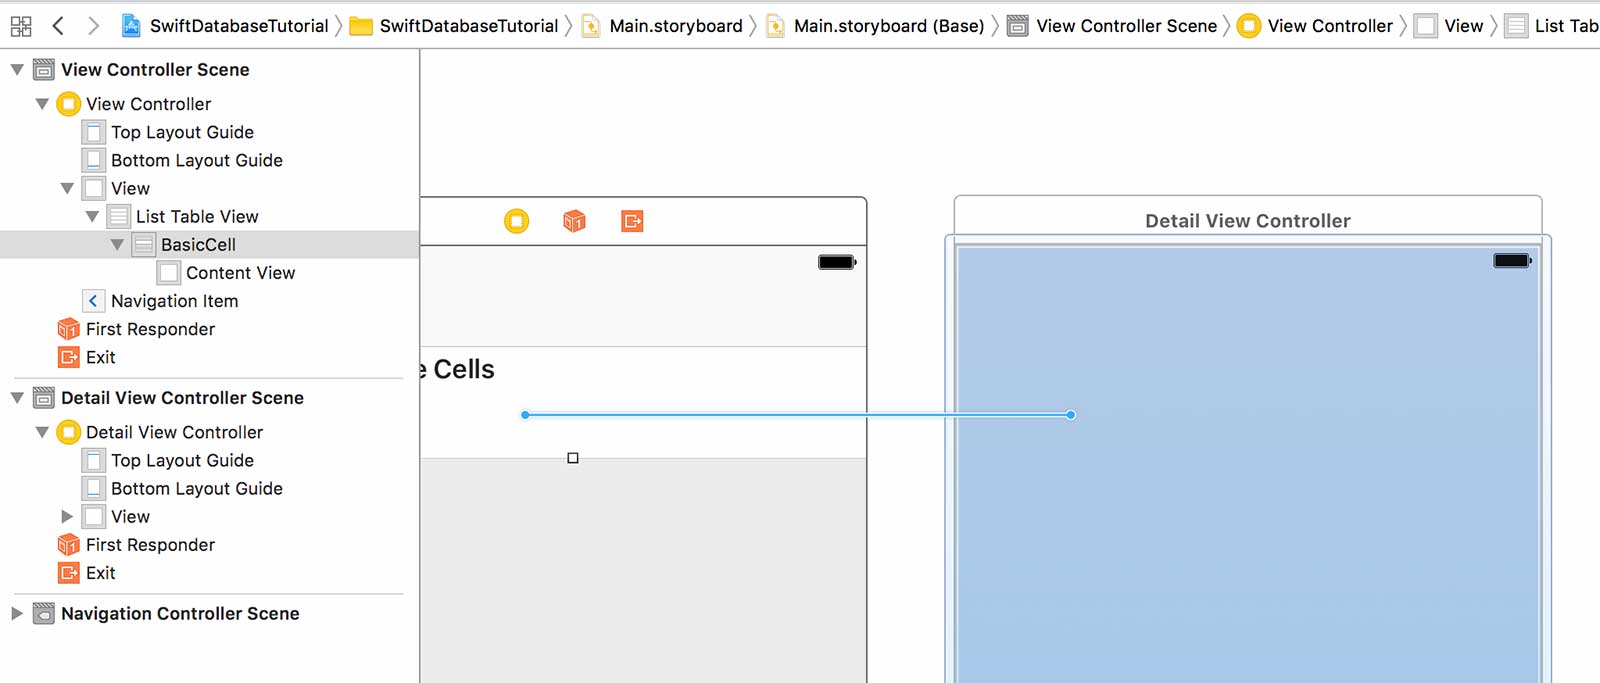
4.5 Adding a second view controller: the map view
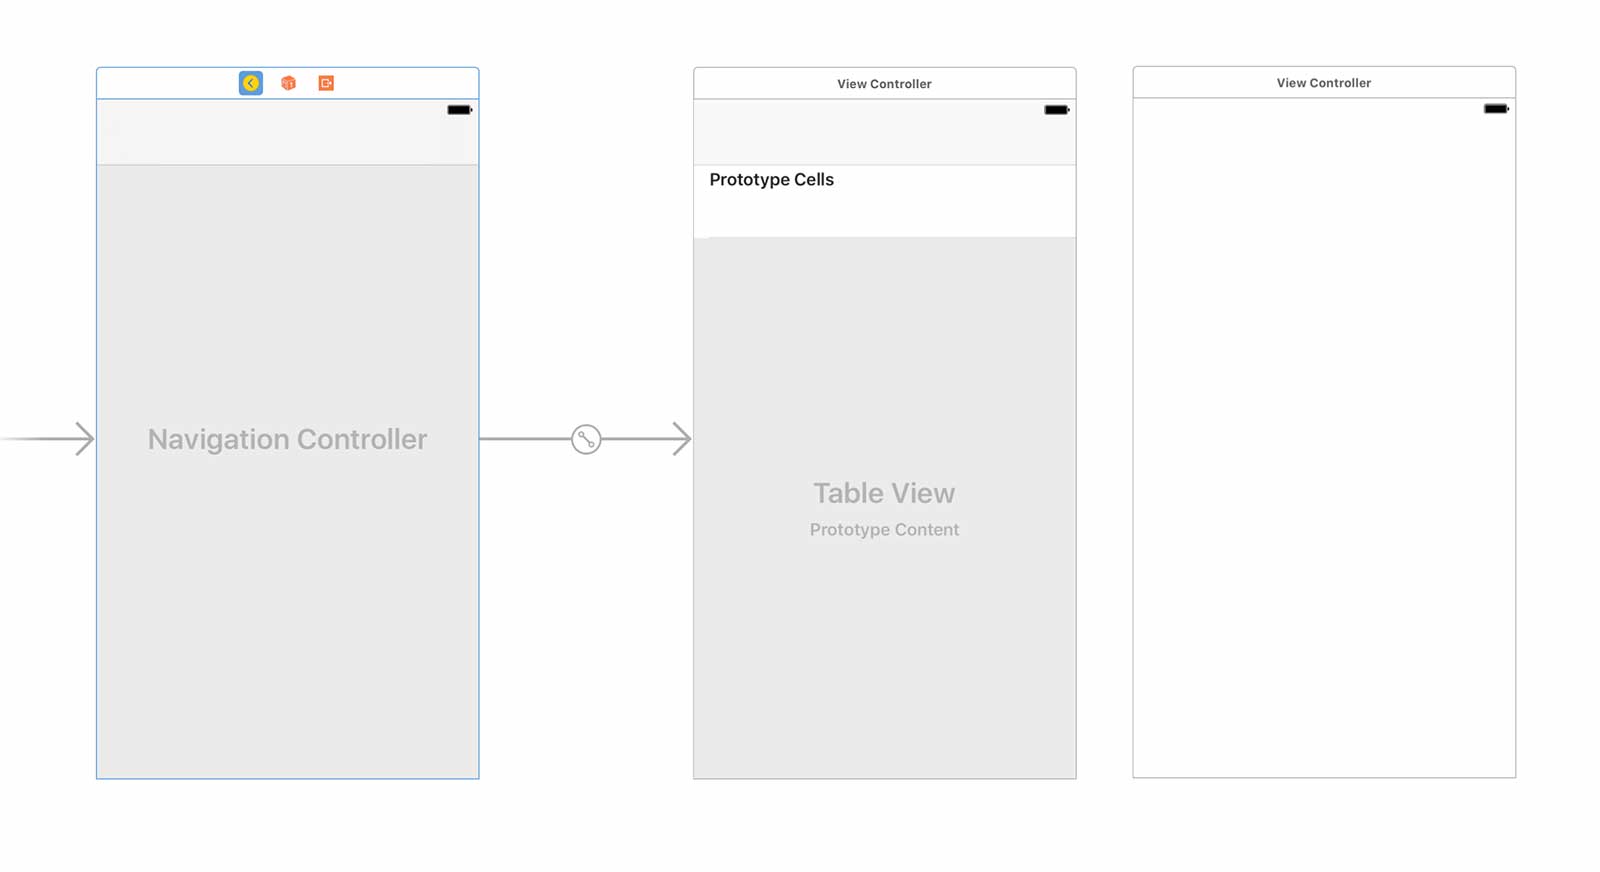
The first thing we need to do here is add a second view controller.
Let’s head to our Main.Storyboard, drag the view controller element from the object library, and place into our scene. Just like we did for the first view, lets set the size to 4.7 in.

We are going to need some sort of navigation mechanism to allow us to switch from one view to the other.
To do this, click on the first ViewController we created with the table view making sure there’s a blue outline around it.
Then, go up to the “Editor” on the menu bar and select “Embed In” followed by “Navigation Controller”
If done correctly, you should now have a navigation controller which connects to our first view controller. Also notice that there is a arrow pointing to the navigation controller, this is our entry point to our scene. As of now, there is nothing connecting our first view to our second, and we need to fix that.
Lets make sure you storyboard looks like this first:
Before we actually make a connection between our two view controllers, lets add a map view to the empty view controller.
Search for the Map Kit View in the object library and drag it onto the view. Resize it so that it fills the entire view.

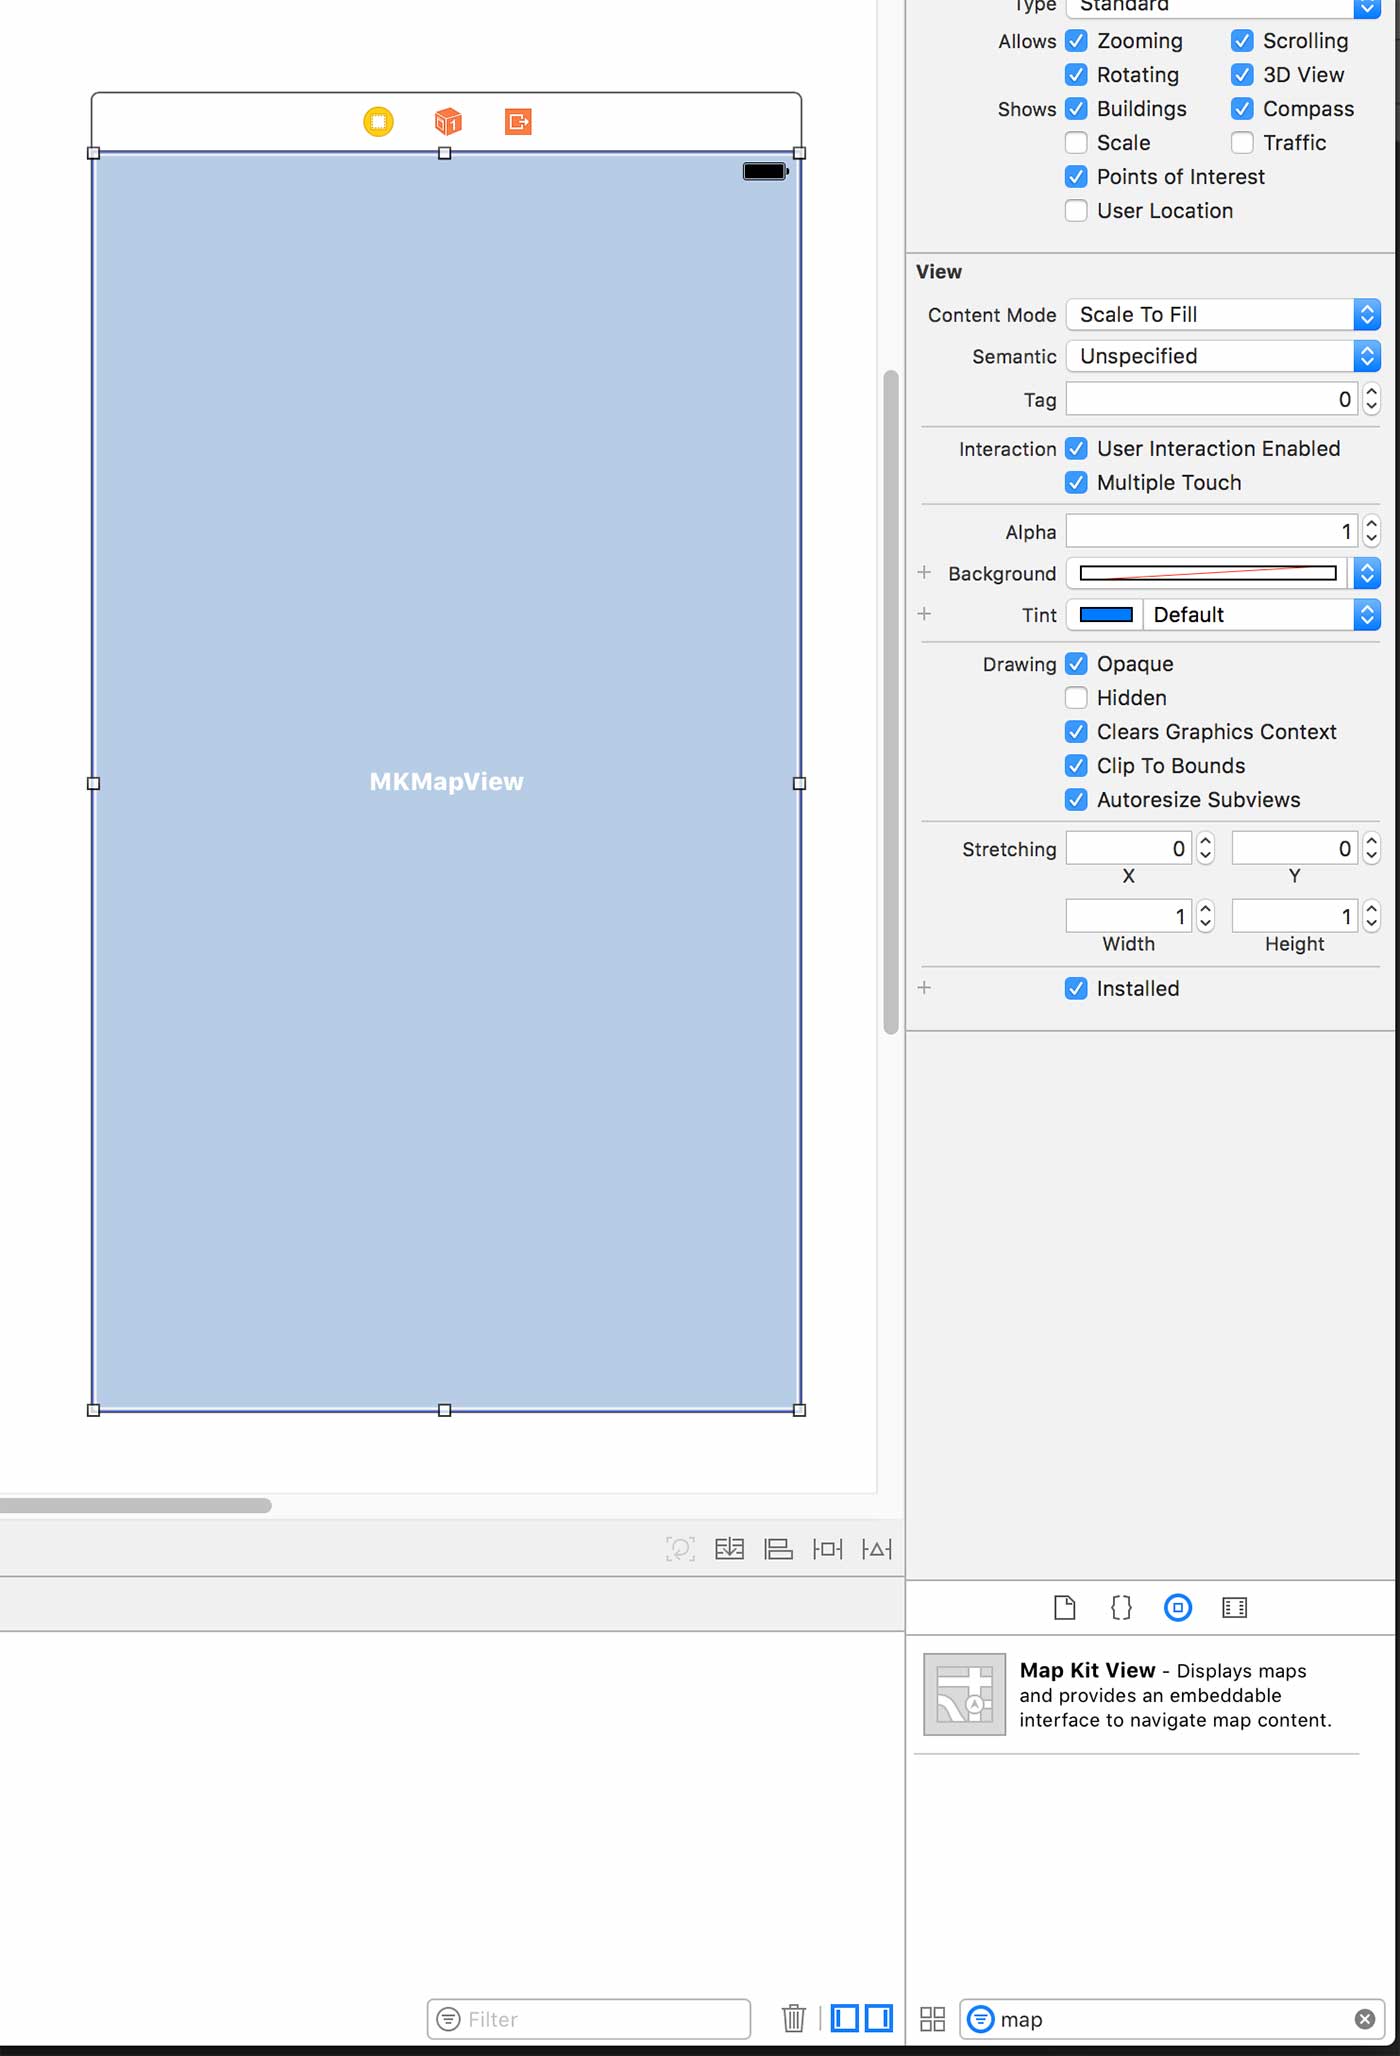
While still having the MapView highlighted, click the add constraints button shown in the screenshot below and then click each of the margins so it activates (it’ll become red). Make sure all the margins are 0 and “constrain to margins” is unchecked. Then click Add 4 constraints.

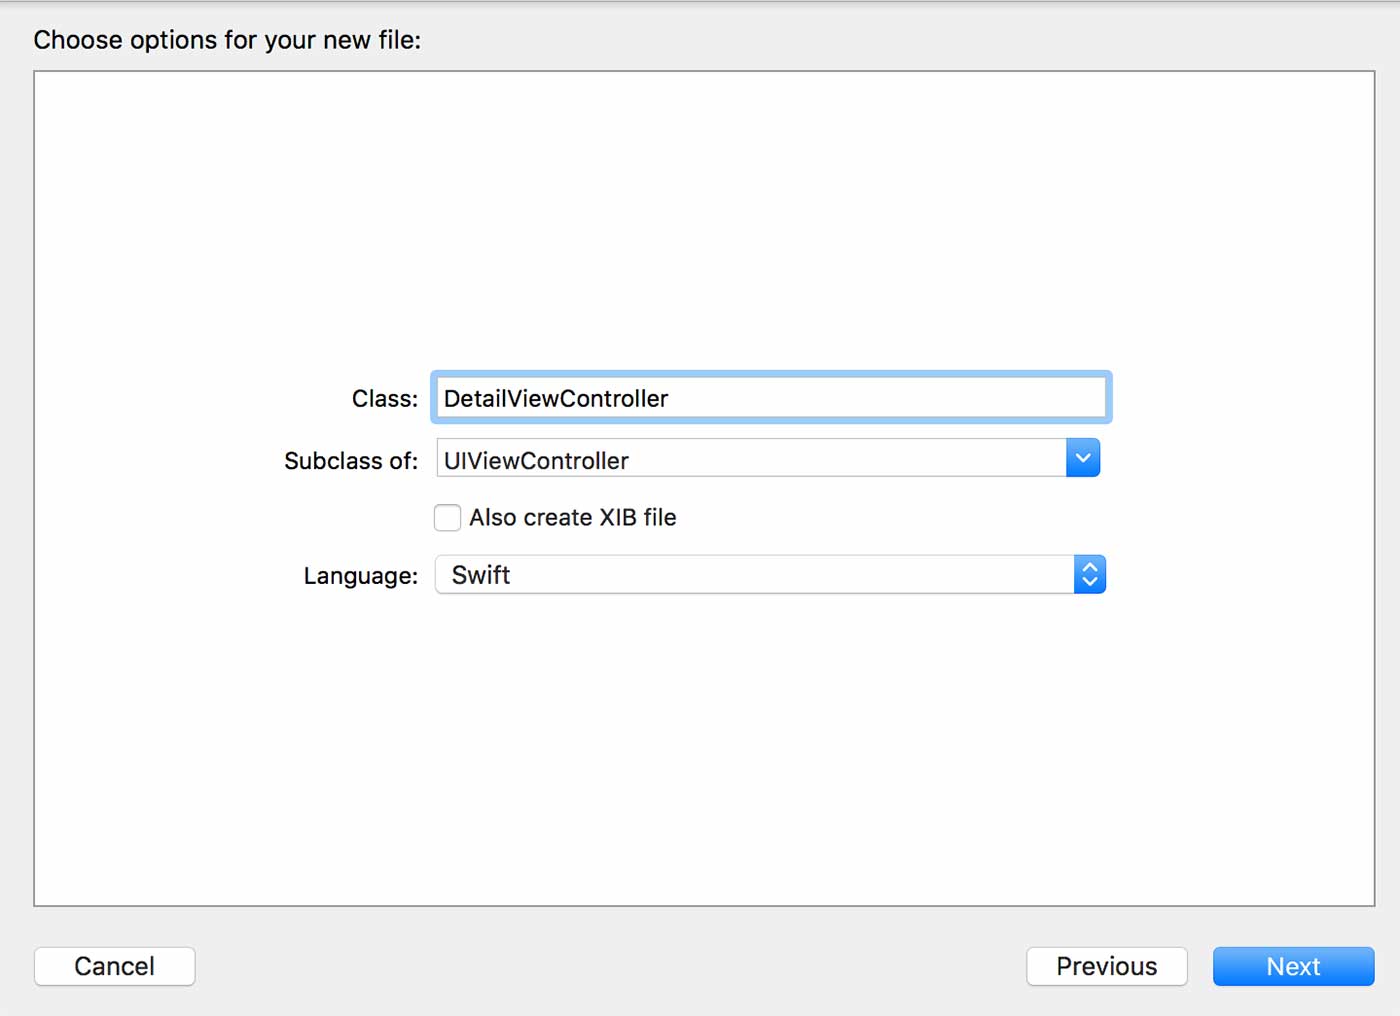
Now lets create a new Swift file so that we can interact with this Map View. Right click the root folder and create a new Swift file named “DetailViewController”

Let’s now define our class:
import Foundation
import UIKit
class DetailViewController : UIViewController {
override func viewDidLoad() {
super.viewDidLoad()
}
}
Notice that we subclassing UIViewController and have the viewDidLoad method just like our other view controller.
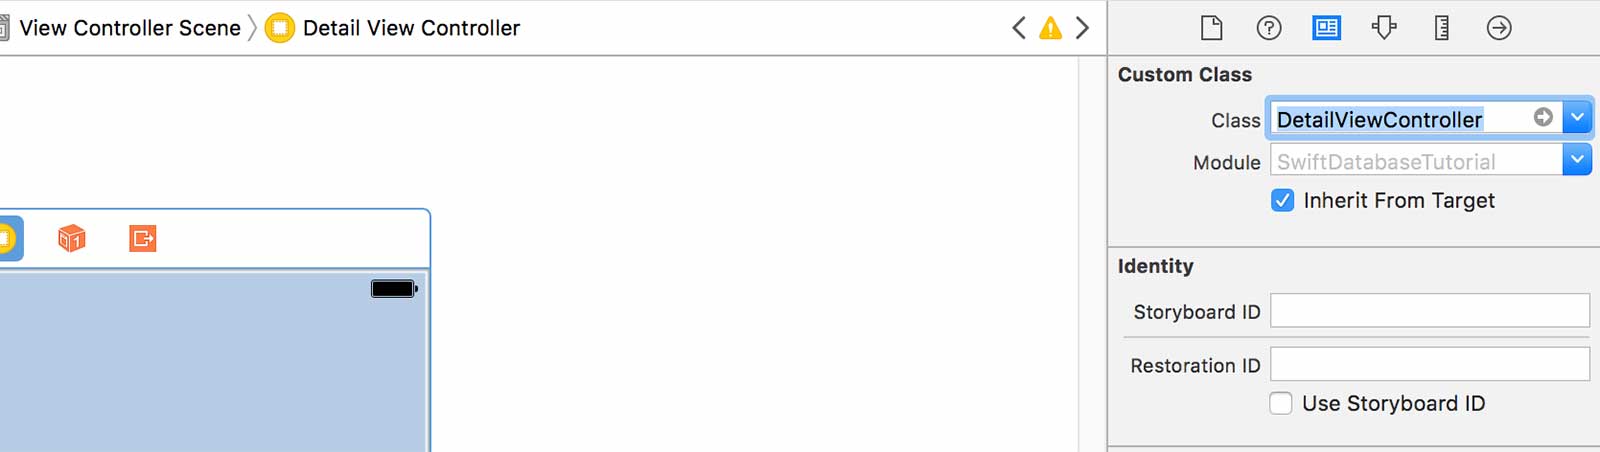
After creating the class, go back to Main.Storyboard and select your second view controller. To make sure you are actually on the view, click on the following icon at the top of the view:

This will create that surrounding blue outline.
Now under the “Identity Inspector” in the right pane, we are going to specify that this view will be controlled by our DetailViewController.Swift class.
Now we need to control drag the map view to the our DetailViewController.Swift as we did previously when we connected our table view. If you forgot how to do this, please review the previous sections.
Name the IBOutlet “mapView”.
At this point you will notice an error, and that perfectly normal. We need to add the MapKit framework to our Xcode project so that it knows what MKMapView is.
Let’s also added a variable “selectedLocation”. This will store the location that is passed through the table view.
import Foundation
import UIKit
class DetailViewController : UIViewController {
@IBOutlet weak var mapView: MKMapView!
var selectedLocation : LocationModel?
override func viewDidLoad() {
super.viewDidLoad()
}
}
4.6 Adding the MapKit framework
Click the project node in your file navigator and the center pane will change to the project settings.
Scroll down to “Linked Frameworks and Libraries”, click on the + sign, then search and add the MapKit.framework

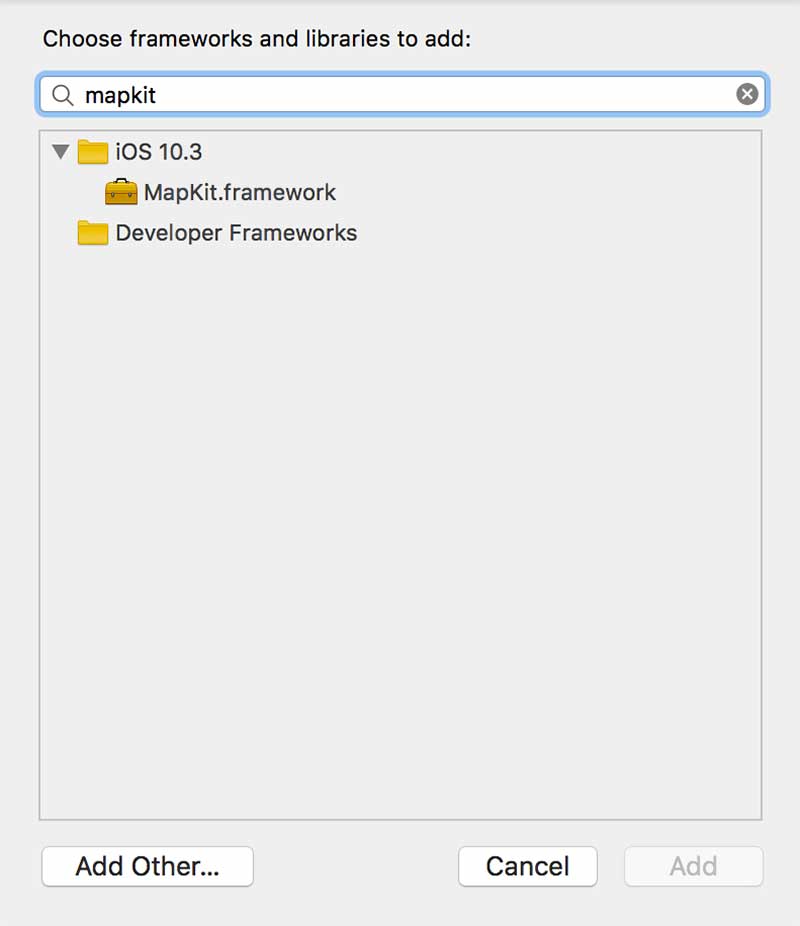
Now go back to the DetailViewController.Swift and under “import UIKit” add “import MapKit”. This will fix the previous error you were getting.
Now time to write some code!
4.7 Transitioning to the map view
Actually, there’s one more thing to do before we can start coding. We need to connect the the two view controllers so that when an address is selected from the table view, it can transition to the map view.
To accomplish this, we need to add a segue of the transition. A segue is like a transition that we call in our code to trigger between scenes.
To do this, we will control click on the yellow icon of our first view controller containing the table view, then drag the blue connection to the adjacent view controller containing out map view.
Head over to Main.Storyboard and let’s add that segue.
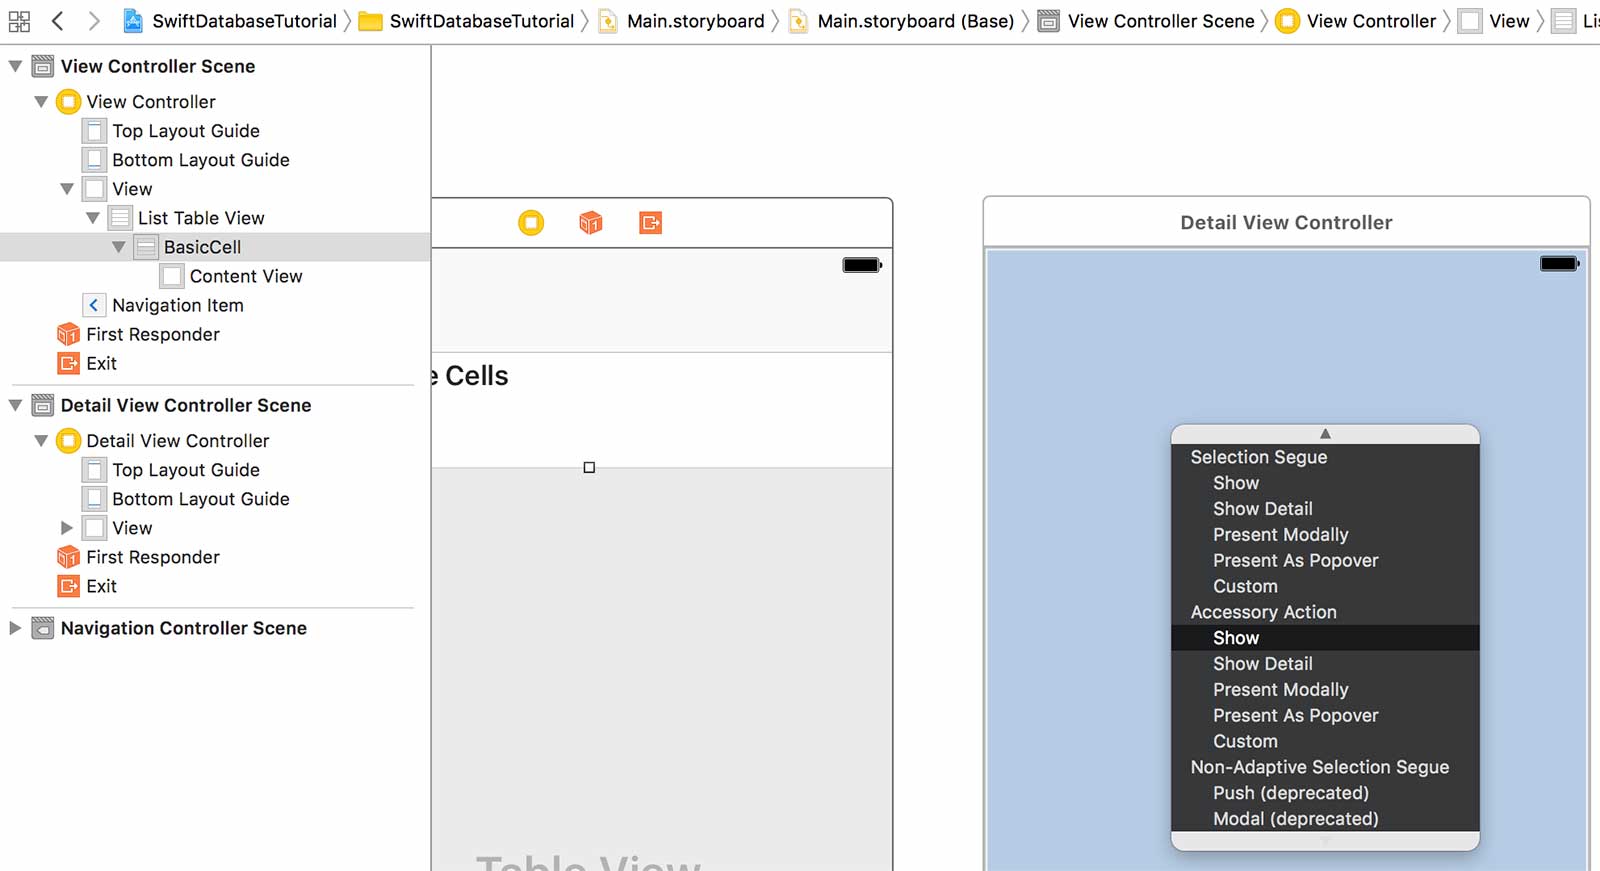
We are just going to use a “Show” segue, which essentially pushes the destination view controller onto the navigation stack and provides a back button to navigate back to the source.
After clicking “Show” on the segue menu, you should now see the connection between the two controllers.

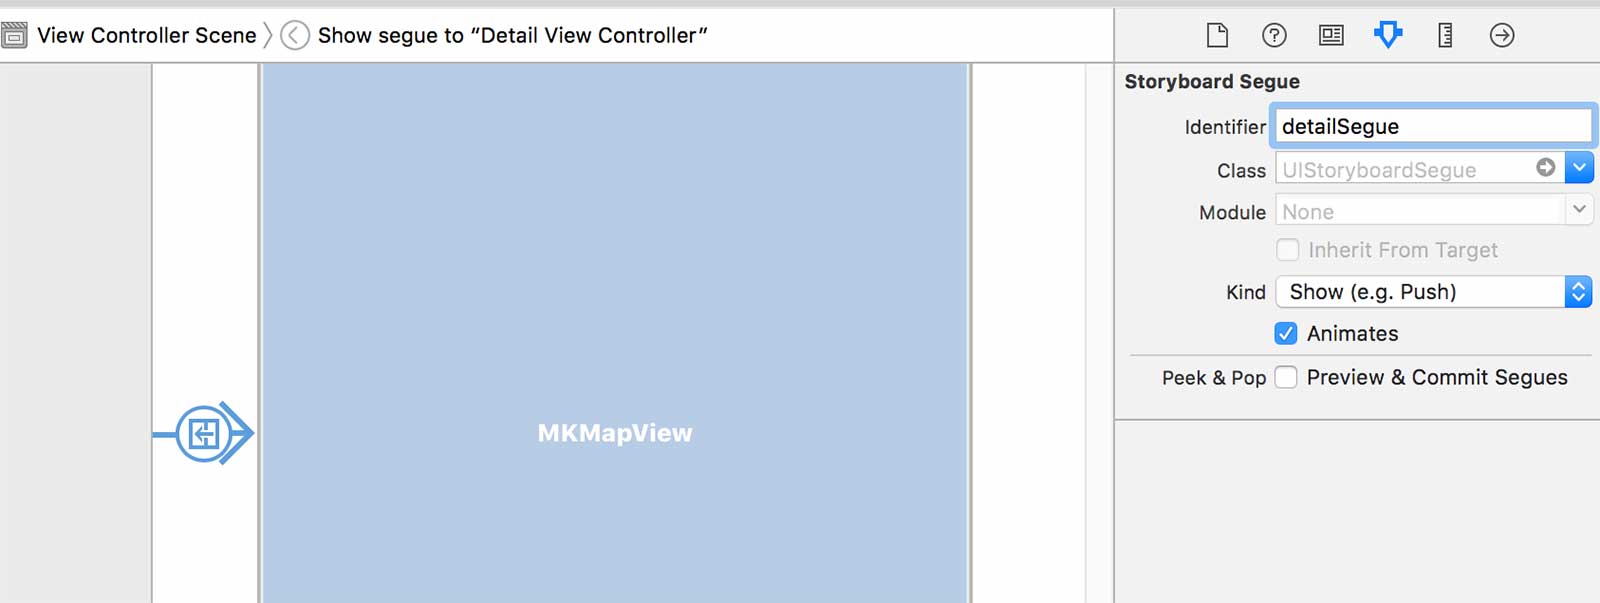
Now we have to give this segue an identifier so that we can trigger it programmatically in our code.
Click on the actual segue and then under the “Attributes inspector” on the right pane, name the identifier “detailSegue”
Let’s navigate back to our ViewController.swift so that we can add the code behind the segue.
func tableView(_ tableView: UITableView, didSelectRowAt indexPath: IndexPath) {
// Set selected location to var
selectedLocation = feedItems[indexPath.row] as! LocationModel
// Manually call segue to detail view controller
self.performSegue(withIdentifier: "detailSegue", sender: self)
}
override func prepare(for segue: UIStoryboardSegue, sender: Any?) {
// Get reference to the destination view controller
let detailVC = segue.destination as! DetailViewController
// Set the property to the selected location so when the view for
// detail view controller loads, it can access that property to get the feeditem obj
detailVC.selectedLocation = selectedLocation
}
On Line 50 we see another UITableView delegate method “didSelectedRowAtIndexPath”. This method gets triggered specifically when the user taps a row.
Since this ViewController has already assigned itself as the delegate of the table view element, it can implement this method.
In this method we store the Location object that the user clicks on via our “selectedLocation” instance variable.
Then we use our segue which we name “detailSegue” and call the “performSegueWithIdentifier” method listed on line 57. This method gives us the opportunity to execute some code before the view finishes transitioning.
At this point, the DetailViewController has already been created and we are referencing it via “segue.destinationViewController” on line 59.
Line 62 passes the Location object that was set in the previous method to our DetailViewController instance variable “selectedLocation”.
Now when the user taps an address, the view will transition to the second view controller containing the mapView.
It’s time to implement the code that will map the location!
Let’s head over to our DetailViewController.swift. We have access to the location object that we need to map thanks to the “prepareForSegue” method in our ViewController.
However, if we try to set the map location in the “viewDidLoad”, the map may have not finished initializing yet and we will not be able to see the animation to our desired location.
To fix this, we’re going to override the “viewDIdAppear” method and place the code there to allow a zoom in animation to our desire coordinates.
Here is the code you should add to your DetailViewController to make this happen:
import Foundation
import UIKit
import MapKit
class DetailViewController : UIViewController {
@IBOutlet weak var mapView: MKMapView!
var selectedLocation : LocationModel?
override func viewDidLoad() {
super.viewDidLoad()
}
override func viewDidAppear(animated: Bool) {
// Create coordinates from location lat/long
var poiCoodinates: CLLocationCoordinate2D = CLLocationCoordinate2D()
poiCoodinates.latitude = CDouble(self.selectedLocation!.latitude!)!
poiCoodinates.longitude = CDouble(self.selectedLocation!.longitude!)!
// Zoom to region
let viewRegion: MKCoordinateRegion = MKCoordinateRegionMakeWithDistance(poiCoodinates, 750, 750)
self.mapView.setRegion(viewRegion, animated: true)
// Plot pin
let pin: MKPointAnnotation = MKPointAnnotation()
pin.coordinate = poiCoodinates
self.mapView.addAnnotation(pin)
//add title to the pin
pin.title = selectedLocation!.name
}
}
Looking at the viewDidAppear method on line 15, we see the code that sets up our map.
Lines 17-20 set up the coordinates using the latitude and longitude properties of our location object.
Lines 22 and 23 initialize the mapView property and specify it to the appropriate region.
Lines 25-27 set up a pin and place it at the appropriate place on the mapView, and line 30 creates a name title for the pin when clicked.
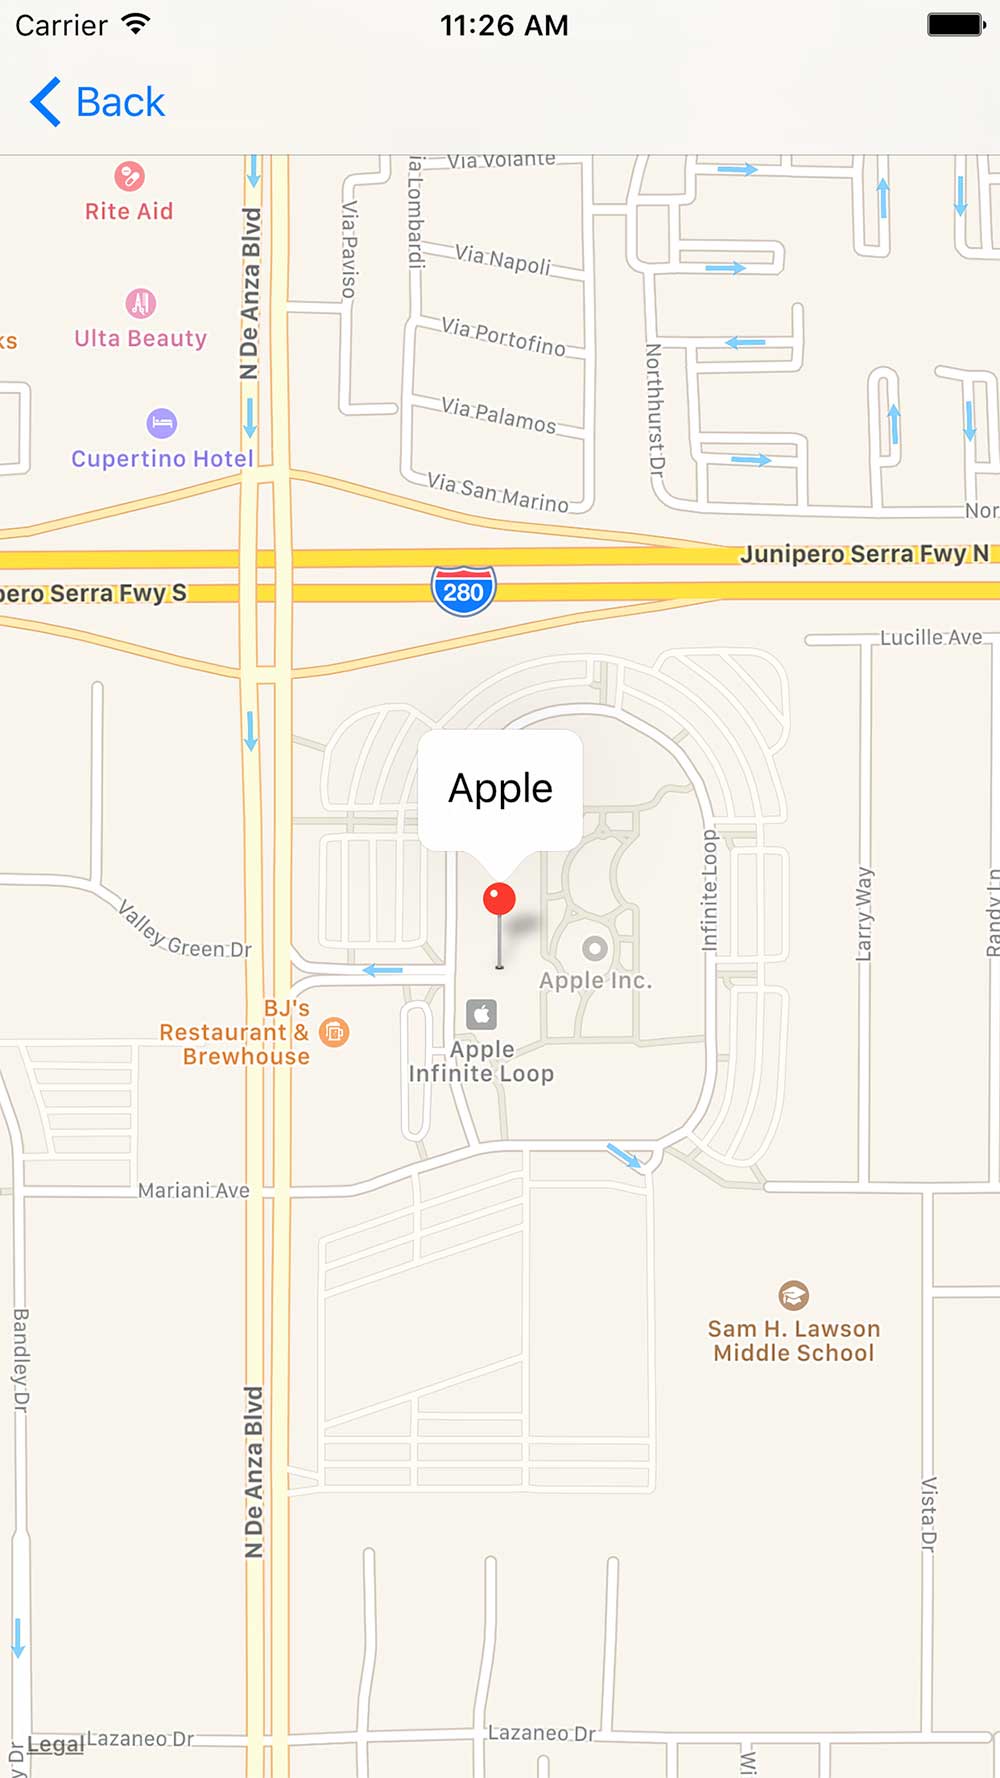
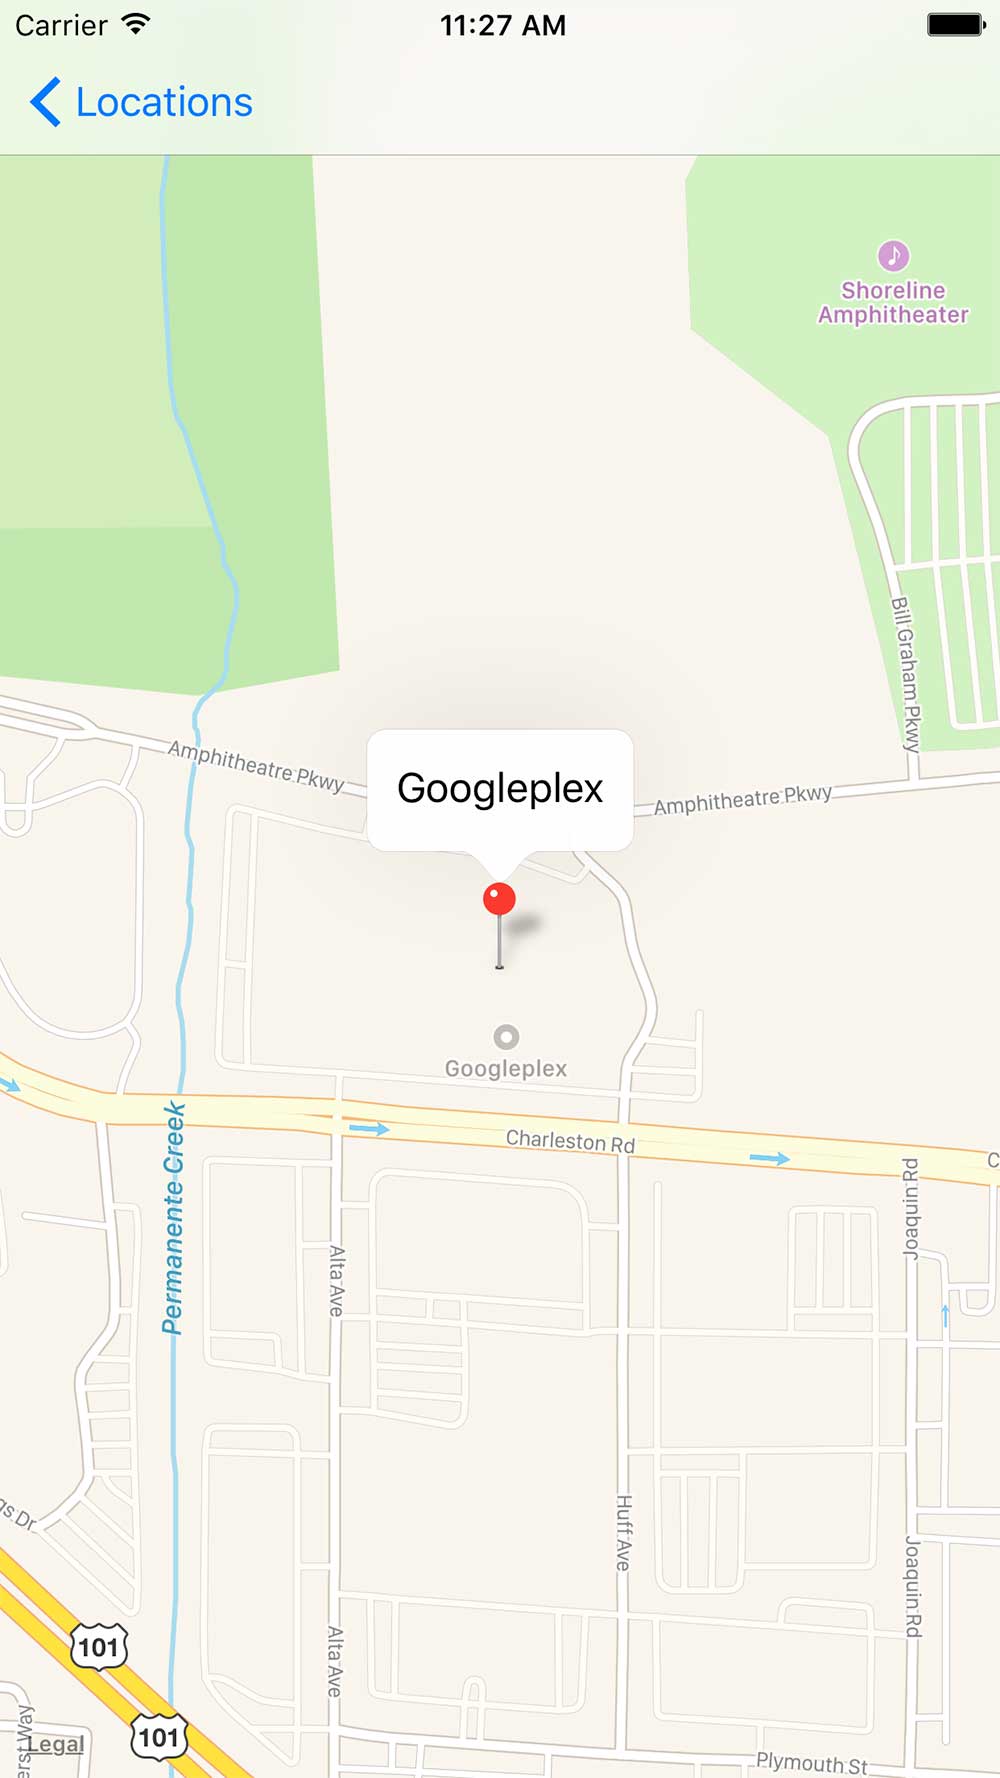
Now try building your application and you should be able to transition from the table view to the map view where you will see a pin located at the address tapped.

Let’s go ahead and do a little customization for the fun of it.
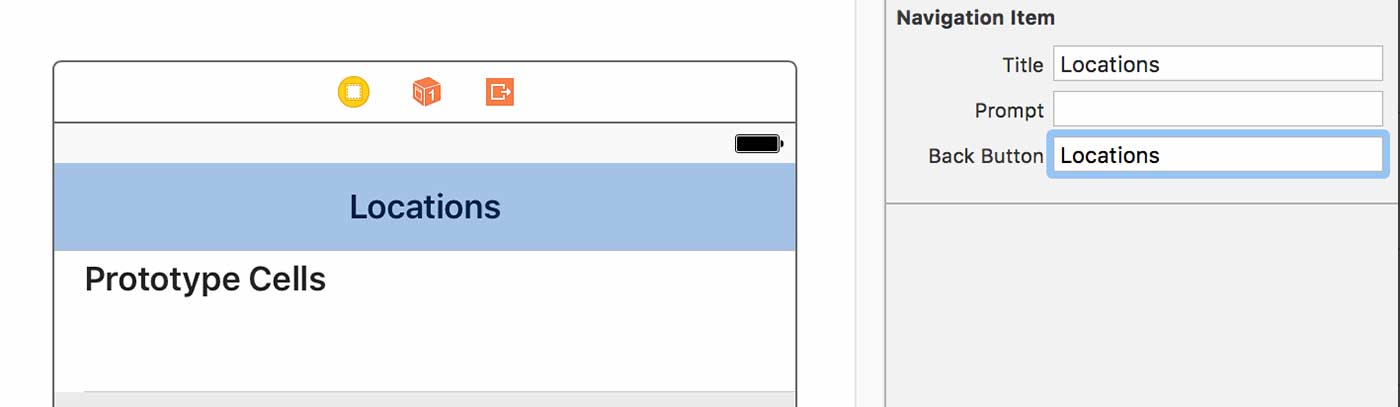
Head over to the Main.storyboard and click on the top portion of the view controller containing the table view. This should pull up the “Navigation Item” menu under the “Attributes inspector” in the top right pane.
You can adjust the title of this view controller and the title of the back button located on the other view controller containing the map view.


Conclusion
So there you have it! How to connect to a MySQL database from an iPhone app or more accurately put, how to retrieve data from a MySQL databased from your app.
I realize that some of the Swift code in this article may be foreign to you but for students of my course, this is all code which they have learned already.
I highly encourage you to check out the course or start with the basics if you haven’t done that yet.
Please help me by sharing, tweeting and liking it with the social buttons below. I really appreciate it!
Very helpful tutorial that has taught me a lot. I have a question about a particular functionality, however:
When I add a new entry in my database, I can refresh the service.php page and it immediately displays the new entry in the array, but it takes what seems like hours to appear in either the simulation or the application. Do you know why this is and how I can fix it? It should update it immediately anytime I launch the app right (or if I was to add a new action that reloads the table)? Why does it take so long?
Thanks for the help.
Hi Chris, Amazing lessons and good example training, I am little bit struggling to connect my SQL databses that already exists in my website http://www.okadco.com, i am doing the app but failing to connect and i guess te name of the database and table is no correct with me…can u put more light on this…thanks
Danilo, a Neteller não presta mais serviços no Brasil? Como efetuar depósitos e receber valores na Sbobet?
Abss
Hi Chris.
How would it be with a Web Service with WSDL, passing parameters?
Something like a login type, passing username and password and the WebService returns “true” or “false” in JSON format.
Note: the WebService uses NuSoap for ease to create the WSDL
Excelente Work! Congratulations!!!
What would the cause of this error be?
i see you address it in the video but when im all done it still displays the error.
Value of type ‘HomeModel’ has no member ‘parseJSON’
Thanks
You have to copy & paste the parseJSON() from the tutorial‘s code.
Is there any chance you will update this tutorial for Swift 5.1? I just downloaded Xcode 11 this morning and it says that it won’t automatically update the code from Swift 3.
Major with service.php file transcript
a php file should start with <?php
and not fetch_object())
change it to:
while($row = $result->fetch_object())
don’t worry if your version of SublimeText doesn’t paint the -> in red
Errors in service.php file transcript
( my previous comment lost lines because of the commenting code being shown, please infer that the backtick ` should be deleted from the the real code
a php file should start with <?php
and not or – – -`> in the
while($row = $result—`>fetch_object())
change it to:
while($row = $result->fetch_object())
don’t worry if your version of SublimeText doesn’t paint the -> in red
Could you please do it backwards. Input something on your iPhone and the store the data locally when offline and send the data through php to MySQL when online?
Thanks a lot !
Its great as your other content :D, thank you for posting.
Very good website you have hre butt I was curious if
you knew of any community forums that cover the same topics ttalked about in this article?
I’d really likje to bee a part of group where I can get
opinions from othner experienced people that share the
same interest. If you have any recommendations, pleasee
let me know. Manyy thanks!
Really Great !! Please let me know how can I help you for supporting purpose. I don’t need any host and non educational course.
I love the valuable information you provide in your articles.
I shall bookmark
your site and check again here frequently. I am
quite sure I’ll learn
lots of new stuff right here! Best of luck for another!
Super Website. Vielen Dank.
Hello one and all. This is my first ever blog post, I am a total newbie to php, C and mySQL. Firstly, thank you so much Chris for this and your other sessions and thank you too to all those with questions and answers below which helped me immensely. I thought I’d submit pointers to others who might be stuck, showing where I got stuck and then fixed things. For clarity, I’m using XCODE 6.3 running on OS X 10.10.3, and and used MAMP 3.2.1 to setup php and mySQL. Here goes:
I used MAMP and the linked myPHPAdmin to complete Part 1 – MAMP helps get the Apache server running locally, then provides the way in to create the database, the password and the user with the right privileges. All straightforward, but watch out for a couple of things – MAMP and MAMP pro share common htdocs folder, but difference databases, so they can’t be used interchangeably. I also accidentally deleted the htdocs folder, causing mayhem, as that is where MAMP and MAMP pro look, for various default positions. Recreating it solved problems. Final tip – If you are using MAMP (or pro) it comes with default ports set that will NOT cause a clash with any Apache server which you may have running already. When you are sure you don’t have any inbuilt Apache running, you need to switch the default ports to the suggested 80, 443, 3306.
In part 2, I managed to introduce two-hours of misery! The symptoms did not appear until much later, but the cause was here: Please check the spelling and Capitalisation of the field names. I accidentally used name instead on Name, and so on. This caused me to think that my localhost settings were somehow wrong. I could get responses in part 4 using someone else’s database (thank you rv (below) for http://viewlocation-mivicio.rhcloud.com)) but not from my own database running on localhost! More follows.
In part 3, the trick is to get the JSON text to appear in a browser window in step 3.2. Creating the service.php file can be tricky – I started using Apple’s TextEdit, but had problems with .txt extensions being amended or not displayed, so eventually switched to Xcode. Copying Chris’s code in from above does work, however, there are two potential gotchas: Some sites I found suggest that after line 9 in the code in part 3.1 the code ‘exit();’ should be inserted, as a failure should end the php code. The second one is that the download file for this code contains an additional line after line 35 in section 3.1 above (‘mysqli_close($result);’). This is not required, so you can comment it out with //. Finally, don’t forget to update the code in Line 4 of 3.1 to use your user, database and password from part 1.
In part 4, I’m only up to 4.4, but wanted to share the point on ‘my code works on someone else’s php, but not mine on localhost’. The real clue was when I downloaded and tried Chris’s completed code. It worked (!) even though no words appeared in my cell. I tumbled it when I clicked on either of the first two cells on my table view controller (I had two entries in my database), it opens the map, and plotted a pin off the west coast of southern Africa (Lat and Long = 0). So I had two entries in the table – and nothing in the third cell. Tracing back to when I lost the valid data, it was in lines 54 to 57 in HomeModel.m in 4.3 above. The JSON conversion steps. I was using name in my database definition (and latitude vice Latitude) and so on, so there was no match, and the empty data followed through. I think the comment below: “Adding the line $con->set_charset(“utf8″) fixed it!” may avoid the problem, but not correct it, but I can’t be sure.
Sorry for the length. I hope it’s of use to someone. Thank you once again Chris – I hope you find time for a Swift update sometime soon.
Hello there! Your tutorials are great 🙂 I’ve had great success 🙂
I’m stuck on 3.1 here. I cut-n-paste the php text, save it to a service.php file and so on. NOTHING shows up when I run the file via http://localhost/service.php. I threw in a standard line of text at the bottom of service.php, and THAT LINE OF TEXT shows up, but the php Stuff doesn’t do anything in my browser 🙁
Any help? I’ve been trying to figure it out for days.
Thanks!
Hey Jake, you’ll have to modify the PHP file to fit your own database! I think the database that the demo points to is no longer alive 🙁
Still struggling myself but I have not has time to review the link Chris sent a few weeks back. I am wondering if I am running it a limit in the array as I am pulling in more than 26,000 entries.
Hi Chris, your explanations really have clicked and helped me. I am running into the problem getting the “while” statement in the PHP service to execute properly. The big problem for me is I am not getting any error response so I an not real sure where to look for the solution. As a novice to PHP and MySQL I am sure I am missing a simple component.
Thanks
Hey Frank, have you tried looking at the sample code? You can download it here: https://codewithchris.com/how-to-make-an-iphone-app-mysql-wordpress-resources/
Hope that helps!
Hi Frank and Chris,
I’m getting this same error. I looked over the sample code and while there is one line different from in this tutorial (mysqli_close($result); before closing $con) that didn’t seem to resolve the issue. My service.php simply generates [[],[]]
Hi Chris, I really love all of your tutorials – super helpful and beginner friendly!
Have you created the Swift Version of creating an app from a WordPress page?
Hey Melissa, I haven’t yet but I’d like to translate and update all of my old articles with a Swift alternative! Just not sure when I’ll be able to do it 🙁
In line 50 of HomeModel.m, where the code is NSDirectory *jsonElement = jsonArray[i], I encounter an error even when copying and pasting the code directly. The error says “Subscript requires size of interface “NSArray” which is not constant in non-fragile ABI.” Has anyone else encountered this problem and does anyone know what I’m doing wrong?
hey instead of the the data being shown when i tested the service.php. It showed the php code. By the way I am using xampp for this.
hello chris thanks for your excellent guide. Would it be possible to send data from text fields in the app to the database using the web service?
Hi Chris. At the risk of sounding repetitive, I must say your tutorial was one of the easiest to follow. The level of detail you went into is impressive and I can see how you get into a newbies mind and then do your tutorials. Keep up the good work.
I am using your Model class to connect to the db and getting a list of items back. However once the user clicks on an item i would like to make a further database call to get details of that item. From the current code, it seems I cant leverage the same Model class and it is very specific in what it returns and parses, etc. Does this mean I have to write a Model class for each different type of db call that I make? Is there a more efficient way to reuse code?
Hey Murtaza, thanks for your kind words and i’m glad you enjoyed it. The model class would contain all of the various calls to the database. Just separating the responsibilities like that (between the model and the view controller) will go a long way for debugging or updating code in the future.
Hi Chris, thanks for the tutorial. It was really helpful. I can now access and see the records on the iPhone screen. Can you please provide a hint on how to edit each record or add a new record?
Hey Reza, thanks for reading!
In order to update or insert new records, you’ll have to create a php service to reads the request for the parameters to insert or update.
Then from the iOS side, you need to include those parameters as part of the request to the service.
Hmm never mind. I figured it out. Forgot to upper case the the first letter of the my database fields. All good now 🙂 Thanks again!
Would you mind telling me how you fixed it?
HMM did my previous comment get deleted? probably cause I put a link in it. Anyways I build the app, then plugged in the location of web service and no locations show up on my build and no errors stop the build from happening.
Then I used Chris’ source code and I get the same behavior. Anyone else having this issue?
I also just tested my json through a linter and it came up as valid json. but no locations are showing up when i run the app. Anyone else having this issue? I just wish at least it would show me an error 🙂
Thanks again for writing this tutorial.
Hey Chris, I just tried running the app building it myself and using your source code. In both cases I am getting blank fields. I am using this data http://jeffreymarx.net/jeff.json I have the service set up but I just want to troubleshoot the problem with the data not being pulled. Also, I am not getting any errors when it build. Is the json output correct?
Thanks for the tutorial. I have a problem with my special chracters in database. I have set utf8 unicode but still getting question marks.. I think we should modify our php file, (encoding decoding problem?)
Great tutorial Chris, it’s really helped me! Everything is working just as you said. Was just wondering how I would go about adding or editing locations? Because the results are in an array, I’m having a lot of trouble posting a change back to the MySQL database..
Awesome tutorial. Thanks Chris.
Thanks for this tutorial, would love to see this in Swift.
How do I make this more secure ? Now anyone can use the service and look into my database table.
Also is there a limit to JSON ?
With a lot of records the result is a blank page, only when using LIMIT in the SQL Query it shows the JSON result.
hey did you solve this? i want to make more secure too.
Great tutorial Chris, Thanks so much.
Just wondering if you had plans to update Objective-C code to Swift any time soon?
Thank you.
Hey Chris! Great tutorial.
My question is: how can I make login screen using the informations from a database? Can you please help me?
Thanks!
Eagerly waiting for your swift version …:)
I had to create a Location.m file and put the code below in it. I could then compile just fine.
import
#import “Location.h”
@implementation Location
@end
This is the error I’m getting.
When I try to build, I’m getting this error. I’ve tried twice now.
Hey Shawn, try downloading the demo source code and running that!
https://codewithchris.com/how-to-make-an-iphone-app-mysql-wordpress-resources/
The source code did compile. Thanks Chis.
Hi Chris, Brilliant and clear instructions but I’m obviously missing something basic. When I upload the service.php file and then try it in a browser, I’m getting “unexpected end of file”. From what I can see in the php file the “>” character in the while loop is matching up with the “<" at the start of the php file, or is it just my text editor fooling me. Any ideas?
Hi Chris – sorted. Not sure what I did wrong but I rewrote the file in parts and it’s now working fine. Cheers
hello, thx for the tutorial.
my cells doesn’t show anything…
here’s my JSON result
[ { “dede”: “Bienvenue” }, { “dede”: “Découverte : la Zumbatomic” }, { “dede”: “Jeux de mains, Jeux demain !…” }, { “dede”: “Allonne Kodokan club” }, { “dede”: “BRC : Les Beaux jours arrivent” } ]
and my parts of modified code
in location.h
@property (nonatomic, strong) NSString *titre;
in viewcontroller.m
myCell.textLabel.text = item.titre;
in homemodel.m
newLocation.titre = jsonElement[@”dede”];
is there any pb with that?
thx
Great tutorial!. Is it a versión updated to swift?
Not yet but will be getting to this in Dec 🙂 Thanks!
Looking forward to the Swift version!
Hello Chris,
Thanks for the tutorial. I been following at your posts.
In this one I got stucked pretty soon. I had previously a host in Godaddy. So I proceed to create the database. After that the service.php file and I uploaded by ftp. But when I try to look for it in the browser “www.mydomain.com/service.php” I cannot get thr right info, instead I received this error.
—————-
Internal Server Error
The server encountered an internal error or misconfiguration and was unable to complete your request.
Please contact the server administrator to inform of the time the error occurred and of anything you might have done that may have caused the error.
More information about this error may be available in the server error log.
——————-
Do you know something about this?. How to deal with it.
Thanks!
Hey Naoa18, that’s most likely cause by an error in your PHP code. Godaddy is not showing you the actual error message and instead is telling you to check the server error log! I’d suggest contacting their support to see how to see the PHP error message or where the log is so you can check it. The error message will give you a hint on what’s wrong with the PHP code.
// Create new HomeModel object and assign it to _homeModel variable
_homeModel = [[HomeModel alloc] init];
// Set this view controller object as the delegate for the home model object
_homeModel.delegate = self;
// Call the download items method of the home model object
THE BELOW HAS AN ERROR IN XCODE AND SHOWING A RED DOT
—-> [_homeModel downloadItems];
picture below
@ Maverick, look in your ViewController.h file and make sure there is a #import “HomeModel.h” near the top.
Also, it looks like you misspelled _homeModel in the @interface ViewContorller () section.
Chris what is this…?
what is going on and why am i getting the stop yield signs?
Hi Chris,
I am following this tutorial in Xcode 6 and have now
gotten to the point where you say that running the app should display
the two addresses. When I open the app in the simulator, I get only a
empty table. by means of putting Log statements throughout the code, it
looks like the JSON is being downloaded properly, but then when it
reaches the part at the end of connectionDidFinishLoading
if (self.delegate)
{
NSLog(@”Data is read”);
[self.delegate itemsDownloaded:_locations];
}
This part never gets performed and thus it appears the table view does not get refreshed with the downloaded data.
Any suggestions?
Hey Anthony, it could be that you didn’t assign the view controller to be the models delegate.
Try downloading the sample code in the last chapter of this series!
aha! I missed this part:
// Set this view controller object as the delegate for the home model object
_homeModel.delegate = self;
and the funny (in a sad way) is that I missed it twice (retyped out the code here twice to try to get a better understanding of what the pieces are doing)
Thanks Chris!
Hello Chris, Thank you so much for this great tutorial!!!! I have one question so I am making an app where instead of a map view it just shows a string of text in a UITextField such as like the name of the address or something but I cannot figure out how to do this. Any Help would be great thank you so much!
Hi Chris, I try to use your php code to extract data from mysql and use it in xcode using swift. I keep getting error when trying to run in xcode and somehow I think the problem come from the NSJSONSerialization because if I comment it out, there is no no error and I could print out the content from the url. The funny thing is if i try to use some others json format site eg. http://www.telize.com/geoip, I can get it working without any error! So now it looks like the site itself and I just couldn’t figure out what is wrong………please help……….
Hi Chris. Longtime iOS front-end developer, learning back-end, came here to learn how to set up the PHP side of things. I set up your PHP script with the proper db name and user information, but when I navigate to the file on my web server I get the following message:
Warning: mysqli_close() expects parameter 1 to be mysqli, boolean given in /home/amarkon/public_html/dbaccess.php on line 36
Any ideas?
Question 2 is how to customize the script so I can run a custom SQL query in the app?
Hi Chris.
Awesome tutorial, very clean and understandable!!!
I have tried everything and it works perfect with me. My question is: how can i make login screen before the table view with different users, so that 2 or 3 different people can use the database?
Best regards from Bulgaria
Hi, Thanks for this great tutorial!
I’m trying to follow every step of your tutorial except the json data. I don’t want to use location information, but a product information. I still use Location.h and Location as the structure, however I change the field names into mine. as below:
#import
@interface Location : NSObject
@property (nonatomic, strong) NSString *ID;
@property (nonatomic, strong) NSString *title;
@property (nonatomic, strong) NSString *sub;
@property (nonatomic, strong) NSString *price;
@end
Accordingly, I modified the scripts in HomeModel.m as below:
for (int i = 0; i < jsonArray.count; i++)
{
NSDictionary *jsonElement = jsonArray[i];
// Create a new location object and set its props to JsonElement properties
Location *newLocation = [[Location alloc] init];
newLocation.ID = jsonElement[@"ID"];
newLocation.title = jsonElement[@"title"];
newLocation.sub = jsonElement[@"sub"];
newLocation.price = jsonElement[@"price"];
// Add this question to the locations array
[_locations addObject:newLocation];
}
Now, the problem is that I cannot build this program, the errors come as below:
"_OBJC_CLASS_$_Location", referenced from:
objc-class-ref in HomeModel.o
ld: symbol(s) not found for architecture x86_64
clang: error: linker command failed with exit code 1 (use -v to see invocation)
I have no clue what the errors talking, please help and advise!
Thanks for this great tutorial!
I’m trying to apply your code to my school project. Still, I have a problem with the tableview. My tableview is blank, although I have checked that the PHP file and database are OK. The JSON feed is valid and the cell identifier is also OK. I have also problems with the tableview object in the storyboard, I have to shrink it about 15 pixels from the right side, otherwise the row lines continue over the right edge of the screen. I had similar problems with my previous exercise, which was also about tableview. Is there any well-known solutions for issue like this?
How would one go about adding and deleting to the mySql database through the app?
Hi Chris,
Great tutorial so far, finally something that actually teaches me about api’s and server communication etc….
I am given this error, your link works but mine does not.
[{“Name”:”Apple”,”Address”:”1 Infinite Loop”,”Latitude”:”37″,”Longitude”:”-123″},{“Name”:”GooglePlex”,”Address”:”Google street”,”Latitude”:”38″,”Longitude”:”-122″},{“Name”:”Home”,”Address”:”123 Fake Street”,”Latitude”:”22″,”Longitude”:”-127″}]
Warning: mysqli_close() expects parameter 1 to be mysqli, object given in /home/a7888838/public_html/service.php on line 36
I just copied and pasted your code then changed the credentials, could that be the problem?
Hi Chris,
Thanks a lot for this great tutorial.
However, for some reason I can’t compile it and get:
Undefined symbols for architecture i386:
“_OBJC_CLASS_$_HomeModel”, referenced from:
objc-class-ref in ViewController.o
ld: symbol(s) not found for architecture i386.
Searching the web, I understood I am missing some frameworks.
The question is which?
Thanks a lot!
Ofir.
Hey Ofir, thanks for following along!
I think you’re missing the HomeModel class!
Try to download the demo project in section 5 and see what’s different with that
Thank you for this great tutorial! It is extremely well organized and explained.
You should remove msqli_close($result); it cause a error saying something about parameter.
without this the program doesn’t function, i think, still i don’t receive any data
[{“Name”:”Apple”,”Address”:”1 Infinite Loop Cupertino, CA”,”Latitude”:”37.331741″,”Longitude”:”-122.030333″},{“Name”:”Googleplex”,”Address”:”1600 Amphitheatre Pkwy, Mountain View, CA”,”Latitude”:”37.421999″,”Longitude”:”-1220.83954″}]
Warning: mysqli_close() expects parameter 1 to be mysqli, object given in /home/route/public_html/service.php on line 36
this is the error im gettingx
Mitchell
i got this error aswell what could be the problem….
Chris
Can someone please help me! I get errors:
Warning: mysql_pconnect() [function.mysql-pconnect]: [2002] Connection refused (trying to connect via tcp://127.0.0.1:3306) in /usr/home/gribbs/public_html/lsdirectory/JSON.php on line 3
Warning: mysql_pconnect() [function.mysql-pconnect]: Connection refused in /usr/home/gribbs/public_html/lsdirectory/JSON.php on line 3
Could not connect
???
i think you’ve put the wrong credentials in the $con line of code.
Hey Chris, thank you for the tutorial. I did everything and it works fine 🙂 I have one Question. How do I present a data from the database Locations (example name) in a UITextView? Without a UITableView.
Hi Chris,
Fantastic tutorial, however I am getting 10 Semantic Issues within HomeModel.h:
3 * Use of undeclared identifier ‘_downloadedData’
2 * Use of undeclared identifier ‘Location’
5 * Use of undeclared identifier ‘_newLocation’
Any ideas?
Hey Jupiter,
It looks like you might have missed importing the Location class and may have also missed declaring the instance variable _downloadedData at the top of homemodel.m. I don’t see _newLocation used any where in the tutorial though?
I am having this same issue and I cannot figure it out. The location class is declared at the top of homemodel.m. _newLocation is taken from the article –
”
{
NSDictionary *jsonElement = jsonArray[i];
// Create a new location object and set its props to JsonElement properties
Location *newLocation = [[Location alloc] init];
newLocation.name = jsonElement[@”Name”];
newLocation.address = jsonElement[@”Address”];
newLocation.latitude = jsonElement[@”Latitude”];
newLocation.longitude = jsonElement[@”Longitude”];
// Add this question to the locations array
[_locations addObject:newLocation];
}
”
Please help! I’m really stuck here.
Hi Chris – I finished this tutorial and I have a small problem. When I select the address is moves to the map view but never zooms in to the location and no pin is placed. I am getting NO errors and it seems the information is stepping through the application. I can trace the address all the way to the end but it never draws that on the app. Any ideas?
Hi Chris, Thanks for the wonderful tutorial. I need you guidance on displaying only the unique items in the database. Once that unique item is clicked, we details of the items. I have a database that has a list of various colors and associated flowers. I only want to display Yellow, Red etc just once. Once I click Red then all the flowers under Red should be shown in another table.
Chris – I really like the way you laid this out very easy for use to understand but I am confused by something I hope you can help. At the end of section 4.4 you show a picture of out the data should look with something like this:
Locations
Address 1
Address 2
When I do it all see are the addresses I don’t see the Locations heading for the life of me I am not sure where to set that and believe me I have been looking all through the code.
Yes, I have the same issue. Regarding the Heading, I just added a label the same way we added the “Table View”.
But regarding the address and location info. I am using my own data which only displays what is in the “ViewController.h” near the end namely ” myCell.textLabel.text = item.address;” It just displays “address” in each row. If I change it to “name”, “name” is displayed in each row and nothing else….. I would appreciate help on this as well.
Thanks
You can change the line to this!
myCell.textLabel.text = item.name;
If this doesn’t work, then double check that in the connectionDidFinishLoading method, you’re assigning the name property:
newLocation.name = jsonElement[@”Name”];
Thank you for your quick reply. Yes, I have that as listed. If in “myCell.textLabel.text = item.name;” if I put …=item.name; I get the name in each row, but nothing else. If I put …=item.address; I get the address in each row, but nothing else. It seams as though we are putting an item in the cell but not the array. Not sure how to fix that.
So I get:
Locations
Joe
Henry
Andy
Or I get:
Locations
53 Anderson Rd, Sacramento, CA
132 Dry Creek Rd. Billings, MT
102 Main St. Cherry Creek, KA
What I want is:
Joe
53 Anderson Rd, Sacramento, CA
Henry
132 Dry Creek Rd. Billings, MT
Andy
102 Main St. Cherry Creek, KA
Thanks, I look forward to your answer.
Chris
Forgive me if I am totally off base but I do know a little about programming. what you suggested does not fix my issue. I am referring to the label “Locations” which might be pulled from the Table name or just a label for the cell but you don’t seem to address is in the programming. I am referring to the first line under the time clock.
What you suggested is just pulling the Name such as “Apple” or “Microsoft”.
is it simply a label you left out of the instructions? I have copy and pasted all your work to double check my typing and it still does it.
Thanks
I think I have it now. I added a label and lowered the TableView to just under the label and now we match.
Hi Chris, thank you very much for this tutorial. It’s really complete and useful. I’m planning to use the things i learned in my first app. Therefore, i have a question. I want to make an app in french and the accents are not supported by the PHP file i think (?). How do i turn the strings in utf8 in the PHP file?
Hi Chris, in step 3.2 when I load http://yourdomain.com/service.php (with my domain name of course) it just takes me to a blank screen. I also noticed that when I create a table, you said that I should be able to see the SQL do the command, but I never did! Any help would be appreciated. Thanks!
Hi, I have a question regarding security, how secure is to include a user´s password in the php file? isn´t it better to POST it as a variable´s value when logging in? how to proceed when you have several users? thanx i.a.
Hello Chris, love the tutorial. I do have one question for you. Should this work for very large queries or is it designed for very simple ones? I have it working for small outputs but not for large ones. I print out jsonArray and jsonElement and everything seems normal (I validate online). However, all the fields are being set to NULL (Address, Name etc) so my table has tons of empty cells in the display. Does this have anything to do with the length of my json? Is there a different approach if I want to make thousands of cells?
Hi Chris, great tutorial! I have one question about the app though. When I am running the app, Xcode says that the build is successful, however when the app actually opens on the simulator, the app crashes and Xcode gives me a sigbart warning for the line which is in main.m:
return UIApplicationMain(argc, argv, nil, NSStringFromClass([AppDelegate class]));
Here is also the output messages:
2014-07-24 09:46:31.955 serverapp[2064:70b] Cannot find executable for CFBundle 0x8a4a930 (not loaded)
2014-07-24 09:46:33.676 serverapp[2064:70b] *** Assertion failure in -[UITableView _configureCellForDisplay:forIndexPath:], /SourceCache/UIKit_Sim/UIKit-2903.2/UITableView.m:6235
2014-07-24 09:46:33.809 serverapp[2064:70b] *** Terminating app due to uncaught exception ‘NSInternalInconsistencyException’, reason: ‘UITableView dataSource must return a cell from tableView:cellForRowAtIndexPath:’
*** First throw call stack:
(
0 CoreFoundation 0x0173b5e4 __exceptionPreprocess + 180
1 libobjc.A.dylib 0x014be8b6 objc_exception_throw + 44
2 CoreFoundation 0x0173b448 +[NSException raise:format:arguments:] + 136
3 Foundation 0x0109f23e -[NSAssertionHandler handleFailureInMethod:object:file:lineNumber:description:] + 116
4 UIKit 0x00319ae5 __53-[UITableView _configureCellForDisplay:forIndexPath:]_block_invoke + 426
5 UIKit 0x00292f5f +[UIView(Animation) performWithoutAnimation:] + 82
6 UIKit 0x00292fa8 +[UIView(Animation) _performWithoutAnimation:] + 40
7 UIKit 0x00319936 -[UITableView _configureCellForDisplay:forIndexPath:] + 108
8 UIKit 0x0031fd4d -[UITableView _createPreparedCellForGlobalRow:withIndexPath:] + 442
9 UIKit 0x0031fe03 -[UITableView _createPreparedCellForGlobalRow:] + 69
10 UIKit 0x00304124 -[UITableView _updateVisibleCellsNow:] + 2378
11 UIKit 0x003175a5 -[UITableView layoutSubviews] + 213
12 UIKit 0x0029bdd7 -[UIView(CALayerDelegate) layoutSublayersOfLayer:] + 355
13 libobjc.A.dylib 0x014d081f -[NSObject performSelector:withObject:] + 70
14 QuartzCore 0x03b4572a -[CALayer layoutSublayers] + 148
15 QuartzCore 0x03b39514 _ZN2CA5Layer16layout_if_neededEPNS_11TransactionE + 380
16 QuartzCore 0x03b39380 _ZN2CA5Layer28layout_and_display_if_neededEPNS_11TransactionE + 26
17 QuartzCore 0x03aa1156 _ZN2CA7Context18commit_transactionEPNS_11TransactionE + 294
18 QuartzCore 0x03aa24e1 _ZN2CA11Transaction6commitEv + 393
19 QuartzCore 0x03aa2bb4 _ZN2CA11Transaction17observer_callbackEP19__CFRunLoopObservermPv + 92
20 CoreFoundation 0x0170353e __CFRUNLOOP_IS_CALLING_OUT_TO_AN_OBSERVER_CALLBACK_FUNCTION__ + 30
21 CoreFoundation 0x0170348f __CFRunLoopDoObservers + 399
22 CoreFoundation 0x016e13b4 __CFRunLoopRun + 1076
23 CoreFoundation 0x016e0b33 CFRunLoopRunSpecific + 467
24 CoreFoundation 0x016e094b CFRunLoopRunInMode + 123
25 GraphicsServices 0x036dc9d7 GSEventRunModal + 192
26 GraphicsServices 0x036dc7fe GSEventRun + 104
27 UIKit 0x0023194b UIApplicationMain + 1225
28 serverapp 0x0000373d main + 141
29 libdyld.dylib 0x01d7970d start + 1
)
libc++abi.dylib: terminating with uncaught exception of type NSException
(lldb)
ok i solved the problem, i did not give my cell an identifier, which should be basic cell. Everything works great now!
i have the same error what did you do to fix it???
Chris very good tutorial. One question how would I get the viewcontroller to refresh. I can not seem to figure it out.
Hey Robert, if you’re trying to get the tableview to refresh, you can call the reloadData method of the tableview. Unfortunately there’s no built in way to refresh all the elements
In the case where we want to restrict who sees the content of our database, how complex would it be to implement a user login to such and app? Conceptually how would that be done?
How would I add more columns in and display other fields in the row
Hello Chris, I can’t thank you enough for making this tutorial. It’s exactly what I was looking for.
I am having a slight problem when I try to connect to a db remotely and I would be really grateful if you could help me out.
I use your code for the php script but I change the host to the ip address of the db and my credentials to log in for the other parameters. However, I do not see the table displayed like in your section 3.2. I added a few prints to see if my connection was successful and I manage to print out the whole array using print_r(array_values($resultArray)).
So everything seems in order, it just won’t display like yours does. Obviously when I run it on xcode I see a blank screen (but no warnings or errors). Any ideas? I am using XAMPP with the url localhost/www/service.php
If it helps, I noticed an anomaly. I get a warning, Warning: mysqli_close() expects parameter 1 to be mysqli, object given in /Applications/XAMPP/xamppfiles/htdocs/www/service.php on line 39 (for the line mysqli_close($result);). Is $result of the wrong type or something? Could this be related?
Hi Guest, I had the same problem and no data displays, with Chris’s code it does…
Removing the line “mysqli_close($result);” fixed it.
I figured out what my problem was. Adding the line $con->set_charset(“utf8”) fixed it!
thanks for sharing this, got a similar problem (a few result were visible in the table, but not all) which could be solved with charset
I have a problem with the connection to the file service.php. The application compiles and runs but does not show any results!
Looking at the file System.log I noticed that I get the following error message
backboardd[10242] : HID: The ‘Passive’ connection ” access to protected services is denied.
I googled this error but i didn’t find any solution. Can you help me???
Thank you.
Hey Maxximetto, i tried googling this error as i haven’t seen it before.. several people have the same issue but not too many solutions. This guy seemed to solve it: https://help.pushwoosh.com/hc/en-us/community/posts/360000819183-ERROR-The-Passive-connection-appname-access-to-protected-services-is-denied-
Hey Josh, it may be that you have a breakpoint set accidentally. Apologies for the late reply! See here on how to remove them https://codewithchris.com/xcode-errors/#simulatorblack
Really good tutorial Chris! Thank you! Learned a great deal from your work!
Do you have any good tutorial on how to , let’s say, save the address locations on a remote database….I’m thinking about using your methods but the other way around….from the app to the web service to the database. Does it it work that way? Any help would be great!
Great tutorial… I have a question, my result set from php is only one row and I want to display column values as rows in UITableView. I tried various options but it is displaying only one row.
Great job Chris! I was wondering how the code for upload a text and image into a mysql database will look like. Please help in explaining that. Thanks!
Hi Chris! I am having troubles with sentences with accented characters. It gives me “NULL”… what can I do to have accented characters correctly shown? THANKS!!!
Hey Giovanni, we probably need to escape the accented characters. Would you mind sending me a sample of your json file with accented characters that the app is trying to parse? You can use the “contact me” link at the top of the site. Thanks!
Hi Chriss! Sorry for my question…. I am a REALLY Newbie …. I’d need to fetch data from a database table, just a bunch of phrases. Then, put those phrases in an Array and show in a label random senteces. Unfortunately I was not able to understand how to use your tutorial for a simple purpose like mine (no tabs and maps), just retrive phrases and put in an array.
How can I do?
Hi Chriss! I am a newby!! What if I wanted to show data inside labels?
1 last question (sorry). Is it possible that I could put the long. and lat. into a UITextView on a separate ViewController? Thanks!
Hey Luke, definitely! In this tutorial, you saw how to pass the location object to the next view controller. You just need to do the same with two strings Lat and Long.
Chris, is there any chance you could show how to get data from an Objective-C client (such as an iOS device) to a server? Your above tutorial is excellent for one way communication, but I was hoping to be able to send an HTTP request using POST to send a location to the server. It does not have to be user entered; I would be fine with the Objective-C sending it upon starting, but just not sure how to do this, especially on the PHP side of it.
Hey David, no worries! It would basically be the same thing.. the iOS client would hit a PHP file with some parameters in the request.
Then the PHP file would work with those parameters and do something to the database.
Here’s how you would send an HTTP request using POST: https://codewithchris.com/tutorial-how-to-use-ios-nsurlconnection-by-example/#post
Wonderful tutorial! One problem though. It appears that the code
– (void)connection:(NSURLConnection *)connection didReceiveData:(NSData *)data{
// Append the newly downloaded data
[_downloadedData appendData:data];
}
in HomeModel.m isn’t running. I’ve adding NSLog to each comment location and nothing happens when this code comes next. Also, I’m running a WAMP instead of using BlueHost.
Hey Luke, to determine if it’s a server problem or a code problem, try using my URL and see if it works.. I mean the URL i used in the demo
Thanks for the response. When I use your service.php URL, the app works just fine. When I use my server, it doesn’t.
Can you hit your server from the web browser?
At the moment, I access the server over the LAN network using the internal IP addresses and when I access the site in a web browser, the JSON appears the exact same as yours.
Try double checking that your simulator or device can access resources on your LAN network!
That was my first thought so I went to Safari in the simulator and tried to access the site and It loaded without a problem. Any other ideas? Thanks for the help so far!
Hmm for your nsurlconnection, are you using the internal IP? Something like http://192.168.1.332/service.php?
Yes except I didn’t add the http://. Mine looks like 192.168.0.4/service.php
Try adding it!
At the moment, I am not at the location of the server/Mac in which the code is on. I will try it ASAP and get back to you. Thanks!
It worked! Thank you SO much for your help!
Maybe your web server is only visible to your local network?
Hello! Great tutorial, even though i stopped pretty fast because of some problems with uploading the PHP file to the server.
After I have uploaded the file, i get these errors:
Warning: mysqli_connect() [function.mysqli-connect]: (28000/1045): Access denied for user ‘a6323849_Vegard’@’localhost’ (using password: YES) in /home/a6323849/public_html/service.php on line 4
Free Web Hosting
Failed to connect to MySQL: Access denied for user ‘a6323849_Vegard’@’localhost’ (using password: YES)
PHP Error Message
Warning: mysqli_query() expects parameter 1 to be mysqli, boolean given in /home/a6323849/public_html/service.php on line 16
And some more errors on line 36 and 37. I can’t really see what I’ve done wrong. I have tried to make delete my database and create a new one, just to make sure everything is okay there. So if you could just give me a clue of what this errors mean, maybe I can figure it out.
Thanks!
Hey Vegard, from those error messages, it looks like the user you created, a6323849_Vegard, has not been given access to that database. There are three parts you should check..
1) did you create a new database
2) did you create a new database user
3) did you give permission for that db user to the database?
Hello Chris, thanks for the tutorials. You are in the spot helping people with O C and I wish all the best in the world for you.
Please help: I´ve done everything right and the apps works fine. I just want that instead of the address (1 infinite loop cupertino CA) appears an image (also from the dB). I´m trying:
myCell.imageView.image = [UIImage imageNamed:item.UrlOfImageFromDb];
in the controller with no luck.
Please try explain me how to implement this.
I did it ! with this:
myCell.selImage.image = [UIImage imageWithData: [NSData dataWithContentsOfURL:[NSURL URLWithString:(item.Imgselec)]]];
after making a subclass of UIimageViewCell an connecting ‘selImage’ to it.
EVERYTHING thanks to your tutorials… this is my first app, you are changing lifes man.
Amazing stuff Eduardo 🙂
I’m glad you did it 🙂 I love that feeling of satisfaction that you get when you solve it! I apologize for not getting to your question earlier!
Is there a copy of you’re project available for download?
Hey Rene, yup it’s in the last chapter of the series!
Thanks Chris, this is the best course site I’ve come across so far.
Great tutorials, Chris!
When I launch the final product, it will only push the map viewcontroller if I select the second option. Only after I have already selected the second option will triggering the first cell load the mapview. Any suggestions about why this may be happening?
Many thanks!
Nevermind. Figured it out!
I had didDeselectRowAtIndexPath rather than didSelectRowAtIndexPath.
Thanks again for the great info!
I hate it when that happens too 🙂 Sorry i couldn’t get to your question sooner!
Simple and easy to follow tutorial. Thank you! I do have one issue though, when I click the location in loads the main.m file and highlights the following line: return UIApplicationMain(argc, argv, nil, NSStringFromClass([AppDelegate class]));
Its line 16 in main.m.
Any ideas why?
I found how to locate the error in another one of your awesome tutorials ;). This is the error but I can’t find the method its calling anywhere and I’m using the search function.
2014-05-20 10:26:00.587 Terminating app due to uncaught exception ‘NSInvalidArgumentException’, reason: ‘-[UIViewController setSelectedLocation:]: unrecognized selector sent to instance 0x9f5d980’
Hello Cortlin! Thanks for following along and the extra initiative to find the solution!
Did you have a line that’s something like “self.selectedLocation = “?
If so, i think you meant “_selectedLocation”!
Chris,
Thanks for the reply. I looked through the files and don’t see that anywhere. Where would it be? The closest I could find was:
poiCoodinates.latitude = [self.selectedLocation.latitude doubleValue];
poiCoodinates.longitude= [self.selectedLocation.longitude doubleValue];
Hi Chris,
Any update on this one?
Hey Cortlin, thanks for following up! Maybe you can show me a screenshot of the code?
Excellent tutorial! thanks!
Would you be able to assist with allowing the app to update/delete records in the MySQL database?
What would the PHP script need to look like and how do you pass the new updated record to the php script? I’ve searched high and low but can’t find any examples that actually show the PHP script needed!
Hello James, thanks for reading! This is an awesome site to learn some PHP/MySQL interaction: https://www.w3schools.com/php/php_mysql_insert.asp
If you look down the side to the left, you’ll see sections for various database operations.
Works great! Thank you 🙂
Martin
Hello Chris this one is awesome, but i have a problem with the map view.. i am having some blank views in certain parts of the map and have this details.. GEOTileSetStyle_VECTOR_ROADS,GEOTileSize_PX512, GEOTileScale_NODPI.en is not VLOC format…
Hey Zapi, unfortunately that doesn’t look at all familiar to me! Is there another error message that you can see from the console window like this: https://codewithchris.com/xcode-errors/#detailederror
Hello Chris, thanks a million for all tutorials. Please help: When a user clicks on a row in the table, I would like to save the value in that row to a String. Please kindly explain how to implement this.
Hey Chi,
Thanks for reading. In the code in the above article, there’s a method like this:
– (void)tableView:(UITableView *)tableView didSelectRowAtIndexPath:(NSIndexPath *)indexPath
{
// Set selected location to var
_selectedLocation = _feedItems[indexPath.row];
// Manually call segue to detail view controller
[self performSegueWithIdentifier:@”detailSegue” sender:self];
}
This method gets triggered when a user taps the row so you can add the code in there to store the value (in this case, the selected object that represents that row is stored in _selectedLocation).
For example, in this demo, each row shows the address.
When the user clicks the row and goes into that “didSelectRowAtIndexPath” method, you can get the selected address by accessing _selectedLocation.address
Hope that helps!
Chris
Thank you very much Chris. I will try that. I am very grateful!
brilliant!! thank you so much for sharing this 😉
Thanks for stopping by and reading Joel!
Hi Chris How r u?
First of all, Allow me to thank u for such a good job helping us to discover the Xcode World, your examples are awesome.
After i finished this example i was wondering….is there anyway to select the first element in the uitableview as soon as the app begins..I mean before the user gets to interact with the app?
I’m asking you this because i realize that I have to make a selection in the uiviewtable…and then another one before the map view becomes visible.
Hope u can help me solve this detail.
Greetings from Mexico!!!
Hello, thanks for reading!
Sure, after the data is loaded in the “itemsDownloaded” method in ViewController.m, you can manually assign the first location to the _selectedLocation variable and then call [self performSegueWithIdentifier:@”detailSegue” sender:self];
What if we only wanted our app to authenticate and return results, in other words a closed api for pulling this data. How could we implement that?
Hello ndh! If you want a closed API, you could consider passing in a key with the request and your PHP service would check the key before returning results. This way would avoid having to create a user registration/login system and would limit the API to only certain callers who have the key.
Chris,
I’ve been struggling through OBJECTIVE-C much like you did.. can’t say enough about your complete and knowledgeable presentations – THANKS MUCH.
I’m getting a Mysqli CLOSE WARNING
“Warning: mysqli_close() expects parameter 1 to be mysqli, object given in /home/… … /service.php”
I can comment out the offending line
(mysqli_close($result);
from the very last portions of “service.php”, but don’t know what else that might do:
// Close connections
// mysqli_close($result);
mysqli_close($con);
?>
Thanks again for your work here Chris, I’m hoping you are terribly successful with the paid portion of your site.
Hello! Thanks for the kind words! Unfortunately i’m not an expert in PHP but from the error that you’re seeing, i would double check your MySQL query (check table name, column names, syntax) because the error indicates to me that $result is not a valid object to close which might mean that the query you’re performing and assigning to the $result variable is problematic.
Hi Chris,
Thanks for these demo files and tuitions.
My project is working linking to your web address, however it does not to mine. My code is exactly the same as your file above, however it won’t validate via the json validator. My link is here -edited out for security-
Any thoughts? Does JSON need to be enable on the host or something?
Thanks Lewis
Hello Lewis!
I took a look at your JSON file and the properties also need to be encapsulated in quotes! So when you’re writing your json, an object with a single property would look like:
{ “property” : “value” }
Hi Chris do you have an article or video on how to upload the contents of a website into an app to make it native, vs. a web app? Thanks so much!
Hey Annabelle, unfortunately apps don’t follow the same paradigm as websites so while you have html, css and image files for a website and you can upload them to a web server it’s quite different for an iOS app.
For a native app, you’ll have to code everything from scratch! In this demo, you could scrap the web view in the detail view and use native UIElements instead but it would depend on your posts being pretty consistent in layout.
how i can fetach data from sqlite database in uitableview?
Unfortunately this isn’t something i’m very experienced with. When i cover this, i’ll let you know!
Hi Chris, I followed this tutorial, created the web service in bluehost and when I did the app I am getting the error. Please help.
2014-05-29 21:09:53.326 DatabaseTableViewApp[73810:60b] *** Assertion failure in -[UITableView _configureCellForDisplay:forIndexPath:], /SourceCache/UIKit_Sim/UIKit-2935.137/UITableView.m:6509
2014-05-29 21:09:53.328 DatabaseTableViewApp[73810:60b] *** Terminating app due to uncaught exception ‘NSInternalInconsistencyException’, reason: ‘UITableView dataSource must return a cell from tableView:cellForRowAtIndexPath
Chris, I figured it out. Also I want to take the paid tutorial from you. Do you labs that allows us to do sample apps.
Hey Joseph, apologies for not getting to your question earlier! It was due to not implementing the “cellForRowAtIndexPath” method right?
Yup! You can actually check out the members area here: https://codewithchris.com/beginnercourse/
And you can see the demos/assignments for practice. Looking forward to having you on board!
Great Tutorial, although I’m receiving a few errors. One in HomeModel.m on lines 64 and 66 from self.delegate:
Error – “Property delegate was not found on object of type “HomeModel *”
And the other in ViewController on line 12 (@implementation ViewController):
Error- “Auto property synthesis will not synthesize property declared in protocol”
This occurred the second and third time I did this tutorial. The first time everything was okay except “- (NSInteger)tableView:(UITableView *)tableView numberOfRowsInSection:(NSInteger)section” and “- (UITableViewCell *)tableView:(UITableView *)tableView cellForRowAtIndexPath:(NSIndexPath *)indexPath” did not load and as a result, the addresses were not in the tableView.
The error may have come about from copying and pasting exactly what was written in the scripts. I will go through again and type it all out as per the first time I did this tutorial.
Update: There was a slight error in the authors code:
The code under the heading “Your HomeModel.h should look like this (line 9 is modified):”
The “@property (nonatomic, weak) id delegate;” Should be placed under line “@interface HomeModel : NSObject ”
However I’m still not able to get the data passed through to the table. (Data does load from MySQL through)
Oops thanks for catching that Aaron!
I’m going to go through it again and build it right now to see if i can catch anymore errors. I’ll follow up in a bit!
Anytime! Regardless, it was a great tutorial. You have explained the concepts clearly. Other tutorials connecting ios to mysql are outdated now that JSON has been incorporated. This is the most up to date one I’ve seen. Thank you again! 🙂
The app is running now but it shows a blank screen
Hello rv, the code is posted in the last section of the guide. Sorry i should make it more clear!
HI –
I managed to get it to work with your url but when i use mine it doesn’t display anything. Here is the url:
http://viewlocation-mivicio.rhcloud.com
I appreciate any feedback. Thanks.
HI, I managed to bypass all the error..
The only issue is that when using your weblink i get results but the results is blank when i use mine:
http://viewlocation-mivicio.rhcloud.com
Hello! I checked the source of your file and there seems to be some extra HTML tags ( and ) at the end.. make sure it’s valid JSON with a json validator such as this one: https://jsonlint.com/
[{“Name”:”Apple”,”Address”:”1 Infinite Loop Cupertino, CA”,”Latitude”:”37.331741″,”Longitude”:”-122.0303333″},{“Name”:”LaFitness”,”Address”:”3400 ARAMINGO AV PHILADELPHIA, PA 19134″,”Latitude”:”39.9910200″,”Longitude”:”-75.1016090″},{“Name”:”Liberty Bell”,”Address”:”525 Market St, Philadelphia, PA 19106″,”Latitude”:”39.949610″,”Longitude”:”-75.150282″}]
You are awesome man. I had two closing html tags at the bottom of my script. It’s working now after following your suggestion. Thanks a lot man. I’m looking forward to sign up for your videos.
I think the issue is my url:
http://viewlocation-mivicio.rhcloud.com
It’s working on your original url not on mine.
Hey Aaron, thanks for your feedback! I realized that I missed calling out that we should set our table cell identifier to “BasicCell”. If you do that in your storyboard, you should see your table view populated.
I updated the article above, but here’s the image (https://codewithchris.com/img/mysql_map_demo_setreuseidentifier.jpg)
Very good Tutorial, thanks for all your free and quality tips !
For the PHP section, you may be show the PDO way to connect to the DB
Thanks Chris !
Another home run Chris (you do play baseball in Canada?)! I have only cruised through this set of 5 chapters — just enough exposure to know that it is going to be immensely helpful.