


Overview
In SwiftUI, seamlessly integrating email functionality can significantly enhance user interaction and communication. There are two primary methods for incorporating email capabilities within SwiftUI apps: utilizing a mailto URL scheme to open the default mail application and employing the MFMailComposeViewController from UIKit, which is wrapped for use within SwiftUI. In this article, we will explore both methods in detail.
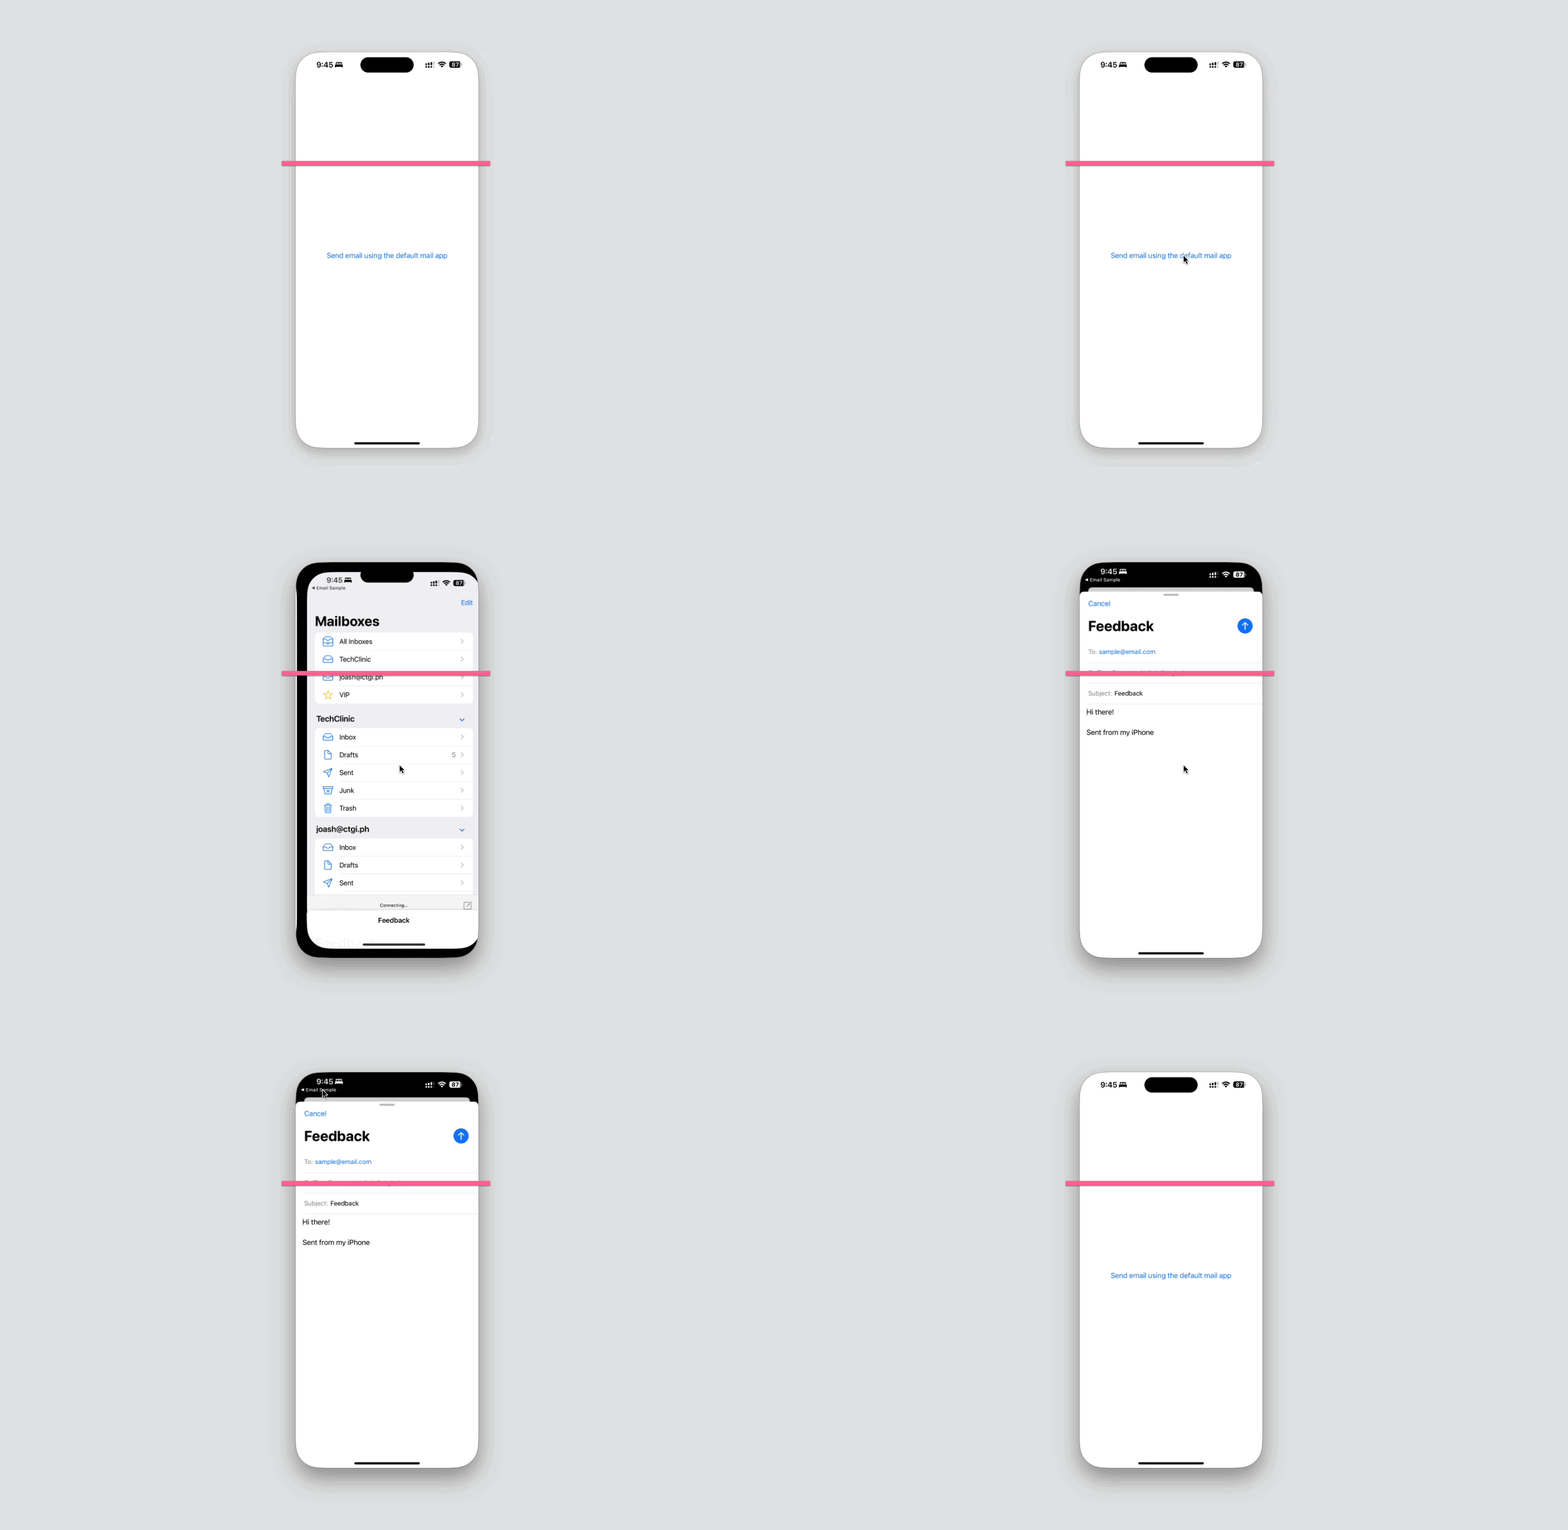
Method 1: Redirecting Users to the Mail App
This method efficiently utilizes SwiftUI's environment-specific capabilities to handle external URLs, aligning well with the modern SwiftUI framework's design philosophy. It provides a clean and direct way to integrate external link handling within the SwiftUI view structure, maintaining a high level of abstraction and minimizing direct interaction with lower-level APIs.
Code Snippet
import SwiftUI

struct ContentView: View {
    @Environment(\.openURL) private var openUrl

    var body: some View {
        Button("Send email using the default mail app") {
            sendEmail(openUrl: openUrl)
        }
    }

    func sendEmail(openUrl: OpenURLAction) {
        let urlString = "mailto:sample@email.com?subject=Feedback&body=Hi%20there!"
        guard let url = URL(string: urlString) else { return }

        openUrl(url) { accepted in
            if !accepted {
                // Handle the error, e.g., show an alert
            }
        }
    }
}
Code Explanation
- Environment Property (
openUrl): The@Environment(\.openURL)property wrapper provides access to the environment'sopenURLaction, which is used to open external links. - Button with Action: A button titled "Send email using the default mail app" is displayed. Upon tapping, it triggers the
sendEmailfunction, passing theopenUrlaction. - URL Construction: The function constructs a
mailtoURL containing a predefined email address, subject, and body, then converts the string into a URL object. - URL Opening: The
openUrlaction attempts to open the constructed URL. If the action is accepted, the mail application opens with the email draft pre-filled. If it is not accepted, error handling logic can be implemented, such as showing an alert.
Pros and Cons of Method 1
- Pros: Simpler implementation; no need to manage email logic within the app. Universally compatible with all devices that have a mail app.
- Cons: Less control over the user interface and user experience. Reliance on external applications.
Method 2: Using UIKit's MFMailComposeViewController
This method provides a highly integrated email composition experience within the app, leveraging SwiftUI's ability to incorporate UIKit components seamlessly. This approach is beneficial for maintaining consistency in the app's user interface and can be particularly advantageous when you want to offer a more controlled and refined email composition experience.
Code Snippet
import SwiftUI
import MessageUI

struct ContentView: View {
    @State private var isShowingMailView = false

    var body: some View {
        Button("Send email in-app") {
            self.isShowingMailView = true
        }
        .sheet(isPresented: $isShowingMailView) {
            MailComposerViewController(recipients: ["sample@email.com"], subject: "Feedback", messageBody: "Hi there!")
        }
    }
}

struct MailComposerViewController: UIViewControllerRepresentable {
    @Environment(\.dismiss) var dismiss
    var recipients: [String]
    var subject: String
    var messageBody: String

    func makeUIViewController(context: Context) -> MFMailComposeViewController {
        let mailComposer = MFMailComposeViewController()
        mailComposer.mailComposeDelegate = context.coordinator
        mailComposer.setToRecipients(recipients)
        mailComposer.setSubject(subject)
        mailComposer.setMessageBody(messageBody, isHTML: false)
        return mailComposer
    }

    func updateUIViewController(_ uiViewController: MFMailComposeViewController, context: Context) {}

    func makeCoordinator() -> Coordinator {
        return Coordinator(self)
    }

    class Coordinator: NSObject, MFMailComposeViewControllerDelegate {
        var parent: MailComposerViewController

        init(_ parent: MailComposerViewController) {
            self.parent = parent
        }

        func mailComposeController(_ controller: MFMailComposeViewController, didFinishWith result: MFMailComposeResult, error: Error?) {
            parent.dismiss()
        }
    }
}
Code Explanation
- Button for Email: A button labeled "Send email in-app" is implemented. When pressed, it sets
isShowingMailViewto true. - Sheet Presentation: The
.sheetmodifier listens to theisShowingMailViewstate variable and presents a mail composer interface when triggered. - UIViewControllerRepresentable Protocol:
MailComposerViewControllerconforms toUIViewControllerRepresentable, allowing UIKit components to be used within SwiftUI. - Creating the Mail Composer: The
makeUIViewControllermethod initializes an instance ofMFMailComposeViewController, configuring it with recipients, subject, and message body. - Coordinator Class: The coordinator acts as a bridge between UIKit's mail composer and the SwiftUI environment. It implements
mailComposeController(didFinishWith:error:)to dismiss the mail composer when the email interaction is completed.
Pros and Cons of Method 2
- Pros: Provides a seamless in-app experience, maintaining UI consistency of the app. Gives more control over the email composition process.
- Cons: More complex implementation; requires integrating and wrapping UIKit components. May not function on devices without configured email accounts or in simulators.
Conclusion
Both methods provide robust solutions for adding email functionality to SwiftUI apps. The choice between these methods should be based on specific project requirements, such as the desired level of user experience and control over the email composition process.