


Overview
In SwiftUI, Lists are used to display a scrollable collection of rows, similar to UITableView in UIKit. They are a crucial component for presenting data in an ordered manner. Lists can handle both static and dynamic data sources and are highly customizable with various SwiftUI views. This article will walk you through creating a simple dynamic List using an array of strings.
Basic Code Snippet
import SwiftUI
struct ContentView: View {
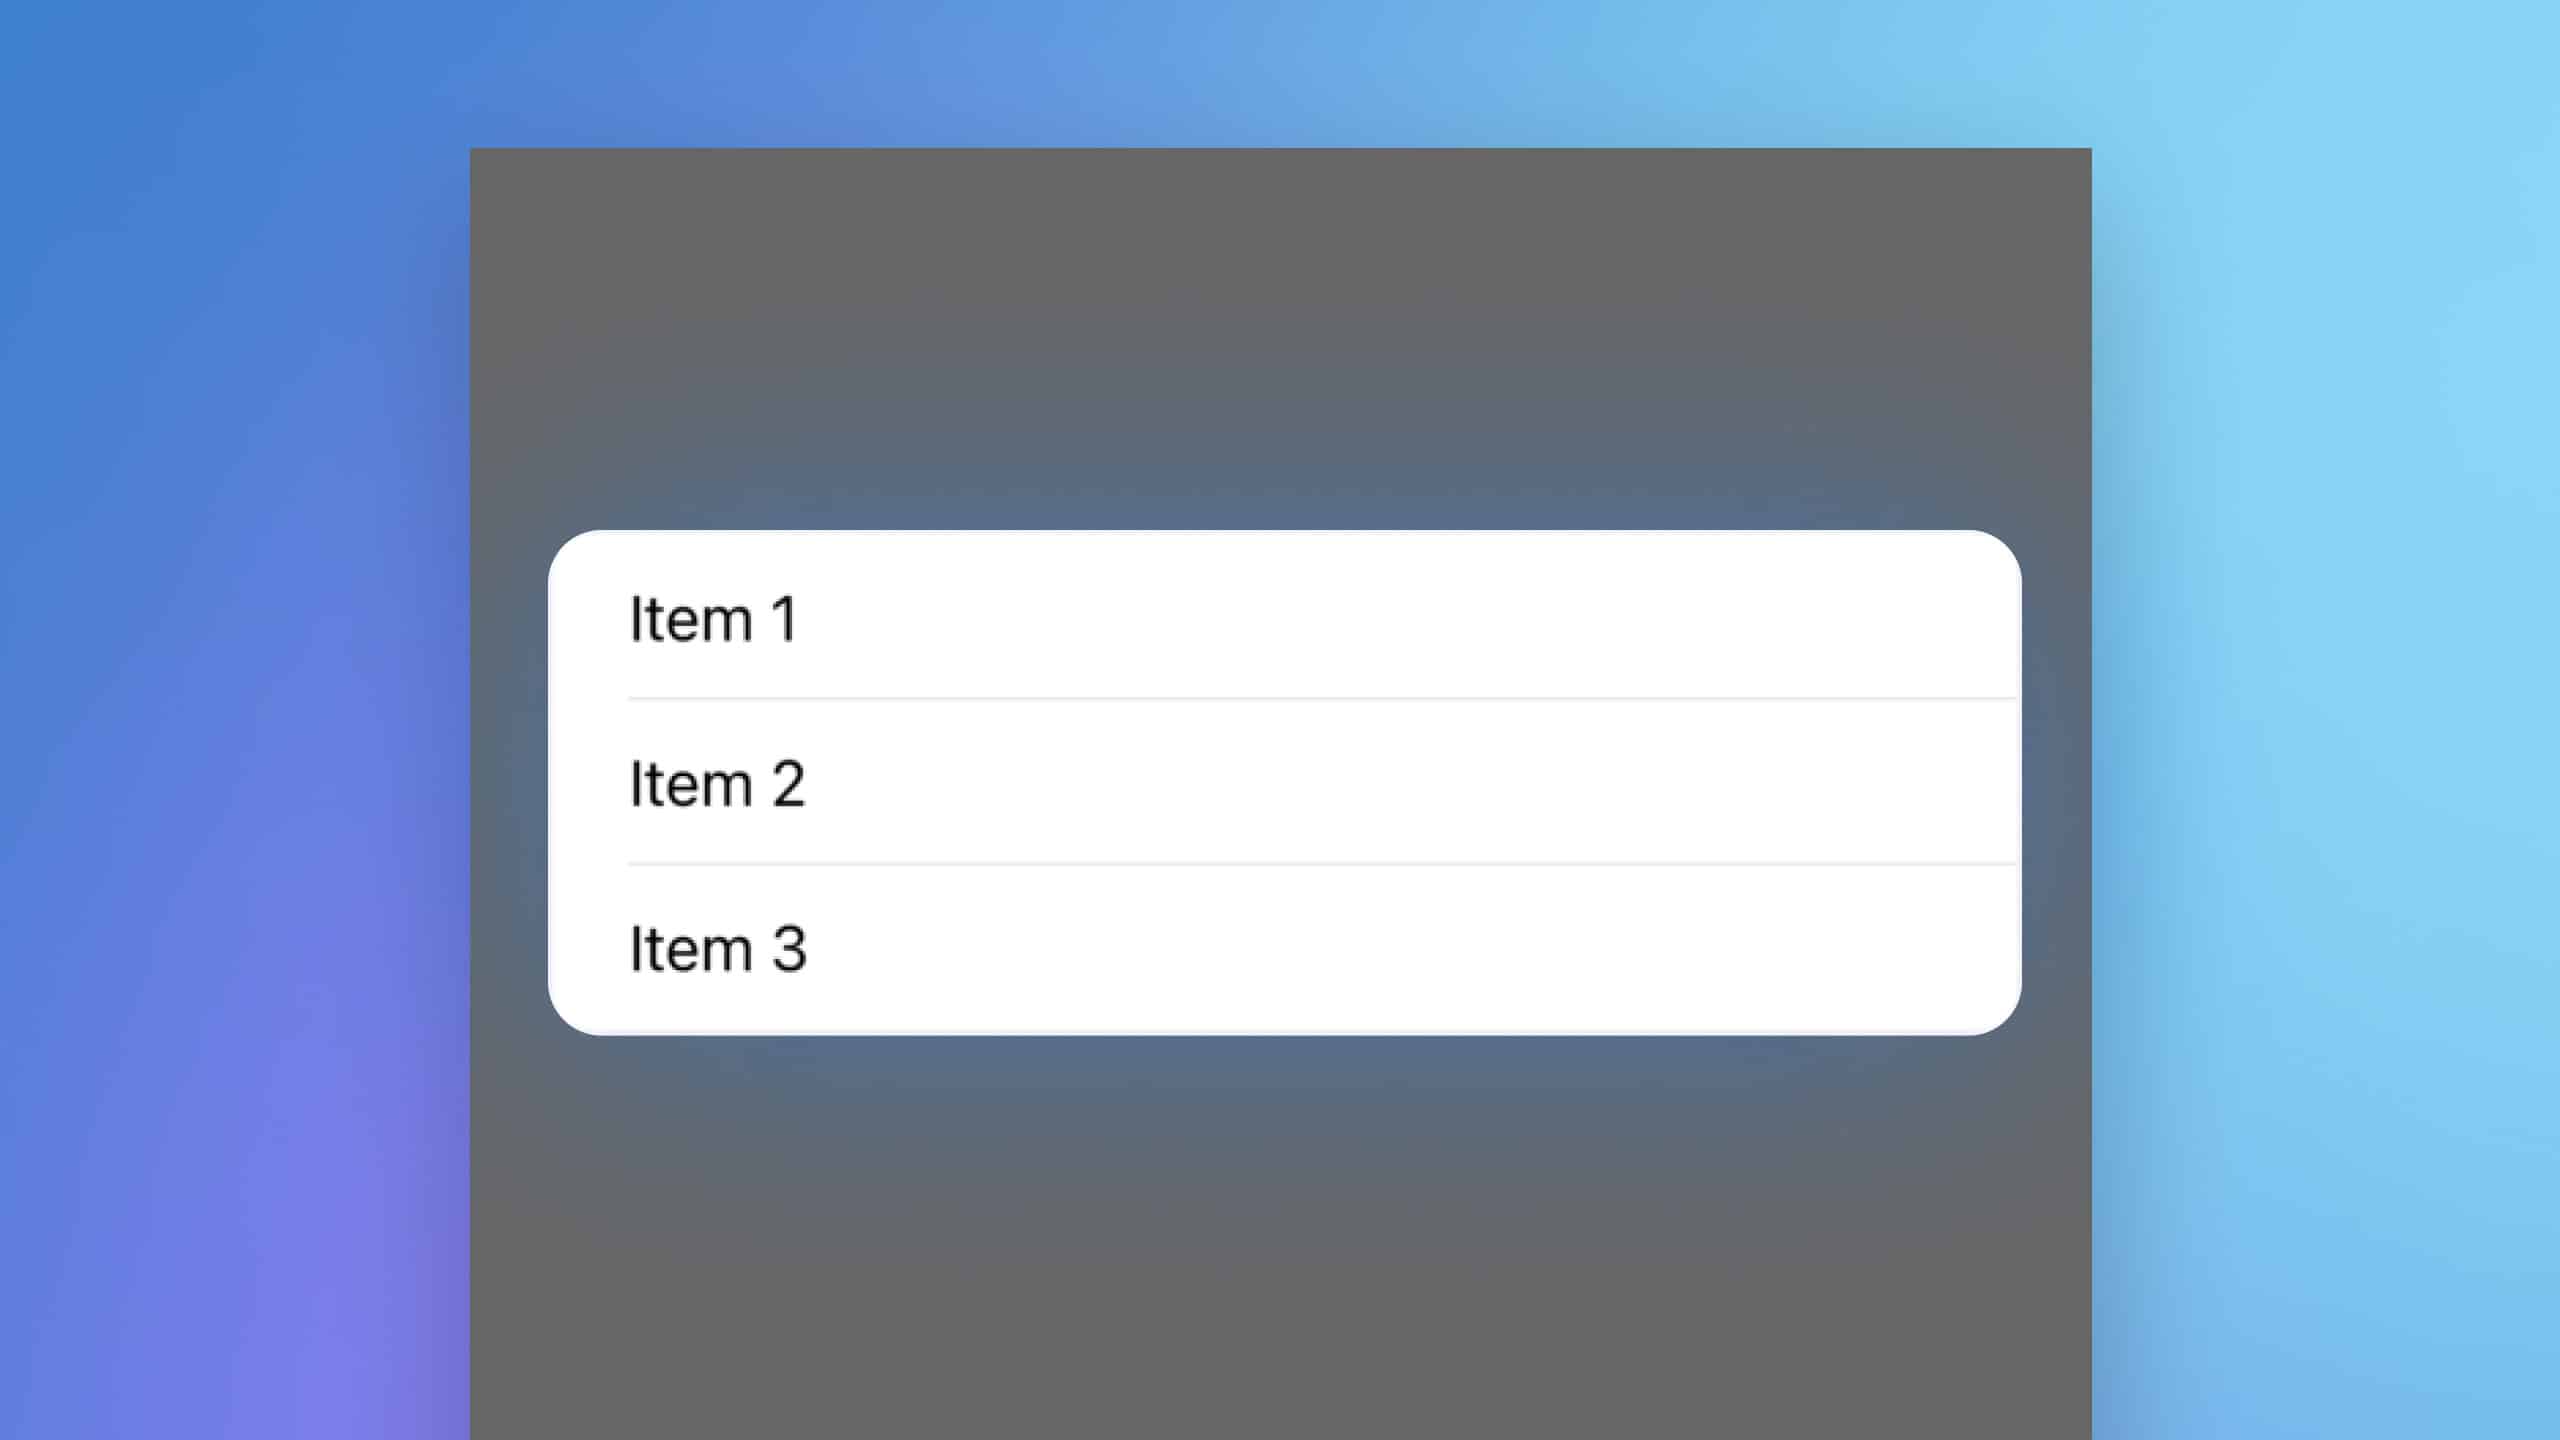
let items = ["Item 1", "Item 2", "Item 3"] // Data source for the List
var body: some View {
List(items, id: \.self) { item in // Creating a List from the items array
Text(item) // Each item is presented using a Text view
}
}
}Basic Code Explanation
List(items, id: \.self): This line initializes the List with an array calleditems. Each element in the array is uniquely identified by itself usingid: \.self, which is suitable here because all strings are unique.Text(item): For each item in the array, a Text view is used to display the string in a separate row. This is the visual representation of each element within the List.
Using List with Structs and Classes
Sometimes, you may want to display your own model in a List rather than simple strings. This is where SwiftUI’s ability to handle complex data types comes in handy. Here’s how you can use a custom struct to populate a List.
Code Snippet using Struct with List
First, let’s define a custom struct that conforms to the Identifiable protocol. This protocol requires a unique identifier for each instance, which helps SwiftUI manage the List efficiently.
import SwiftUI

struct Item: Identifiable {
    var id = UUID()
    var name: String
}

struct ContentView: View {
    let items = [
        Item(name: "Item A"),
        Item(name: "Item B"),
        Item(name: "Item C")
    ]  // Data source with custom structs

    var body: some View {
        List(items) { item in  // Creating a List from the items array of structs
            Text(item.name)  // Each item is presented using a Text view, showing the name property
        }
    }
}
List with Struct Code Explanation
struct Item: Identifiable: This defines a struct namedItemthat conforms to theIdentifiableprotocol. Theidproperty, which is a UUID, ensures each item is uniquely identifiable.var name: String: A property to hold the name of the item.List(items) { item in }: Initializes the List with an array ofItemstructs. TheIdentifiableconformance allows SwiftUI to uniquely identify each row.Text(item.name): For each item in the array, a Text view is used to display thenameproperty of the struct.
Code Snippet using Classes with List
Similarly, you can use a class with the Identifiable protocol for more complex data models.
import SwiftUI

class Item: Identifiable {
    var id = UUID()
    var name: String

    init(name: String) {
        self.name = name
    }
}

struct ContentView: View {
    @State private var items = [
        Item(name: "Item X"),
        Item(name: "Item Y"),
        Item(name: "Item Z")
    ]  // Data source with custom class instances

    var body: some View {
        List(items) { item in  // Creating a List from the items array of class instances
            Text(item.name)  // Each item is presented using a Text view, showing the name property
        }
    }
}
List with Class Code Explanation
class Item: Identifiable: Defines a class namedItemthat conforms to theIdentifiableprotocol.init(name: String): Initializes the class with anameproperty.@State private var items: Uses the@Stateproperty wrapper to create a mutable array ofIteminstances.List(items) { item in }: Initializes the List with an array ofItemclass instances.Text(item.name): For each item in the array, a Text view is used to display thenameproperty.
By using custom structs or classes with SwiftUI’s List, you can create more complex and dynamic UIs that better reflect the structure and needs of your app’s data. This flexibility makes Lists a powerful tool in your SwiftUI arsenal.
Styling the List Code Snippet
import SwiftUI

struct Animal: Identifiable {
    let name: String
    let id = UUID()
}

struct StylizingListView: View {
    let animals = [
        Animal(name: "Dog"),
        Animal(name: "Cat"),
        Animal(name: "Bird")
    ]

    var body: some View {
        List(animals) { animal in
            Text(animal.name)
        }
        .listStyle(.sidebar)
    }
}
To change the basic style of the List, add the .listStyle modifier as seen in line 19. The listStyle modifier takes in a ListStyle type, which includes .siderbar, .grouped, .inset, and a few more.
Sectioned Lists Code Snippet
import SwiftUI
struct Breed: Identifiable {
let name: String
let id = UUID()
}
struct Animal: Identifiable {
let name: String
let breeds: [Breed]
let id = UUID()
}
struct SectionListView: View {
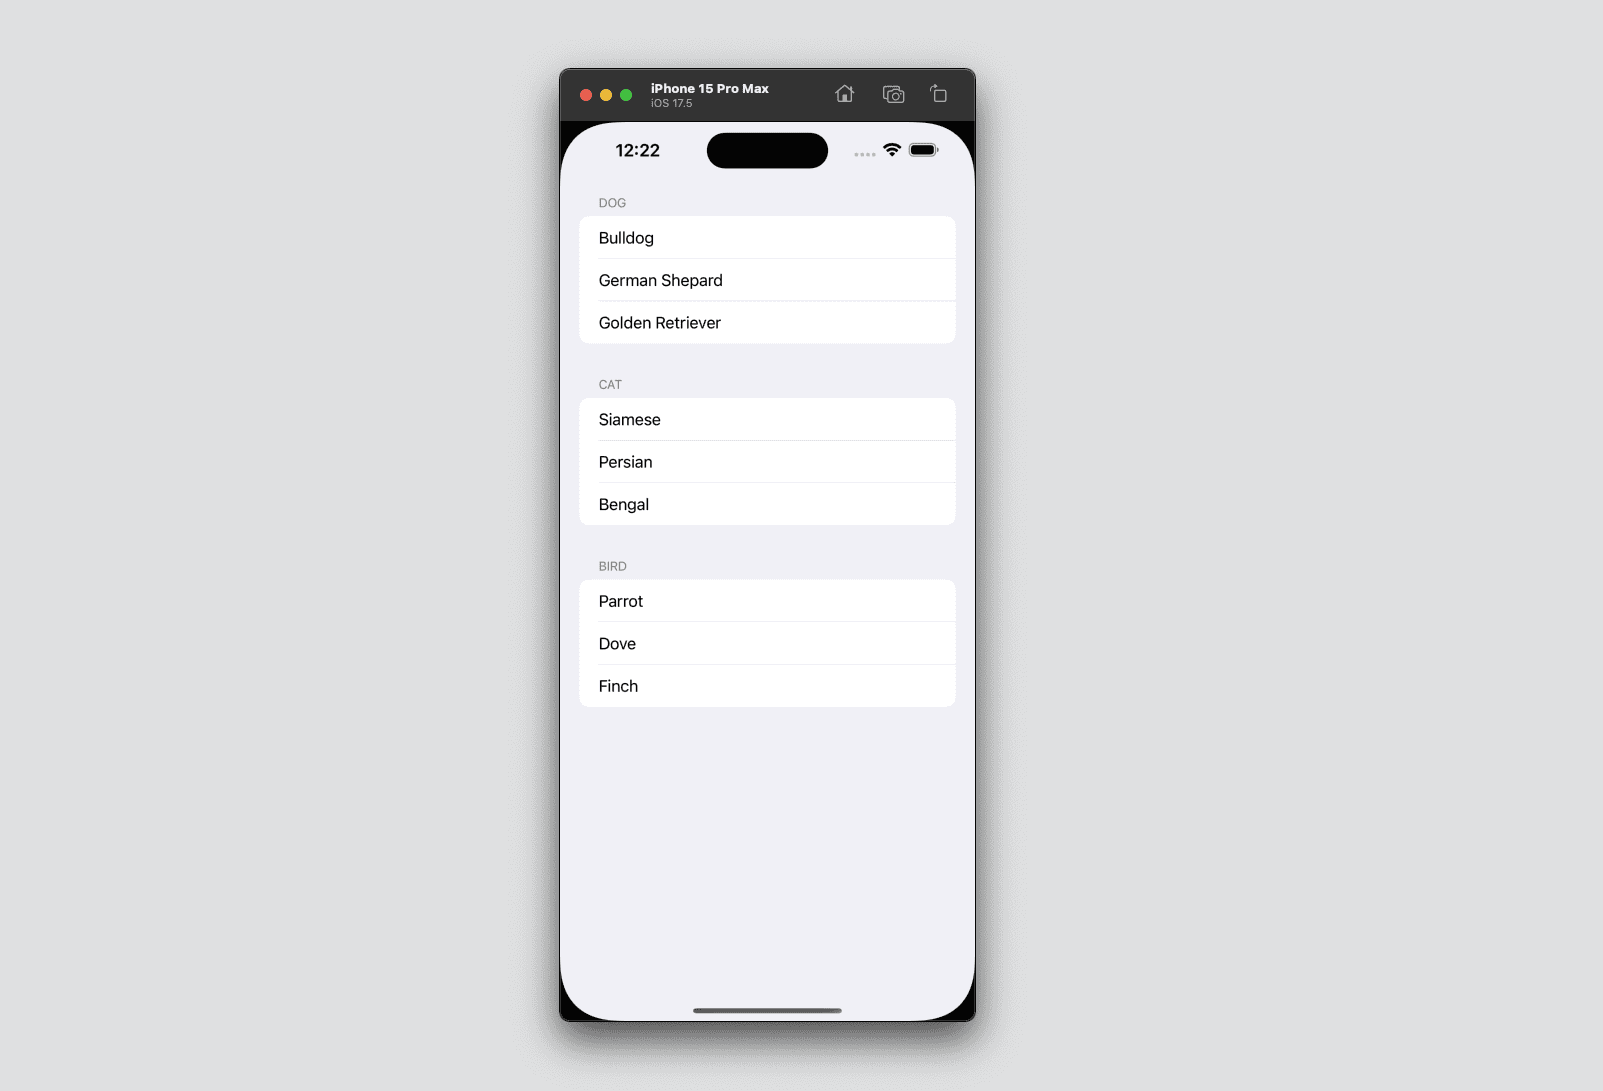
let animals = [
Animal(name: "Dog", breeds: [Breed(name: "Bulldog"), Breed(name: "German Shepard"), Breed(name: "Golden Retriever")]),
Animal(name: "Cat", breeds: [Breed(name: "Siamese"), Breed(name: "Persian"), Breed(name: "Bengal")]),
Animal(name: "Bird", breeds: [Breed(name: "Parrot"), Breed(name: "Dove"), Breed(name: "Finch")])
]
var body: some View {
List {
ForEach(animals) { animal in
Section(header: Text(animal.name)) {
ForEach(animal.breeds) { breed in
Text(breed.name)
}
}
}
}
}
}Sectioned lists can be created for data that is categorized into different sections. In the example above, we added an array of breeds for each animal type. In the List itself in line 23, we use ForEach() to go through each animal type and create section headers, and then we go through each breed name.
Using Lists in SwiftUI allows developers to efficiently display collections of data in an easily navigable format. With the flexibility of integrating with other SwiftUI components and modifiers, Lists are indispensable for creating feature-rich, data-driven applications. Whether you’re displaying a simple list of items or a complex set of interactive rows, SwiftUI’s List view provides a robust solution for your app’s UI.