The CoreLocation framework is utilized to provide services that determine a device’s geographic location (Latitude, Longitude), altitude, and orientation. It can also determine its position relative to a nearby iBeacon device. We can use CoreLocation to center on the users specific location on a map!
Basic Code Sample
Setting up a map is pretty easy, the basic code is as simple as this:
Map(coordinateRegion: Binding<MKCoordinateRegion>)
However, notice that it needs a Binding or @State variable of type MKCoordinateRegion. In order to do so we need to look at the basic requirements for MKCoordinateRegion first.
The basic syntax is as follows:
MKCoordinateRegion(center: CLLocationCoordinate2D, span: MKCoordinateSpan)
it now needs to set up two new data types namely the CLLocationCoordinate2D and MKCoordinateSpan.
CLLocationCoordinate2D is simply the longitude and latitude of a specific coordinate of the map which can be done by simply doing it like this
CLLocationCoordinate2D(
   latitude: 37.789467,
   longitude:-122.416772
)
MKCoordinateSpan is the width and height of the map view in degrees, namely the latitudeDelta and longitudeDelta.
The range of values for latitude is from -90 to 90 and -180 to 180 for longitude. Thus, setting a high value for this makes the view wider view (zoomed out) while setting a smaller value for this makes it more precise view (zoomed in). Ideally, a good zoomed in view is around 0.1 to 0.5 degree while a nice zoomed out view is around 1 to 10 degrees.
MKCoordinateSpan(
   latitudeDelta: 0.5,
   longitudeDelta: 0.5
)
Given both this information, we can now easily create our MKCoordinateRegion by doing this:
@State var region = MKCoordinateRegion(
    center:  CLLocationCoordinate2D(
      latitude: 37.789467,
      longitude:-122.416772
    ),
    span: MKCoordinateSpan(
      latitudeDelta: 0.5,
      longitudeDelta: 0.5
   )
)
However, the problem is that we do not know what are the exact coordinates of the user, this is where CoreLocation comes to the rescue!
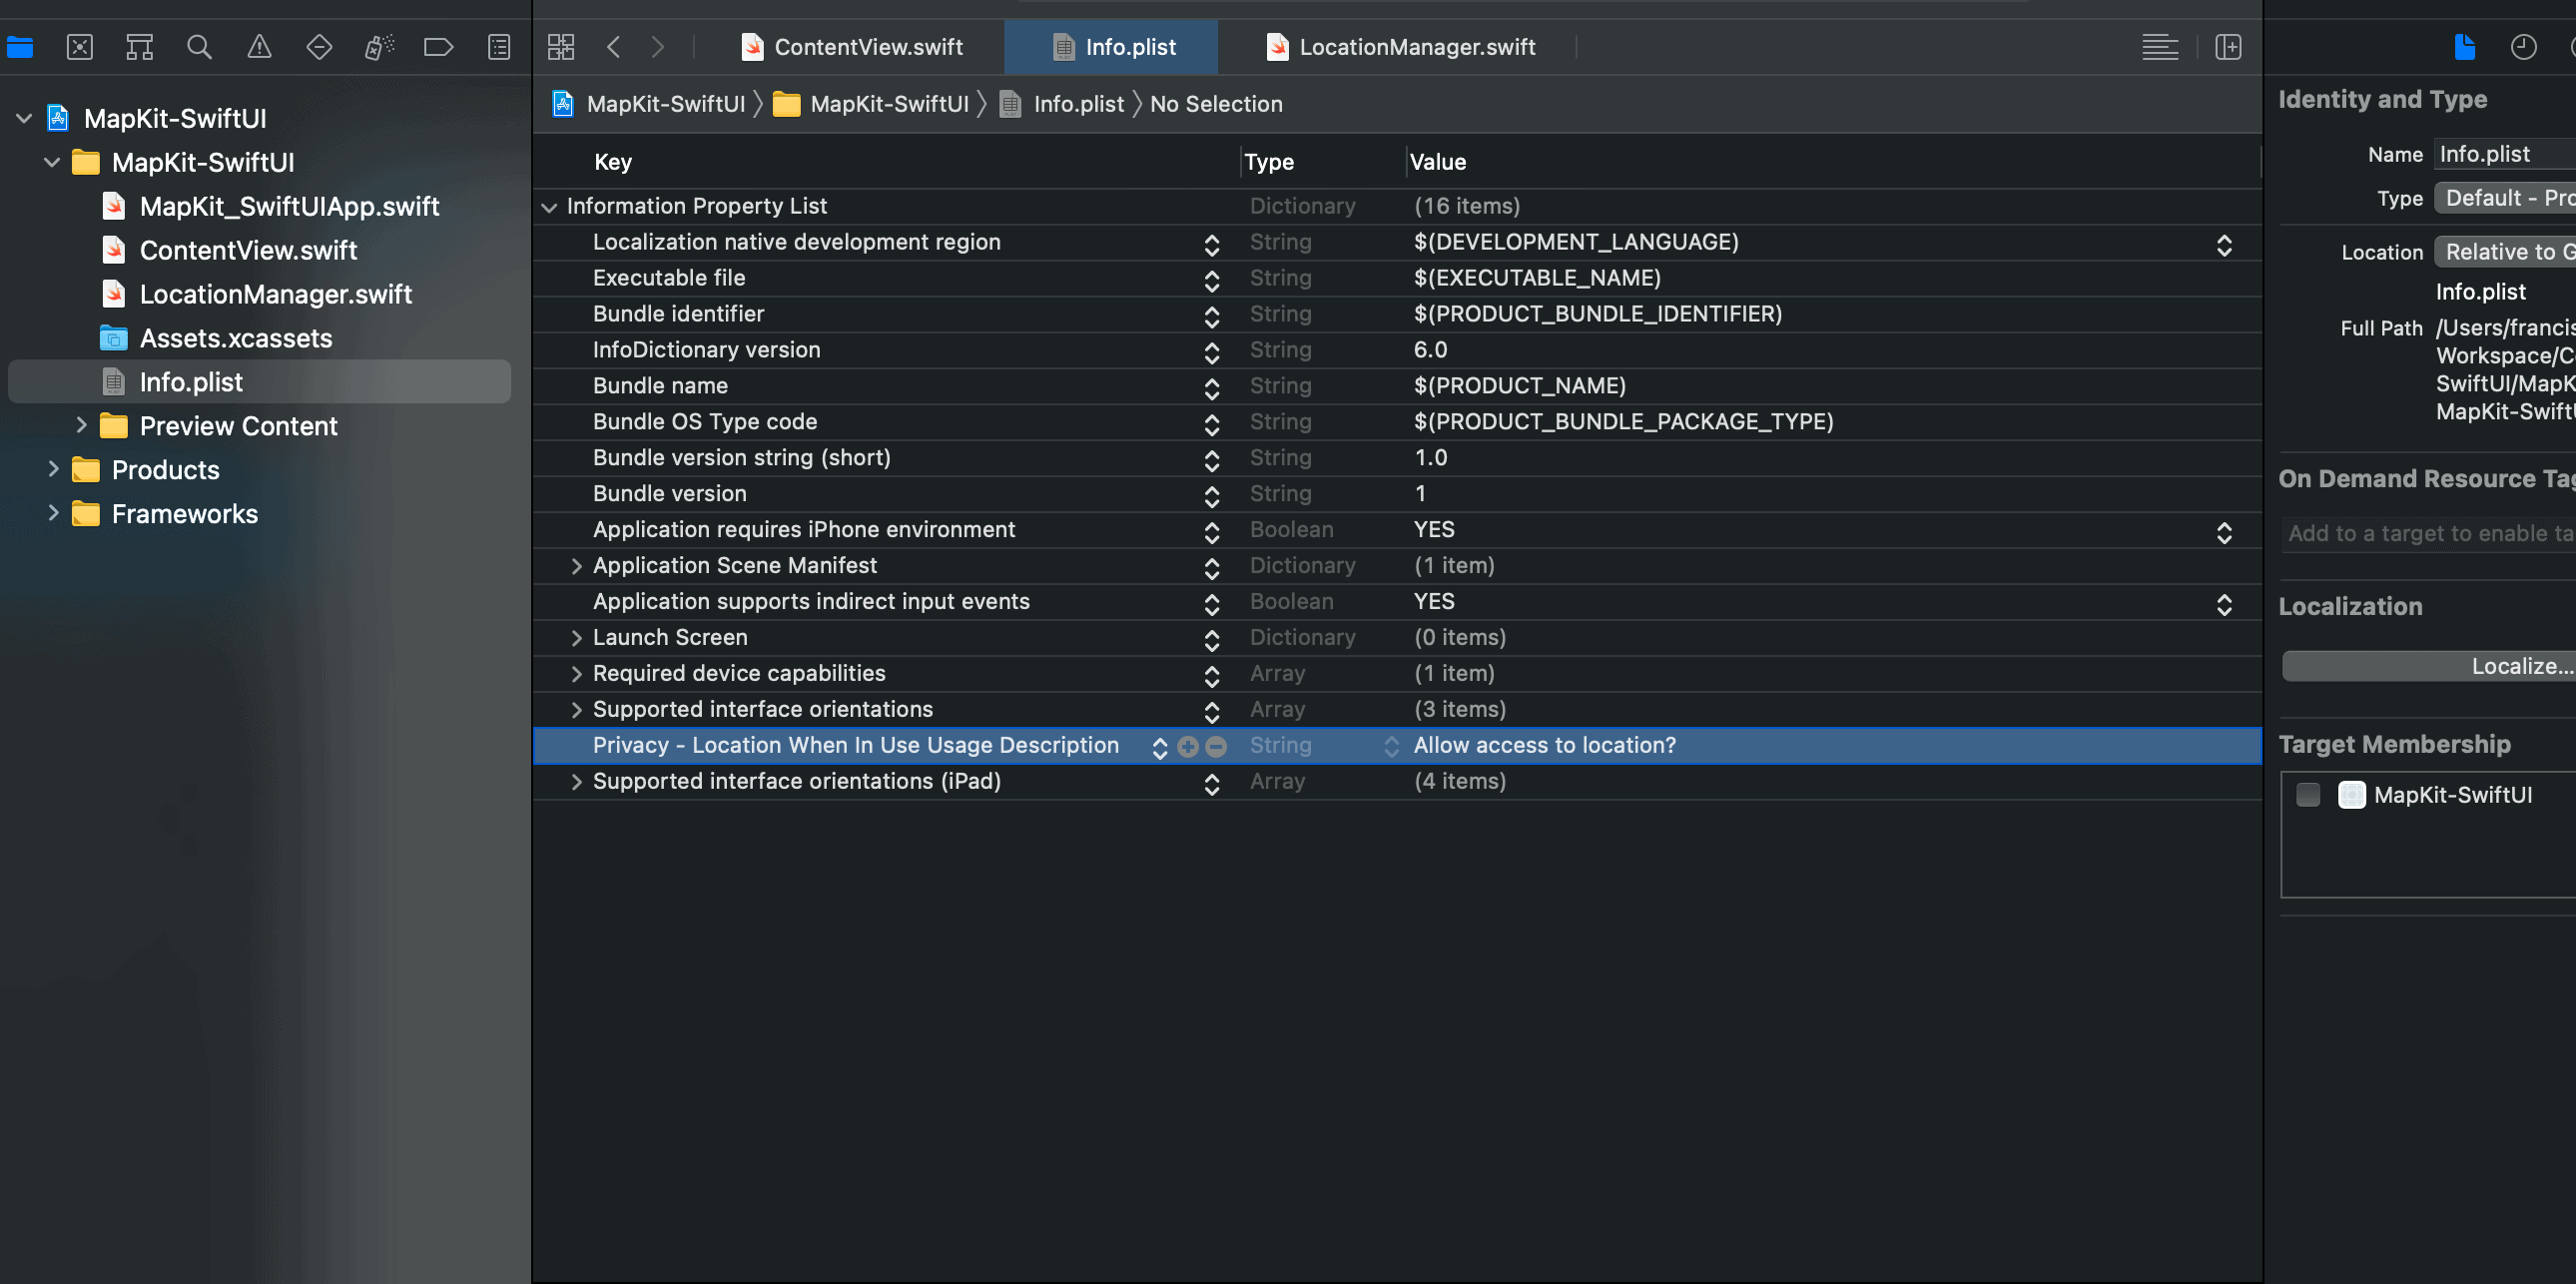
In order to set up CoreLocation we first need to ask for permission to be able to access location data. This can be done by editing the Info.plist file.
Once inside your Info.plist file just right click and add a new row (add row). You can then simply choose from the combo box what you want to add, look for Privacy – Location When In Use Usage Description and select that, you can then put any string value in the Value section, the text here will be shown once the app asks for permission from the user later on.
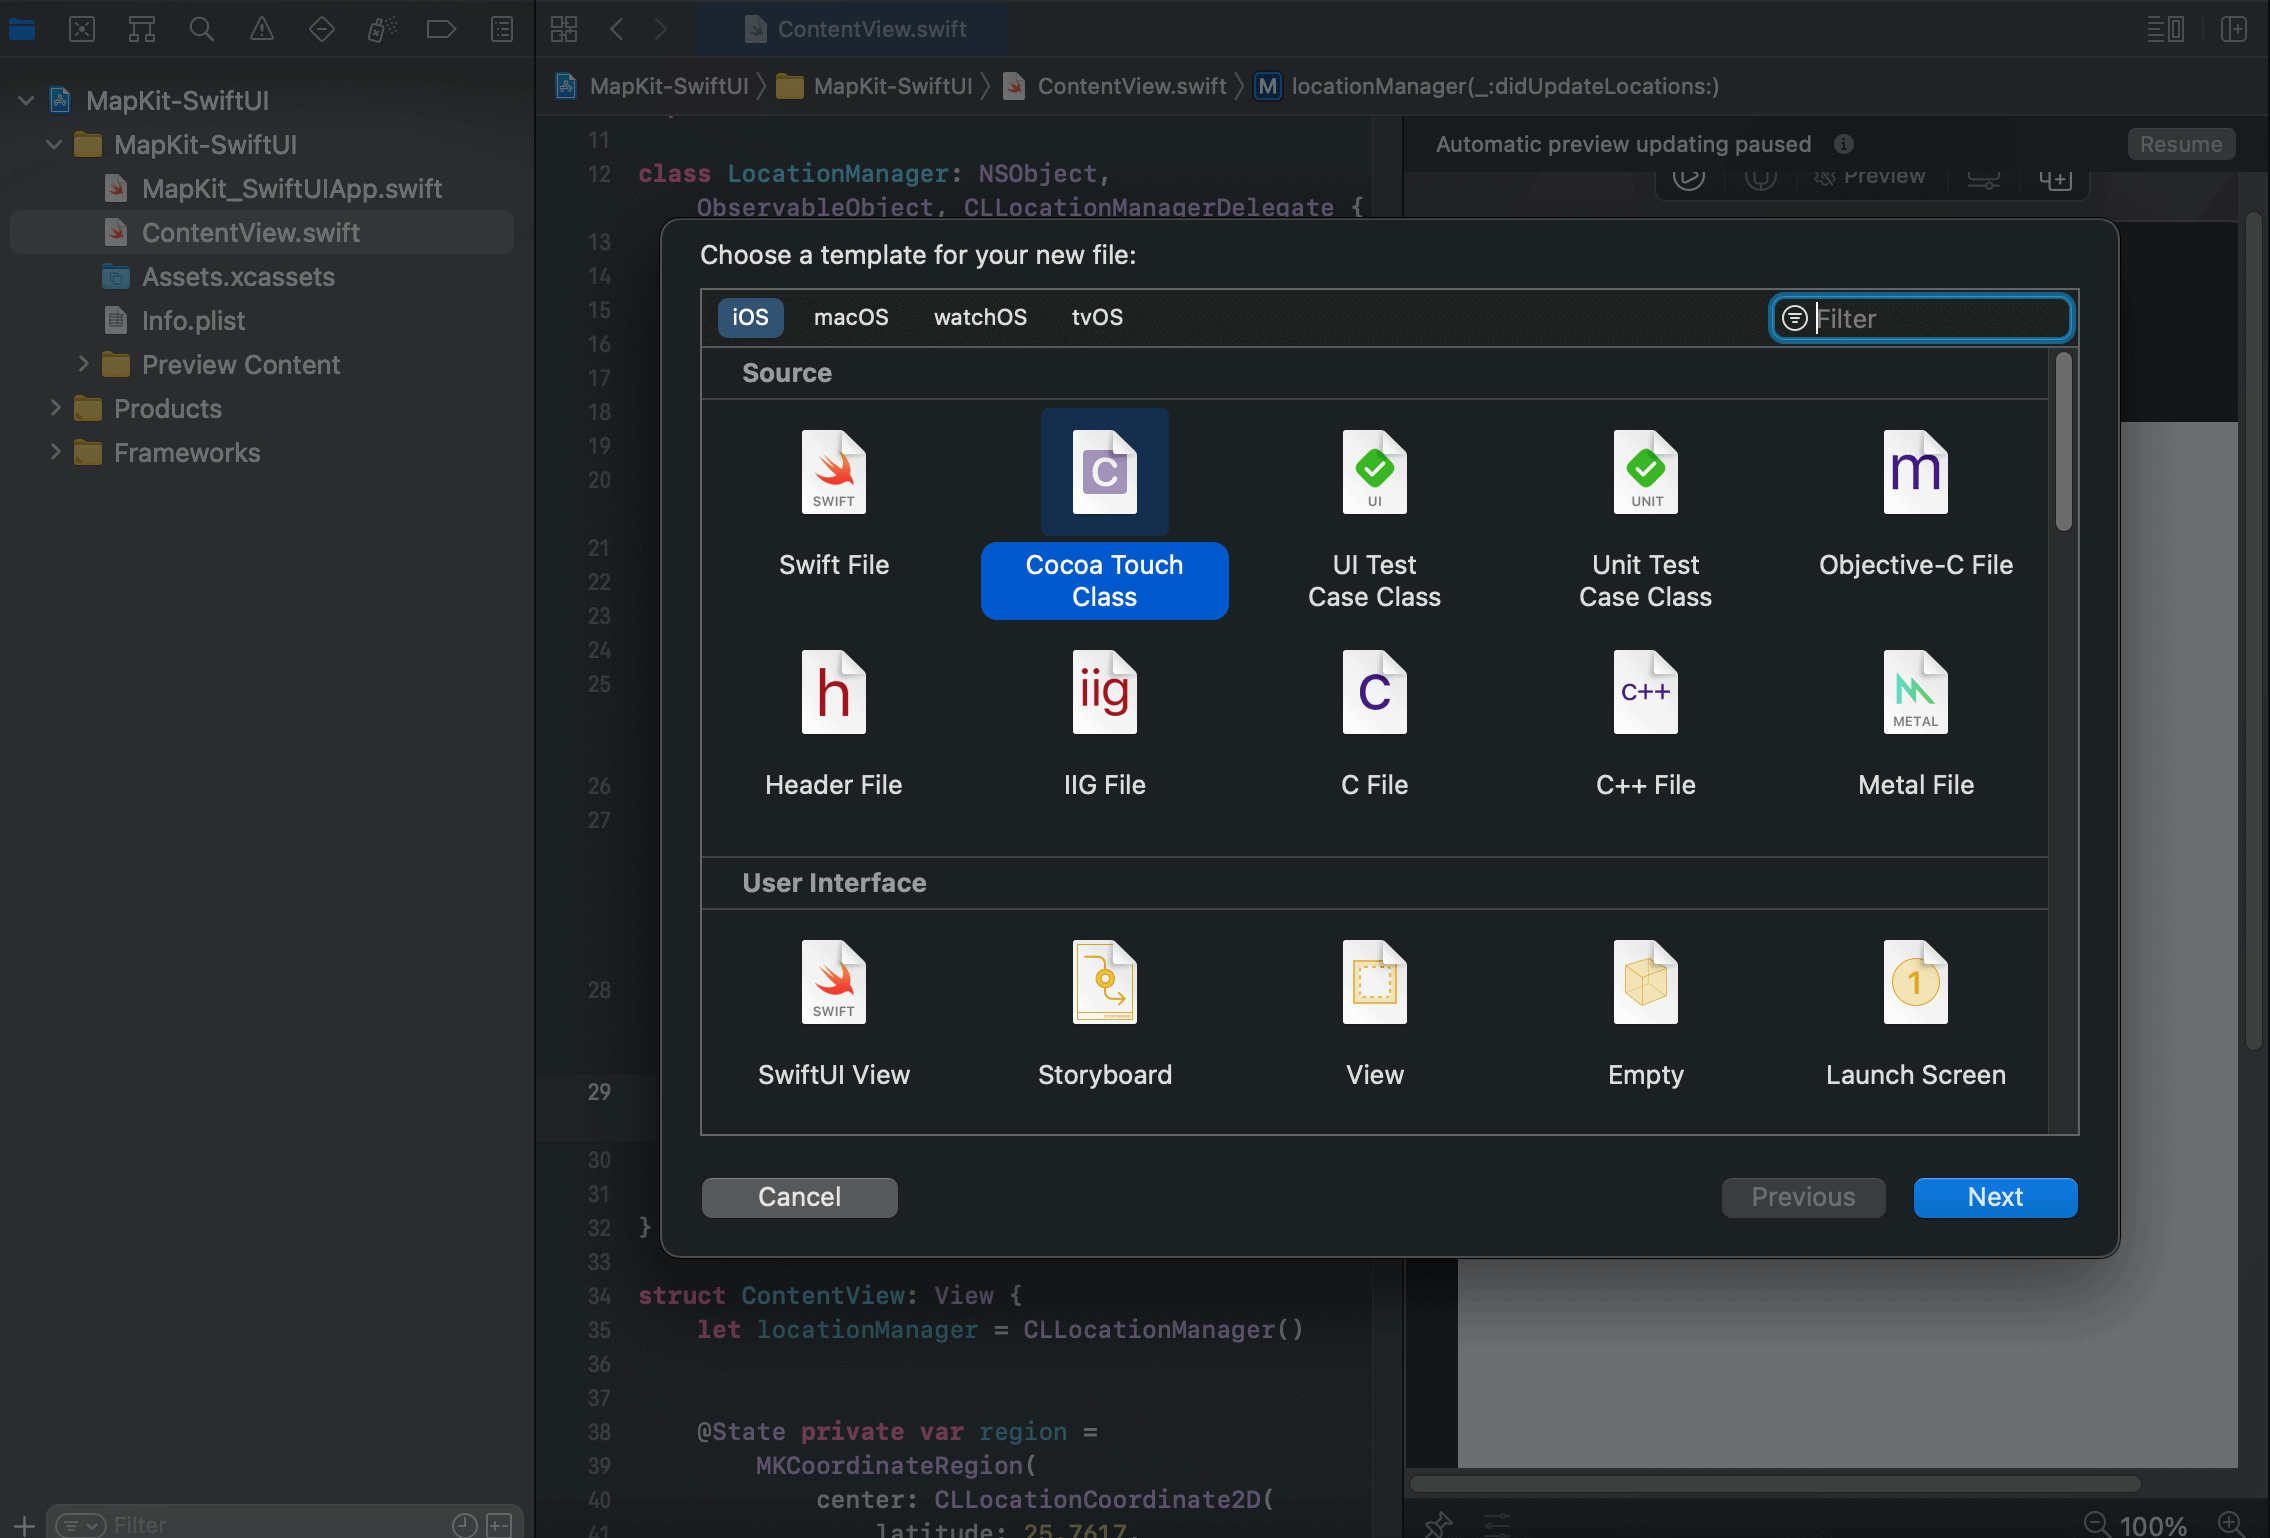
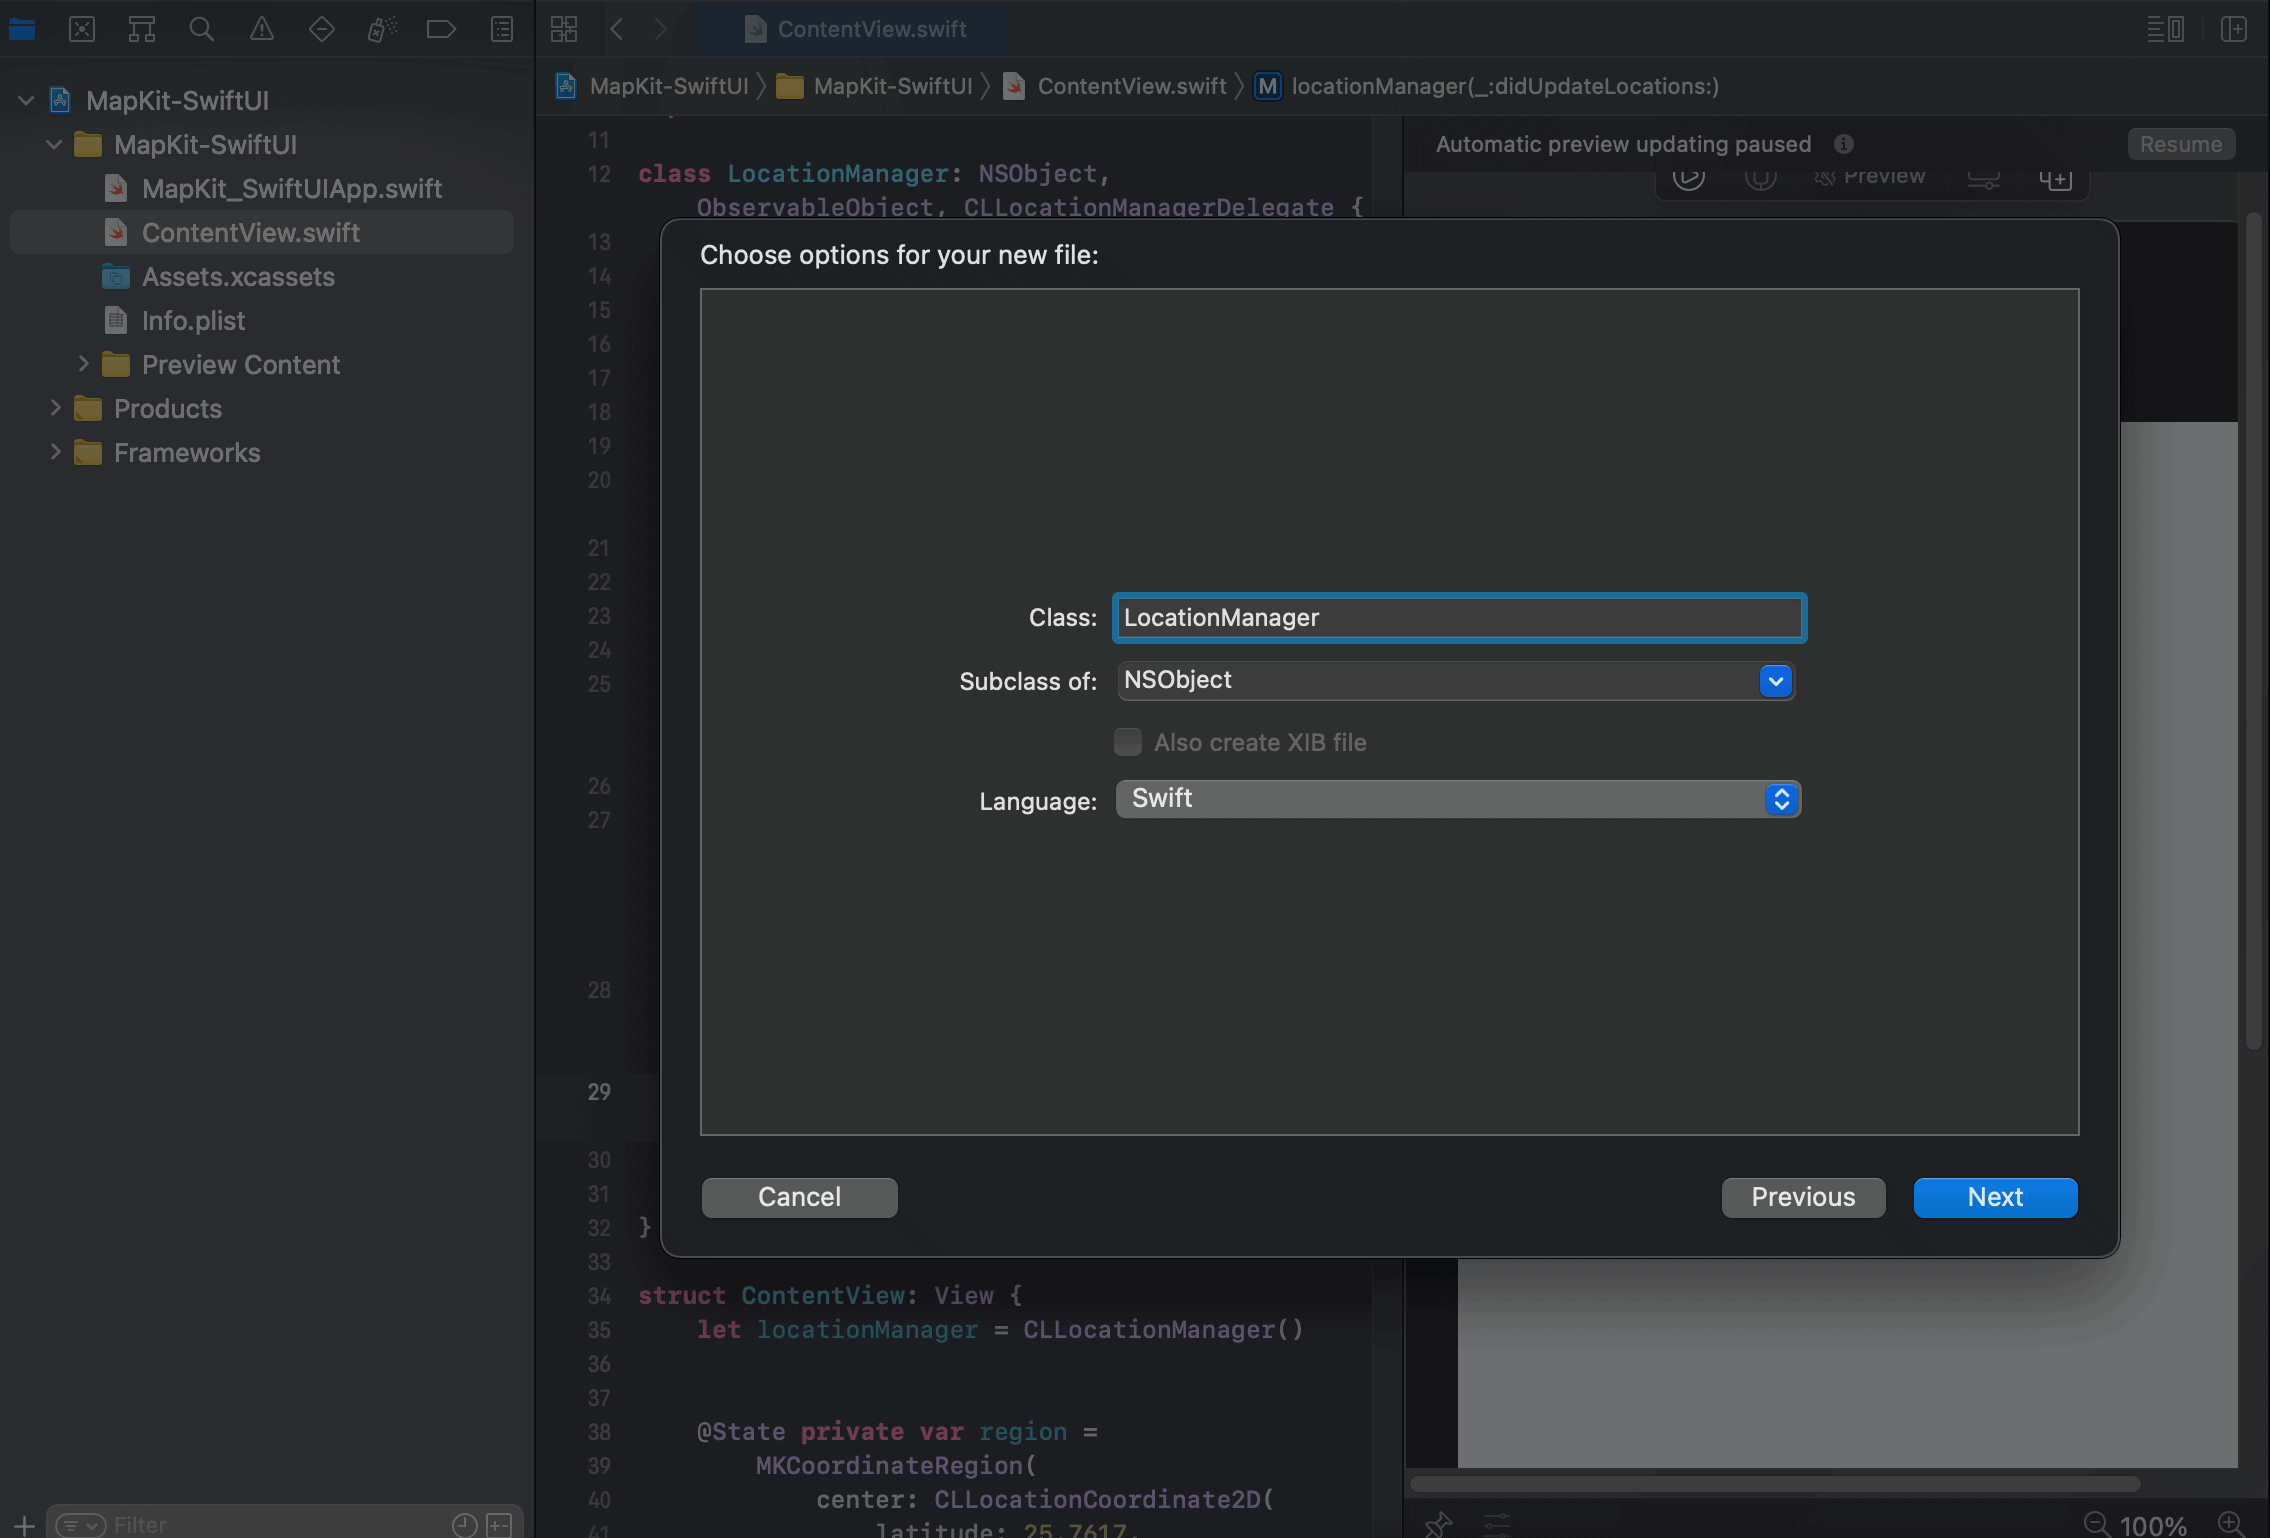
CoreLocation is a bit tricky in SwiftUI compared to its UIKit comparison. This is because we need to set a CLLocationManagerDelegate in order to have access to location updates in our app. This is ideally done by creating a custom class that will handle the CLLocationManagerDelegate.
Start by adding a new file (File -> New -> File…) then select Cocoa Touch Class. It will then ask for the name of the class and the subclass of the file, in this sample we set the class name to LocationManager and set the subclass to NSObject. make sure that Target is checked so it will be integrated properly to your project and finish up.
Make sure to import MapKit and CoreLocation to the top of the file.
Now add another subclass to your LocationManager class which are namely CLLocationManagerDelegate and ObservableObject. CLLocationManagerDelegate is to have access to our location updates while ObservableObject is be able to cater to Binding or State variables
Import MapKit
Import CoreLocation

class LocationManager: NSObject,CLLocationManagerDelegate, ObservableObject {
//code here
}
Now why does it need to be a Binding variable? well in normal circumstances the location set might change or the user might want to zoom in/out or pan around the map so in order handle this the state needs to change on the fly. This is the reason why MKCoordinateRegion asks for a Binding value.
Next step is to create a @Published variable of type MKCoordinateRegion, this will be our Binding variable that will observe for changes in the user’s location
@Published var region = MKCoordinateRegion()
Next step is to create a variable of type CLLocationManager, this will set up and handle what we need in order to get the user’s coordinates.
private let manager = CLLocationManager()
Next step is to override the init of the class. Inside the class we will call our CLLocationManager variable and set the .delegate to self.
Once that’s done you can set the .desiredAccuracy, there’s a lot of pre-made values to add to this, you can check the list by doing a kCLLocation and it will show a list of possible values. For now we will choose kCLLocationAccuracyBest.
Next, we need to ask for authorization to access location data, we can easily ask for permission by doing .requestWhenInUseAuthorization(). Doing this will result in a pop-up that will ask for location permission. Make sure you already set-up your Info.plist so you won’t run into problems when doing this.
Finally, once it has been authorized by the user we can now begin tracking the user’s location, you can do this by simply doing .startUpdatingLocation().
override init() {
        super.init()
        manager.delegate = self
        manager.desiredAccuracy = kCLLocationAccuracyBest
        manager.requestWhenInUseAuthorization()
        manager.startUpdatingLocation()
    }
Since we added the CLLocationManagerDelegate to our class it will require the following function:
  func locationManager(_ manager: CLLocationManager, didUpdateLocations locations: [CLLocation]) {
        //code here
    }
This is the function that will track the users location, this is where we will set our MKCoordinateRegion. In order to easily have access to the last location of the user simply do a locations.last.map{ code } . doing the MKCoordinateRegion inside this hashmap will let us easily access the last longitude and latitude value as shown:
func locationManager(_ manager: CLLocationManager, didUpdateLocations locations: [CLLocation]) {
        locations.last.map {
            region = MKCoordinateRegion(
                center: CLLocationCoordinate2D(latitude: $0.coordinate.latitude, longitude: $0.coordinate.longitude),
                span: MKCoordinateSpan(latitudeDelta: 0.5, longitudeDelta: 0.5)
            )
        }
    }
Finally, we can use our custom LocationManager class in order to feed the MKCoordinateRegion of our map.
Go back to your ContentView.swift and create a variable of type LocationManager, since its a custom class in order to make it Binding we need to set it as a @StateObject
@StateObject var manager = LocationManager()
We can now easily use our custom class to easily add the MKCoordinateRegion to our map. Remember to access the MKCoordinateRegion using dot notation:
Map(coordinateRegion: $manager.region)
Map Options
Although it is enough to display a map using the basic Map declaration with just the coordinateRegion it will just look like a basic map centered around the location that you specified, it won’t even have a marker on where you are!
Here is where some map options or map overloads come in, ideally you want to use a map with this lists of overloads:
Map(coordinateRegion: Binding<MKCoordinateRegion>, interactionModes: MapInteractionModes, showsUserLocation: Bool, userTrackingMode: Binding<MapUserTrackingMode?)
interactionModes is basically how you want to interact with your map, you can fill this up easily by using the built-in class called MapInteractionModes and doing a .pan or .zoom if you want only specific interactions enabled, or you can allow both but doing a .all
showsUserLocation just asked for a Bool if you want to show the location, if activated it will show a marker for the location of the user.
userTrackingMode is basically if you want to track the movement or changes in the location, you can set this up easily by using the built-in class called MapUserTrackingMode and doing a .follow or .none
However it is to be to be noted that userTrackingMode should be a Binding variable so its ideal. to set it separately then using the variable for your Map set-up later on.
@State var tracking:MapUserTrackingMode = .follow
Given all this info we can now set our Map with more specific functionalities and control.
Map(
   coordinateRegion: $manager.region,
   interactionModes: MapInteractionModes.all,
   showsUserLocation: true,
   userTrackingMode: $tracking
)
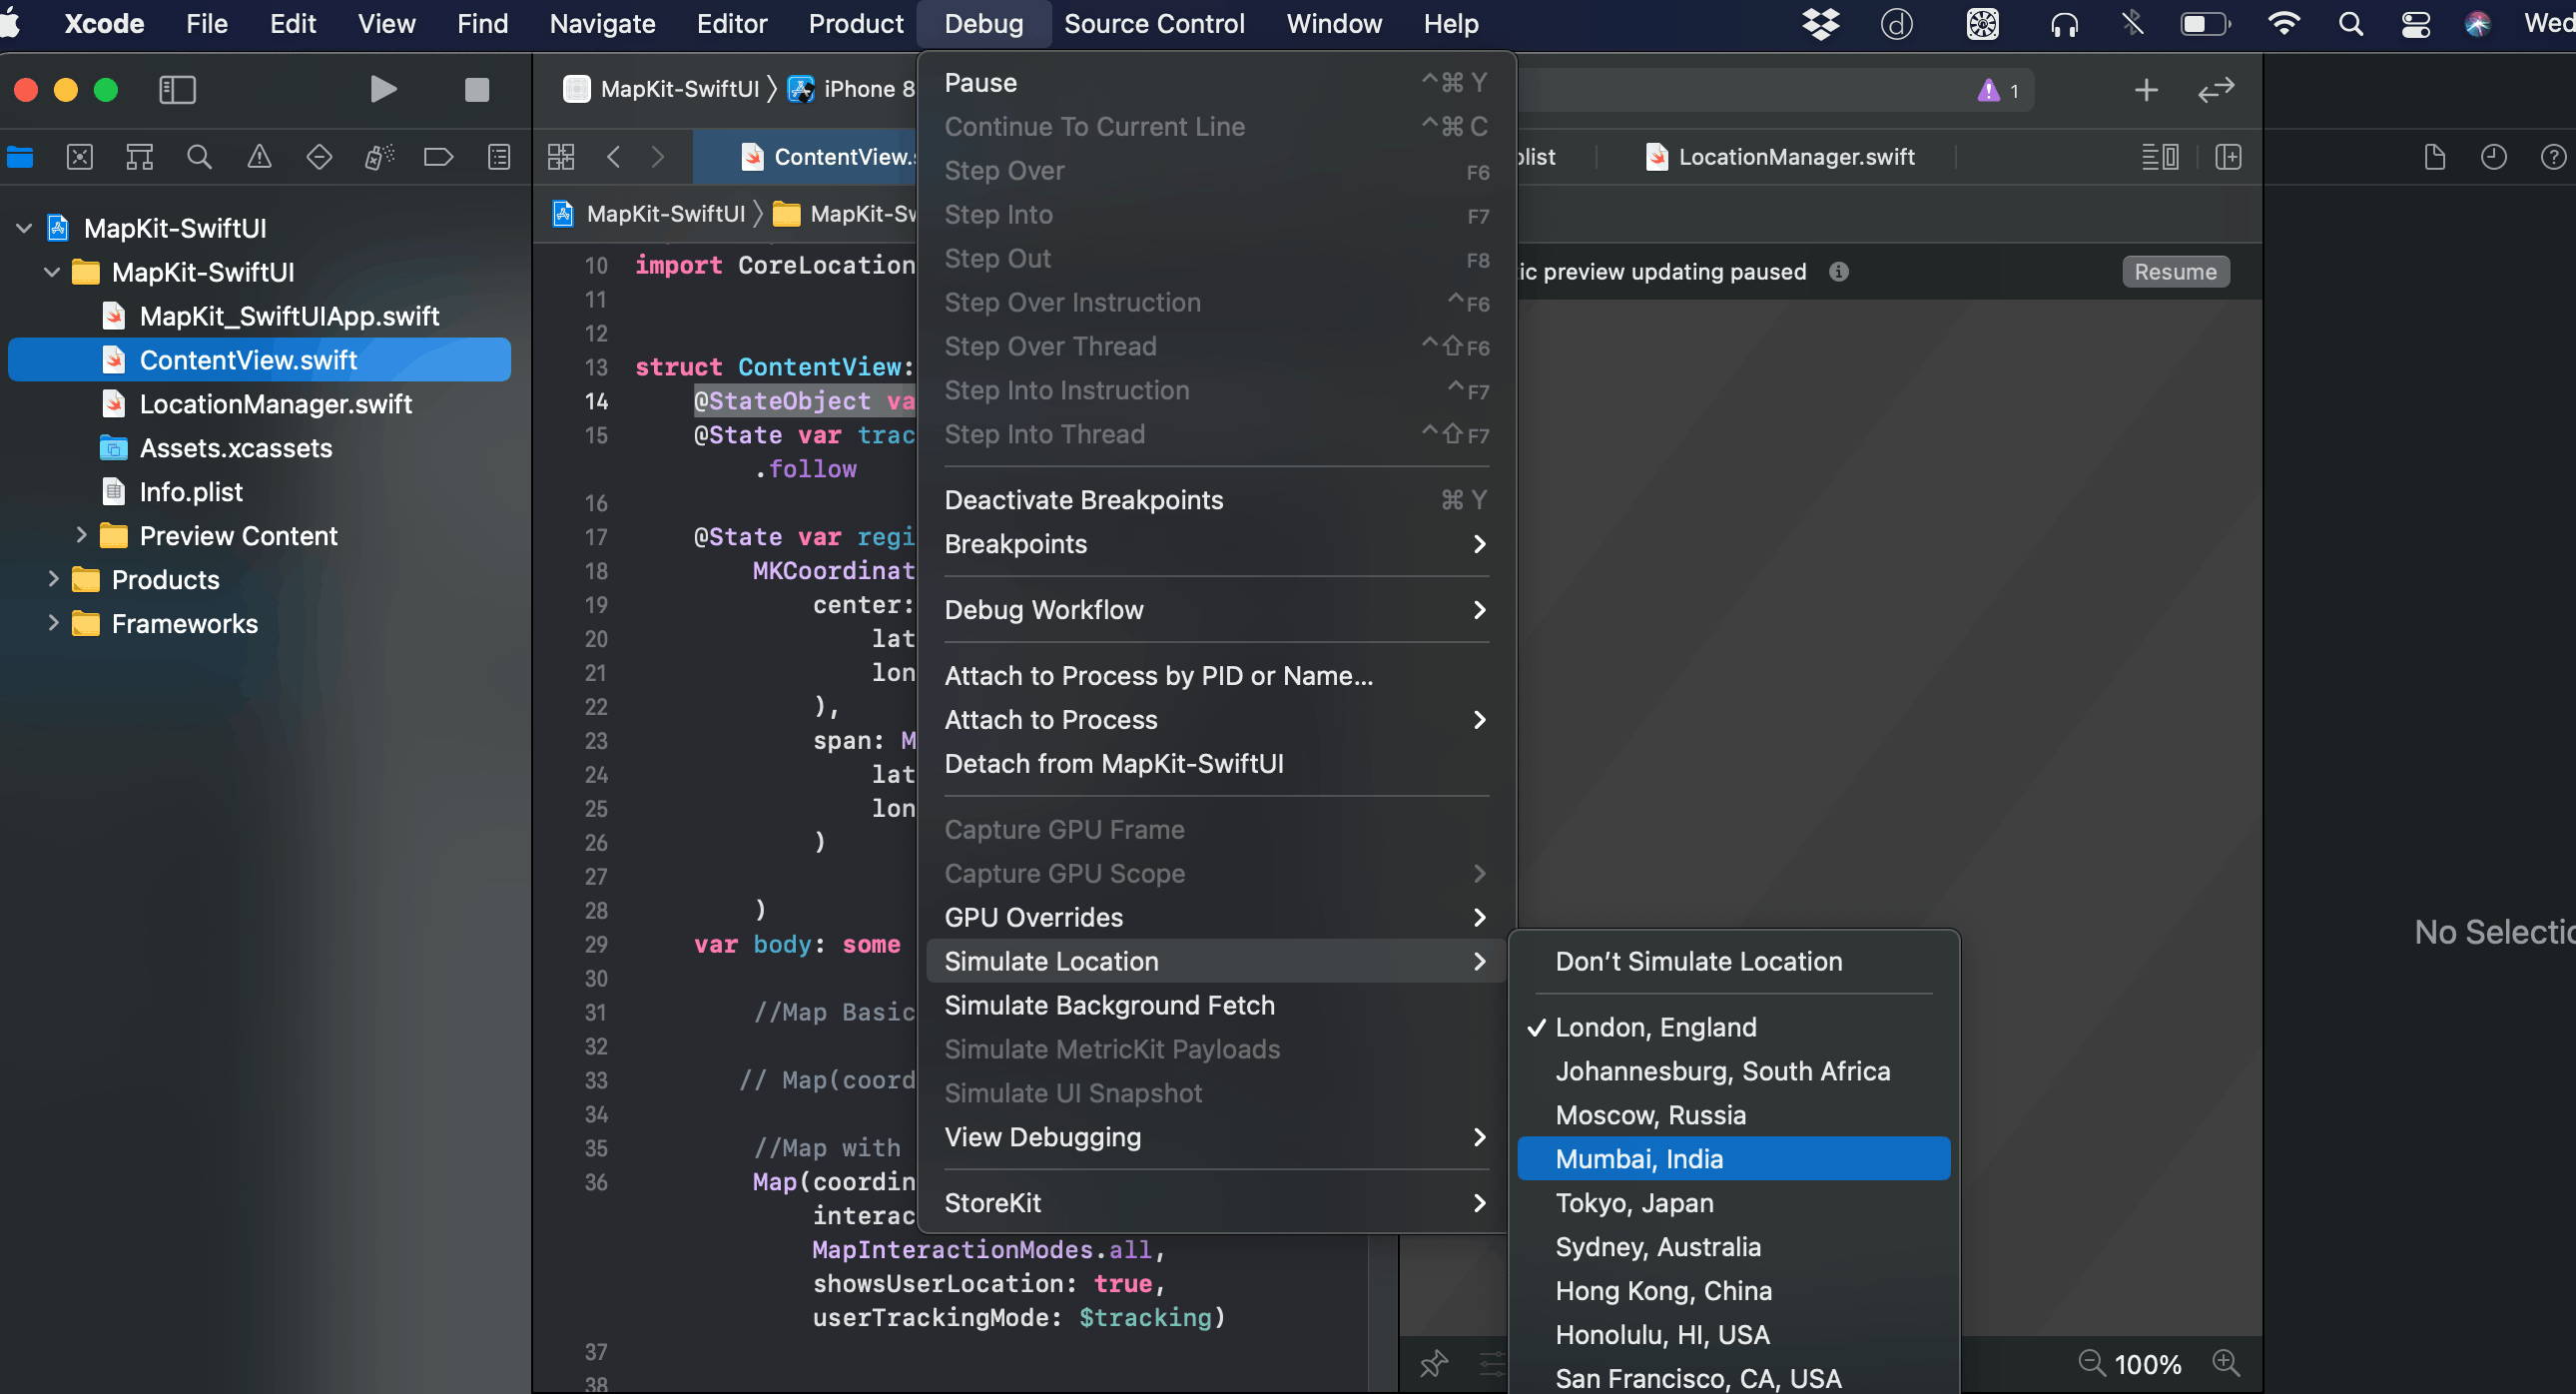
Simulate Location
Simulating location on SwiftUI is a bit different compared to its UIKit counterpart. In UIKit you. needed to set the simulated location at the Scheme, now in SwiftUI you can easily change simulated location on the fly even while your simulator is running.
First just select the Swift file that will show the map in your project, for our case its the ContentView.swift file. Then just simply navigate to Debug -> Simulate Location -> Select a location