Xcode 10.2 on High Sierra – Step by Step

If your question is “How to update Xcode 10.1 to Xcode 10.2.1?” then you have come to the right place!

Recently Apple has updated Xcode to only work with the latest Mac OS Mojave (10.4.4), this means that developers who have old Macs won’t be able to update their OS and develop in Swift 5 using Xcode 10.2.1.

We at CodeWithChris however, found a solution to this dilemma!

Please do note however that this is a workaround. This is not in anyway supported by Apple as they have specifically set the new version of Xcode 10.2.1 for the latest OS only. We found that these steps work for us and we cannot guarantee if it will work for you.

Presenting: Installing/Updating Xcode 10.1 to Xcode to 10.2.1 on Mac OS High Sierra (10.13.6) or Mac OS Mojave (10.4.0)

Please note that we won’t be using the App Store to do this

Step 1:

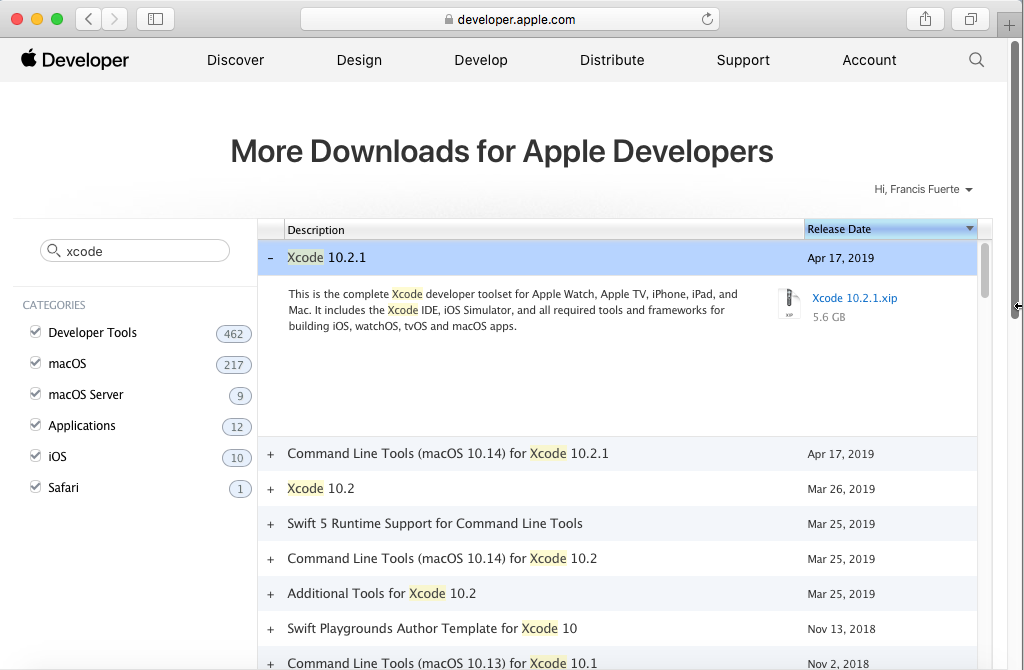
Open in your browser  https://developer.apple.com/download/more/

Log-in your Apple account and download Xcode 10.2.1 (or whatever is the latest)

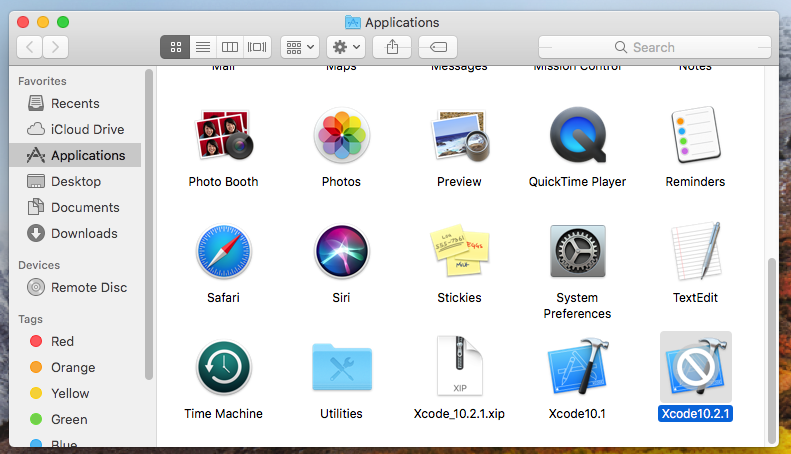
Important!: If you don’t have Xcode installed yet also download and install 10.1 (you can do this by exacting the .xim file for Xcode 10.1 – it will automatically uncompress and have Xcode 10.1 installed and ready to use – you may rename the application to Xcode 10.1 to avoid confusion in the next parts)

Xcode direct download from apple developer site

After download completes (for Xcode 10.2.1) extract the .xim file (exacting the file will automatically uncompress and install that version of Xcode ready to use – you may rename the application to Xcode 10.2.1 if you wish as to avoid confusion).

The logo of Xcode should have an error icon on it, you can ignore this for now

Xcode 10.1 vs (Incompatible) Xcode 10.2.1

Step 2:

Open the app directory (right click->show package contents) of your xcode 10.2.1 app

Navigate to Xcode 10.2.1.app/Contents/ and edit the file Info.plist, change the Minimum System Version to 10.13.6 (it should have 10.14.3 originally written on it), make sure to save.

Info.plist contents with the edited Minimum System Version

Additionally, navigate to Xcode.app/Contents/Developer/Applications/Simulator.app/Contents/ edit Info.plist and also change the Minimum System Version to 10.13.6.

Step 3: (This is the reason why we need Xcode 10.1 installed)

Now go to your xcode 10.1 app directory (right click->show package contents) and copy the file xcodebuild located on Xcode 10.1.app/Contents/Developer/usr/bin/

xcodebuild file that needs to be overwritten from Xcode 10.1 folder to Xcode 10.2.1 folder

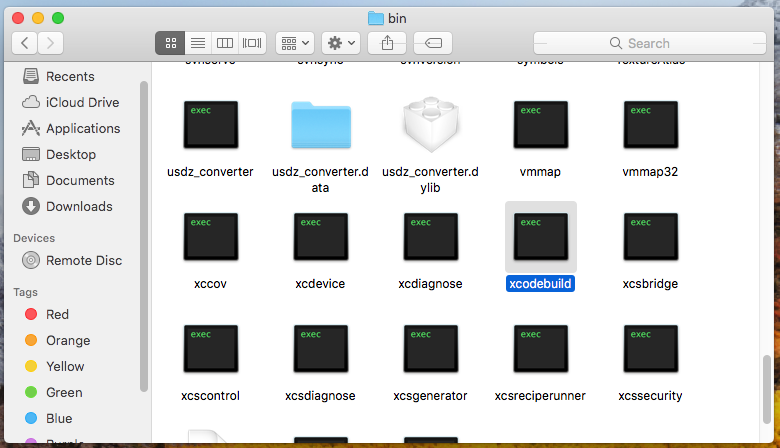
Then, go to your xcode 10.2.1 app directory and overwrite the file xcodebuild located on Xcode 10.2.1.app/Contents/Developer/usr/bin/

Step 4:

Finally, restart your mac to reflect the changes made to the system.

And your done! you can now use xcode 10.2.1 in your your Mac! You will notice that the error icon is gone and you can now launch and use xcode10.2.1 for app development!

(Now working) Xcode 10.2.1

45 Comments

  1. Thank you so much! I am a Mac newbie, so this was a bit intimidating, but I wanted to share that not only does following these instructions verbatim work fine on High Sierra for me, but it worked to the latest Xcode of 10.3. The only thing I must point out that the instructions omitted (assumed we would know) is how to edit the Info.plist files. No, using vi didn’t cut it. Presumably this is the second reason we needed to have 10.1 installed first, I learned you need to use Xcode to edit the Info.plist files. No save button, just edit the value and quit out. Rebooted. When I ran the 10.3 app it complained it needed to download more updates, which scared me, but it did this and then Xcode 10.3 opened up without any complaints! Didn’t try to use it yet, assume it works.

    Thank you!

    Reply
  2. I did all of this post.
    Install xcode 10.3 and it works(all about this post).
    after download https://github.com/iGhibli/iOS-DeviceSupport the folder that i need 13.0,13.1,13.2
    after move this folder to Xcode 10.3 directory
    /Applications/Xcode.app/Contents/Developer/Platforms/iPhoneOS.platform/DeviceSupport
    Restar the Mac.
    now i can debug from IMAC 2010 with Xcode 10.3 a iPhone 7 device with iOS 13.2.2

    Reply
  3. Just a note, to allow the editing of PLIST files you have to reboot your computer and hold the ⌘+R keys, then when you reach the menu, select utilities—Terminal, when the terminal is finished loading, type; csrutil disable.

    Reply
    • This disables SIP (System Integrity Protection), is only to be done when it’s really necessary (modifying Library things does not count) and could expose your Mac to dangers. Please remember to enable it back.

      Reply
  4. ran the following to bypass the startup OS version error

    /Applications/Xcode\ 10.2.1.app/Contents/MacOS/Xcode

    First time I ran it, it installed the libraries. Send time it started the IDE.

    Reply
  5. the simulator is working too now. Have to do the same for simulator info.plist. (/Applications/Xcode1021.app/Contents/Developer/Applications/Simulator.app/Contents/info.plist).

    Reply
  6. Hi,
    Thanks for putting this up.. and saved me to buy a new mac. Does anyone experiencing with the simulator greyed out? Please let me know if you have an idea on how to get it to work.
    Thanks

    Reply
  7. As some seem to fail I’ll share my success:
    Using hardware: iMac (21.5-inch, Mid 2010), 3.06 GHz. 12 GB.

    I only worked off of an Xcode_10.2.1.xip from developer.apple.com. Unpacked by `open -a “Archive Utility”`. Edited like `cp -pi /Applications/Xcode{10.1,10.2}.app/Contents/Developer/usr/bin/xcodebuild&&for bundle in /Applications/Xcode10.2.app{,/Contents/Developer/Applications/Simulator.app};do defaults write “$bundle”/Contents/Info LSMinimumSystemVersion -string 10.13.6;done`.
    No restart needed. Admin access needed first run (to complete install).

    Finally I’ll add my local date, afaics otherwise wholly lacking on this page: September 2019.

    Reply
  8. Like Jurie, I was also able to get this working for 10.3 on High Sierra. Note: For some reason the plist files were cached before I edited them, so after editing and rebooting I was still blocked. So, I had to force a re-cache of the plist files (there are multiple ways to do this) to be able to start xcode 10.3.

    Reply
  9. Hi,
    So I’ve posted a couple times with issues I was having. I’ve resolved my issues and thought I’d post again. Machine:Macbook Pro 13″ mid 2010 running OS 10.13.6, Xcode 7.
    OS 10.13.6 is max for this machine Apple won’t let it go any further. Xcode stopped updating a long time ago I don’t know why.
    1) If you have Xcode prior to 8 and you want to keep your program code you must install Xcode 8 to bring your code up to date. Apparently, open all your code inside 8 and let it update everything.
    2) You cannot go from Xcode 7 directly to 10.2.1 or 10.3 doesn’t matter if you have existing code or not, you must install Xcode 10.1 first, let it load all the supporting files.
    3) Follow the instructions EXACTLY as Chris has written them to upgrade from 10.1 to 10.2.1. Skip a step and it won’t work.
    Tips: remove the Xcode quick-launch from the Dock, rename your current Xcode version in the Application directory (now), Download the file from Apple to your download directory, unpack it in the download directory, make the edits as outlined by Chris, move the file to the Applications directory, make sure everything is closed (not JUST minimized), reboot your computer, go to the Applications directory and launch Xcode and follow the prompts–be patient your computer is old it will run slow!
    4) I upgraded from 7 to 10.1 then from 10.1 to 10.2.1 then to 10.3. I followed the procedures outlined above each time.
    Yes, I have Xcode 10.3 running on a MacBook Pro 13″ mid 2010!!!
    It was Soooo Excellent to see the screen come up and tell me 10.3!
    Tip: when I loaded my first couple programs it took a LONG LONG time for them to load and execute. I’m not sure what is being updated but you need to be patient!! If you are not sure if something is running look in the Dock, if it’s there click it once and see if it comes up,,,,wait,,,wait,,,.

    Reply
  10. This worked fine for me with Xcode 10.3 on a Mac Mini (2011) with High Sierra. Does anybody know a trick to install (and use) the command line tools for XCode 10.3 under High Sierra?

    Reply
    • So how did you get it to install? I downloaded 10.3 and after unpacking it stopped. When I tried to run it so it would install it says I cannot run on 10.13.6 OS. I modified the files as instructed while it was still sitting in the download directory and it still wouldn’t install or run. I moved it myself to the Applications folder and tried to run it but no luck. (Mid 2010 Macbook Pro 13)

      Reply
  11. Thank you so much. I bought a mac just to compile Xcode, a Pro Early 2011 and I was desperate when I figured out Xamarin didn’t work with Xcode 10.1

    I found your article and now Im compiling .IPA

    Thank you so much.

    Reply
  12. Thank you! This worked on my Mac Mini 2011 on High Sierra with Xcode 10.1 upgrading to Xcode 10.3. Followed all the steps, be patient. After the last step and restarting it will still look like it can’t run, but when you do it asks to install additional updates and after that it works. Could run the simulator and build to my phone running iOS 12.4.

    Reply
  13. Hello

    I followed step by step this tuto, but is not working for me.
    I steel have the error icon & even when I lunch Xcode_10_2_1 I’m getting an error that this program need macOS 10.14.0

    Did someone succeed ?

    Best

    Reply
  14. Hi there,
    This hasn’t worked for me. I’ve double checked the steps over and over and restarted my computer a bunch of times but no luck! Has anyone been successful?

    Reply

Leave a Reply to Gianluca Cancel reply

Share
Tweet
Pin
Share
Buffer