So you’ve been developing your app and testing it on the Simulator. However, did you know that there could be bugs that only show up when your app is running on an actual iOS device?
Furthermore, testing your iOS app on a device is the best way to gauge performance issues before you go too far down the road.
For those of us who don’t have actual iOS devices, the Simulator is actually really good. But if you have a spare device lying around, then this tutorial will show you how to put apps on the iPhone or other iOS device.
Why do we have to go through all this trouble?
It’s common to wonder why it takes so many steps just to put your app creation on a real device. The answer is really about security. Although you might not create malicious apps to put on peoples phones, Apple cares that it can identify who created the app and that it can tell if the app has been tampered with or not.
These security measures are ensured by a process known as code signing. When you create an app package (binary) to put on a device, you have to put your “digital signature” on it by code signing it. Otherwise, Apple won’t let that app be deployed on any device.
Requirements:
– You’ll need an actual iOS device.
– You’re going to need to join the Apple Developer Program which costs $99/year.
Yes, you read that right! You don’t need to purchase the $99/year membership to be able to transfer your own app to your own device.
Request your certificates
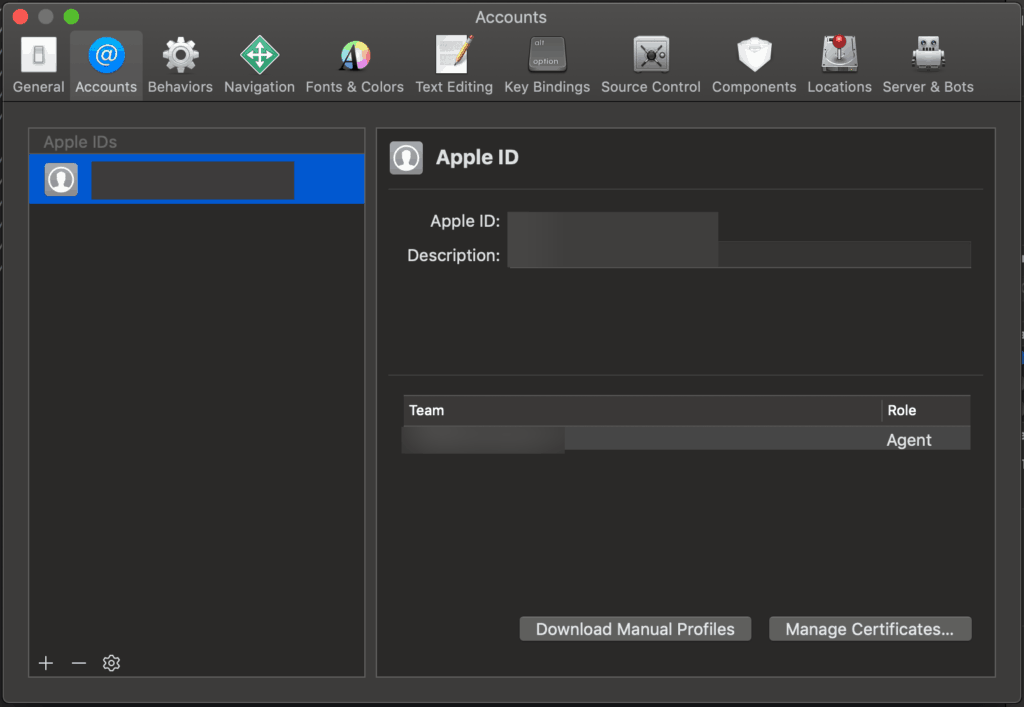
Xcode is pretty smart as it now takes care of all those little details for us as long as we have our Apple ID registered in Xcode’s Preference Pane. Now it might happen you encounter a little hick-up along the way and so you will have to do it yourself.
Your certificate is used to code sign the apps and they uniquely identify you. In this step, we have to generate and request two certificates: one for development and one for distribution. We only need to do this once (not for each app!).
The development one is used for testing while the distribution certificate is used to sign your app bundle for distribution in the App Store once it’s ready. Launch Xcode 10 and go to your preferences menu. Then go to the “Accounts” tab. Fill in your Apple iOS developer account details here.
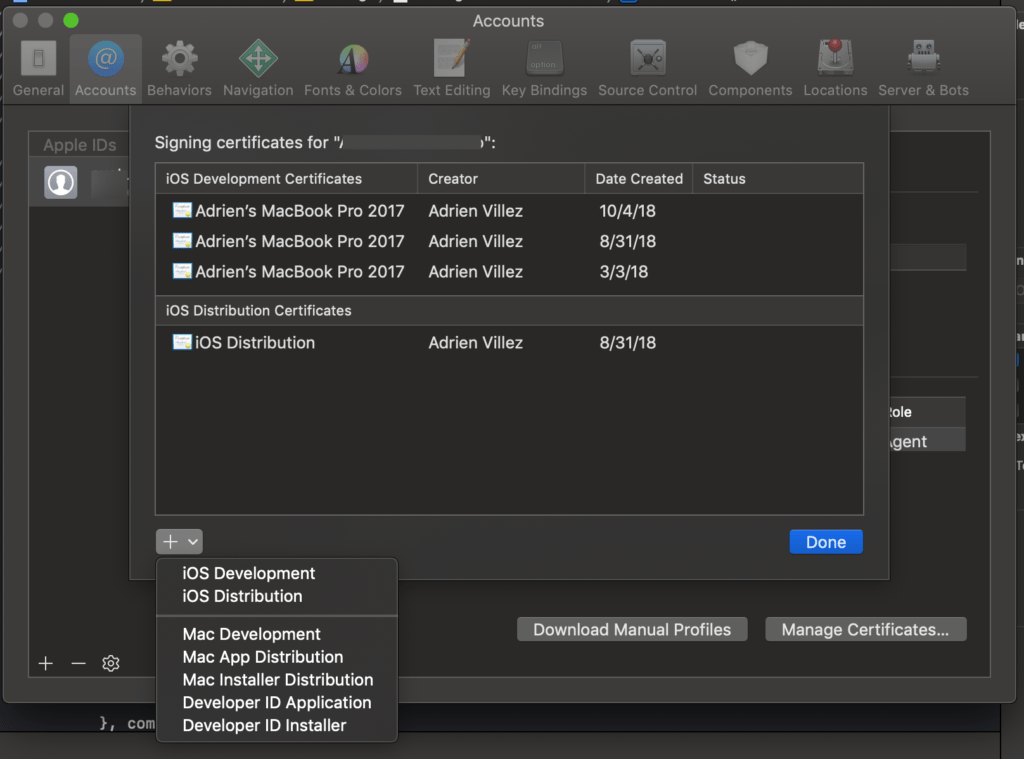
Once you’re signed in, click “Manage Certificate” and you’ll get to this panel where you can see your existing certificates and provisioning profiles.
If you click the “+” icon below the certificates pane, you can request a new iOS Development Certificate. Go ahead and do that now.
Also do the same thing and request an iOS Distribution Certificate as well.
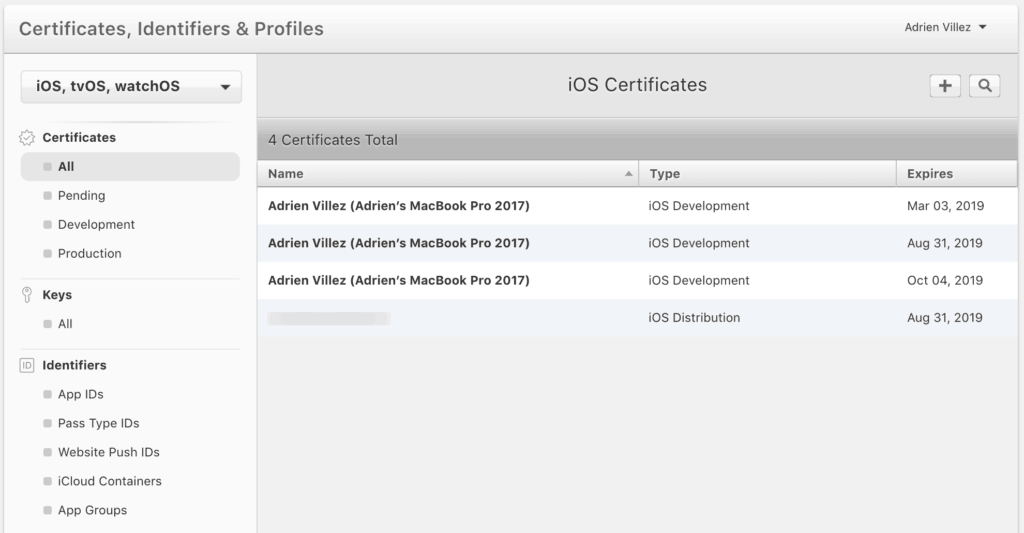
If you want to verify that they’re created, simply login to your your iOS provisioning portal and go to “Certificates”, you can see that it’s actually been created!
In the past, this used to be a lot more tedious and you’d have to go through multiple steps to generate the request on your computer and then upload it to Apple through the provisioning portal. It’s nice that it’s integrated and automated into Xcode 10 now!
Deploy the app to the device
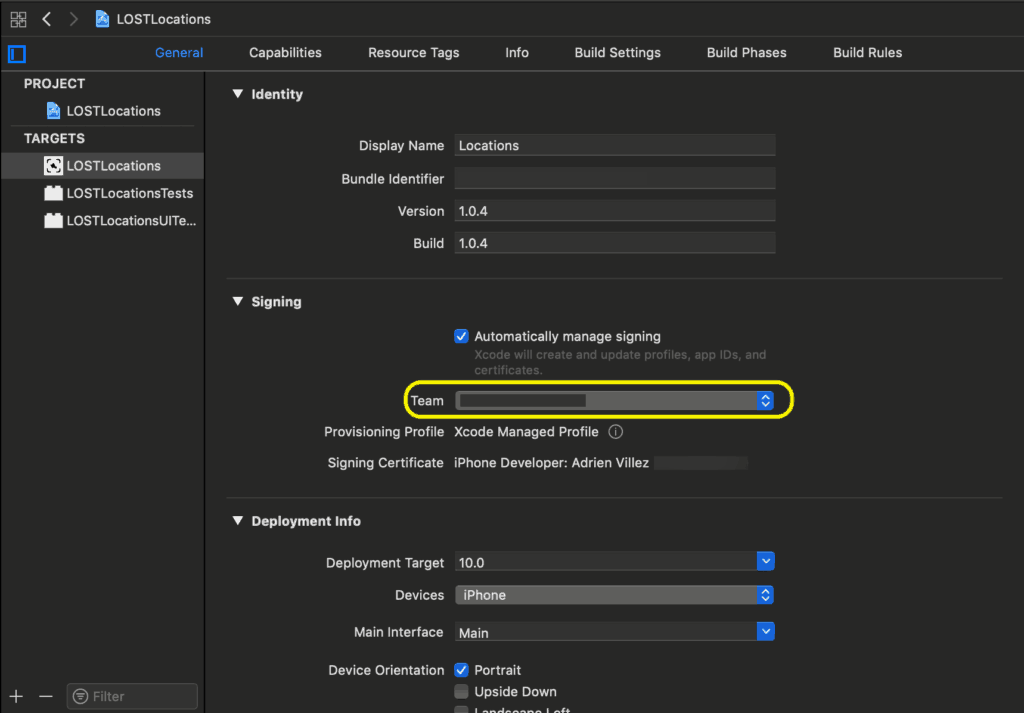
Before sending the app to the device, let’s make sure the project has a Team associated with the Signing option. The use of “Automatically manage signing” takes care of the job in 99% of the case so make sure that is enabled.
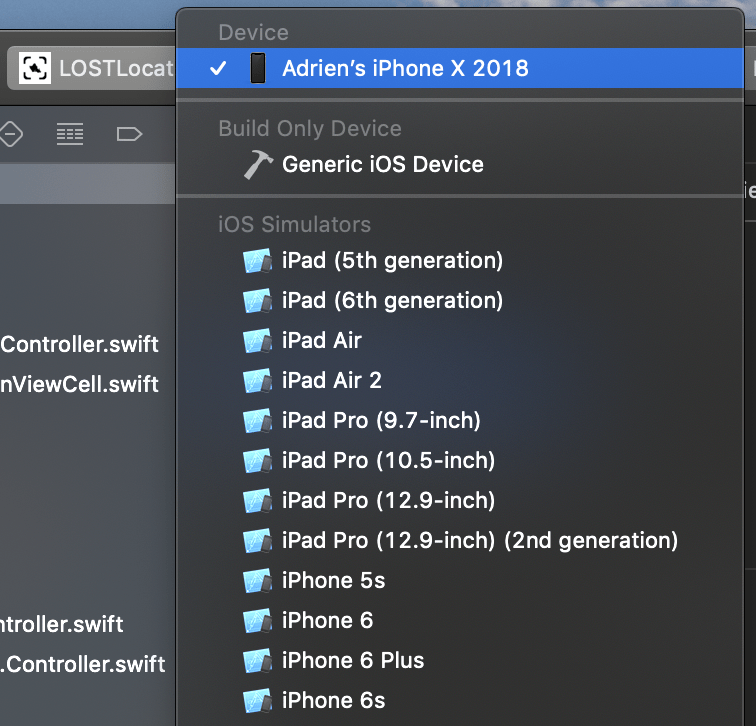
Now if everything is set up correctly, you’ll see the name of your phone in the list of deployable targets.
If you only see “iOS Device”, it won’t work. You’ll need to actually see the name of your device in the list.
Troubleshooting
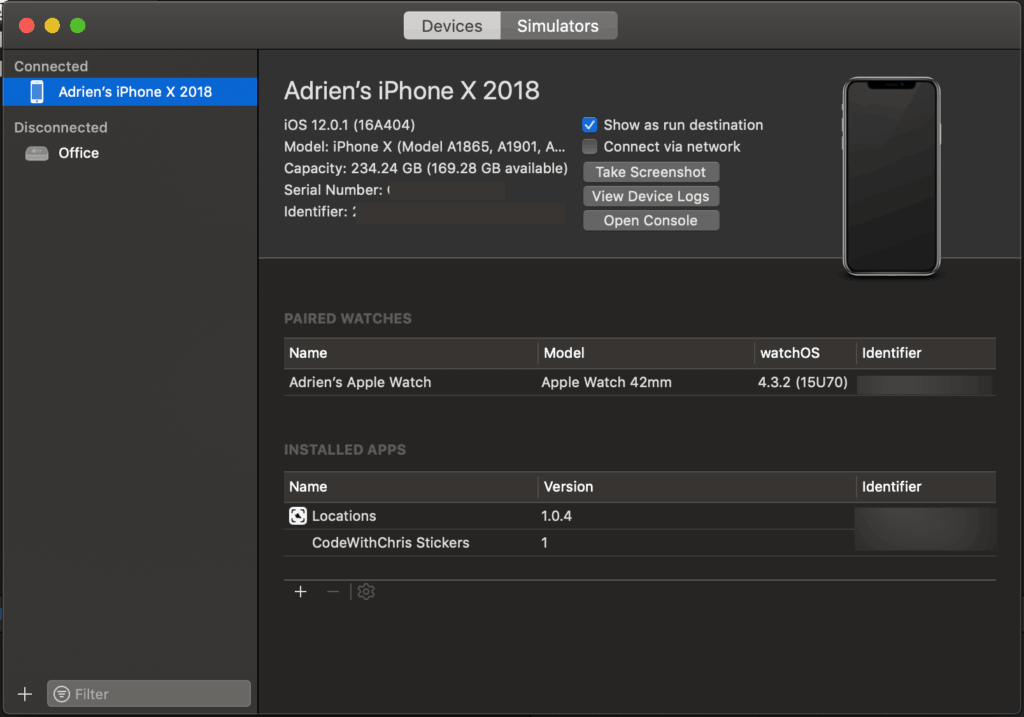
Don’t see your device name on the list of deployment targets? Make sure the USB of your device is well connected on both ends. If after checking the USB your device still does not show up in the list, let’s go check in the Devices and Simulators list of Xcode. You can find this window inside Window >> Devices and Simulators (Shift+Cmd+2).
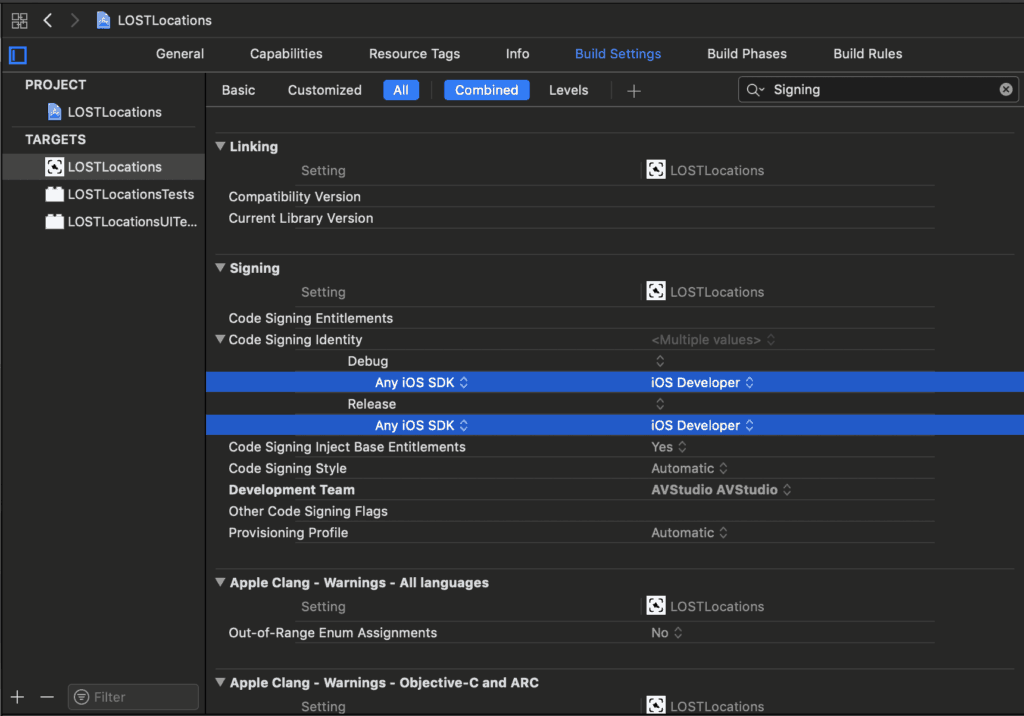
If Xcode gives your some error messages saying that the app is not set for iOS Development you have a couple of solutions:
(1) First is to check the Target’s Build Settings and search for “signing” and make sure that Code Signing Identity is set to iOS Developer.
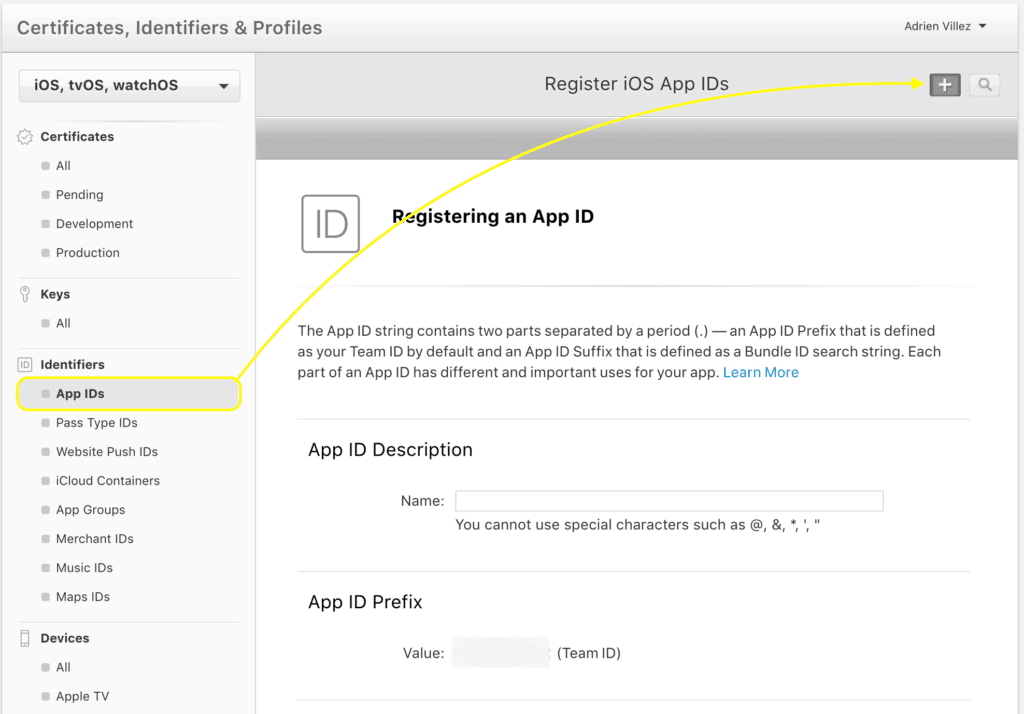
(2) Second, it happens that your app might just not be on the Developer Portal. This means that The certificate that Xcode create (or not) doesn’t know about the App Bundle Identifier which looks like this:
com.MyName.MyAppName
Go back to the Developer Portal and this time go to the App ID menu and select the “+” to create a new one. Give it a name to be able to identify it and scroll down until you find the Bundle ID field. If you select this field, there should be a list of app that currently are connected to your Xcode. Follow the steps to manually create this App ID.
Conclusion
It used to be pretty tedious to set up for the first time but today, Xcode 10 does 99% of the work for you and you probably didn’t even need to follow this whole article!
When you’re ready to publish your app, check out my tutorial that shows you how to submit and publish an app into the App Store.
Thanks for reading this far and if you found it helpful, please help me out by sharing it using the social buttons below. Thanks!
!!BONUS!! – Cut the Cord
When Xcode 9 came out, Apple gave us the ability to work on our apps while having more freedom with our iOS device. You do not have to keep your iPhone connected to your Mac via the USB port anymore! Yes, you can transfer your app to your phone and test it while walking around your office!
How does this work? Here is what you need to set this all up:
– Have a USB cable connected to your iPhone and Mac.
– Have both devices connected on the same WiFi network
– Have Xcode open.
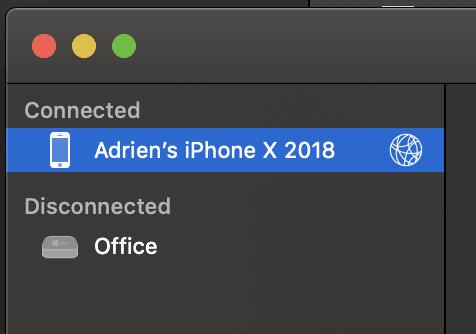
Ok, so first go to Window >> Devices and Simulators. If this is the first time you’ve plugged your phone into your Mac, select the “Trust” option when it pops up a dialog box. Once this is done, your phone should be listed in the list of Connected devices.
Now select the option next to the device image called [√] Connect via Network. Wait a couple of seconds and you should see a little network globe showing up next to your connected device. Disconnect the USB and voila!
Now enjoy the freedom of debugging your apps wirelessly while you spin around with your office chair! 🙂
is it possible to deploy app using mac on VMware
Hello I just started with this app-creating-thing and I have a question regarding your article, so I want to build an app for my personal use, I don’t seem to find what I need in the app store so I decided to give it a shot and create it myself, my question is, even if I want it only for me do I need to subscribe for apple’s developers program eventually? for what I understood I can install it on my phone but would have to do so every seven days right? o is there a way that I can keep it as a private project per say so? (btw great blog!)
Hi Chris.
I simply don´t understand one thing.
If i have a Xamarin IOS-app that works and is ready to deploy – how do i get the project from Visual Studio to XCode?
Hi, I could deploy my app to my iPhone, but I wonder if I could also deploy it to my friend’s iPhone (so different AppleID) for testing purpose?
Thanks for sharing your experience! Really enjoyed the reading.
Hi guys,
How to launch the app in different iPhone mobiles in same mac machine. Is it possible
Very informative article! Thanks so much for taking the time to write such a comprehensive article. I think I got all the information I was looking for. Thanks for this wonderful piece of article.
COULD NOT LOCATE DEVICE SUPPORT FILES.
This iphone 6 is running ios 12.2 (16E227), which may not be supported by this version of xcode
showing the above message as pop up in xcode . can’t run
This is Great. Was so easy.
Chris, honestly I haven’t finished reading the article… yet.
Let me tell you – I already sense greatness! just from the first couple paragraphs.
That explanation of why we have to go through so many steps – that was enough for me to go down and write this comment.
Besides $99, I’ve spend about 2 hours looking for a step by step tutorial on deploying an app on an actual device.
The biggest issue with all Xcode tutorials – once there is a new version of Xcode – you can toss majority of tutorials in the garbage.
Apple simple loves changing UI and hiding menu items, categories and other elements.
<3 Apple.
Q: Say I can run the app on my device as it is attached to a Mac running XCode, as this tutorial nicely describes. Now, does the app *stay* on a device once I unplug it from a computer, or does one have to go through the mentioned “ad-hoc distribute” procedure (which is more work I suppose) in order to have an app in your pocket, testing it on the go (at first, I would just test it myself, of course) ?! The answer to this would be important for me for deciding about should I purchase/enroll in the iOS developer program right away or not (or enroll a bit later when my app is ready to be given to beta testers). ?!
They app stays on your phone even after you unplug it! 🙂
Yes,
the app stays on your iPhone even after unplugging it from mac or iMac but it only stays for 7 days.
After 7 days you need to re-deploy, it means that you need to this procedure again or you can simply just buy the 99.9 dollar subscription from Apple.
Hi Chris,
Your tutorial is really informative. I am trying to deploy my app on my iPhone. I am using XCode 6.1.1, my phone is running iOS 8.1.1 and my project target is 7.1. I manually created all of my certificates and profiles in the Provisioning Portal. No matter how many times I try to set up everything correctly, I keep getting this error:
“CodeSign /Users/carielle/Library/Developer/Xcode/DerivedData/MyGreenCar-dxcteyhgrzypmxbhhitafnmtuznk/Build/Products/Debug-iphoneos/MyGreenCarTests.xctest
cd /Users/cariellespangenberg/MyGreencar-iPhone
export CODESIGN_ALLOCATE=/Applications/Xcode.app/Contents/Developer/Toolchains/XcodeDefault.xctoolchain/usr/bin/codesign_allocate
export PATH=”/Applications/Xcode.app/Contents/Developer/Platforms/iPhoneOS.platform/Developer/usr/bin:/Applications/Xcode.app/Contents/Developer/usr/bin:/usr/bin:/bin:/usr/sbin:/sbin”
Signing Identity: “iPhone Developer: Carielle”
/usr/bin/codesign –force –sign 3C0C17EC603A533C104EC5F5CD3592F0656196EB /Users/carielle/Library/Developer/Xcode/DerivedData/MyGreenCar-dxcteyhgrzypmxbhhitafnmtuznk/Build/Products/Debug-iphoneos/MyGreenCarTests.xctest
/Users/carielle/Library/Developer/Xcode/DerivedData/MyGreenCar-dxcteyhgrzypmxbhhitafnmtuznk/Build/Products/Debug-iphoneos/MyGreenCarTests.xctest: bundle format unrecognized, invalid, or unsuitable
Command /usr/bin/codesign failed with exit code 1″
Do you have any idea how I can resolve this error??
Hey Chris,
Thanks for your guides and videos; they are very helpful. I’m new to all of this, so following step by step works.
I’m currently stuck on the configuring your device for development step. I’m using Xcode 6, so it looks a bit different from what you are doing. Please let me know what I’m suppose to do in the Devices window. Is it easier to do this in Xcode 6?
I have the same issue. There are no use-for-development-button in the “Organizer – Devices” (Devices actually got it`s own window in “window” now).
However, thanks a lot! I am a new, norwegian developer, and your tutorials really help 😀 You`re awesome!
I`ve solved it! 😀 You simple choose your iOS device in the simulator selector when it`s connected with a cable. Then, when you hit Run, xcode downloads your app on your device. Good luck 😀
Hi Chris, Nice work.
So, the above gets you as far as deploying on your own registered ios device, but do you need to publish on the app store for others to get your app? I.e. are all apps published in this way?
Thanks
Chrisbuc
Hey Chris,
It’s a different and I outlined it here! https://codewithchris.com/submit-your-app-to-the-app-store/
The process has since changed slightly though but you can still take a look at that article to get a general idea of what’s involved.
I don’t like Apple now. I don’t plan to deploy my app to App Store. I just want to build apps for my iPhone or iPad. Why do I have to pay $99/year?
thanks for this. i got my app deployed today. i’m really excited to this test it and i’m planning to submit it to app store maybe tomorrow.
Awesome! Let me know when you submit it!
Does your response to Richard mean that Testflight no longer works? Every time I try to move my binary code over to Testflight, it fails.
Hey Jim, nope Testflight is working fine! Check my response to your other question below and hopefully that clears some of it up!
Is connecting devices by USB the only way to explicitly register the device IDs that are permitted to install the app? Is there another way?
Hey Richard, there are a lot of apps that you can download from the app store onto your device which will tell you that devices ID.
However, a lot of them failed to work after the latest update from Apple. You can still try it but i would recommend connecting your device.
Thanks Chris so much! I’ve been trying to do what you just taught me in ten minutes for 2 weeks and I still didn’t get it. I am trying the Quiz Demo from your premium course on my phone. 🙂
Hi Chris, Expertly described with the right amount of screenshots and details. I just joined the site. You’ve created a great resource, nice work!
When you state “The architecture setting needs to be changed…if you set your deployment target to 6.0” do you actually mean “…to something other than 7.0” When selecting any older iOS version, isn’t the idea typically to choose the architecture under which it was originally released, or is this really something specific only when selecting 6.0? I suppose the exception would be if you wanted to support an older iOS but still require newer hardware. This question is based just on what I’ve read here. I haven’t explored this specifically in Xcode so maybe it sorts this out automatically or I’m not getting something.
Hey John, your assumptions are correct. I guess I shouldn’t have been so explicit because it made it sound like a hard and fast rule!
Thanks for reading and commenting!
Extremely helpful! I have struggled for over a week to get three devices “provisioned”. Each time I seemed to encounter a different problem. Your directions should make it possible to isolate my errors more readily.
I know that one of my errors was to use the “ad hoc” mode of distribution. I assume that this is for companies that want to distribute apps within their work force. But it does not work with devices attached to the xCode machine — do company employees have to download the “ad hoc” apps from Apple?
Hey Jim, even with the ad hoc profile, you still have to add register each device in the member center and then include that device in the ad hoc provisioning profile and regenerate it.
The only difference is that with ad hoc profile, it can only contain one distribution certificate to ensure that the app is only controlled and distributed by one source.
With a development provisioning profile, multiple certificates can be used so that multiple developers can generate a build and distribute it.
Unfortunately either way, you have to explicitly register the device IDs that are permitted to install the app.
I am still confused! Don’t I need an “ad hoc” profile for Testflight distribution? And doesn’t that profile make possible the inclusion of many registered devices (more than “one distribution certificate”)? I eagerly await the tutorial on Testflight. . . .
Hey Jim, I can see that you have some confusion between the certificate vs the inclusion of registered devices.
Maybe this way will be clearer:
– Certificate means who can create a binary. 1 certificate means only that 1 person can create a binary. Multiple certificates mean multiple people can create a binary (useful when working in a team)
– Registered devices are which devices can install the app and this can be added to the provisioning profile for either type.
Hope that helps!
Hi Chris,
Thanks for showing us how to set up the app for deployment on the phone. I successfully deployed the app am testing on my phone and it was satisfying to see it on my phone.
This app is the quiz app you helped us with. Unfortunately, i have noticed that at the end of the quiz. The app does not refresh to all the user to retake the quiz. I was hoping you could help me figure out how i can fix this issue.
Thanks again!
Hey Sly, thanks for reading!
When the user finishes the quiz, you can set the _currentQuestion = questions[0] to start all over instead of displaying an alertview.