
Table of Contents
- Introduction
- Part 1: Memory Management using PhotoKit
- Part 2: Memory Management practices for a photo-grid UI
- Part 3: Creating the photo gallery app
- Part 4: Adding Multiple Gestures
Hello, and welcome back! This is part 3 of 4 of the Building a Photo Gallery app in SwiftUI series.
In Part 2 of the series, you learned about the built-in memory management mechanisms of LazyVGrid (Lazy Loading) and UICollectionView (cell reuse mechanism) and used this knowledge to improve the default behaviour of LazyVGrid to release all items that scroll way past the viewable area to save memory from accumulating.
In this post, we’ll continue building the grid UI to use the PhotoThumbnailView as the LazyVGrid‘s GridItem and navigate towards the photo detail view when we select a photo from the grid.
The Library View
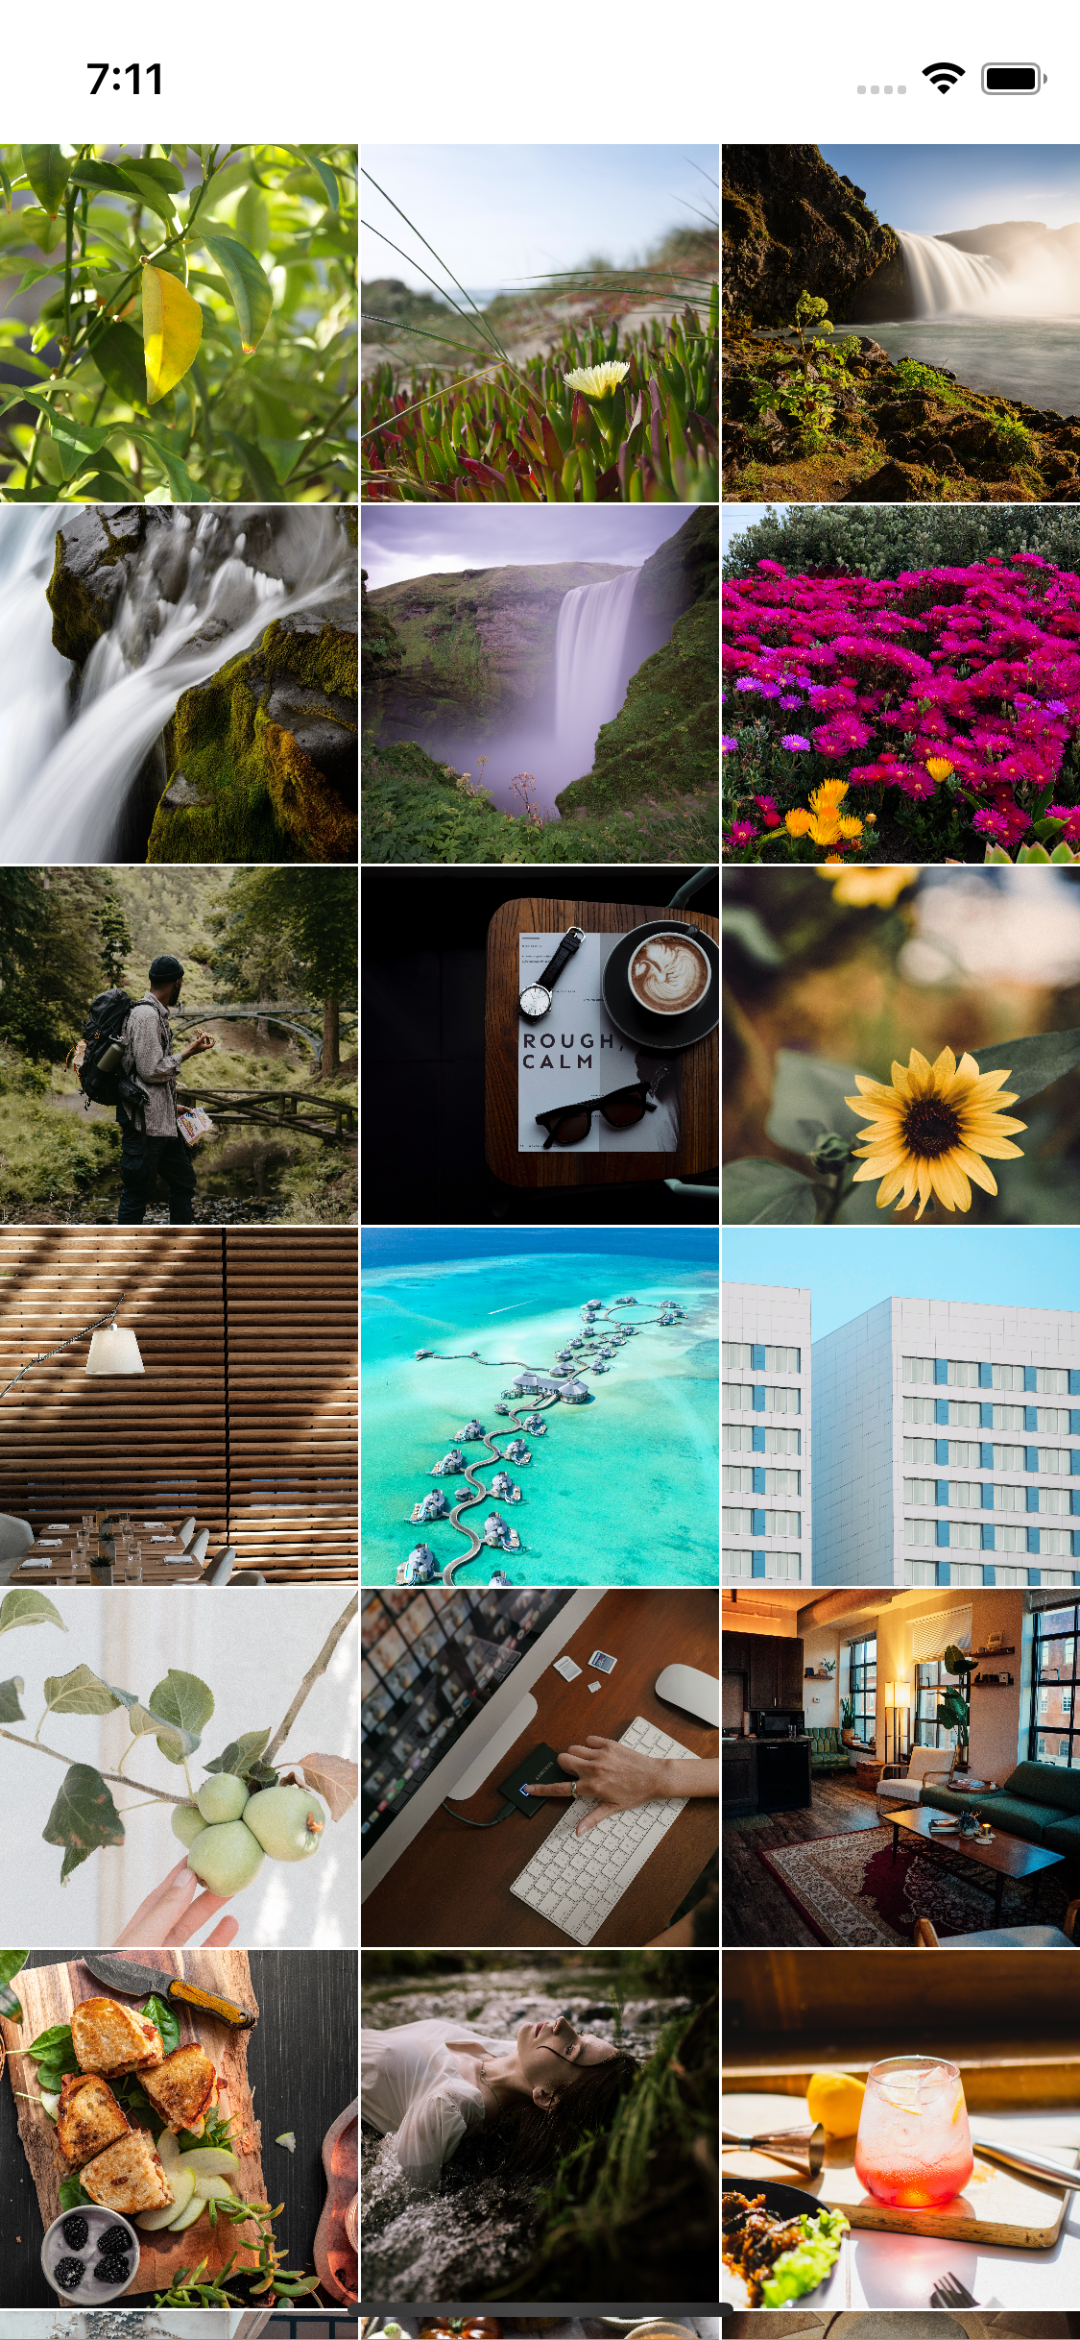
The library view uses a LazyVGrid wrapped in a ScrollView so it’s scrollable. For each photo item, we’ll be using the PhotoThumbnailView that we created from Part 2 of the series. To give you a quick recap, PhotoThumbnailView uses PhotoKit to fetch a photo from the library, and frees up the photo when it’s no longer needed to avoid the accumulation of memory use. We can guarantee that when the PhotoThumbnailView is shown on screen, it will fetch and show the photo for us, and when it scrolls past the viewable area, it will be freed from memory.
To get started, let’s begin by creating the PhotoLibraryView in SwiftUI:
import SwiftUI

struct PhotoLibraryView: View {
	...
}
We need to add the PhotoLibraryService as we need to ask the user for permission to access the user’s photo library. Once granted, we’ll use the PhotoLibraryService to fetch all photo references from the library using PhotoKit.
struct PhotoLibraryView: View {
	...
	/// Photo library will ask for permission to ask the user for
	/// Photo access, and will provide the photos as well.
    @EnvironmentObject var photoLibraryService: PhotoLibraryService
    ...
}
There’s a possibility that the user may revoke or decline access to the photo library, we must be able to handle this on the UI as well.
struct PhotoLibraryView: View {
	...
    /// Frag that will show the error prompt if the user does not
    /// grant the app Photo access.
    @State private var showErrorPrompt = false
    ...
}
We then add the code that will show the prompt to access the photo library and properly handle the scenario when the user declines access to the photo library.
extension PhotoLibraryView {
	func requestForAuthorizationIfNecessary() {
        // Make sure that the access granted by the user is
        // authorized, or limited access to make the app work. As
        // long as access is granted, even when limited, we can have
        // the photo library fetch the photos to be shown in the app.
        guard photoLibraryService.authorizationStatus != .authorized ||
                photoLibraryService.authorizationStatus != .limited
        else { return }
        photoLibraryService.requestAuthorization { error in
            guard error != nil else { return }
            showErrorPrompt = true
        }
    }
}
The next thing to do is to create the UI itself. We’ll do it as a computed property for readability.
extension PhotoLibraryView {
	var libraryView: some View {
        ScrollView {
            LazyVGrid(
	            /// We'll set a 3-column row with an adaptive width
	            /// of 100 for each grid item, and give it a spacing
	            /// of 1 pixel in between columns and in between rows
                columns: Array(
	                repeating: .init(.adaptive(minimum: 100), spacing: 1),
		            count: 3
		        ),
                spacing: 1
            ) {
	            /// We'll go through the photo references fetched by
	            /// the photo gallery and give a photo asset ID
	            /// into the PhotoThumbnailView so it knows what
	            /// image to load and show into the grid
                ForEach(photoLibraryService.results, id: \.self) { asset in
	                /// Wrap the PhotoThumbnailView into a button
	                /// so we can tap on it without overlapping
	                /// the tap area of each photo, as photos have
	                /// their aspect ratios, and may go out of
	                /// bounds of the square view.
                    Button {
						// TODO: Add tapping action here
                    } label: {
                        PhotoThumbnailView(assetLocalId: asset.localIdentifier)
                    }
                }
            }
        }
    }
}
Then add the libraryView property inside the body of the PhotoLibraryView.
struct PhotoLibraryView: View {
	...
    var body: some View {
        ZStack {
            // We'll show the photo library in a grid
            libraryView
                .onAppear {
                    // But first we need to make sure we got
                    // permission to Access the Photos library
                    requestForAuthorizationIfNecessary()
                }
                .alert(
                    // If in case the user won't grant permission,
                    // we'll show an alert to notify the user that
                    // access is required to use the app.
                    Text("This app requires photo library access to show your photos"),
                    isPresented: $showErrorPrompt
                ) {}
        }
    }
}
Now that we have the library view, go ahead and try running the app on a phone or in a simulator. If you grant photo library access, you should be able to see your photos on the app.
The Detail View
The detail view would be another SwiftUI that will transition a photo selected from the PhotoLibraryView. The selected photo will be focused on the detailed view. We’ll be adding more features to the detail view in the next part of the series but for now, let’s create the UI. We’ll call the detail view the PhotoDetailView.
import SwiftUI

struct PhotoDetailView: View {
	...
}
As discussed in Part 1 of this series, we should avoid passing around the actual photos themselves, and instead, we should pass around the photo references in between views. We have previously implemented this approach on both the PhotoLibraryView and the PhotoThumbnailView. The PhotoLibraryView will tell PhotoKit to fetch all photo references via the PhotoLibraryService, and each PhotoThumbnailView is given access to a local photo asset ID. The local asset ID is then used by the PhotoThumbnailView to fetch the actual photo itself from PhotoKit using the abstractions of the PhotoLibraryService.
Using the same approach, we will need to pass a photo local asset ID from the PhotoLibraryView into the PhotoDetailView and have the PhotoDetailView fetch a cached copy of the photo using the PhotoLibraryService.
Let’s start by adding the PhotoLibraryService into the PhotoDetailView.
struct PhotoDetailView: View {
	@EnvironmentObject var photoLibraryService: PhotoLibraryService
	...
}
And also add the function to fetch the cached copy of the photo itself using the asset local ID.
extension PhotoDetailView {
	func loadImageAsset() async {
        guard let uiImage = try? await photoLibraryService.fetchImage(
            byLocalIdentifier: assetLocalId
        ) else {
            image = nil
            return
        }
        image = Image(uiImage: uiImage)
    }

}
Then we’ll add a property that can hold a reference to the photo asset local ID, so it knows what photo to fetch using the PhotoLibraryService.
struct PhotoDetailView: View {
	...
    /// The reference id of the selected photo
    private var assetLocalId: PhotoLibraryService.PHAssetLocalIdentifier

    init(
        assetLocalId: PhotoLibraryService.PHAssetLocalIdentifier
    ) {
        self.assetLocalId = assetLocalId
    }
    ...
}
We would also like to add an optional Image since we don’t necessarily have a copy of a photo to show until the PhotoLibraryService completes fetching the cached copy of the image.
struct PhotoDetailView: View {
    /// The image view that will render the photo that we'll fetch
    /// later on. It is set to optional since we don't have an actual
    /// photo when this scene starts to render. We need to give time
    /// for the photo library service to fetch a cached copy
    /// of the photo using the asset id, so we'll set the image with
    /// the fetching photo at a later time.
    ///
    /// Fetching is generally fast, as photos are cached at this
    /// point. So you don't need to worry about photo rendering.
    ///
    /// Also, we would want to free up the image from the memory when
    /// this view disappears to save up memory.
    @State private var image: Image?
}
For the UI, we’ll create the photoView and put it as a computed property for readability purposes.
extension PhotoDetailView {
    var photoView: some View {
        GeometryReader { proxy in
            image?
                .resizable()
                .aspectRatio(contentMode: .fit)
                .frame(width: proxy.size.width * max(minZoomScale, zoomScale))
                .frame(maxHeight: .infinity)
        }
    }
}
Then we’ll use the photoView inside the body of PhotoDetailView.
struct PhotoDetailView: View {
    var body: some View {
        ZStack {
            // We'll need a black background regardless of the
            // environment's colour scheme.
            Color.black
                .ignoresSafeArea()

            // Show the image if it's available
            if let _ = image {
                photoView
            } else {
                // otherwise, show a spinning progress view
                ProgressView()
            }
        }
        // We need to use the task to work on a concurrent request to
        // load the image from the photo library service, which is an
        // asynchronous work.
        .task {
            await loadImageAsset()
        }
        // Finally, when the view disappears, we need to free it up
        // from the memory
        .onDisappear {
            image = nil
        }
    }
}
Selecting a Photo and Doing Transitions
Now that we have both the PhotoLibraryView and the PhotoDetailView, we need to add the transition between the two views when a photo is selected.
Let’s begin by adding the necessary changes to the PhotoDetailView
struct PhotoDetailView: View {
	...
	/// Flag that will close the detail view if set to false
    @Binding var showDetailView: Bool
    ...
    /// Update your init to accept showDetailView binding
	init(
        assetLocalId: PhotoLibraryService.PHAssetLocalIdentifier,
        showDetailView: Binding<Bool>
    ) {
        self.assetLocalId = assetLocalId
        self._showDetailView = showDetailView
    }
}
Then we also need to add additional subviews for the close button so we can transition back from the PhotoDetailView into the PhotoLibraryView when the close button is pressed.
extension PhotoDetailView: View {
	var photoView: some View { ... }

    var toolbarView: some View {
        HStack {
            closeButton
        }
        .frame(maxWidth: .infinity, alignment: .trailing)
        .padding(.horizontal, 20)
        .frame(height: 44)
        .frame(maxHeight: .infinity, alignment: .top)
    }

    var closeButton: some View {
        Button {
            showDetailView = false
        } label: {
            Image(systemName: "xmark")
                .font(.body.bold())
                .aspectRatio(contentMode: .fit)
                .foregroundColor(.white)
                .frame(width: 16, height: 16)
                .padding(.all, 12)
                .background(.ultraThinMaterial, in: Circle())
        }
    }
}
We’ll then add the toolbar into the body so it will be included when PhotoDetailView is shown onscreen.
struct PhotoDetailView: View {
	var body: some View {
        ZStack {
            // We'll need a black background regardless of the
            // environment's colour scheme.
            Color.black
                .ignoresSafeArea()

            // Show the image if it's available
            if let _ = image {
                photoView
            } else {
                // otherwise, show a spinning progress view
                ProgressView()
            }
        }
        // The toolbar view holds the close button
        .overlay(
            toolbarView
        )
        // We need to use a task to work on a concurrent request to
        // load the image from the photo library service, which is an
        // asynchronous work.
        .task {
            await loadImageAsset()
        }
        // Finally, when the view disappears, we need to free it up
        // from the memory
        .onDisappear {
            image = nil
        }
    }
}
Let’s go back into the PhotoLibraryView so we can work on the changes for transition as well.
Let’s begin by adding a new Boolean state that will determine if the PhotoDetailView is shown or not, and a state that will hold the photo asset ID reference of the selected photo.
struct PhotoLibraryView: View {
	...
    /// Flag that will show the detail view when a photo is selected
    /// from the grid.
    @State private var showDetailView = false

    /// Selecting a photo from the grid will show a detail view where
    /// the user can zoom/pan.
    /// To do so, we store a reference to the selected photo
    /// here.
    @State private var selectedPhotoAssetId: PhotoLibraryService.PHAssetLocalIdentifier = .empty
	...
}
We will need to add a new subview for the PhotoDetailView so we can put it on top of the ZStack when a photo gets selected from the grid.
extension PhotoLibraryView {
	var libraryView: some View { ... }

    var detailView: some View {
        ForEach(photoLibraryService.results, id: \.self) { asset in
            if asset.localIdentifier == selectedPhotoAssetId {
                PhotoDetailView(
                    assetLocalId: selectedPhotoAssetId,
                    showDetailView: $showDetailView
                )
                // We need to make sure that the detail view gets the
                // top layer of the ZStack when rendering. We don't
                // want to hide the detail view underneath the photo
                // grid when we select a photo. So we'll assign it a
                // higher zIndex value.
                .zIndex(1)
                // We would also want to add a small transition
                // easeIn/easeOut animations during the
                // photo grid to detail view transition and vice
                // versa.
                .transition(
                    .asymmetric(
                        insertion: .opacity.animation(.easeIn),
                        removal: .opacity.animation(.easeOut)
                    )
                )
            }
        }
    }
}
We also need to update the libraryView to set some Button actions when tapping a PhotoThumbnailView from the photo grid.
extension PhotoLibraryView {
	var libraryView: some View {
        ScrollView {
            LazyVGrid(...) {
                ForEach(photoLibraryService.results, id: \.self) { asset in
                    Button {
						/// Add them here
                        showDetailView = true
                        selectedPhotoAssetId = asset.localIdentifier
                    } label: {
                        PhotoThumbnailView(assetLocalId: asset.localIdentifier)
                    }
                }
            }
        }
    }

	var detailView: some View { ... }
}
Lastly, we need to include the PhotoDetailView in the PhotoLibraryView‘s ZStack when a photo is selected from the grid. To do this, we need to update the body to include:
struct PhotoLibraryView: some View {
	...
	var body: some View {
		ZStack {
			libraryView
				.onAppear { ... }
				.alert(...) {}


            // We'll show the detail view on top of the ZStack if a
            // photo is selected
            if showDetailView {
                detailView
            }
		}
	}
}
You can try running the app again at this point, and you should be able to select a photo from the grid. The selected photo should be shown in the PhotoDetailView, and when you press back, you should also be navigated back into the PhotoLibraryView.
In this post, we have put together what we have previously built and created the UI for the photo gallery app. We now have a memory performant photo grid, and we also made sure that passing along photos by references won’t cause any duplication in our memory.
In the next and final part of the series, I’m going to show you how to add multiple gestures so we can provide functionalities such as double tap to zoom, pinching to zoom, and panning the photo. I hope you liked reading the series thus far. I’ll see you at the next one!