If you want to learn Swift programming (even if you’ve never coded before), then you’re in the right place!
In this Swift tutorial, you’ll learn how to read and write Swift code, complete exercises, and ultimately become a Swift wiz!
I’ve also compiled a Swift cheat sheet for beginners which you can download and keep beside you as you learn. It covers the most common syntax that you’ll learn in the tutorial below.
Another good supplementary resource is Apple’s own Swift programming language guide that contains in-depth technical documentation of the Swift programming language.
If you prefer to learn via video tutorials instead, check out the video version of this tutorial here.
Table of Contents:
Xcode Setup

Getting Started
In order to get started with making iOS apps, you need to download a program called Xcode from the Mac App Store. Xcode is what is known as an integrated development environment or IDE for short. In general terms, an IDE is simply a program that provides you with the necessary tools to write a piece of software. Xcode in particular helps you run and test Swift code on your computer.
Start a New Playground
Once you have Xcode installed and launched, you should see the following welcome dialogue:
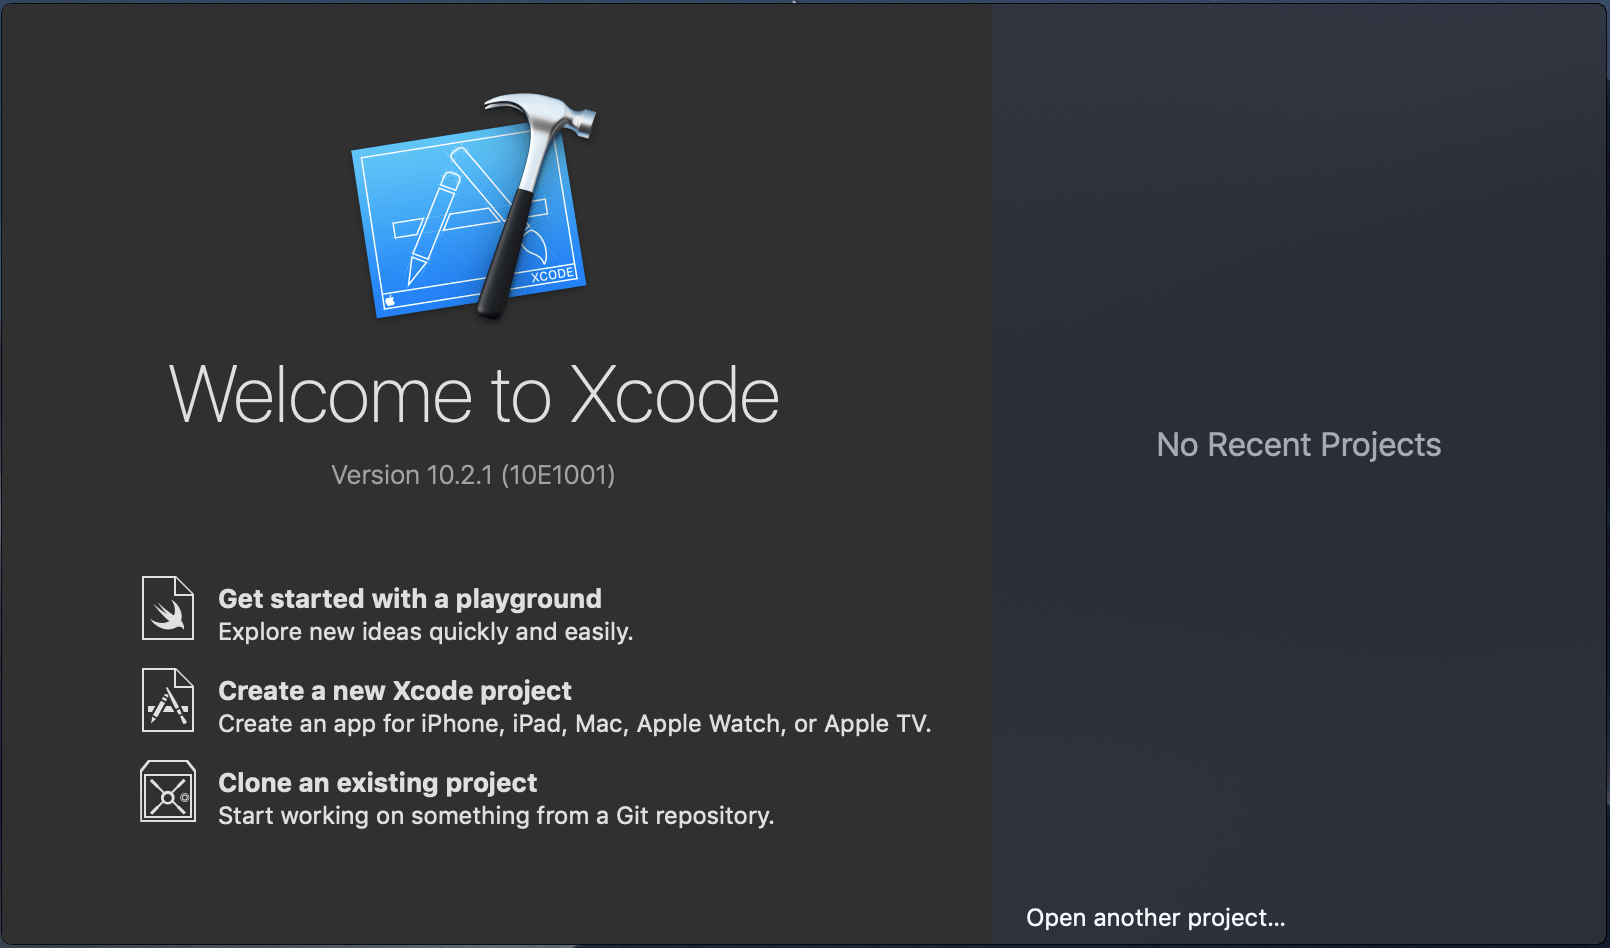
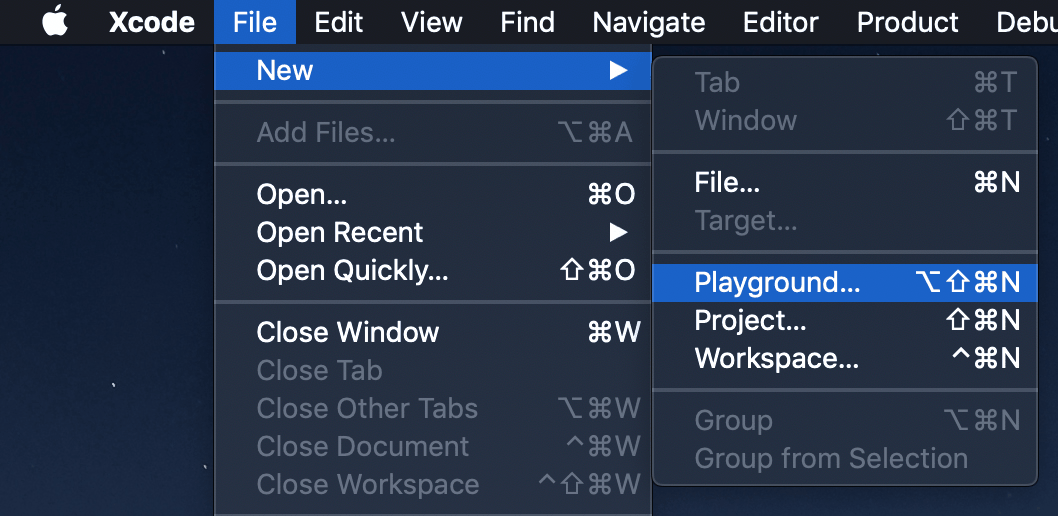
If you don’t get this welcome dialogue, then you can always go up to the “File” menu, go under “New,” and then choose “Playground.”
Click on “Get started with a playground.” The dialog that pops up allows you to choose what type of playground you want to create. For the purposes of this article choose “Blank” under “iOS.”

You can save your playground anywhere you want. Make sure you remember where you save it so you can easily access it. In my case, I usually save it on my desktop.
Different Elements of the Playground
Here are the most important elements of the playground that you need to focus on for now:
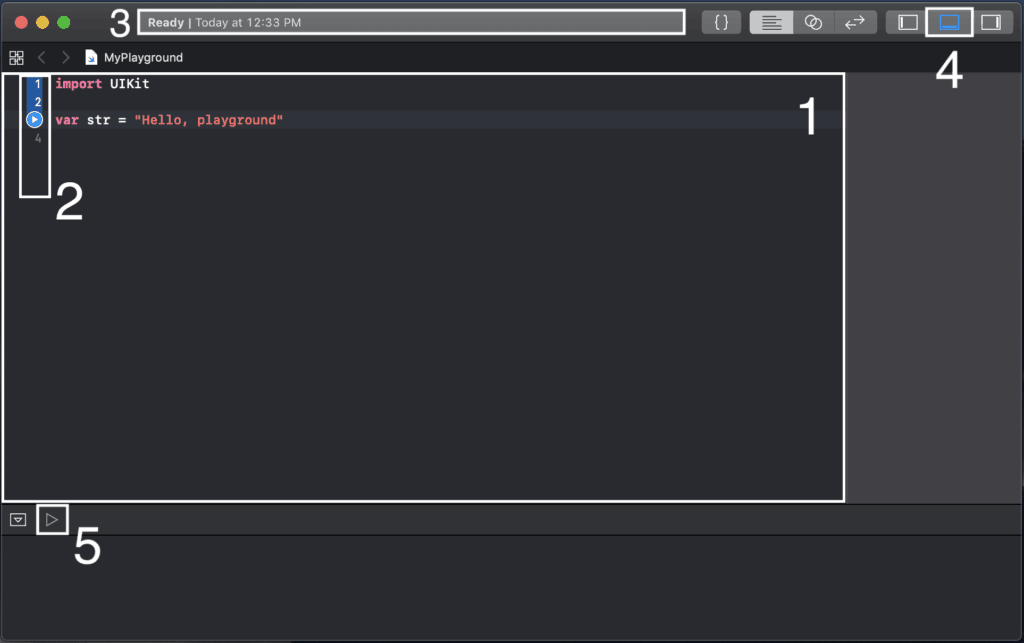
1. Code editor – this is where you’re going to be typing your Swift code.
2. Line numbers – these will help you refer to different lines of code.
If you don’t have line numbers and you want to enable them, then just go to Xcode > Preferences > Text Editing > Line Numbers, and you can turn those line numbers on or off.
You’ll also notice that when you hover your mouse over the different lines, a blue play icon follows. Clicking on the play icon executes the code highlighted in blue on the left. For example, if I hover over line 2 below and click play, Xcode will only run the first line of code.

However, if I hover over line 4 and run it, then Xcode will run all the code up to and including that point.

3. Status bar – tells you the current status of the playground.

If the status says that it is ready for you, Xcode is ready to accept your code and run it.
4. Show/Hide Debug – allows you to hide or show the debug or console area: the place where we’re going to be testing our Swift code.

5. Execute Playground – runs all the code in your playground
Holding down the play button gives you two options: “Automatically Run” and “Manually Run.”

The “Manually Run” mode means you need to click either click this play button or the blue play icon to run your code. Otherwise, setting it to “Automatically Run” means Xcode will automatically execute your playground and update the results every time you edit the code.
The automatic mode can be a little buggy at times. Sometimes Xcode won’t update the results when it’s constantly running your playground. If this happens, just click the stop button (same place as the play button), and hold down the play button to change it to “Manually Run.” When the status bar says “Ready,” you will be able to click and run your code again.
Variables and Constants

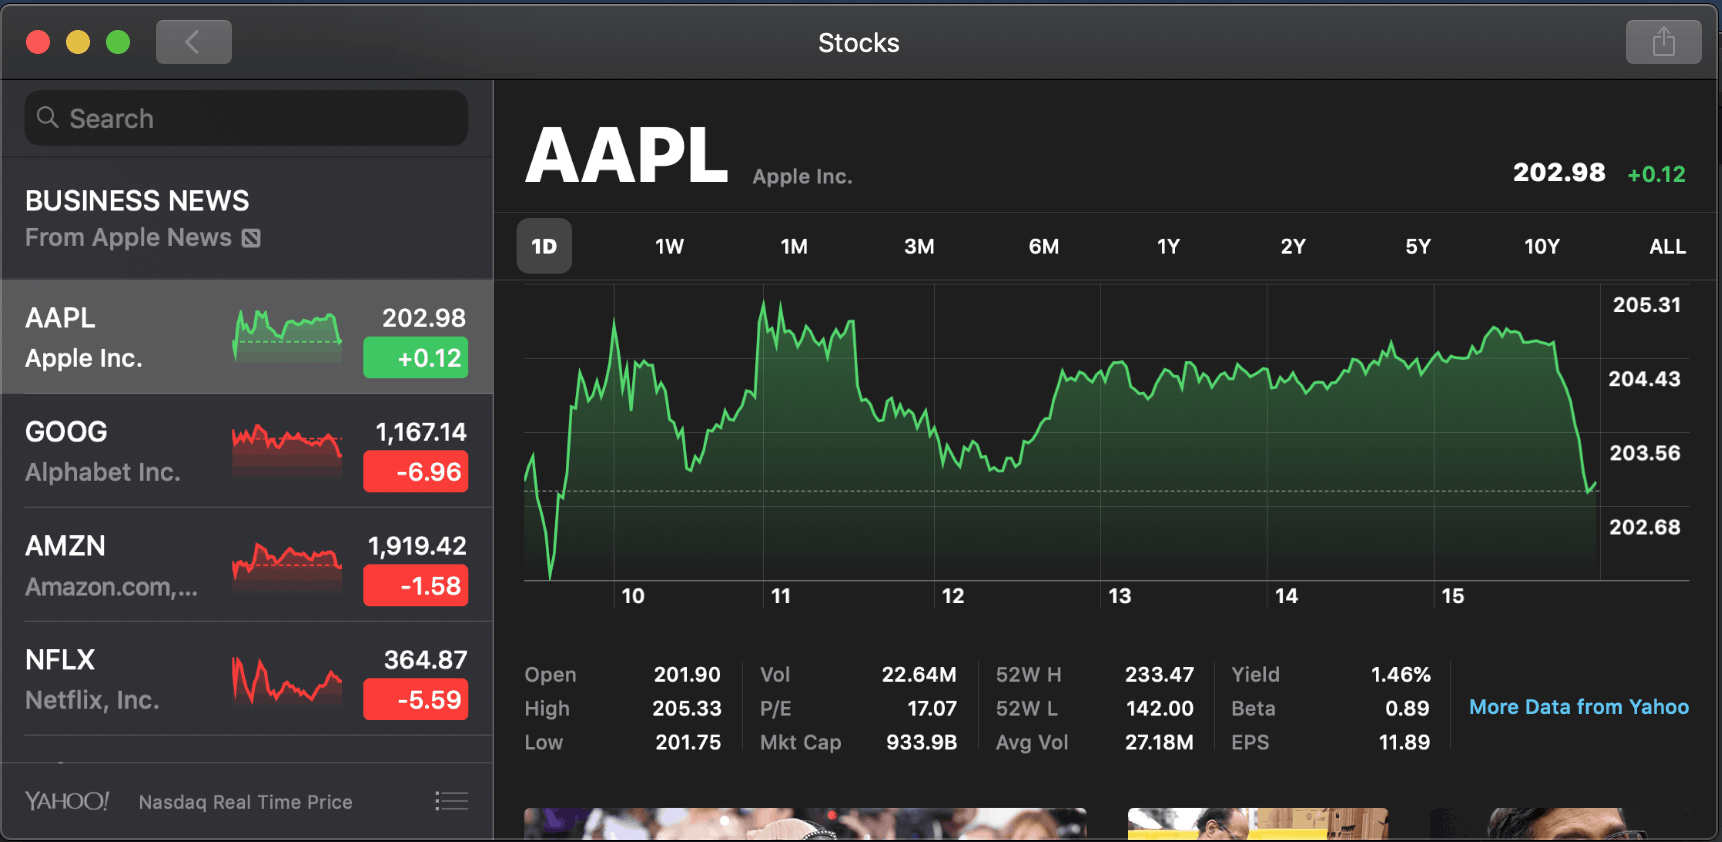
When you’re coding, you need to have the mindset that you are giving the computer instructions on how to process data. If you were to build a stock portfolio app, for example, then you’d have to write code to tell the computer where to grab the stock prices, tell the computer how to manipulate the prices, and come up with the percentage lost or percentage gained. Then, you’d have to write code to instruct the computer how to display that to the user in a table format.
Similarly, to build a photo app like Instagram, you’d have to write code to tell the computer where to grab the images and how to display them to the user. Furthermore, if the user tries to upload a photo to their account, you’ll need to have code explaining how to take the image data from the user’s phone and upload it to a file server and make an entry in a database.
Thus, you’re always working with data when building an app. In this lesson, we are going to show some simple pieces of data to you. Take a look at the playground below:
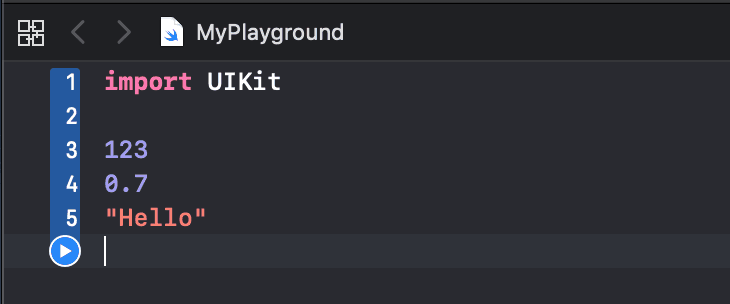
Here, we have different types of data. Data can be numbers like 123 and the decimal 0.7 as shown on lines 3 and 4. We can even have text data like "Hello" surrounded by double quotes on line 5.
Swift Variables
Your computer stores data in its memory to keep track of where the data is and what it is. For us to work with data, we need a way to refer to it in our programs. This is where variables come in, to help keep track of data within an app.
Let’s learn how to create, or declare, a new variable to track a piece of data in memory. First, type the keyword var, followed by a space, and your variable’s name. You can name it anything you want, but the name should clearly describe the data the variable will contain. For example, if I had a piece of data for someone’s first name, I might name my variable firstName.
Following your variable name, add an equal sign and then the piece of data you want to keep track of. Since we named this variable “firstName,” we’ll give it a piece of text data, namely the word “Tom.” Note: the single equal sign lets us assign a piece of data to the firstName variable. A complete example of the variable declaration is given below.
var firstName = "Tom"
Here’s how our variable looks in the playground:
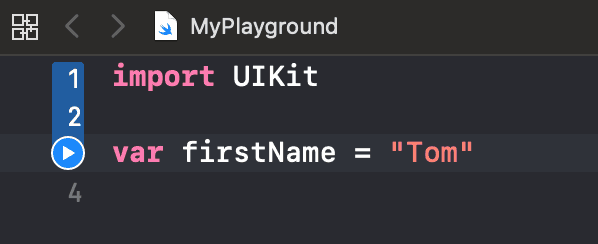
We’ve created a new variable called firstName and assigned the text data “Tom” to it. Now, whenever we want to work with that piece of data, “Tom”, we can just use our variable firstName in its place.
Let’s use firstName by printing “Tom” to the console. We do this with the print() command, which outputs to the console whatever data you put in the middle of its parentheses. In that case, let’s add firstName in the parentheses and click the play button to execute our code:
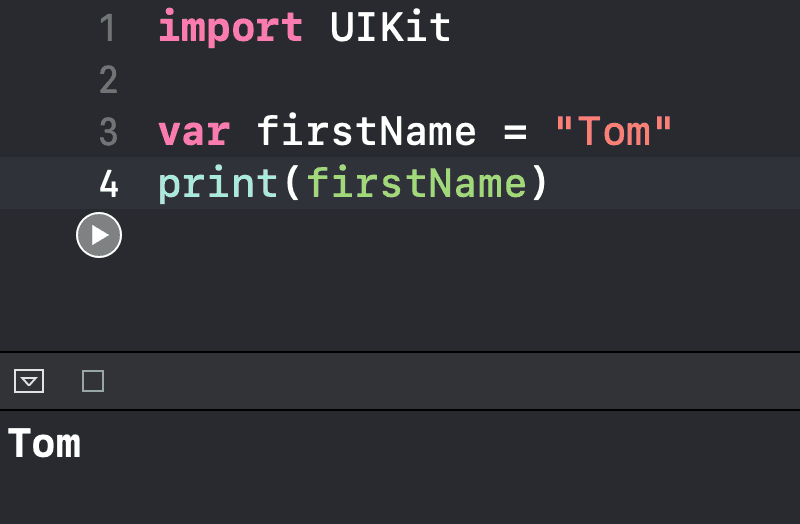
As shown, we successfully printed our variable’s data, “Tom”. Remember, the print() command tells Xcode to print the data that the variable firstName references.
Although we’ve only worked with text data until now, you can store a variety of data in variables. For example, I can declare a variable called stockPrice and set it equal to the number 100:
var stockPrice = 100
Something to note when working with variables is that you can always change a variable’s value when you decide it should store something different. Check out the example below:
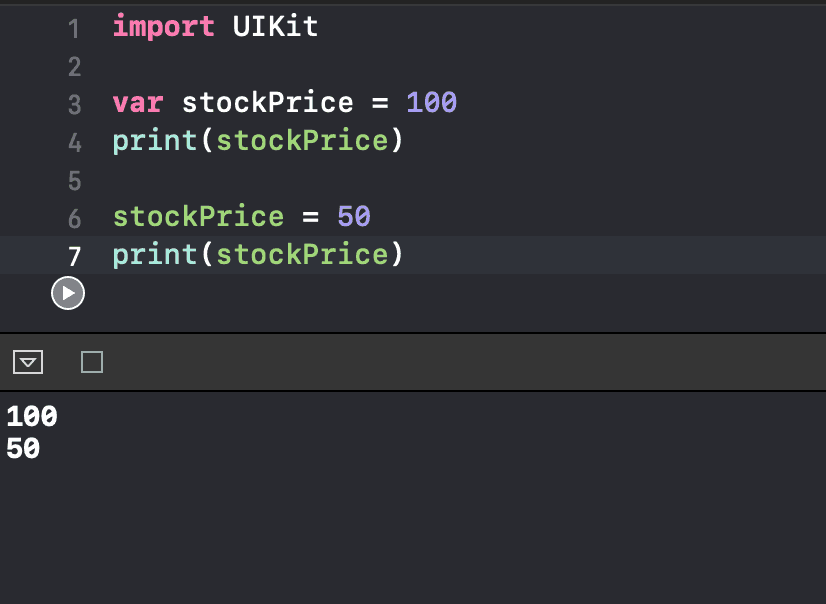
Here, we declare a variable, stockPrice, and set it to 100 on line 3, then print it out on line 4. Afterwards, we reassign the value of stockPrice to 50 on line 6 and print it again on line 7. Note: we use the var keyword only to create (declare) new variables. We don’t need var to change the value of an existing variable. Where did the original value of 100 go after we changed stockPrice to 50? Well, when you change the value a variable stores, you lose track of its old data and can no longer access it.
So far, it looks like variables are quite flexible since they can store whatever we want. However, you cannot assign data of a different type to what your variable originally had. For example, because stockPrice initially had a number, we can’t give it text data later on:
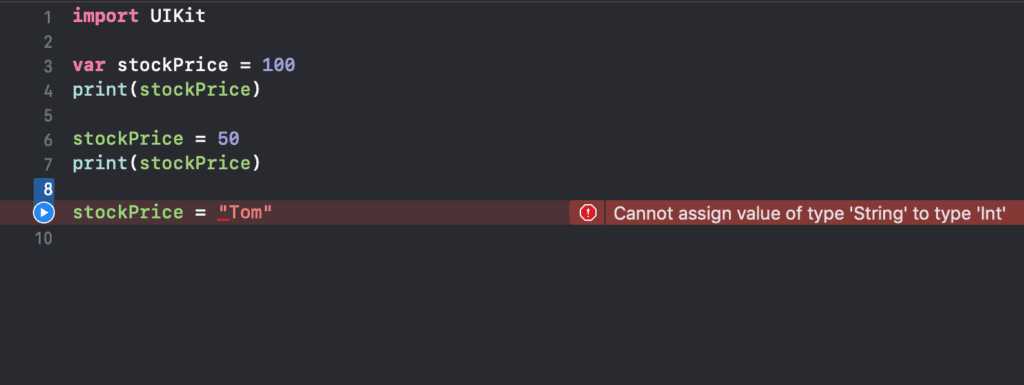
Xcode ends up giving us an error if we try assigning “Tom” to stockPrice. This is because stockPrice only expects to store number data. When we talk about data types in the next lesson, I will explain why this is so in more detail. For now, just remember that variables only expect to store the same kinds of data as whatever you give them initially. In our case, stockPrice can only accept number data, and firstName can only accept text data.
Swift Constants
Now that you know how to declare new variables and assign pieces of data to them, let’s look at a similar construct used to store data called constants:
let lastName = "Smith"
Notice that the code above looks quite similar to a variable declaration. The only difference is we use the let keyword instead of var. The difference between a constant and a variable is that you cannot reassign a different piece of data to a constant after declaring it. If you tried doing so, Xcode will give you an error as shown below:

Here, Xcode tells me that I cannot assign something else to the constant lastName because it was already assigned the value of “Smith”.
At this point, it seems that variables are much more flexible than constants. Despite this, it’s more preferable in some cases to use constants over variables, like to keep track of data you don’t intend to change later. Over the course of your Swift journey, you’ll build a sense of when to use variables versus constants. Also, if your program uses variables that never change their data, Xcode will suggest changing the variables into constants instead. In those cases, it’s simply a matter of changing the var keyword to the let keyword in the variables’ declarations.
Best Practices for Naming Variables and Constants
I mentioned before that your variable names should be descriptive so you know what kind of data they hold. There’s a fine balance to upkeep when it comes to the length of your names. If they are too long, they can get hard to read. If they are too short like str, you won’t know what kind of data the variable holds. Ideally, a variable name should be one to four words long.
A variable name such as veryfirstname can also be hard to read, though. Thus, a good capitalization method to use is camel casing. Camel casing simply means starting the first word with a lowercase letter, and starting every subsequent word with an uppercase letter. Then, veryfirstname in camel casing would be veryFirstName, which is much easier to read.
Chapter Recap
- Variables and constants are used to keep track of data in your app.
- Use the
varandletkeywords to declare new variables and constants. - Use the equal sign to assign data to a variable or constant.
- Use camel case as a best practice for naming your variables and constants.
- Constants are like variables, but you can’t reassign data to them after the initial assignment.
Data Types

Data in apps can be as simple as text or numbers or as complex as photo data or employee records in a company database. In this chapter, we’ll talk about different data types in Swift. To start, let’s look at a line of code from the previous chapter:
var str = "Hello, playground"
Above, we’ve declared a variable called str, and assigned a piece of string or text data to it. I previously mentioned you can’t change the kind of data a variable stores, as in the following line:
str = 20
Most Common Data Types in Swift
In Swift, there are several different types of data, but these are the most common ones:
- String – this is just text data. The name basically refers to having a string of characters:
var aString = "This is a string" - Int – this is short for “integer.” This type represents whole numbers: positive and negative.
var myInt = 108var itemsInStock = -20 - Float and Double – these two represent decimal numbers. The difference is that Doubles have more precision than Floats, so they can store longer decimal numbers.
let pi = 3.15159265359 - Boolean – Swift shortens this to “Bool.” Booleans can only store either “true” or “false”. They are perfect for when there are only one of two options.
var isTVOn = true
By no means are these the only data types in Swift. However, they are the most common data types you will work with for a while.
How to Specify the Data Type for your Variable or Constant
We learned in the last lesson that we need the var keyword to declare new variables, or the let keyword for new constants:
var firstName = "Tom"
let lastName = "Smith"
But whether you’re declaring a variable or a constant, there is, in fact, an optional part of the declaration we left out. After your variable or constant name, you can add a colon and the type of data you expect this variable or constant to contain:
var firstName: String = "Tom"
In this case, we are explicitly telling Swift that firstName will only store String, or text, data. Why didn’t we have to specify these data types before? Well, that’s because we don’t have to. If a variable’s data type is unspecified, Swift will automatically figure it out from the first piece of data you assign to the variable. Here’s what I mean:
var str = 100
If I first give a variable an integer like the 100 above, Swift will automatically give my variable str an integer data type:

Then, if we try assigning a string to it later, Xcode tells us we can’t. But why doesn’t it work this way? Different types of data are stored differently in memory. When you declare a variable str to store integers, str will only be set up to store integers. If you declare that a variable should store string data, it gets set up differently in memory. But don’t fret – in a later chapter, I will introduce a data type that will give you more flexibility to store different kinds of data.
Some of you might be thinking that not being able to store what you want in a variable when you want seems too limiting. However, if you think about it, this has the advantage of setting your expectations as a coder. If your variable could store just any kind of data, sometimes you wouldn’t know what to expect from it. Too much freedom isn’t ideal because it makes way for more possible errors. When programming, our greatest enemy is actually us making mistakes, either in our logic or the way that we’ve coded something.
Examples of Data Types
Let’s see some examples of specifying data types when declaring variables:
- String :
var str: String = "Tom" - Int:
var anInteger: Int = 100 - Float:
var aFloat: Float = 0.2 - Double:
var aDouble: Double = 0.3 - Boolean:
var aBool: Bool = true
Because Swift can automatically determine the data types in these cases, we can leave them off:
var str = "Tom"
var anInteger = 100
var aFloat = 0.2
var aDouble = 0.3
var aBool = true
However, the float and double examples are slightly misleading since Double is the default decimal data type for Swift. Thus, in the example above, Swift would think aFloat is a Double. In this case, we would need to keep the data type around if we want to enforce aFloat as a Float.
Chapter Recap
String,Int,Float/Double, andBooleanare the most common data types you will work with in Swift.- You can specify a data type when declaring a variable or constant. Leaving it off will give the variable or constant the data type of the first piece of data you assign to it.
Swift Math Operators
In this chapter, we’ll examine some basic math operations that you can use with constants, variables, and equations in general. Swift covers your basic math operations: addition, subtraction, multiplication, and division (syntax for all shown below).
You can also chain these operators together, so something like the following would evaluate to 8:
print(a * b * c)
Besides the basic math operators, there are several operators in Swift you might not realize exist. For example, we can use the power function for exponentials, as demonstrated below. This function accepts two numbers, either doubles or ints, the base and the exponent to raise the base to. Thus, the example below evaluates to 8.
pow(2, 3)
Another common function at our disposal is sqrt(). For example, sqrt(16) would give us 4.
One operator that you might not be familiar with is ceiling, or ceil(), which rounds any number up to the next whole number. In the example below, it rounds 4.5 up to 5. Whole numbers get rounded up to themselves.
Similarly, there is floor(), which rounds any number down to the next whole number. Below, we have floor() rounding 4.5 down to 4. Again, whole numbers are rounded down to themselves.
Incrementing and Decrementing Numbers
Let’s say you want to increment a variable by one, in this case the variable a. As shown below, you would take a, add 1 to it, and reassign it back to a. If we run this code in a playground, we would see that a now contains 3.
The equivalent, shorthand way of writing the same thing is to use += instead:
a += 1
Similarly, you can use the shorthand way of decrementing numbers, as shown below:
a -= 1
This shorthand also works with multiplication (*=) and division (/=). This shorthand exists because you tend to modify variables through simple math operations quite often when expressing your logic or writing algorithms in your code.
If Statement

Now that you know all about variables, constants, and data types, we’re going to talk about a staple construct that exists in all programming languages in some form or another: the if statement. After this chapter, you will be able to write code that can make its own decisions!
Let’s start with this piece of code:
let a = 10
print("a is less than 10")
You can see on line 1 we create a constant, a, with a value of 10. Afterwards, we have a print statement saying “a is less than 10.” Running this code gives us the following output:
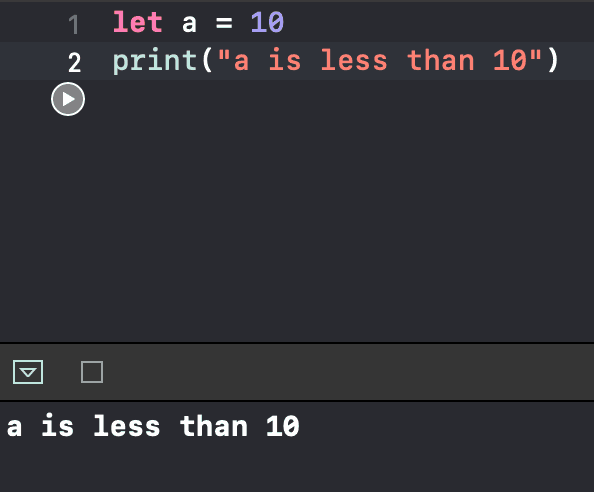
Our console shows that “a is less than 10.” Of course, this isn’t true because a is 10. We don’t want that print statement to show up in this case, but we all know it’s going to run eventually each time we execute the code. So, what do we do? This is where we can use an if statement, which allows us to say we only want to run that print statement under certain conditions.
Syntax
if condition {
    // some code
}
As you can see, an if statement starts with the if keyword followed by the condition you’re going to test. Then you add a pair of braces (or curly brackets). Any code inside those braces will only run if your condition equates to true. If the condition is false, the code in your braces will not run. Let’s see how we can apply this to our example with a:
let a = 10

if a < 10 {
    print("a is less than 10")
}
Notice that on line 3, we’ve specified a condition that we would read as “a less than 10.” To represent that in code, we use the “less than” (<) operator, which checks if what’s on the left side is less than what’s on the right side. Here, we’ve got a on the left and 10 on the right. After this condition, we add our opening brace and the closing brace on line 5. Always make sure that there’s a space in between your opening brace and your condition.
Let’s try running this code in a playground:
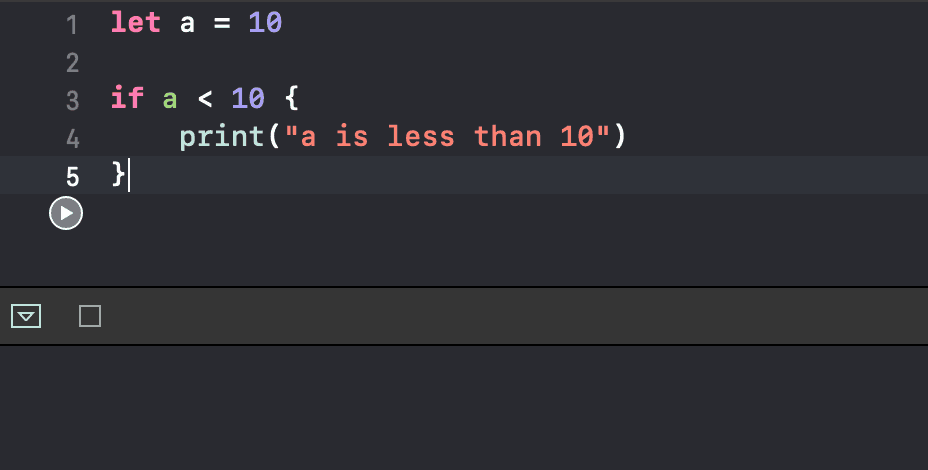
Now we see the console is empty. What happened here was that it checked the condition a < 10. Because a is 10, it’s clearly not less than 10. Thus, the condition equated to false, and it didn’t run our print statement inside the braces for that condition.
Now, let’s try making that condition true:
let a = 10

if a <= 10 {
    print("a is less than 10")
}
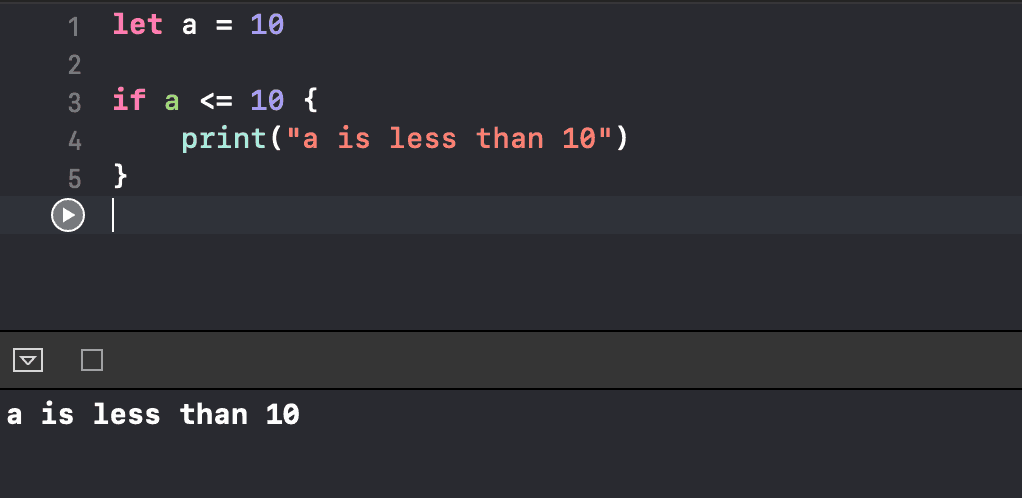
In our condition on line 3, we added an equal sign beside the less than operator so it would read “a less than or equal to 10.” Now with a being 10, our condition is true. If we run this code, we should see our message in the console. This is really cool because you can now write code that runs based on a condition, instead of every time your code executes.
Else If Clause
Although the standard if statement can be useful in certain situations, oftentimes, we have multiple conditions that we need to test. For situations like these, we’ll be using another feature of the if statement called an “else if” clause. Here’s its structure:
if condition1 {
    // some code
} else if condition2 {
    // some code
}
Right after the closing brace of our if statement, we added the keyword else and then if again. Afterwards, we added another condition, followed by another set of braces. Thus, we are effectively creating another if statement after the else keyword. Now, we have multiple branches of code to run that we can choose from, and Swift will only ever run one of these code branches.
However, how does it choose which branch to run? First it checks the condition in your initial “if” branch. If that condition is false, it skips right down to check the next condition in your “else if” branch. If that’s also false, it simply skips again without doing anything. However, if any one of those conditions was true, then Swift would run its respective branch of code.
To use an analogy, imagine yourself standing in the middle of crossroads with two paths, one going left and one going right, and you can only go down one path. An if statement works similarly, except that it always evaluates the conditions from top to bottom. The moment it finds a true condition, it runs the block of code associated with that branch and ignores everything underneath it.
To see this in action, let’s change a from our example above to 20.
let a = 20

if a <= 10 {
    print("a is less than or equal to 10")
}
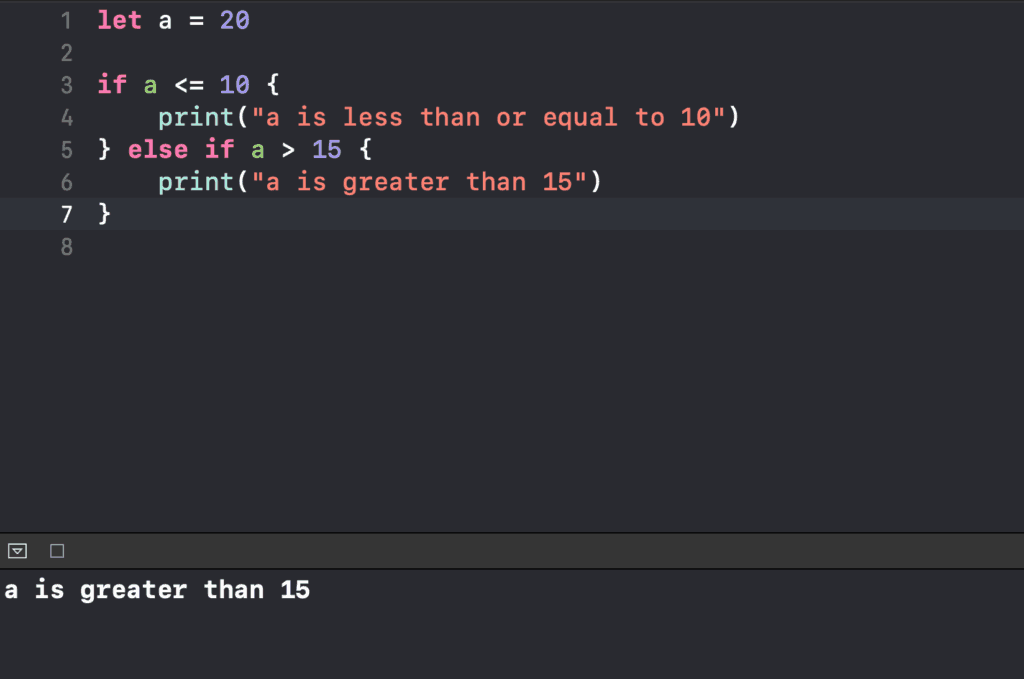
We know the print statement won’t show because our condition is false, which we can verify by running the code. However, on line 5 in the example below, we’ve added an “else if” clause followed by the condition a > 15. Running this now prints out “a is greater than 15.”
Now, say on line 1 we change the value of a to 5 and make the condition on line 5 a < 15. Both conditions are now technically true, so what do you think will happen?
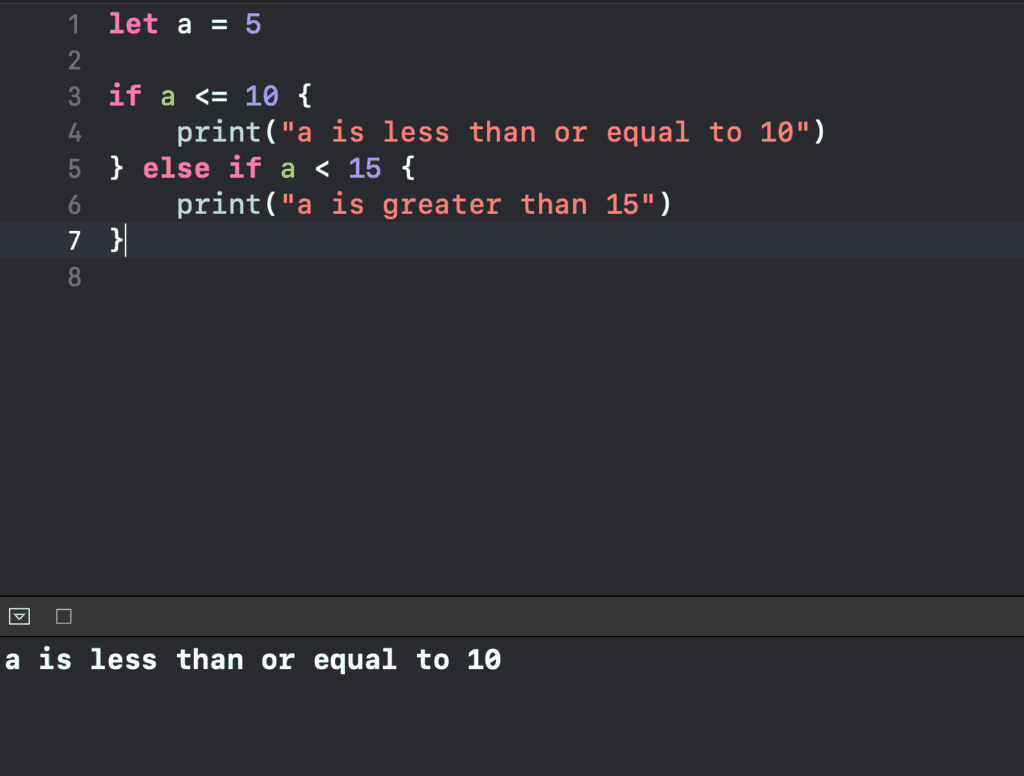
After running our code, we see it evaluated the condition on line 3 which happened to be true and then jumped to line 4, which is the corresponding fork in the road. It then executed that branch of code and ignored everything else. Notice it didn’t check the second condition at all after picking the first branch.
Stacking Else If Clauses
If statements are much more flexible than our example above, though. One cool feature is that you can stack else if clauses:
if condition1 {
    // some code
} else if condition2 {
    // some code
} else if condition3 {
    // some code
} else if condition4 {
    // some code
} else if condition5 {
    // some code
}
This helps if you have many conditions to check. The caveat to this is that you don’t want these conditions to grow too long. Later on, we’ll learn another kind of decision-making structure that you can use for those instances instead.
Else Clause
Now let’s take a look at this last feature of the if statement: the else clause:
if condition1 {
    // some code
} else if condition2 {
    // some code
} else if condition3 {
    // some code
} else {
    // some code
}
The else clause is kind of like a “catch-all” bucket. If none of the conditions above it evaluate to true, only then does Xcode run the code associated with that else cause. To include an else clause in your if statement, you simply use the else keyword. There’s no condition necessary because the point of the else branch is to run some code in case nothing above it got executed.
Take a look at the following example:

On the first line, we now set a to 25, and our conditions read “a is less than 10” on line 3, “a is less than 15” on line 5, and “a is greater than 30” on line 7. If we run the code, nothing is printed because none of the conditions are true.
Let’s add an else branch to handle this case with some more useful information:
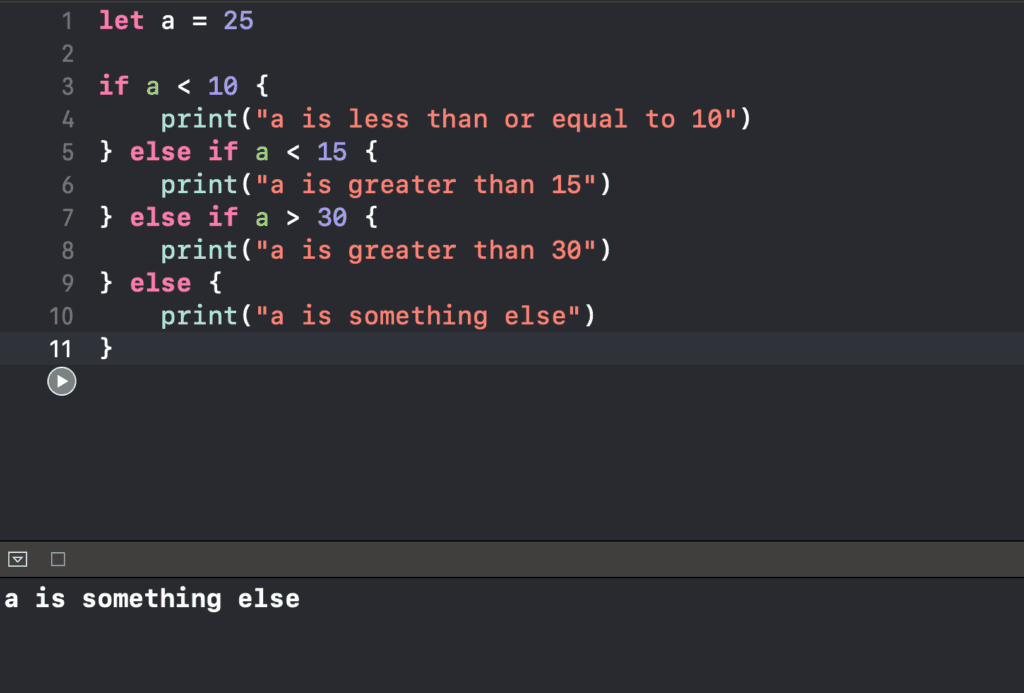
We added our new else branch on line 9 with a set of curly braces beside it. In its code block, we added a print statement for “a is something else.” Running this clearly shows how Swift fell into the catch-all else branch of code.
Chaining Conditions
We’ve now seen all of the basics of the if statement. But our example conditions have been quite simplistic so far. How do we create more sophisticated conditions to check? For one, we can actually chain conditions together. Let’s see how.
First, let’s introduce another variable b on line 2, initially set to 10. If, for example, I want to check that a is less than 10 and that b is greater than five, i.e. both those facts are true simultaneously, then I can use this double ampersand symbol (&&) in order to express that. The “&&” symbol is called an AND operator and means I want both of those conditions to be true in order for that branch to be executed.
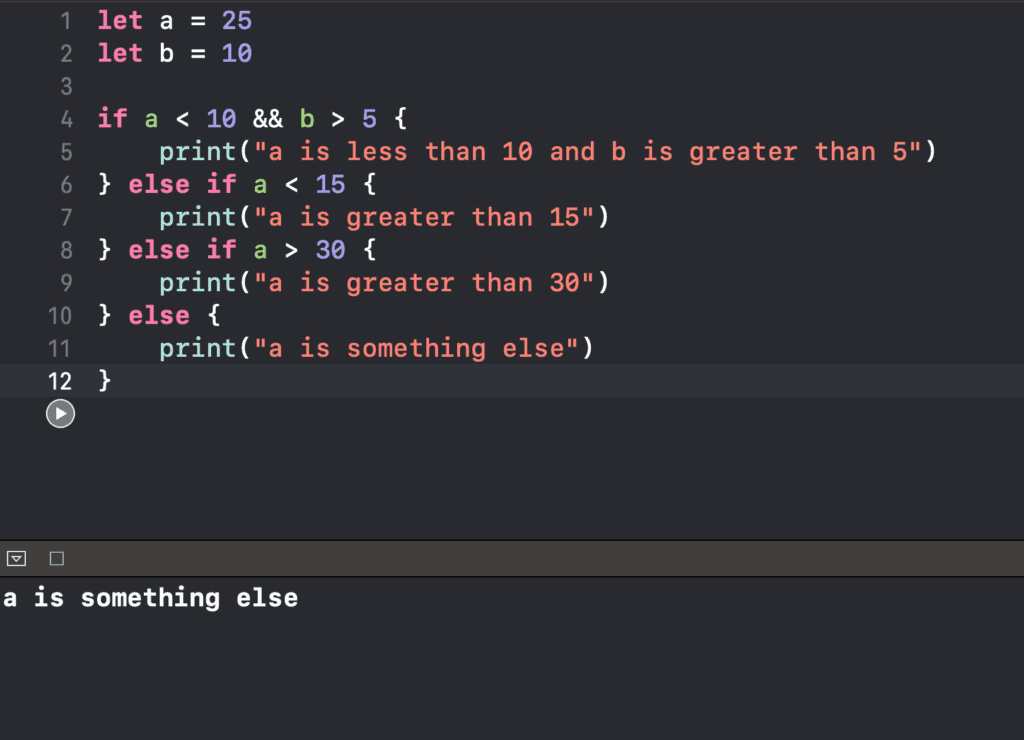
However, if you’re fine with any one of those conditions being true, like an either/or check, then you can use the OR operator, symbolized by two double pipes (||). You can type the “|” character by holding down Shift on your keyboard and pressing the key above your return key.
Here’s what it looks like if we run code with an OR operator:
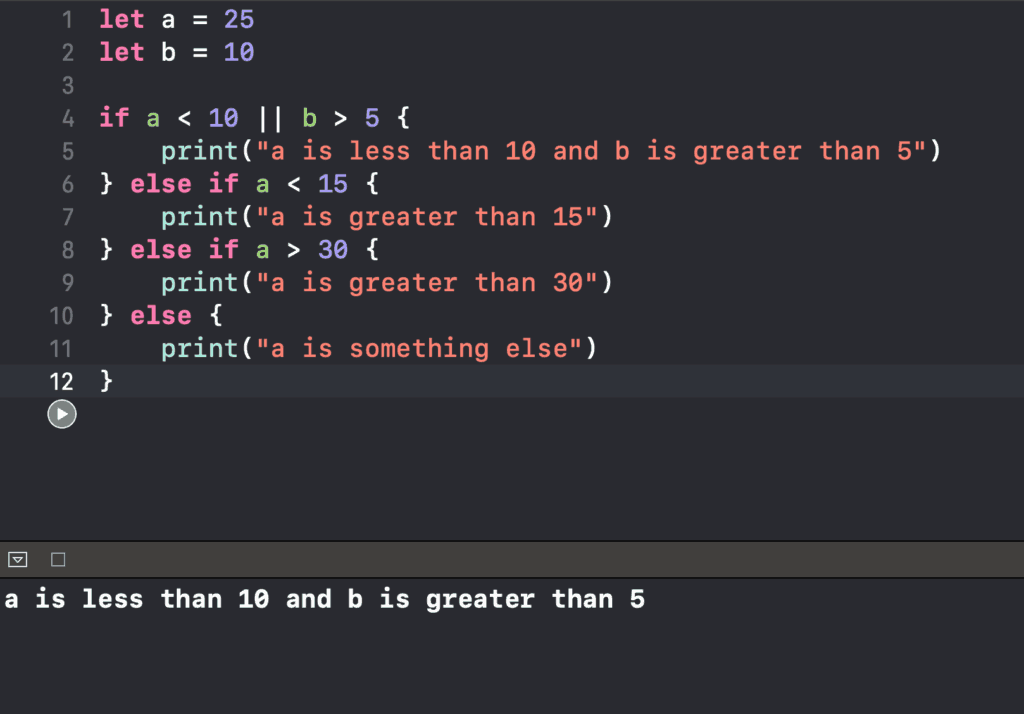
Even though a isn’t less than 10, the first branch executes because b is greater than 5.
Now I’m going to blow your mind even more because we can further chain these things. By wrapping our conditions in parentheses, we can chain them with even more operators:
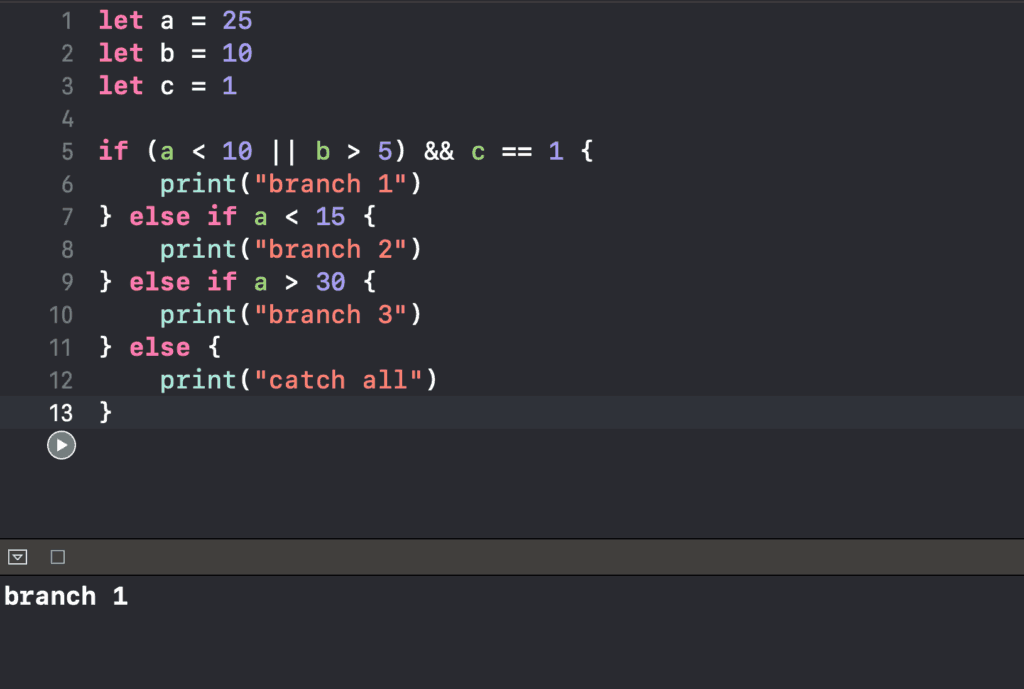
We know the (a < 10 || b > 5) part is true from the previous example, and we also want c to be 1 at the same time, which is clearly true, so Swift runs the first branch of the if statement.
Although you can wrap as many conditions as you want in a pair of parentheses, keep in mind that the more conditions you have, the harder it will be to read and understand.
Let’s turn our attention back to line 5 for a moment. You might notice that the c == 1 condition looks quite similar to the c = 1 statement above on line 3. But there’s a big difference between the two equal sign operators. A single equal sign (=) is used for variable/constant assignment, and a double equals sign (==) is used for testing equality between two values.
For testing inequality instead, you would use an exclamation mark and equals signs (!=). Here’s an example of testing for inequality:
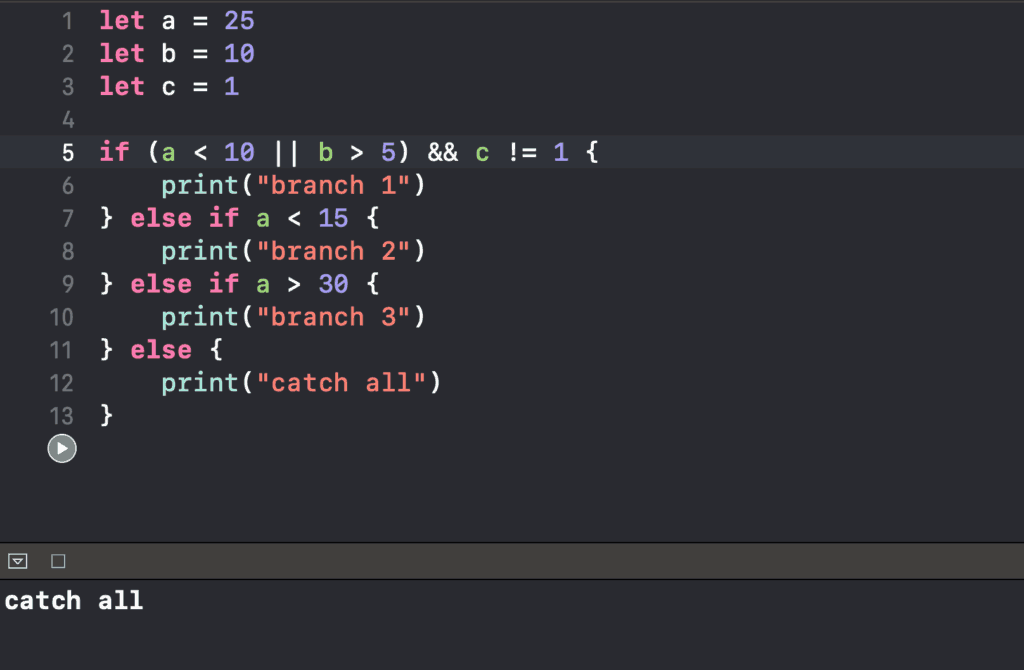
The code ran the else clause here because c no longer equals 1, thus none of the conditions evaluate to true. Remember that because we use the && operator on line 5, we need both sides of the && to be true in order for that block of code to run.
However, this behavior changes if we use the OR (||) operator instead:
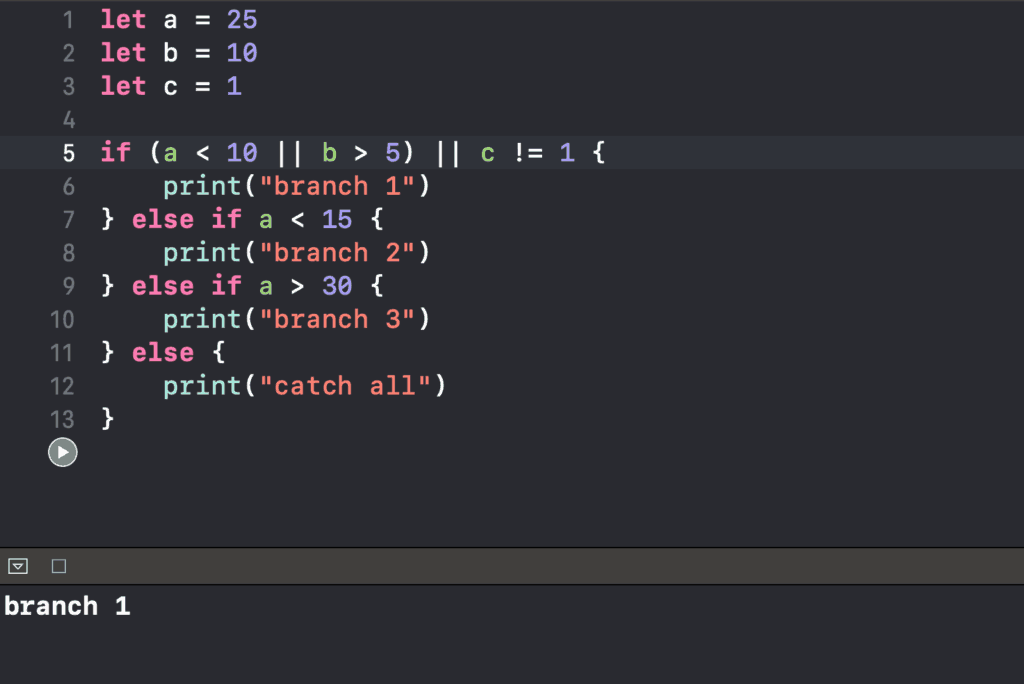
Now it doesn’t matter if c is equal to 1, because we know (a < 10 || b > 5) is true.
This all takes a bit of practice to wrap your head around. But here’s an important reminder: don’t memorize the keywords you’ve learned today. Why? Because I’m going to introduce more keywords and syntax to you in the next lessons, and it’s not going to be fun or practical for you to try to memorize all of them.
What I would recommend is to instead spend 30 minutes working on the worksheet for this lesson. Try out the statement by yourself in a playground, and after 30 minutes of learning, you’re going to learn a lot more. I also have a Swift cheat sheet and worksheets for you to practice what you’ve learned in today’s lesson. I highly recommend that you go through the worksheet so that you don’t make the same mistakes I did when I first started.
Chapter Recap
- Use if statements to conditionally execute code.
- Add alternative conditions with the “else if” clause.
- Use the “else” clause as a final alternative that will execute if no other condition is true.
- Conditions are checked from top to bottom.
Switch Statement

In the previous lesson, you learned how to use if statements to run code under certain conditions. But after a while, you might find yourself writing giant if statements with many branches. When you see yourself going down this path, I want you to stop and consider using a switch statement, which we’ll learn about here.
Have a look at the code below:
let chr = "a"

if chr == "a" {
    print("the character is a")
} else if chr == "b" {
    print("the character is b")
}
On line 1, we declared a new constant chr, assigned to the text “a.” To test if chr was equal to “a”, we can use an if statement with a double equal sign (==) as on line 3.
If we wanted to compare chr with every letter of the alphabet, I could use multiple else if clauses like the one on line 5. However, that would result in a giant if statement, which I don’t recommended. It’s at this point where using a switch statement becomes handy.
Syntax
switch value-to-consider {
    case value1:
        //some code
    case value2:
        //some code
    default:
        //some code
}
Let’s discuss each part of this syntax:
- Start with the
switchkeyword, followed by the expression or value that you want to check. In our first example, that’s the constantchr, followed by a set of braces. - Inside the braces, precede each value you want to compare with your expression by the
casekeyword. After the value, type a colon, then the code that you want to execute if your expression matches that case, followed by the next case, and so on and so forth. - After all your specific cases, add a
defaultcase to run if your expression matched none of the other cases. Swift requires every switch statement to have a default case.
Let’s go back to our code and see this in action:
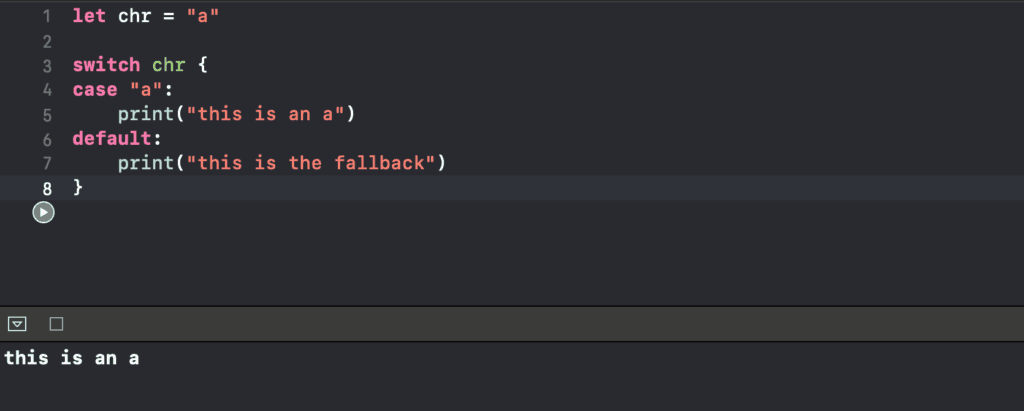
We’ve now replaced the if statement from earlier with a switch statement. You can type out a whole switch statement for practice, but Xcode has an autocomplete feature that will sometimes autofill all your cases for you. Just type “switch”, choose the “switch – Swift Switch Statement” option, and then you can navigate to the different fields to fill out with the tab key.
On line 4, we see that the pattern we’re checking for in the first case is a. If this case runs, we will see “this is an a” get printed. The default case would print “this is the fallback” as shown on line 7. As expected, when we run the code, it prints out “this is an a” since it matched the case on line 4.
What happens if we wanted to check for something else?
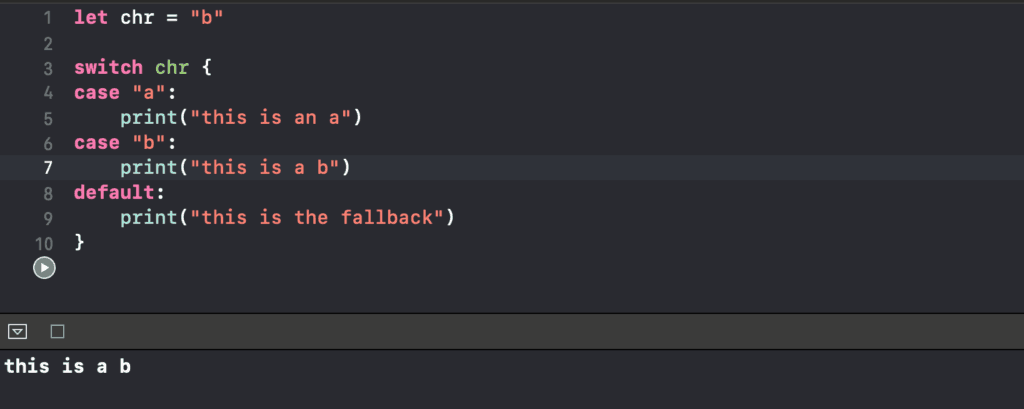
This time, we set chr to “b,” added another case to match with “b” in the switch statement. If we run the code again, we see that it will match the second case this time.
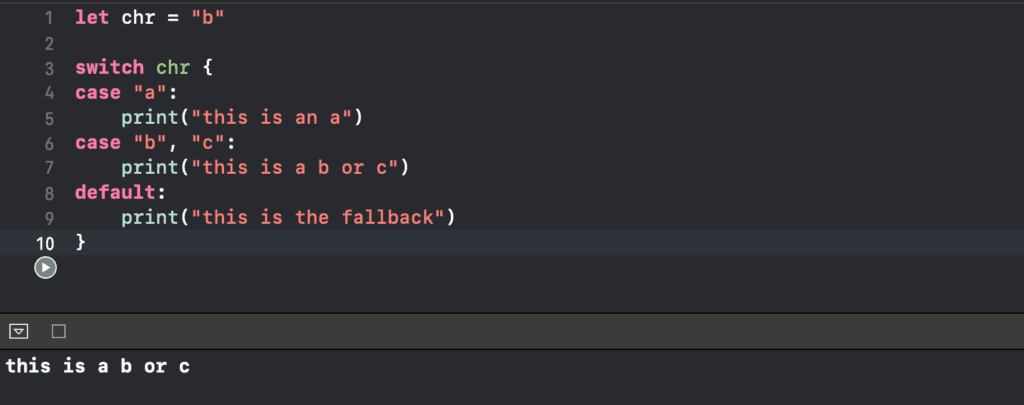
An additional cool feature of switch statements is being able to combine cases. If we want to take the same action when our expression matches with any one of multiple patterns, we simply separate the patterns by commas after the case keyword, as shown below:
And that is pretty much it for switch statements! In all honesty, they’re easy to use and much easier to read than giant if statements.
For-In Loop

In the last two lessons, you learned how to write code that can be executed under certain conditions. This lesson will cover loops which allow you to repeat a block of code multiple times. Once you know how they work, it turns out you’ll need to use them all over the place!
Swift has multiple kinds of loops. First, we’ll look at the for-in loop, which repeats a block of code a specific number of times.
Say I want to greet 5 people in a room. I could print “hello” to the console five times like so:
print("hello")
print("hello")
print("hello")
print("hello")
print("hello")
However, a for-in loop can condense this into just a few lines. Let’s dissect its syntax first:
Syntax
for counter in lower...upper {
    // some code
}
Going over each part of this syntax:
a). True to its name, the main keywords these loops use are for and in.
b). Start with the keyword for, followed by a variable name. You don’t have to use var here; just add a stand-alone name. This will act as a kind of placeholder, which I’ll explain how soon.
c). After the variable, type the keyword in, and then specify a range. The syntax for a range is number1...number2, which represents all numbers between number1 and number2. This range is inclusive. For example, if your range is 1...5, the loop would iterate (or repeat) exactly five times.
d). After the range, we add our set of braces. Inside the braces is where you put your code, which the loop will repeat for whatever range you’ve specified.
I know this is another set of keywords and syntactical structure that you have to remember, but let me emphasize this point again: don’t try to memorize anything. As long as you do the exercises and worksheets after each lesson and spend 15 minutes playing around with loops, the structure of the for-in loop will become second-nature. Go ahead and download the Swift cheat sheet from our Resources page. If you ever forget anything, you can just quickly refer to it!
Let’s refactor the code from above to use a for-in loop:
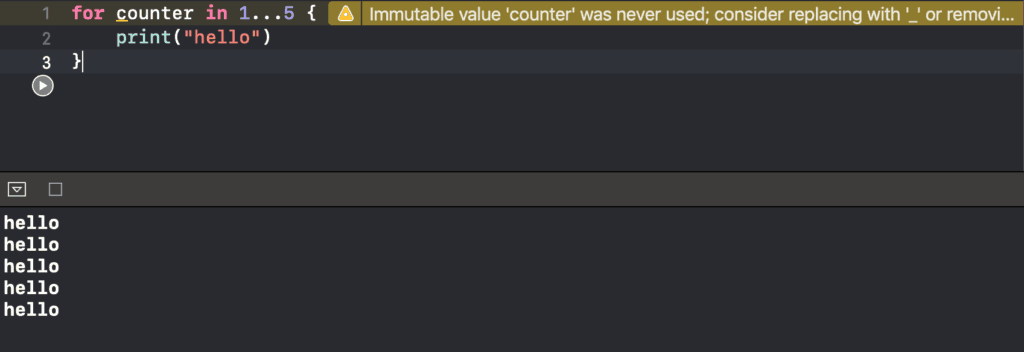
Following the syntax that I discussed above, we started the for-in loop with the keyword for, followed by a variable that I named counter. Then we have in after counter followed by the inclusive range of 1 (lower range), three dots, and 5 (upper range). Right after the range, I added in my braces, in which I’ve put the print("hello") command. After running this code, we see “hello” shown in the console five times, as expected.
Counter Variable
Look at line 1 again where the variable name counter is located. What is it for?
Well, for each iteration of the for-in loop, the value of counter refers to which iteration the loop is on. For example, counter contains 1 in the first iteration of the loop, then counter contains 2 in the second iteration, and so on and so forth. We can see this happening in action:
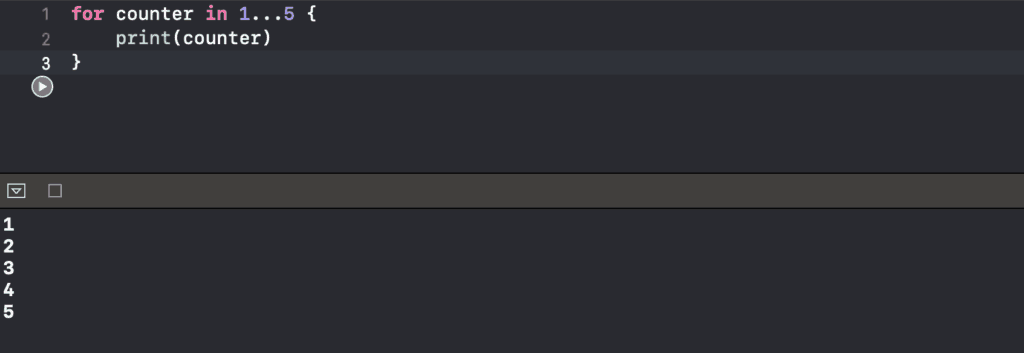
Notice that on line 2, we print out the value of counter, and after running this code, we see 1, 2, 3, 4, 5 outputted in the console.
Yellow warning
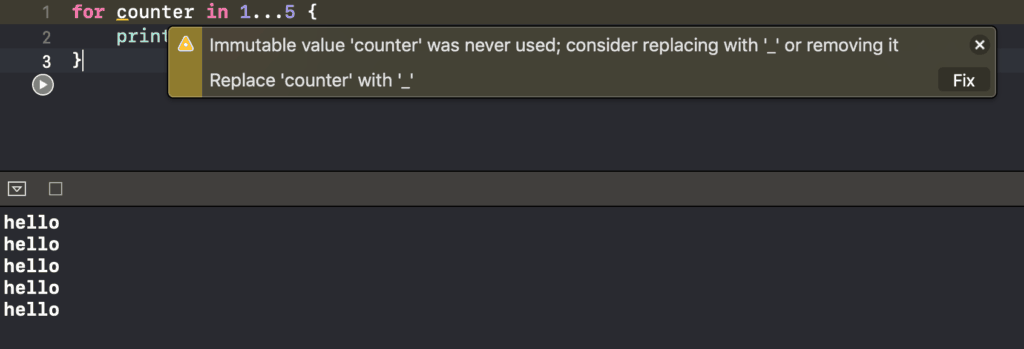
Xcode uses a yellow warning to tell us that if we don’t need to use a certain variable, then we don’t have to specify a name for it.
In the screenshot above, we are printing out “hello” instead of counter. The yellow warning appeared and stated that we should consider replacing counter with an underscore or removing it. What that means is if your loop never uses the counter variable, you can replace it with an underscore, and the loop still functions the same.
We can try this out with our own loop, as the code below shows:
for _ in 1...5 {
    print("hello")
}
Now I want to show you one more thing that might trip you up when working with loops. Let’s say I want to add up every number from 1 to 5. You might do something like this:
for counter in 1...5 {
    var sum = 0
    sum += counter
    print(sum)
}
On line 2, we declared the variable sum and set it equal to 0.
Remember that counter above will contain the numbers 1 to 5 over the loop iterations. The line sum += counter adds the value of counter to sum. The += operator is just shorthand notation for addition. For example, if sum is 10 and counter is 5, using the += operator would update sum to 15. An equivalent way to write sum += counter is sum = sum + counter.
On line 4 in the screenshot below, we print sum on each iteration of the loop. After running the code, we see the numbers 1 to 5 in the console.
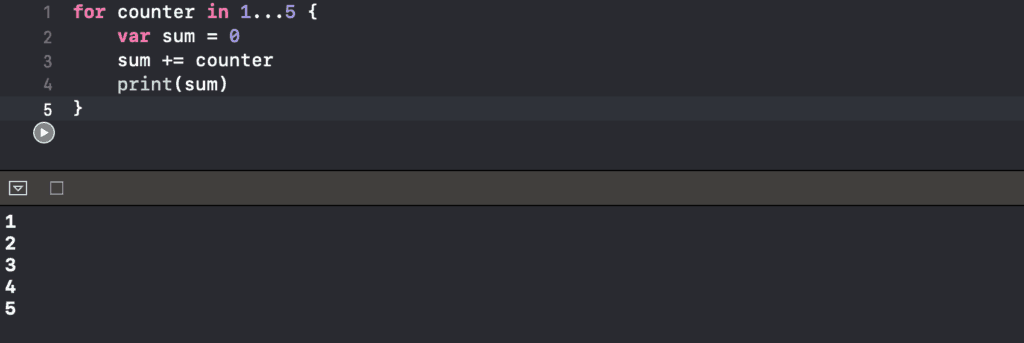
However, this is not the result we expected. Let’s take a look at what happened.
In the first iteration, we declared a variable called sum, set it equal to 0, and added counter to it, which was 1. Then, we printed sum and saw 1 in the console. In the second iteration, counter was set to 2, and we declared sum again and set it 0. In other words, we added 2 to 0, printed sum, saw 2 in the console, and so on and so forth.
Thus, on every iteration in the loop, we re-declare sum and set it to 0. This means that we don’t actually add up the previous counter values like we want to.
You might ask: why am I able to declare sum so many times?
Well, that’s because the for loop starts with a clean slate on every iteration. There’s no recollection of what happened in previous iterations, which means that we essentially reset the sum on every single iteration.
Here’s what we should do to get the desired effect:

I moved the declaration of sum outside the for-in loop, and inside each iteration, I just add counter to sum.
After printing sum on line 7 and running the code, I finally see 15 in the console, which is the total sum of all numbers from 1 to 5.
Here’s a short recap of this example: on line 1, we’ve declared sum and set it to 0. Then, on the first iteration of the loop, counter is 1, which we added to 0 so sum becomes 1. On the second iteration, counter is 2. We then added 2 to 1 giving us 3, and so on and so forth. The loop ends after 5 iterations. We then printed sum, which explains why we got the single number 15 in the console.
Chapter Recap
- Use a for-in loop to execute a block of code for a set number of times.
- You can specify how many times your loop runs with a range.
- Each time your loop runs its code is called a loop iteration.
- Loops have no recollection of variables from previous iterations.
While and Repeat-While Loops

Now that we learned about the for-in loop, which repeats code for a set number of times, we’ll examine two kinds of loops that allows you to repeat code indefinitely until a certain condition is met. These kinds of loops are great when you don’t know how many iterations you need to get the job done. Let’s dive in and see how they work!
While Loop
This type of loop resembles an if statement in many ways. It uses a condition to determine whether to run your code, and skips over its block of code entirely if the condition is initially false. Otherwise, it will instead run your code until the condition is false. A while loop’s syntax is similar to that of an if statement, except we use the while keyword instead of if:
while condition {
    // some code
}
Let’s try using a while loop in an example:
var counter = 5

while counter > 0 {
    print("hello")
}
We create a counter variable and then a while loop with the condition “counter greater than 0.” If the condition passes, Swift will run the print command on line 8. What do you think will happen if I run the code?
First, it checks that counter is indeed greater than 0, which is clearly true. Thus, it will print “hello,” return to the top of the loop, and check the condition again. It will be true again, since nothing changed. In fact, it will print “hello” infinitely until our program crashes. In short, the program will overflow. When this happens, we call it an infinite loop:
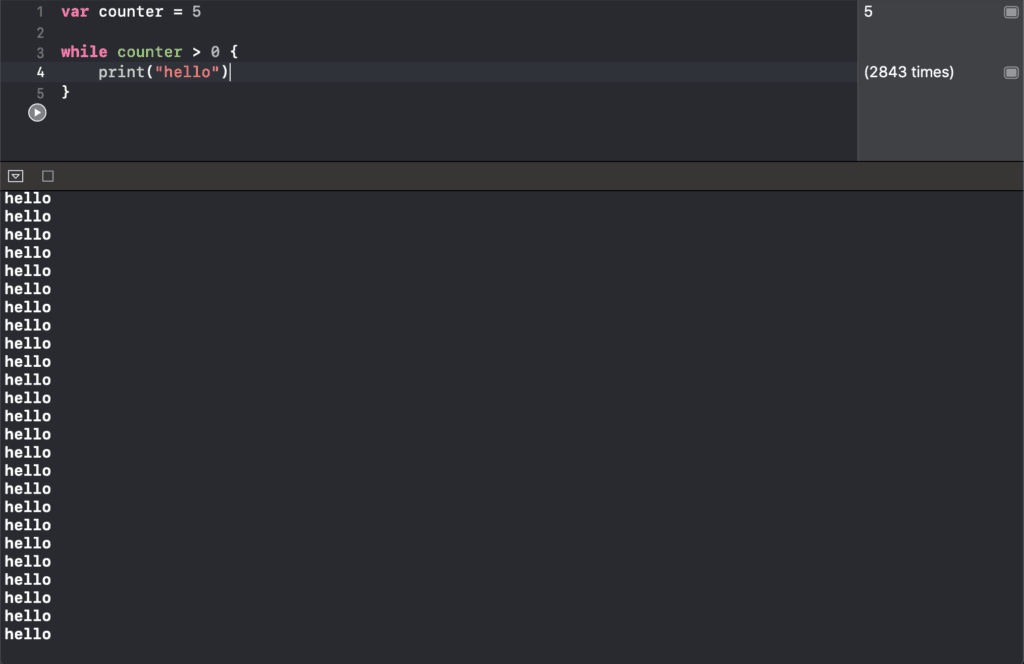
You can see the number of times our loop ran on the right-hand side. It just won’t stop! There’s a chance your computer will go haywire if you attempt to do this because that happened to me. If that happens, feel free to restart Xcode and go back in.
How can we prevent these infinite loops? In our example, I had to write code that eventually made the condition on line 3 false. Notice the code I added on line 5 below which uses shorthand notation to decrement counter by 1:
var counter = 5

while counter > 0 {
    print("hello")
    counter -= 1
}
We know counter starts off as 5. On the first iteration, it prints “hello” and updates counter to 4. The condition is still true in this new state, so the loop reruns, printing “hello” and updating counter to 3. This continues until counter becomes 0. Since 0 isn’t greater than 0, our loop will then quit and we should see “hello” five times in the console.
Repeat-While Loop
The next indefinite loop we will examine is the repeat-while loop, with its syntax below:
repeat {
    //some code
} while condition
The syntax is similar to a while loop’s, but our condition is now on the bottom. We start with the repeat keyword, then our braces that will surround the code to repeat. Then, we have the while keyword and loop condition, which concludes the repeat-while loop.
A repeat-while loop almost executes opposite to a normal while loop. It runs your code first, then checks if the condition holds true before deciding to continue running your code. As a result, your code is guaranteed to always run at least once.
The example below demonstrates how the repeat-while works identically to the while loop. On line 8, we declared another variable, counter2, to use in our repeat-while loop. This loop prints a different message but decrements its counter like the normal while loop above it:
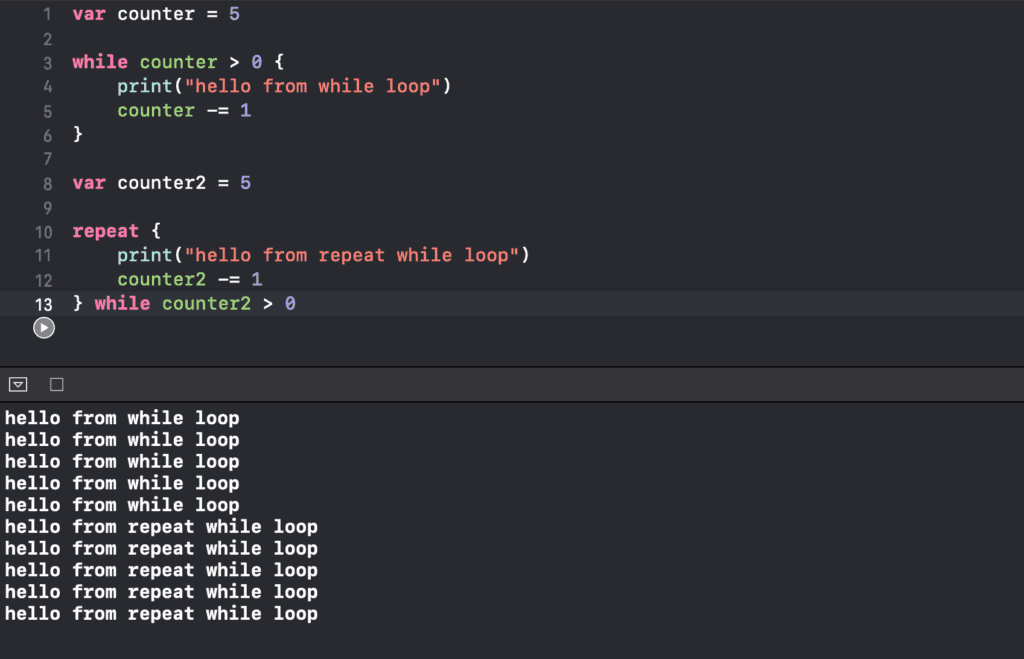
Now what if we changed both our initial counter values to -5 instead?
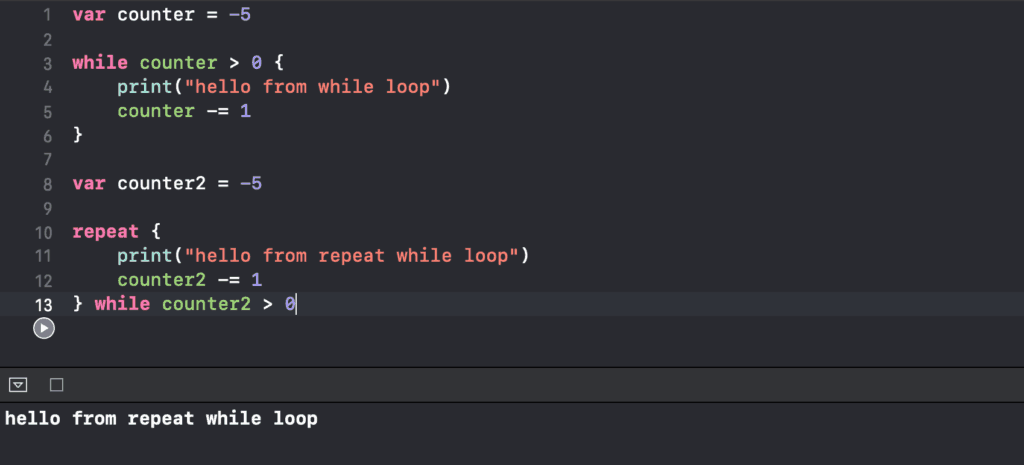
Both loop conditions were false initially. As a result, the while loop did not run at all, but the repeat-while loop ran once and no more because of the false condition.
So far, you might wonder how to decide which loop to use among the ones we’ve seen. That depends on what you’re trying to accomplish. For code you know should execute once and only conditionally repeat afterwards, a repeat-while loop works. But for code that should run only while some condition is true, you would use a while loop.
Chapter Recap
- The while loop and the repeat-while loop lets you execute a block of code and loop it indefinitely until a condition is met.
- The while loop checks the condition first before executing the block of code and then looping
- The repeat while loop executes your block of code first and then check your condition to decide whether or not it should repeat for another iteration.
Functions Part 1
A function is a named block of code that you can execute on demand by calling its name. Functions help you organize code into smaller chunks for specific tasks, so you can simply run a specific function to execute a specific task. A function can also take in custom data to work with, making it much more versatile. For now, we’ll just look at some basic functions in this lesson.
Syntax
func name() {
    // some code
}
We start defining a function with the func keyword followed by the function’s name. Like with variables, the name can be anything as long as it sufficiently describes what the function does. This will help you remember what function to call for a certain task later on. Next, we add a pair of parentheses after the function name.
In the next lesson, we’ll learn about input parameters, which you can add here to make your function more flexible. However, for now, we will leave these parentheses empty for our basic functions. Finally, we add a pair of curly braces to contain the code the function will run when you call its name.
Defining a Basic Function
Here’s an example of a basic function, i.e. one without input parameters:
func addTwoNumbers() {
    let a = 1
    let b = 2
    let c = a + b

    print(c)
}
We’ve called this function addTwoNumbers and instructed it to run some addition code within its curly brackets. But running this code alone gives us nothing in the console. Why is that? Well, the code inside the function won’t run by itself until you call the function, as shown below:
func addTwoNumbers() {
    let a = 1
    let b = 2
    let c = a + b

    print(c)
}

addTwoNumbers()
I call our basic function on the last line. Every basic function call uses the function’s name followed by a pair of parentheses. This should now output 3 when we run the code.
Here’s another function that we invoke on the last line, which should output 4 in the console:
func subtractTwoNumbers() {
    let d = 5
    let e = 1
    let f = d - e

    print(f)
}

subtractTwoNumbers()
Functions Save Time
This may not be immediately obvious, but functions are actually huge timesavers. Often, you might want to repeat the same sort of code in different places. But generally, you want to avoid simply duplicating the code wherever you need it. In these cases, try moving that code into a function instead so you can call it from multiple places.
Variable Scope
Variable scope refers to the idea that any variable and constant that you define inside of your function only exists and can be used within the curly brackets of that function. Now…what does that mean, and why is it important?
Let’s explore this in the context of our addTwoNumbers function:

On line 9, we try to print a outside of its function, addTwoNumbers, where we initialized it. But instead, we get the error “Use of unresolved identifier ‘a’.” This error basically tells us that, from line 9’s perspective, the variable a does not exist. This would also happen if I tried printing b or c on line 9 or from another function like subtractTwoNumbers.
If you need to access variables outside a function, you would have to declare the variables outside the function. Many beginners run into issues where they’re frustrated from not being able to access variables they’ve declared inside their functions, and now you know why.
Chapter Recap
- Functions help us organize our code into executable blocks.
- The
funckeyword defines a function. We use the function name to call it. - The scope of a function is in between its curly brackets.
- Variables and constants created in a function’s scope are only accessible in that function.
Functions Part 2

Previously, you learned what functions are and how to call them. However, we’ve only seen basic functions that print out things when you call them. We call these kinds of functions “void” functions because they don’t give us any data back. But how do we write functions that returned data to us instead?
Return Values
It turns out a common use case for functions is to take some input, perform some task, then return its result to us. Our first step is to specify that our function actually returns something when we call it.
To do this, we must add an extra part to our function syntax:
func name() -> DataType {
    // some code

    return someValue
}
Notice that between the parentheses and the starting curly brace, we have this arrow sign ->, written with a hyphen and a greater than sign. Then, we add the data type of the value our function will return. We also call this the return type. It’s very important to know this in advance, which is why we must specify this.
When you specify your function’s return type, Swift will expect your function to have a line of code called a “return statement.” The syntax for return statements is simply return <value>, as the example below shows. The return keyword makes Swift exit the function and return the specified value back to the caller.
Let’s modify our addTwoNumbers function to return its sum instead of printing it out:
func addTwoNumbers() -> Int {
    let a = 1
    let b = 2
    let c = a + b

    return c
}

addTwoNumbers()
We first define our addTwoNumbers function as usual but now with an extra -> Int part. This specifies the return type as Int, since the sum is an integer. Also, our print statement on line 6 has now changed into a return statement. But if we call this function, the console will still remain empty. Where did the value of c go?
Well, when you call a function that returns data, like addTwoNumbers, a call to that function is equivalent to the value it returns. What does that mean? In our case, the example above is equivalent to:
func addTwoNumbers() -> Int {
    let a = 1
    let b = 2
    let c = a + b

    return c
}

3
Clearly, the 3 on its own won’t get itself printed to the console. Therefore, we need to capture and use the value returned somehow. Check this out:
func addTwoNumbers() -> Int {
    let a = 1
    let b = 2
    let c = a + b

    return c
}

let sum = addTwoNumbers()
print(sum)
Now I defined a constant sum assigned to the result, or returned data, from addTwoNumbers. Printing out sum on the next line would now output 3 in the console.
As previously mentioned, because a function call is equivalent to its return value, the last two lines above are, in fact, equivalent to:
let sum = 3
print(sum)
That’s why we see 3 printed to the console.
Input Parameters
So far, addTwoNumbers is a lame function since it only ever returns 3. What if we could actually tell it which two numbers to add? We can do exactly that by using input parameters.
They make up one more piece in our syntax for functions:
func name(argumentLabel parameterName: DataType) {
    // some code
}
All input parameters go in between the rounded parentheses. Let’s go over the syntax above from right to left.
For each input parameter, we need to specify what its data type and parameter name will be. Similar to variable names, we use the parameter name (which can be anything) inside a function to access the data the parameter holds. Notice the colon between the parameter name and data type.
You could also specify an optional argument label. The argument label and parameter name only have a space in between. But what’s the argument label for? It can help function calls read more like natural English by changing what you label a parameter as.
Let’s try adding a parameter to addTwoNumbers:
func addTwoNumbers(arg para: Int) -> Int {
    let a = 1
    let b = 2
    let c = a + b

    return c
}
We now have a single parameter with “arg” as its argument label and “para” as its parameter name. Then we add a colon and the input’s data type, Int. Here’s how this new parameter changes our resulting function call:

On line 9, you can see Xcode automatically detected that our function call is no longer correct (see highlighted text in red). To call addTwoNumbers now, I have to specify the value of that parameter. An easy way to do this is to start rewriting the function call, so we get a chance to use Xcode’s autocomplete feature, as shown below:
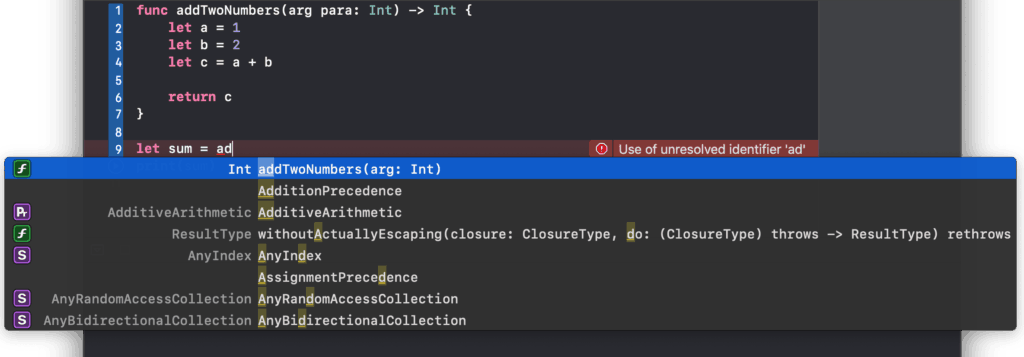
In the popup list, the “Int” type we see to the left of the function name tells us the return type of addTwoNumbers. If the function doesn’t return anything, it would say “Void” there instead. You can also see the parameter we added along with its data type. Choosing the first option gives us a placeholder for the parameter value, which we can replace with something like 5:
func addTwoNumbers(arg para: Int) -> Int {
    let a = para
    let b = 2
    let c = a + b

    return c
}

let sum = addTwoNumbers(arg: 5)
print(sum)
This is how you’d call addTwoNumbers with one parameter. Essentially, we’re passing 5 into the function from outside the function. On line 2, I wanted to assign 5 into a, so I use the parameter name, not argument label, inside the function. Argument labels cannot be used in your functions. As a result of using the parameter, running the code above would print 7 to the console.
Multiple Parameters
So far, we have this variable b that just contains the value 2. However, we can specify another parameter to assign to b on line 3 as well. Multiple parameters in a function simply need to be separated by commas. Note the similarities in their syntax below:
func name(arg1 param1: DataType, arg2 param2: DataType) {
    // some code
}
You can repeat this syntax pattern for 3, 4, 5 parameters, or however many you need. Let’s add another parameter to addTwoNumbers for b:
func addTwoNumbers(arg para: Int, arg2 para2: Int) -> Int {
    let a = para
    let b = para2
    let c = a + b

    return c
}

let sum = addTwoNumbers(arg: 5, arg2: 5)
print(sum)
In the parentheses, we first add a comma after the Int to separate our parameters, which we specify by arg2 para2: Int. Then we assign this parameter to b inside the function. We also need to rewrite our function call to specify the values of the two arguments, both 5s in this case. Running this code gives us 10 in the console from adding 5 and 5. Tip: you can use Tab to jump to the next placeholders in the code that autocomplete gives you.
Recall that argument labels are optional. If a parameter has no argument label, Swift will expect you to use its parameter name in the function call instead, like in the example below:
func addTwoNumbers(para: Int, para2: Int) -> Int {
    let a = para
    let b = para2
    let c = a + b

    return c
}

let sum = addTwoNumbers(para: 5, para2: 5)
print(sum)
Before we move on, let’s use different parameter names that are easier to understand. Remember to also update every spot that used the names (lines 2, 3, and 9). Changing the names shouldn’t affect our code’s behavior, so we should see the same output:
func addTwoNumbers(number1: Int, number2: Int) -> Int {
    let a = number1
    let b = number2
    let c = a + b

    return c
}

let sum = addTwoNumbers(number1: 5, number2: 5)
print(sum)
However, sometimes parameter names don’t make function calls read very naturally. For example, line 9 looks like it says “add two numbers, number one 5, number two 5.”
But by adding the right argument labels, we can have a much neater function call:
func addTwoNumbers(using number1: Int, and number2: Int) -> Int {
    let a = number1
    let b = number2
    let c = a + b

    return c
}

let sum = addTwoNumbers(using: 5, and: 5)
print(sum)
Now on line 9, the function call reads much more clearly: “add two numbers using 5 and 5.” Don’t forget that, inside your function, you still need to reference those parameters by their parameter names, and not their argument labels.
Surprisingly, you can also completely omit parameter names and labels from the function call by using underscores as your argument labels. In the example below, you can see the underscores before the parameter names. Because of this, the function call on the last line doesn’t need parameter names:
func addTwoNumbers(_ number1: Int, _ number2: Int) -> Int {
    let a = number1
    let b = number2
    let c = a + b

    return c
}

let sum = addTwoNumbers(5, 5)
print(sum)
Chapter Recap
- Using the
returnkeyword allows your function to return a value back to its caller. - Parameters let you supply data into your function when you call it.
Classes

In this lesson, we will introduce you to classes, which are a highly critical part of the Swift programming language. Back in chapter 2, I mentioned that you can actually construct your own data types. Now, we’ll get to see how. Classes are like custom data types that help organize your information. Similar to how functions group pieces of code together, classes group related pieces of information together.
Let’s start off by looking at the following code snippet:
var name = "John"
var salary = 100
var role = "Director"
This has several pieces of information: two String variables and an Int variable. These variables seem to describe data for an employee. So far, we’re representing a single employee, John, but what if we wanted to represent other employees as well? Wouldn’t we need multiple sets of variables for them? In a way, yes, but what we can do is group these pieces of information together in a new data type. And in order to do that, we have to define a new class.
Syntax
class name {
    // class properties
}
We start with the class keyword followed by your class name. A good class name describes the kind of item we are trying to define with all our pieces of information. In this case, our class name can simply be Employee since we are defining an employee with certain data. Then we add a pair of curly braces, inside which you’ll define your class.
Here’s what a definition for our Employee class would look like:
class Employee {
    var name = ""
    var salary = 0
    var role = ""
}
Inside the curly braces, we have pieces of information that an employee would have. However, our variables, so far, do not describe a specific employee yet because we are creating a new data type, so we don’t know which employee they should describe. Just like how we assign values to String or Int variables when we declare them, the variables in our class will get specific pieces of information when we declare Employee variables. Imagine our Employee class as a general definition that we can use over and over again.
Before I show you how to use our Employee data type, let’s recall how we set up variables of other types we’ve seen before:
let a = 10
let b = "Ted"
On the first line, I created a piece of data (i.e. 10) to be stored in memory. Then I created a constant, a, to keep track of that data in memory. Similarly, I created a constant, b to store the piece of string data, “Ted,” in memory. This same idea applies to our new data types as well.
var c = Employee()
Here, we give c a new, empty Employee to store in memory which we create by using Employee(). This specific Employee that I’ve created in memory is called an object, or an instance of the class, in this case, an instance of the Employee class. This is because it functions as a specific copy of our original Employee template with its own values for name, salary, and role.
For now, to create instances of a class, you’d type its name followed by a pair of parentheses. However, this can get slightly more complex for other classes which we will discuss later on.
Dot Notation
Variables a and b from above have simple data types, specifically Int and String. However, c has a custom type: Employee. Right now, new Employee objects have those boring "" and 0 values we gave them. However, we can change and access the data for a specific Employee by using what we call dot notation. Let’s see how that works:
c.salary = 1000
print(c.salary)

c.name = "Tom"
c.role = "Art Director"
First we type c, which points to our new Employee object, and then a dot, telling Swift we are trying to access something inside c. As an example, I set the salary of c to 1000, which we can then print out to see that it indeed holds 1000. Similarly, we can change the values of the other variables in c as demonstrated in the following lines.
In addition to specifying what pieces of data a class should store, you can also define functions in your class. Below, we add a function, doWork, to our Employee class:
class Employee {
    var name = ""
    var salary = 0
    var role = ""

    func doWork() {
        print("Hi my name is \(name) and I'm doing work")
        salary += 1
    }
}

var c = Employee()

c.salary = 1000
print(c.salary)

c.name = "Tom"
c.role = "Art Director"

c.doWork()
The doWork function prints a message from the employee and increases their salary. These functions need to be called on specific objects of the class, so we need dot notation with the variable c to call doWork in this case. After running the code, we would see “Hi my name is Tom and I’m doing work” in the console.
Let’s now create another Employee object:
var d = Employee()
d.name = "Sarah"
d.role = "Manager"
d.salary = 1000
d.doWork()
On the first line, we assign a new Employee object in memory to the variable d, and then set the name to “Sarah”, the role to “Manager”, and the salary to 1000. Finally, we call doWork() on d, which should print the same message as before but with Sarah’s name instead.
Keep in mind c and d are two separate Employee objects. Modifying any data for d won’t affect c and vice-versa. Similarly, calling doWork() on d has nothing to do with calling this function on c.
Some commonly-used terminology with classes: a class’ functions are called its methods, and a class’ variables are called its properties. A class’ methods always have access to its properties because they’re defined in the same class.
We’ve covered a lot here so far, but there’s, in fact, much more to classes. I hope this introduction made it a bit clear how they are fundamental to organizing your information.
Subclassing

Up until this point, we’ve seen many different ways of organizing your code, like functions that organize repeatable chunks of code and classes that can organize variables and functions that logically go together. In fact, we can even organize our classes by using what’s called inheritance.
Also known as subclassing, inheritance allows you to create classes that build upon or extend other classes that have already been defined. This saves us a lot of time and effort from defining classes that do similar things.
Remember our point about duplicated code when we discussed functions? Having duplicated code can make your project hard to manage. With functions, however, you can call them from multiple places when you needed to execute the same block of code instead.
This idea also relates to classes because sometimes you might have two classes that have similar methods or properties. Instead of defining them separately, you can use subclassing and have one class extend from the other.
Let’s look at an example using the Employee class from the previous chapter:
class Employee {
    var name = ""
    var salary = 0
    var role = ""

    func doWork() {
        print("Hi my name is \(name) and I'm doing work")
        salary += 1
    }
}
The variables on lines 2-4 are the properties of the Employee class, whereas the doWork() function is a method of the Employee class. Let’s say I want to create another custom data type called Manager. Managers will have names, salaries, roles, and of course, they also do work. Thus, if I were to separately define a Manager class, I would essentially be recreating the Employee class. Instead, we can have the Manager class become a subclass of Employee:
class Manager: Employee {

}
After the class name, we add a colon and then specify Employee. This syntax tells Swift that the Manager class subclasses Employee, making Employee the parent class of Manager. Now, Manager will automatically inherit all properties and methods of the Employee class.
Let me show you what I mean:
var m = Manager()
m.name = "Maggie"
m.salary = 2000
m.role = "Manager of IT"
m.doWork()
We first created a new Manager object and assigned it to m. We then set up its name, salary, and role, just like with Employee objects, and call doWork() on m. This would print “Hi my name is Maggie and I’m doing work” to the console.
Let’s say a Manager also needs to track the size of the team they are managing. We can add this functionality by adding a new property, teamSize, in the Manager class:
class Manager: Employee {
    var teamSize = 0
}

var m = Manager()
m.name = "Maggie"
m.salary = 2000
m.role = "Manager of IT"
m.teamSize = 10
m.doWork()
The code above shows how a Manager object has all the properties and methods that it inherited from the Employee class and its own property called teamSize, which we assigned to 10 for our variable m. Essentially, we were able to create a new class based off an existing class and add additional functionality to it.
A subclass can also modify existing functionality from its parent class:
class Manager: Employee {
    var teamSize = 0

    override func doWork() {
        print("I'm managing people")
        salary += 2
    }
}

m.doWork()
Let’s say when a Manager does work, they are also managing people. Thus, I changed this definition of doing work by overriding doWork() in the Manager class. After running the code above, we should get “I’m managing people” in the console because Swift is using the overridden method on line 4.
What if we wanted to extend the functionality of the inherited doWork() method instead of just replacing it? We can do this by calling the doWork method of Employee:
override func doWork() {
    super.doWork()
    print("I'm managing people")
    salary += 2
}
Notice the new function call, super.doWork(). This calls the doWork function of the parent class, in this case, Employee. Therefore, m will execute the Employee doWork method followed by the additional code on lines 3-4. Running the code should give us “Hi my name is Maggie and I’m doing work” followed by “I’m managing people” in the console. The reason why this super keyword is called as such is that a parent class is also called a superclass. In this case, Employee is the superclass of Manager.
Besides redefining superclass methods, Manager can also have its own new methods:
class Manager: Employee {
    var teamSize = 0

    override func doWork() {
        super.doWork()

        print("I'm managing people")
        salary += 2
    }

    func firePeople() {
        print("I'm firing people")
    }
}

var m = Manager()
m.name = "Maggie"
m.salary = 2000
m.role = "Manager of IT"
m.teamSize = 10
m.doWork()
m.firePeople()
Notice the new function, firePeople, on line 11, which I call on line 22. An Employee object couldn’t call this method because inheritance works from bottom to top, not from top to bottom.
You’ve finally got a taste for how powerful subclassing can be. It can save you a lot of work from not having to redefine two different, but somewhat similar, things. Our demonstration above uses one level of subclassing or inheritance, but we can set up as many levels as we like:
class Person {
    var name = ""
}

class Employee: Person {
    var salary = 0
    var role = ""

    func doWork() {
        print("Hi my name is \(name) and I'm doing work")
        salary += 1
    }
}
In the example above, we can declare another class called Person that contains the name property and have Employee inherit from Person. Now, I don’t have to define name inside Employee since it subclasses Person as we specified on line 5.
Now it’s evident that you can end up building these hierarchies and trees as a way of organizing your properties and functions. This might start to reveal how variables, functions, and classes are all starting to come together.
Chapter Recap
You can save time by using subclassing to define your new classes based on already existing classes and improving or customizing them without having to redefine everything from scratch.
UIKit

UIKit is an Apple framework that contains many classes for common elements that most iOS apps share, i.e. for labels, buttons, text fields, and images. If we tried building these components from scratch, creating an app would be time-consuming. Thus, UIKit, comes with all of these pre-built elements that we can use in our apps instead.
Although this somewhat strays from Swift programming, we will see how UIKit frequently makes use of inheritance and subclassing to create the elements that make up the framework.
Exploring UIKit
You can access the documentation for UIKit here. To find a page on any UIKit element, search for “UIKit” + the element name on Google. Notice the UIKit docs don’t just detail user interface elements, but also things like classes for animation, touches, gestures, drag and drop.
Another really handy way to explore the UIKit, which I recommend even more, is through Xcode. You can access it from “Window” > “Developer Documentation.” Under “Swift” in the menu to the left, you will find UIKit near the top.
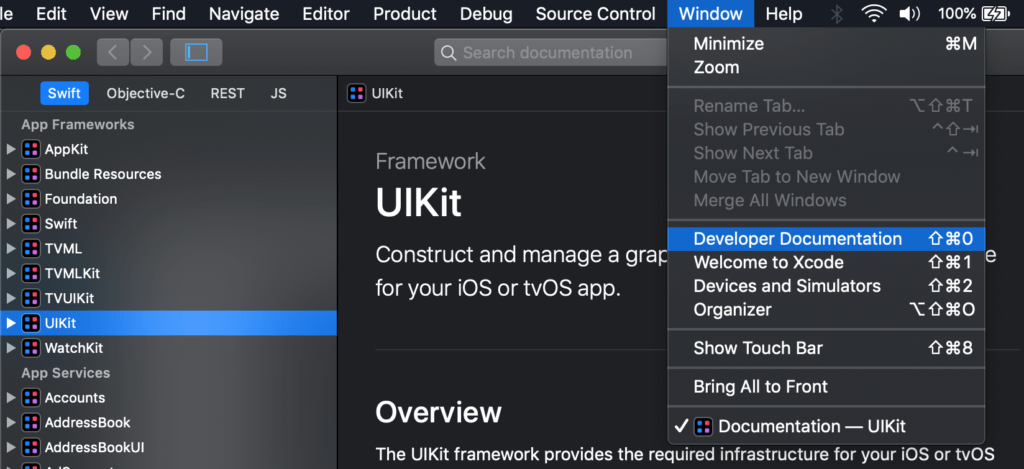
One thing that’s since been removed is a kind of hierarchy showing how each class extends other classes above it. However, I found this diagram on Google showing the inheritance relationships:
In the rightmost column, you can see UIButton, the classic or standard iOS button you would put in your view. By following the lines along the UIKit, you’ll see that UIButton is a subclass of UIControl, a subclass of UIView, a subclass of UIResponder, which is ultimately a subclass of NSObject:

If you are curious about what any of these classes do, you can find them in the documentation I showed earlier. The “Declaration” part in particular shows what a class derives from. You can even click on the parent classes and travel back through the entire class hierarchy:

On the page for the UIControl class, you can see that it’s the “base class for controls, which are visual elements that convey a specific action in response to user interactions.” Pretty cool!
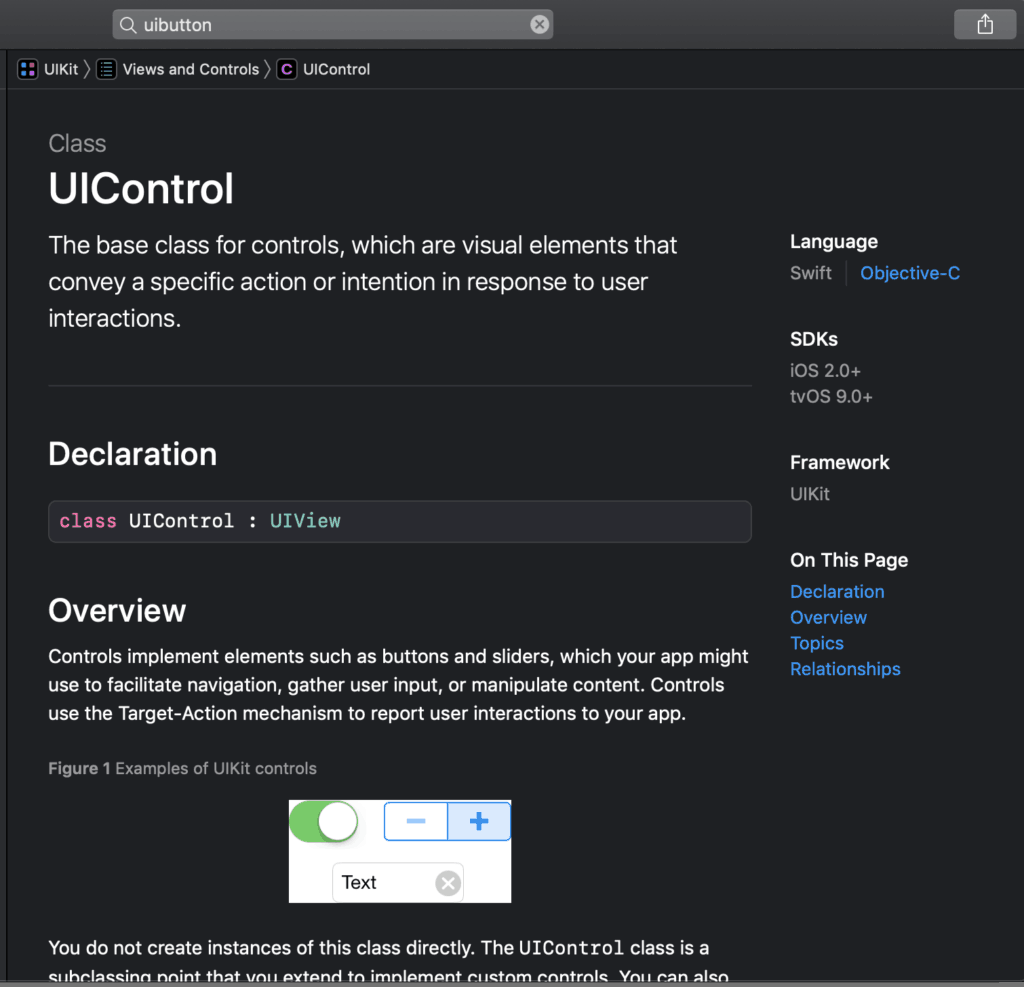
UIControl extends from UIView, which is something you can put on screen for the user to see. UIView extends UIResponder, “an abstract interface for responding to and handling events.” This explains why so many user interface elements are ultimately a subclass of UIResponder. But UIResponder in itself is a subclass of the NSObject which is described as “the root class of most Objective-C class from which subclasses inherit a basic interface to the runtime system and the ability to behave as Objective-C objects.” It’s basically what makes an object tick, if you will.
The reason it says Objective-C is that was the language originally used to build apps before Swift. That explains why much of UIKit is still written in Objective-C, with Swift just a layer on top of it all. One dead giveaway is the NS prefix in front of the class name, such as NSObject. Usually when you see this prefix in a class name, you can expect that it is an Objective-C class.
I hope this chapter has shown you how Apple has created the UIKit library through the use of inheritance and subclassing. You have this UIKit library at your disposal with so many pre-built components that you can use to build your app. All of these classes will come in handy once you finish this series on Swift and then learn about Xcode and building user interfaces.
Initializers

In chapter 9, we learned how to use dot notation to set up the properties of a new object. However, setting these up directly as we’ve done is quite tedious and error-prone. To help with this, classes have functions called initializer methods to help set up new objects just how you want and make sure they are ready for use.
class Person {
    var name = ""
}

class Employee: Person {
    var salary = 0
    var role = ""

    func doWork() {
        print("Hi my name is \(name) and I'm doing work")
        salary += 1
    }
}

class Manager: Employee {
    var teamSize = 0

    override func doWork() {
        super.doWork()

        print("I'm managing people")
        salary += 2
    }

    func firePeople() {
        print("I'm firing people")
    }
}
What we’ve got here are the classes we created during our discussion on subclassing. As a reminder, we have class definitions for Person, Employee which extends Person, and Manager which extends Employee. Let’s first create a new Person object. Recall that we would do this using Person():
let myPerson = Person()
You might notice the syntax Person() looks oddly similar to a function call, right? Function calls use a function name followed by two parentheses, plus any input parameters in between the parentheses. In fact, when we call Person(), we are calling a function of that class. But we didn’t declare any functions in Person yet. Even so, every class gets a default initializer function that we don’t see. We can explicitly declare this function as well, so let’s see what it looks like:
class Person {
    var name = ""

    init() {
        name = "Joe"
    }
}
To explicitly declare the Person initializer function, we’d simply use the init keyword and two parentheses like on line 4, with no func keyword required (Xcode would throw an error if you tried using func here anyway). Then we add any sort of initialization code we want. In this case, we set the name property to “Joe.” Our initializer method will get called when we request to create a new Person object with Person(). Thus, it also runs our custom code on line 4. To prove this, we can print out the name and should see “Joe” in the console:
let myPerson = Person()
print(myPerson.name)
An interesting thing about initializer functions is we can have as many as we’d like, including ones with their own input parameters. On line 8 below, we have an initializer with a String parameter, name, but with the basic initializer function above it as well:
class Person {
    var name = ""

    init() {

    }

    init(_ name: String) {
        self.name = name
    }
}
In this new initializer, I want to set our name property to the name input parameter that gets passed in. So we don’t confuse the two names, we use the self keyword with our property: self.name. We use self as like a special variable that refers to the object that’s running this code. In this context, it distinguishes between the name belonging to the object itself, and the name parameter passed into our method. Our code should output “Tom” in the console:
let myPerson = Person("Tom")
print(myPerson.name)
We know that from inheritance, Employee will inherit all functions from the Person class. Do you think that also includes the Person initializers? Let’s try calling one:
let anotherEmployee = Employee("Joe")We know the Employee class itself doesn’t have an initializer with a name parameter. Thus, the code above shows how it does have the init functions it inherited from Person, which explains why we could pass in the name “Joe” to its initializer. That’s pretty cool!
Overriding Init Functions
class Manager: Employee {
    var teamSize = 0

    override func doWork() {
        super.doWork()

        print("I'm managing people")
        salary += 2
    }

    func firePeople() {
        print("I'm firing people")
    }
}
Remember how the Manager class could override the Employee doWork function? It called super.doWork() which executes the Employee doWork function, then ran the extra code on lines 7-8. This same idea applies for init functions.
class Person {
    var name = ""

    init() {

    }

    init(_ name: String) {
        self.name = name
    }
}

class Employee: Person {
    var salary = 0
    var role = ""

    override init(_ name: String) {

        // This is calling the init(_ name: String) function of the Person class
        super.init(name)

        // Additional init code
        self.role = "Analyst"
    }

    func doWork() {
        print("Hi my name is \(name) and I'm doing work")
        salary += 1
    }
}
Take a look at the Employee initializer. Note that since Person is its superclass, calling super.init(name) actually invokes the Person initializer with the name parameter. This takes care of setting up the Person properties, like name, so we don’t have to. Afterwards, we can also set up our new Employee property, role, with the code on line 23.
Also notice that our call to Person‘s initializer occurs before the incoming role is assigned to Employee‘s role property. However, Swift actually requires that you call superclass initializers after initializing all necessary subclass properties unless the subclass properties have default values (which they do in the example above) or are optional (which you will learn about later).
let myEmployee = Employee("Joe")
print(myEmployee.name)
print(myEmployee.role)
Now, after creating an Employee object called myEmployee using the initializer we discussed above, I am able to access myEmployee‘s role and name. The code above should output “Joe” for the name and “Analyst” for the role.
Chapter Recap
In this chapter, you learned that that even with init functions, you can use the override keyword and provide a custom implementation of that initializer function and call the superclasses’ implementation as well. Later on, we’ll dive a little deeper and explore the two different types of initializers: designated and convenience initializers.
Optionals

In this chapter, we’re going to talk about optionals, probably one of the most confusing topics for beginners. If you’ve seen Swift code with exclamation marks or question marks, then you’ve come across optionals.
How exactly do optionals work? Up until this point, we’ve always assigned something into our variables or constants right away when declaring them. However, in some cases, you may want to declare your variable but not assign data to it right away. Xcode won’t like that since it wants to make sure all your variables and constants are actually keeping track of some sort of data. That’s what they’re for, right?
Nil
This is where optionals come into play, to help declare a variable as “empty”. But how do you define emptiness? We use the nil keyword which stands for empty or nothing. If you don’t want to assign actual data to a variable, you can assign it nil:
var a = nil
Even so, this will give us the error message “nil requires a contextual type.” What does this mean? Variables in Swift can only store data of their specific data type. But if Swift sees a variable assigned to nil, it can’t automatically conclude what the variable’s data type should be.
This is because nil doesn’t have a data type. Thus, we have to explicitly label our variable’s data type. For example, let’s tell Swift we want an empty Int variable:
var a: Int = nil
If we run this code, we still see an error because integer variables can’t actually store nil. In fact, none of our usual data types (Int, String, etc.) allow nil as a valid value. This is where we use optionals instead by adding a question mark to the data type as follows:
var a: Int? = nil
Notice we now have a data type of Int? instead of just Int. Our variable is now an “optional integer,” meaning it could either store an integer as usual or nil. The same thing goes for variables of other data types, like String.
Let’s set up another example for other optional data types:
class XmasPresent {
    func surprise() -> Int {
        return Int.random(in: 1...10)
    }
}

let present = XmasPresent()
print(present.surprise())
I’ve declared a class called XmasPresent with a function called surprise that returns a random integer from 1 to 10.
Below the class, I created a new XmasPresent object and printed the result of invoking the surprise function on it. You should see a number from 1 to 10. If I explicitly declared the data type of the constant on line 7, then it would be XmasPresent.
Checking the Optional Type
What if we label the constant as an optional by adding a question mark and assign it nil?

Xcode throws an error saying the value of our “optional type, XmasPresent, must be unwrapped to refer to the function surprise.” This is because optional variables could either contain an actual object, or nil. One issue with that is you can’t access any members (functions or properties) of nil, so we need a way to check if an optional variable is not empty before we try accessing its members. In this case, even if we know present is nil because we set it up that way, we must check that it actually contains an object, specifically an XmasPresent object, before we can call surprise on it.
Ways to Check an Optional Type
There are several ways to check if an optional variable/constant is nil before using it. Let’s see some examples of these:
Optional Unwrapping
let present: XmasPresent? = nil

// Check the optional to see if it contains an object
if present != nil {
    // it contains an object
}
One way is to simply compare the optional variable/constant to nil using an if statement. We can either choose to take action if the variable is equal (==) or not equal (!=) to nil. In this case, because we want to use present only if it isn’t empty, we check that it’s not equal to nil.
Now we can add in our call to surprise in the if statement so our code reads that we want to call surprise on present only when it’s not nil:
// Check the optional to see if it contains an object
if present != nil {
    present.surprise()
}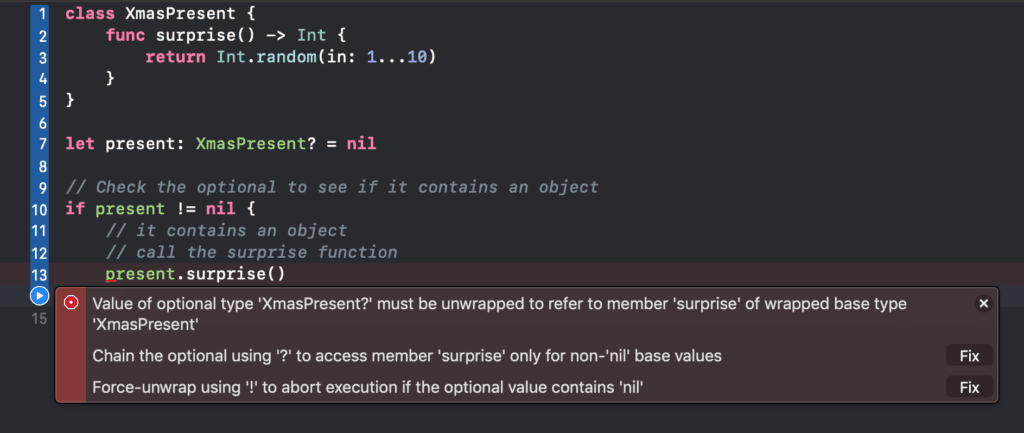
After attempting to run the code above, we get yet another error. Before you can access the value inside an optional, you have to unwrap the optional, regardless of whether the variable is empty or not. To understand why, it might help to imagine the optional variable as a Christmas present or a box. You won’t know about its contents (or lack thereof) unless you unwrap the box first.
You might be wondering why we have to unwrap the optional if we’ve already checked that it isn’t nil. This is because our optional variable is, in a way, covering up the object that it’s carrying. Since we want to call a function on the object inside, and not the wrapper, we need to further open up the optional first.
Another way to think about this is running the if statement is similar to shaking a box and listening to it like when you were a kid trying to find out what was inside your present. Shaking the box merely tells you whether there’s something inside. If you are shaking a box that is empty, it won’t sound like anything, but if there’s something inside, you’ll hear it rattle around. Thus, our if statement tells us whether present contains an object or nil, but you cannot access or use the object until you unwrap present.
let present: XmasPresent? = nil

// Check the optional to see if it contains an object
if present != nil {
    // it contains an object
    // call the surprise function
    print(present!.surprise())
}
To unwrap our present, we use an exclamation mark after the variable name, which is analogous to tearing the optional box open, giving us access to whatever’s inside. This would throw an error if the box was empty, because we’re trusting that it in fact carries something. But our if statement verifies that the optional is not empty, so we can safely call surprise on its contents. Because present is currently nil, this code should not print anything, meaning our if statement worked as intended.
Let’s put a present inside the box instead:
let present: XmasPresent? = XmasPresent()

// Check the optional to see if it contains an object
if present != nil {
    print(present!.surprise())
}
Now that present contains a new XmasPresent object, this code should output a random number surprise to the console.
Optional Binding
Now let’s learn a more advanced technique called optional binding to check if an optional variable or constant actually contains an object:
// Optional Binding
if let actualPresent = present {
    print(actualPresent.surprise())
}
In the code above, I’m using what’s called an if let statement to check if present is nil or not. If it is nil, the code inside the if statement will not be executed. Otherwise, Swift will automatically unwrap present and assign its contents to a constant called actualPresent. Thus, inside the if statement, you can use actualPresent just like any other object and do not need to unwrap anything. Running the code should print out a random number as expected.
Optional Chaining
Another technique we can use to work with optionals is called optional chaining.
let present: XmasPresent? = XmasPresent()

//Optional Chaining
present?.surprise()
In the example above, I added a question mark after present followed by calling surprise. The question mark operator works almost identical to the exclamation mark from earlier. The only difference is if the optional turns out to be nil, the code will not crash and the entire line is ignored. That’s also why we don’t need any if statements. If it actually contains an object, then Swift will unwrap the optional as usual. In this case, it will call surprise on present since it contains an object.
Optionals in Swift
Why do Swift even have optionals? Well, Swift is a type-safe language so it forces you to specify the exact data types you’re working with at every point in your program. In the long run, this helps tremendously by forcing you to think of things such as whether a variable will ever need to be empty or always contain a value. Swift’s type-safety also prevents you from accidentally storing different kinds of data from what you intended in a variable.
One thing I haven’t demonstrated with optionals is that Swift will, in fact, give them a default value of nil if you don’t assign them any data at first:
var c: String?
In this case, c is automatically given a value of nil, so you don’t have to explicitly assign nil to it. I recommend that you declare optionals this way if you intend them to be nil at first.
var d: String!
There’s also another optional data type that uses an exclamation mark as shown above. I know that, so far, I’ve shown how using an exclamation mark unwraps a variable or constant to access what’s inside them. But in the context of data types, this is called an implicitly unwrapped optional. This is a normal optional, but when you use it in code, Swift automatically unwraps it for you, so you don’t need to use extra “?” or “!”s to get at its contents.
When would you want to use implicitly unwrapped optionals versus the kind with the question mark? In my opinion, you’d want to use the optional with the question mark in general because it forces you to consider the appropriate action to take if the optional turns out to be nil every time you use it.
Only in some cases where you know for sure that the optional variable is nil only initially, but then always contains a value after a certain point, it might make sense to use an implicitly unwrapped optional. Then you can ignore all of the optional binding, optional chaining, and any other checks for nil.
Let’s recap what we’ve learned about the two optional data types with another quick example:
var present1: XmasPresent? = nil
var present2: XmasPresent! = nil

present1.surprise()
present2.surprise()
We’ve declared two variables above, the first a regular optional and the second an implicitly unwrapped optional, and then we try calling surprise on both of them directly.
Because we aren’t using optional chaining on present1, Xcode prevents us from running our code entirely until we unwrap it. It also provides some information on which unwrapping method to use.
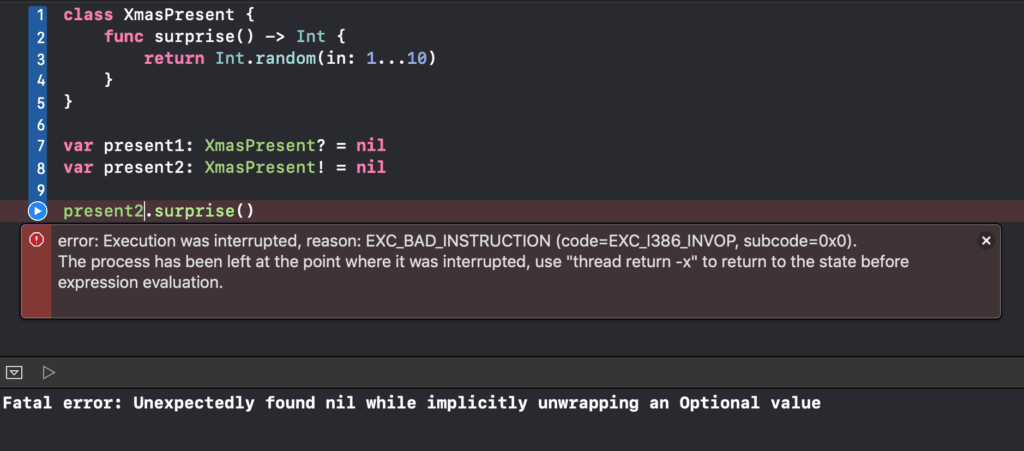
On the other hand, Xcode doesn’t warn us about calling surprise on present2, but instead crashes when we try running that line, since it will always automatically unwrap present2. Sometimes, this can be helpful when debugging a program. If your optional was never meant to be nil at some point, but does end up being nil there, Xcode will highlight this point when the app crashes and you’ll know exactly where to look to fix the issue.
And that was your introduction to optionals! Practically speaking, you’ll use them most of the time, like how we covered in this lesson. In the future, we’ll cover more of the complex aspects of optionals. If the purpose of optionals is still not entirely clear, let me say when we get to building apps together, you’ll know what they are and how they’re used.
Properties

In this chapter, we’re going to learn about properties, which you’ve been using ever since we introduced them in our lesson on classes. However, we will now see some additional things you can do with properties.
Property Scope
Before we start, let’s revisit the idea of property scope. Remember that when you declare a variable or constant inside a function, you can’t access it outside that function, because each function has its own variable scope. Similarly, any properties inside a class are accessible by any of the class’ methods since they are all at class level.
Here’s the class hierarchy we created over the past few chapters:
class Person {
    var name = ""

    init() {

    }

    init(_ name: String) {
        self.name = name
    }
}

class Employee: Person {
    var salary = 0
    var role = ""

    override init(_ name: String) {
        super.init(name)
        self.role = "Analyst"
    }

    func doWork() {
        print("Hi my name is \(name) and I'm doing work")
        salary += 1
    }
}

class Manager: Employee {
    var teamSize = 0

    override func doWork() {
        super.doWork()

        print("I'm managing people")
        salary += 2
    }

    func firePeople() {
        print("I'm firing people")
    }
}
We can access the salary property inside the doWork method because both salary and doWork are declared in Employee. Even other methods of Employee can also access salary and role.
Let’s now look at some unique things we can do with properties in addition to accessing them inside methods. Say we want to add a “bonus” property to determine how much of a year-end bonus a Manager would receive as part of their compensation:
class Manager: Employee {
    var teamSize = 0
    var bonus = 0

    init(_ name: String, _ teamSize: Int) {
        super.init(name)

        self.teamSize = teamSize
        self.bonus = teamSize * 1000
    }

    override func doWork() {
        super.doWork()

        print("I'm managing people")
        salary += 2
    }

    func firePeople() {
        print("I'm firing people")
    }
}
Above, we added an Int property called bonus, and let’s say its amount will depend on the number of people a Manager manages. In the Manager initializer function, we can say the bonus property equals the teamSize times 1000, meaning a Manager gets an extra $1,000 for each team member he or she manages.
Computed Properties
Of course, we could explicitly assign bonus to teamSize * 1000, but if our teamSize changes, we’d have to recalculate bonus as well. Also, teamSize could be changed anywhere in our class, so tracking all its changes and updating bonus accordingly in every one of those spots would be annoying.
Instead, we can make bonus a computed property which, unlike variables that store values, stores a calculation. To declare a computed property, we specify the name and data type, as with normal properties, but then we add a pair of curly braces, like with functions:
class Manager: Employee {
    var teamSize = 0
    var bonus: Int {
        // This is a computed property
        // When it's accessed, the code in here will run
        // Then, it will return the value

        return teamSize * 1000
    }

    init(_ name: String, _ teamSize: Int) {
        super.init(name)

        self.teamSize = teamSize
    }

    override func doWork() {
        super.doWork()

        print("I'm managing people")
        salary += 2
    }

    func firePeople() {
        print("I'm firing people")
    }
}
(Recall how self helps to distinguish between properties and arguments of the same name.)
Now, in our declaration of bonus, we’re saying its value is whatever the result of teamSize * 1000 is at a given time. This definition is much more flexible since we don’t need to constantly update bonus whenever something it depends on changes.
We can access bonus like a normal property since it is still a class property. Running the code below will print “11000” to the console, thanks to our computed property:
let m = Manager("Kate", 11)
print(m.bonus)
There are other aspects of properties like getters and setters and property observers, so we’ll have to do another lesson on properties later on. For now, this is a great start!
More Initializers

Let’s revisit initializer methods by discussing designated and convenience initializers. To start, here’s a variation on the Person class we’ve used in the past chapters.
class Person {
    var name = "None"
}
The class has one property, name, initialized to the string “None.” Remember we learned that all classes have a default initializer that takes no arguments, so we can create a new Person object using Person(). We also discussed how the initializer method was meant to make sure a new object is set up and ready to go. Along with allocating memory for that object behind the scenes, an initializer method also makes sure all the object’s properties are initialized.
Let’s see how that works in action:
class Person {
    var name = "None"
    var netWorth:Int?
    var gender:String!
}
Above, we have an optional netWorth property, which Swift initializes to nil by default. We also have an implicitly unwrapped optional gender property, also initialized to nil. Without doing anything else, all our properties of the Person class are initialized, which is why we can create a new Person object using the default initializer.
What if some properties weren’t initialized? For example, let’s not initialize name to “None”:

Above, we see Xcode displays an error saying the Person class needs to have an initializer that sets up name with a String value. Now it is the responsibility of an initializer method to initialize name before a Person object can be created for us to use, otherwise it would not have any values. Let’s now add an initializer to actually initialize name. In this case, we set it to “None”:
class Person {
    var name: String
    var netWorth:Int?
    var gender:String!

    init() {
        name = "None"
    }
}
Now, let’s create a new Person object, which will call our initializer to do that, and print out its name. We should see “None” for a.name and “nil” for a.netWorth because it is optional.
let a = Person()
print(a.name)
print(a.netWorth)
Initializer methods that ensure all properties are initialized are designated initializers. These can be guaranteed to return an object to you where all properties are ready to be used.
The other type of initializer method is a convenience initializer. These methods allow you to pre-configure some properties of an object in a certain way, but they may rely on a designated initializer to make sure all properties still get initialized.
Let’s look at an example of a convenience initializer:
class Person {
    var name: String
    var netWorth:Int?
    var gender:String!

    // Designated Initializer
    init() {
        name = "None"
    }

    // Convenience Initializer
    convenience init(_ gender: String, netWorth: Int) {
        // Call the designated initializer to ensure that the object is ready to go
        self.init()

        //Set any other properties or custom code to initialize for this scenario
        self.gender = gender
        self.netWorth = netWorth
    }
}
You can see the convenience initializer is just a normal initializer labeled with the convenience keyword. First, it calls the designated initializer to initialize the name property and then sets up the gender and netWorth properties accordingly. This convenience initializer now helps us conveniently create Person objects that are rich:
// Creating a new Person object
let a = Person()

// Creating new rich Person objects
let b = Person("Male", netWorth: 10224334532)
let c = Person("Female", netWorth: 143211234321)
Notice our convenience initializer lets us easily create specific Person objects with whatever values we want. However, it must call the designated initializer first to make sure that all properties are initialized. This is something all convenience initializers must do before changing any properties of a class.
Chapter Recap
Designated initializers, which are required, guarantee that all class properties are initialized when creating new objects. Convenience initializers, on the other hand, are optional and help create objects in specific ways that you might find convenient in your program.
Arrays

For our final chapters, we’ll learn about some “collection” data types that help us organize and manage collections of data. In this chapter, you’ll learn how to manage data in what are called arrays. After a point, managing several pieces of data might prove difficult using just constants and variables, but arrays can make this much easier.
At their core, arrays are ordered collections of data. They only store one type of data, like how variables have just one data type. This way, we know exactly what to expect from them.
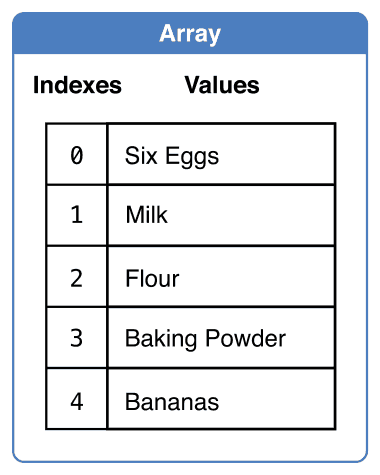
In the screenshot above from the documentation on collection types, you can see array values are stored in a specific order. You use the numbers on the left, called indexes, to access these values. Notice that the indexes start at 0, then go 1, 2, 3, etc.
Let’s create a motivating example for using arrays:
var a = "Dog"
var b = "Cat"
var c = "Bird"
Above, we have 3 simple String variables. Say we want to change them to “My Dog”, “My Cat”, and “My Bird” respectively. The code below presents one possible solution:
a = "My " + a
b = "My " + b
c = "My " + c
We simply reassigned each variable to a new string starting with “My “ followed by the string itself. For example, a becomes “My Dog”, and so on. Repeating this action all 3 variables isn’t much of a hassle, but for 100 or 200 items, this method would be quite tedious.
For a more streamlined approach, let’s start by putting our strings into an array:
var myArray = ["Dog", "Cat", "Bird"]
We denote our array using a pair of square brackets and separating the items “Dog”, “Cat”, and “Bird” with commas. Note that commas are only used in between the actual items. We say that “Dog” is at index 0, “Cat” is at index 1, and “Bird” is at index 2.
print(myArray[0])
In order to access the items “Dog”, “Cat”, and “Bird”, we use the array’s name followed by square brackets around the index of the value we want. If we wanted to print “Dog”, for example, we’d use index 0 in the brackets. Similarly, we’d use index 2 to get the value “Bird.”
Loops
The previous example demonstrated how to access values in an array. We can also assign or change values at certain indexes using the assignment operator, just like with variables:
myArray[0] = "My " + myArray[0]
print(myArray[0])
This example changes the first element in the array to “My Dog.” However, this system is still not efficient since we would need to do this for every index. Instead, we can use loops in conjunction with arrays to simplify this process:
for counter in 0...2 {
    print(myArray[counter])
}
Above, we have a for-in loop which will loop from 0 to 2. Inside the loop, we print the values in myArray using counter as the index. Running this should print “Dog”, “Cat”, and “Bird”. We’ll build upon this idea and try adding “My ” to each of our elements:
for counter in 0...2 {
    myArray[counter] = "My " + myArray[counter]
    print(myArray[counter])
}
We used counter to access each value of myArray again, added “My ” in front of the value, and reassigned it to the same index. If we had 200 items in my array, we could just change the upper range limit of my loop to 199. Now you can see how powerful it is to use arrays with loops.
Count
Until now, we’ve assumed myArray stores 3 elements, so our loop range was simply 0…2. What if we didn’t know how many elements myArray had? To help with this, arrays come with a handy property called count which gives gives us the number of items in an array.
Notice our loop range always starts at 0, corresponding to the first index of our array. Now, we can end the range with myArray.count so it automatically runs as many loops as there are items in the array:
var myArray = ["Dog", "Cat", "Bird"]

for counter in 0...myArray.count {
    myArray[counter] = "My " + myArray[counter]
    print(myArray[counter])
}
However, Xcode gives us “fatal error: Index out of range” in the console when we try running this. That means Swift accessed an index that doesn’t exist in our array. How did this happen? Using myArray.count gave us the total number of items, in this case, 3. This meant our loop went from 0 to 3 inclusive, but we wanted a range from 0 to 2 inclusive. When it tried accessing index 3, there was nothing there, explaining why it crashed and gave us that error message.
Instead, we’ll need to manually shrink our range to prevent the loop from going too far:
var myArray = ["Dog", "Cat", "Bird"]

for counter in 0...myArray.count - 1 {
    myArray[counter] = "My " + myArray[counter]
    print(myArray[counter])
}
Notice we precisely changed our loop range by adding “-1” after the count. Sometimes such minor adjustments are necessary to get just the range you need. Regardless, there’s actually an even easier way to write this for loop without using ranges:
var myArray = ["Dog", "Cat", "Bird"]

for item in myArray {
    print(item)
}
The output now should not have changed from before. Notice this for loop has quite similar syntax to the previous one, only we’re now using an array in the range’s position. This is the simplest syntax for a loop over an array you can use. Our loop variable will now contain an element from the array on each loop, instead of a number like before. Use this method when you only want to work with the elements of the array directly. Otherwise, to write loops that need indexes to, for example, reassign values in an array, you will need to use the for loop with the ranges instead (from our previous example).
Declare an empty array
Declaring empty arrays is a tricky edge case. The empty array, [], is similar to nil in that assigning a variable to [] doesn’t help Swift determine the variable’s type. In this case, you can do one of two things:
var emptyArray: [String] = []
var emptyArray2 = [String]()
First, you can specify the variable’s type if you want it to be an empty array initially. For array variables, we specify data types by surrounding their values’ data type with square brackets. Because our array here stores Strings, its data type is [String]. Second, you can create a new array object of that array type, which would be equivalent to an empty array.
Add and Remove Items
Swift offers several ways to add items to an array:
var myArray = ["Dog", "Cat", "Bird"]

myArray.append("Raccoon")
myArray.insert("Frog", at: 0)
myArray += ["Frog", "Bear"]

for item in myArray {
    print(item)
}
We can add something to the end of an array, as on line 3. Otherwise, we can insert a new element at a particular index using the approach on line 4. This doesn’t replace the item at that index, but pushes everything back instead. On line 4, we add “Frog” to the beginning of the array, which appears when we run the following for loop to print out the elements.
We can also append arrays onto arrays, as line 5 demonstrates. Using the addition shorthand notation, we can attach two arrays together into one larger array. Our resulting array should now have “Frog” and “Bear” at the end of it.
Swift also has several functions for removing items from an array. For example, to remove a specific item, we simply supply its index to the remove function. The line below will remove the item at index 0 and shift all the other elements down to fill the gap:
myArray.remove(at: 0)
We can also use removeAll, removeFirst, removeLast, or removeFirst number of elements. Pick a certain function depending on what you want to do.
Search for items
Occasionally, you may want to search for something in your array or check that it exists at all. One way we can do that is by using the firstIndex method, which returns the first index where the specified value appears, as seen in the example below.
myArray.firstIndex(of: "Cat")
Alternatively, there’s the lastIndex method which returns the last index of the item you’re looking for. Like for adding or removing items, there are many options for searching, which you can explore further on your own.
Dictionaries

Finally, we will examine another collection type: dictionaries. These are common especially when using data from a remote database or a third party API.
Dictionaries are like special arrays that can be indexed by anything. Arrays allowed us to access data using numeric indexes, and dictionaries allow us to retrieve values using indexes of other data types. How does this work? Well, data is added to dictionaries in key-value pairs. For every value you want to add to your dictionary, you must supply a corresponding key that you would use to access that value later on.
Recall that arrays could only store data of a specific type. Similarly, dictionaries can only use keys and values of a specific type. The key and value types don’t have to match, but all keys should have the same type, as for values.
In a way, Swift dictionaries resemble actual dictionaries where each word is a key, and the word’s definition is like the value associated with the key. In the diagram below from the documentation on collection types, the values are the airport name, and the keys the airport codes.
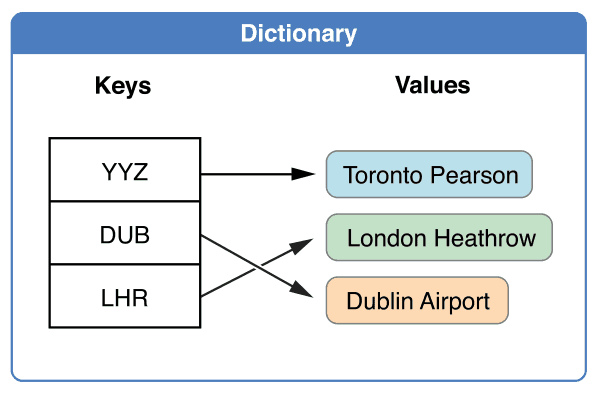
Declaring a Dictionary
Let’s learn how to declare dictionaries and perform basic operations similar to those we’ve seen with arrays.
var myDictionary = [String:String]()
Notice our declaration resembles that of an array. In fact, this code also creates a new dictionary object in memory. Dictionary data types are specified with the key data type, followed by a colon, then the value data type. The example above uses [String:String] as our data type, meaning both our keys and values will be Strings.
Say we want to create a database of registered cars with their license plates. Using license plates as keys is a good example because they’re unique. Here’s how we would add an entry for a fictitious car to this dictionary:
myDictionary["SJD 293"] = "Red Ferrari"
print(myDictionary["SJD 293"])
Our key in this case is “SJD 293” and the value is “Red Ferrari.” Just like how we access data in arrays using indexes, we can access data in dictionaries with keys.
Notice we got “Optional(“Red Ferrari”)” when printing what we just added. But we never added an optional into our dictionary, so where did this come from? Swift automatically wraps all your dictionary values in an optional type. That way, if you try using a key that doesn’t exist in your dictionary, it can conveniently give you nil in that case. Otherwise, you’ll get your value as an optional which you would unwrap later using any of the methods we’ve discussed before.
What if we wanted to change cars but keep the same license plate? We can simply assign a different value to our license plate key in the dictionary:
myDictionary["SJD 293"] = "Black Lambo"
Now what if we sold the car and no longer have it? To remove a value for a key, we just assign nil to it:
myDictionary["SJD 293"] = nil
Iterating Through a Dictionary
Finally, we’ll learn how to iterate or loop over items in a dictionary. Even though dictionaries have no inherent order, we can still use a for loop to process each of its elements:
myDictionary["SJD 293"] = "Red Ferrari"
myDictionary["UDS 111"] = "Silver Porsche"

for (key, value) in myDictionary {
    print("\(key) is a \(value)")
}
This is the end of our chapter on dictionaries. These are most useful when you want to store two kinds of data that have a natural association. Swift has many other collection types you can use, but for the most part, you’ll store a lot of your data in arrays and dictionaries.
Conclusion
If you made it this far, give yourself a well deserved pat on the back. This is a huge achievement and now you’ve got a solid foundation in the Swift programming language. You’re well on your way to Swift mastery!
Did you enjoy this Swift tutorial? Our team worked really hard to put this together!
If it was helpful for you, please leave a comment below and let us know! If you’d like to continue learning, make sure you’re subscribed to the CodeWithChris YouTube channel where we post weekly video tutorials.


